As we leave 2015 behind and usher in a brand-spankin' new 2016, we can look back at the myriad new updates, tools, and innovations HubSpot brought with it. This year, we saw the Reporting Dashboard, the CRM, updates to Workflows, Emails, Contacts, new content editors...the list goes on and on.

One of my favourite updates from the last year has to be Smart Content (available in Professional and Enterprise subscriptions). Smart content is content that is tailored specifically to the reader and is going to change how we consume information. It makes it more interactive and lends itself to having a more personalised conversation with the reader.
Smart Content in HubSpot can be done in a couple of ways: through lifecycle stages (where, depending on which stage your customers are in, they will get specific content), what device type they are using, referral source, and more.
Personally, my favourite way of using Smart Content is by using List Membership in combination with a custom contact property and the Form tool. Why are we using all these tools? Other than the fact that they are awesome and work really well together, it gives us a lot of granular control in who to push what content to. So sit back, relax, and see this as a fun little weekend project (we might have different definitions for fun...) as we walk through the 3 steps to using Smart Content with Lists and Forms.
Step #1 - Captain Custom Property
Our Smart Content is going to be based on a custom contact property. For this example, I am targeting specific pet lovers. Say you are a dog lover. Maybe you want to see content that is dog-specific. Maybe you have an unhealthy obsession with hamsters and don’t want to look at these scruffy mutts. Have no fear: Captain Custom Property will help you out!
Go to the Contacts App and then navigate to Contact Settings. Here, you can create a new custom property. I’m naming mine "Pet Lover":
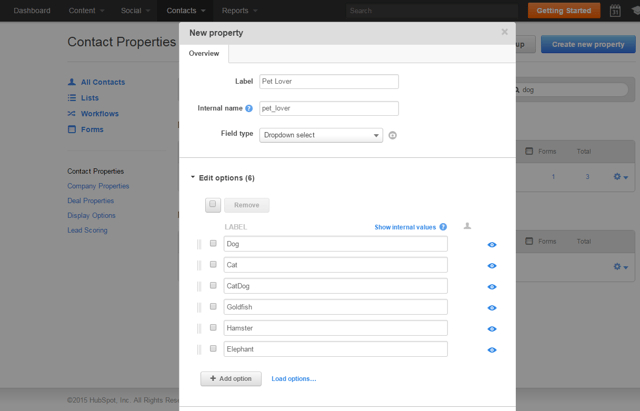
You can use any custom property you want. Say you want to target contacts who have bought a specific service from you, or contacts who have attended some of your webinars. It's important to know who you are targeting before creating your property.
I’ve set the field type above as "Dropdown select" so the contacts can select the one applicable to them, and I’ve also made sure that the properties are enabled to use in forms, which we need for the next step.
PRO-TIP: Come back to this property after you have some form submissions. You’ll see another tab called "Analytics" (next to "Overview", which you can see now in the above screenshot) where you can see a quick snapshot of how many contacts have each value.
Step #2 - Mr. Form, the Sidekick
This step is optional if you know which contacts are associated with which contact property, but if you aren’t sure, our trusty sidekick the Form App is at hand. Sending an email pointing your contacts to a landing page with a form is a sure fire way of finding more information about your contacts and updating the custom property we created in the previous step.
Let’s go to the Forms App, create a new form and add in the custom contact property we created from the "Fields" tab in the form.
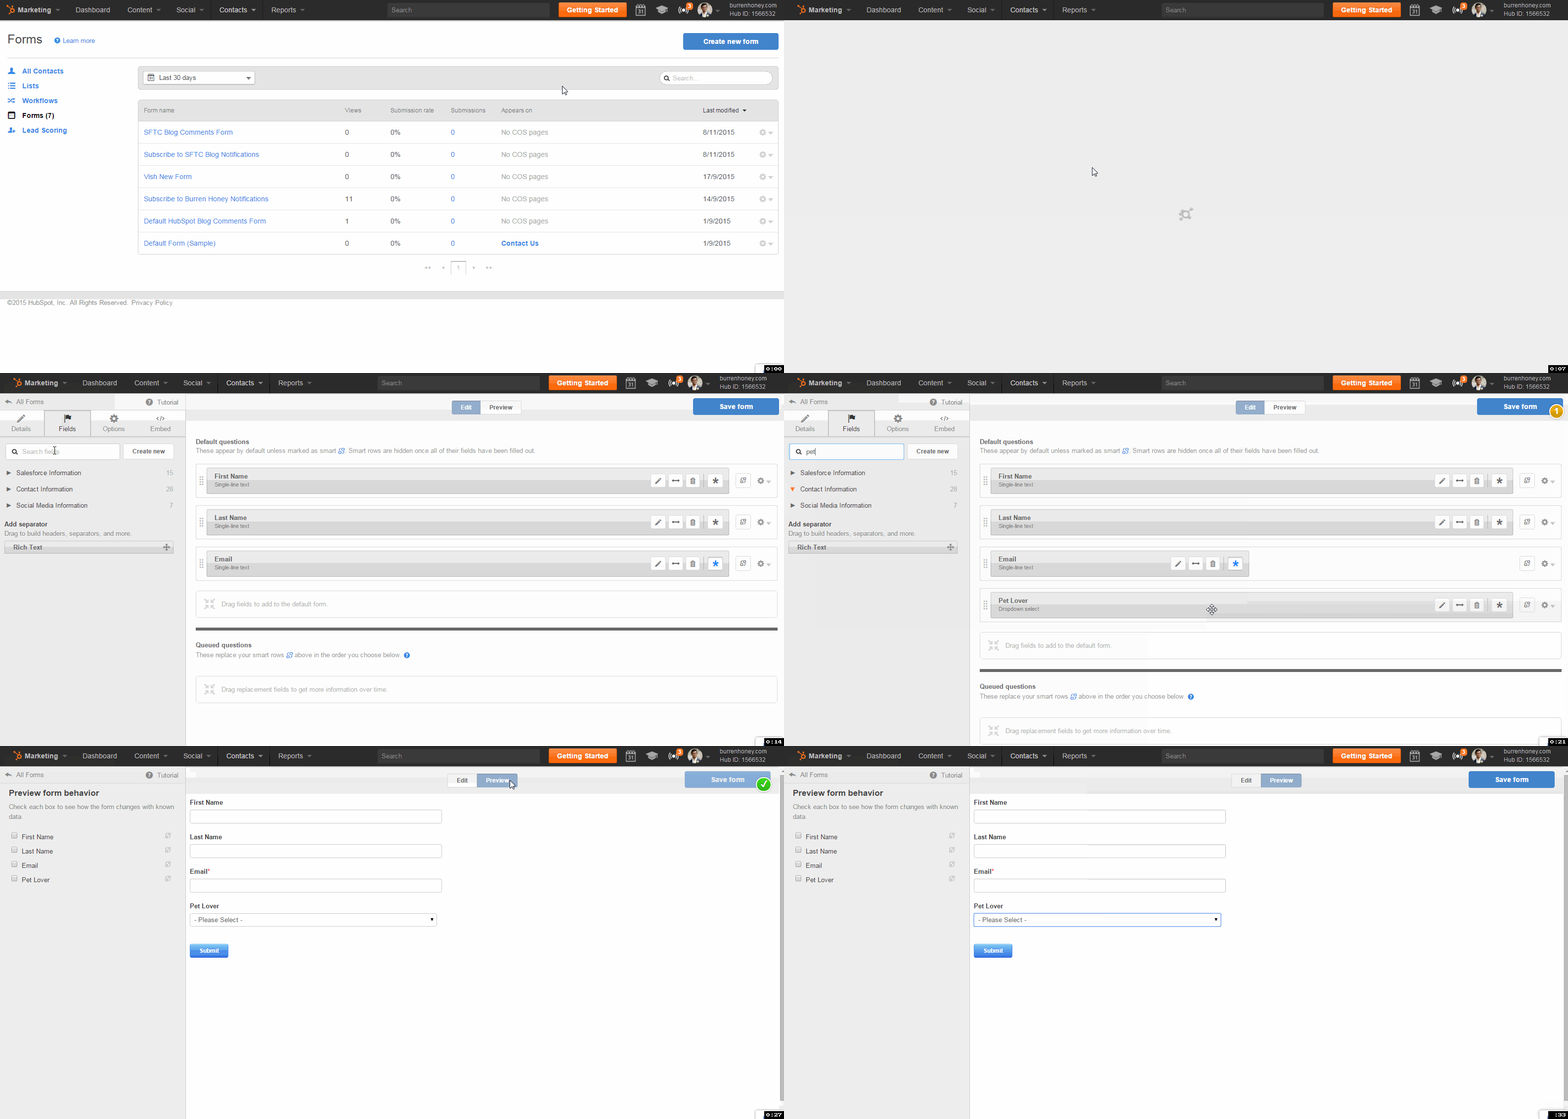
Make sure you hit "Save form" on the top right to see the preview. Now, we can insert this form into a landing page and then add a link to that landing page to an email.
So what do we do once people start updating this property? We create some Smart Lists so we know who these contacts are!
Let’s go to the Lists App and create a new smart list that is going to pull contacts with the correct contact property. Contacts on each list are going to get targeted content. My "cat lover" list is going to get specific feline content, while my dog list is going to be filled with cute mutts.
All of this marketing is based on the contact property we created initially, and the selections your contacts made on the form. Once your lists are made, we can start making our Smart Content!
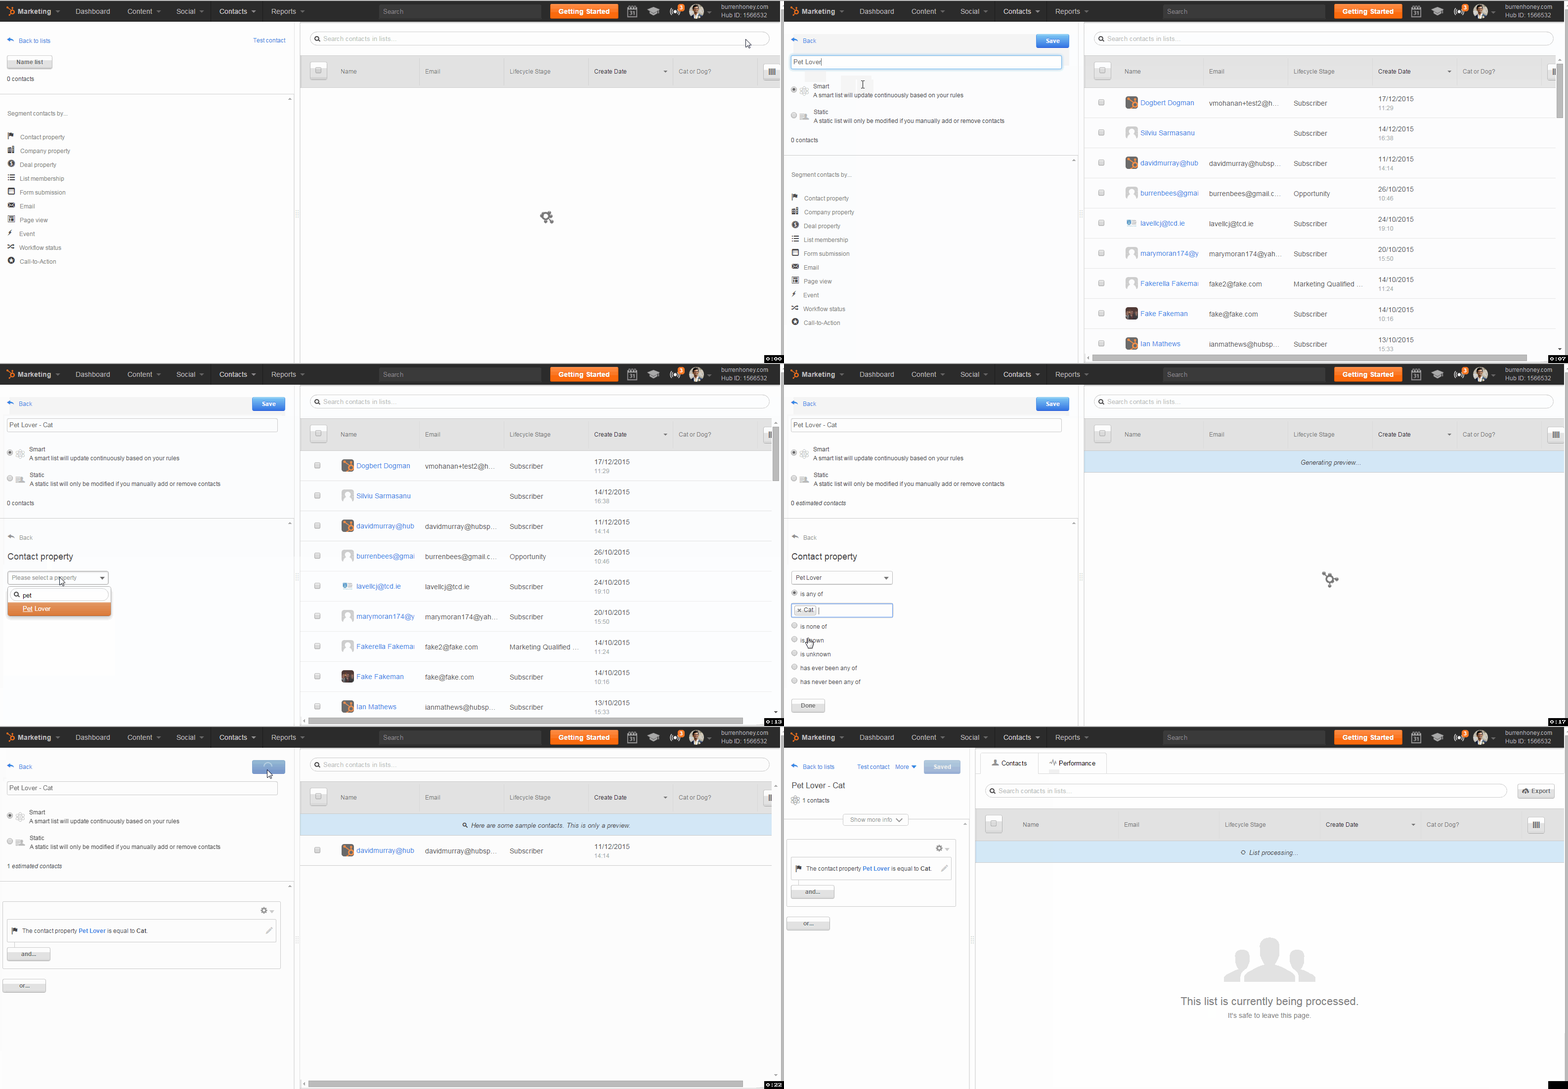
PRO-TIP: I would use a solid naming convention when naming multiple lists. I’ve set mine as "Pet Lover - Dog," "Pet Lover - Cat" etc. This is so that I know in a quick glance which list is which. Putting it into specific folders helps as well.
Step #3 - Smart Content, the Slick Ride
So your email was a success, you’re getting all those notifications from the form submissions and you’ve made your lists, but where do you go from here? Well, this is where the fun begins. Information is king, and now you can start tailoring your content - be it on landing pages, website pages, or emails - to each individual viewer or recipient. I’m going to use email for my pet-loving Smart Content. Once you create a new email, you can add Smart Content to the Rich Text module.
First, let’s create the default content for the email. This is for contacts who haven’t selected their pet of choice. Once that content is ready, you can make the module smart by clicking on the "Make smart" button.
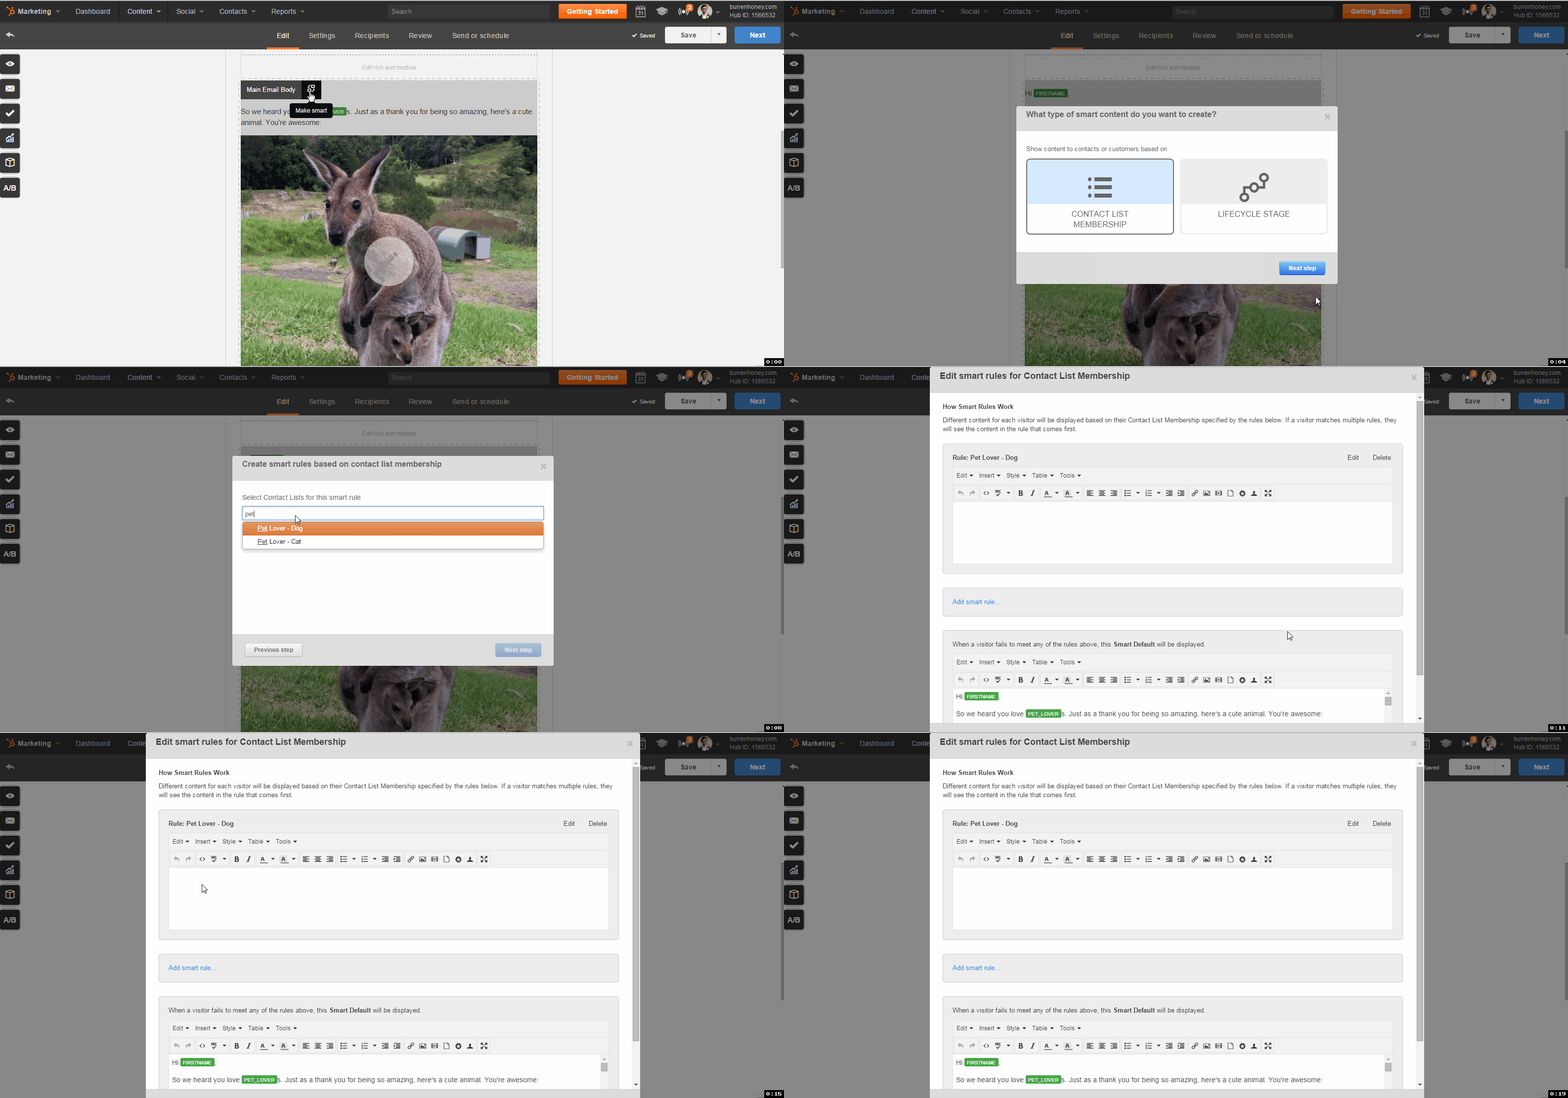
Here, you can add in whatever content you choose. Contacts who are part of this smart rule will see this targeted content. For my email, contacts who are in the "Pet Lover - Dogs" list will see a picture of a dog, while the contacts in the cat list will see this feline in all its greatness:
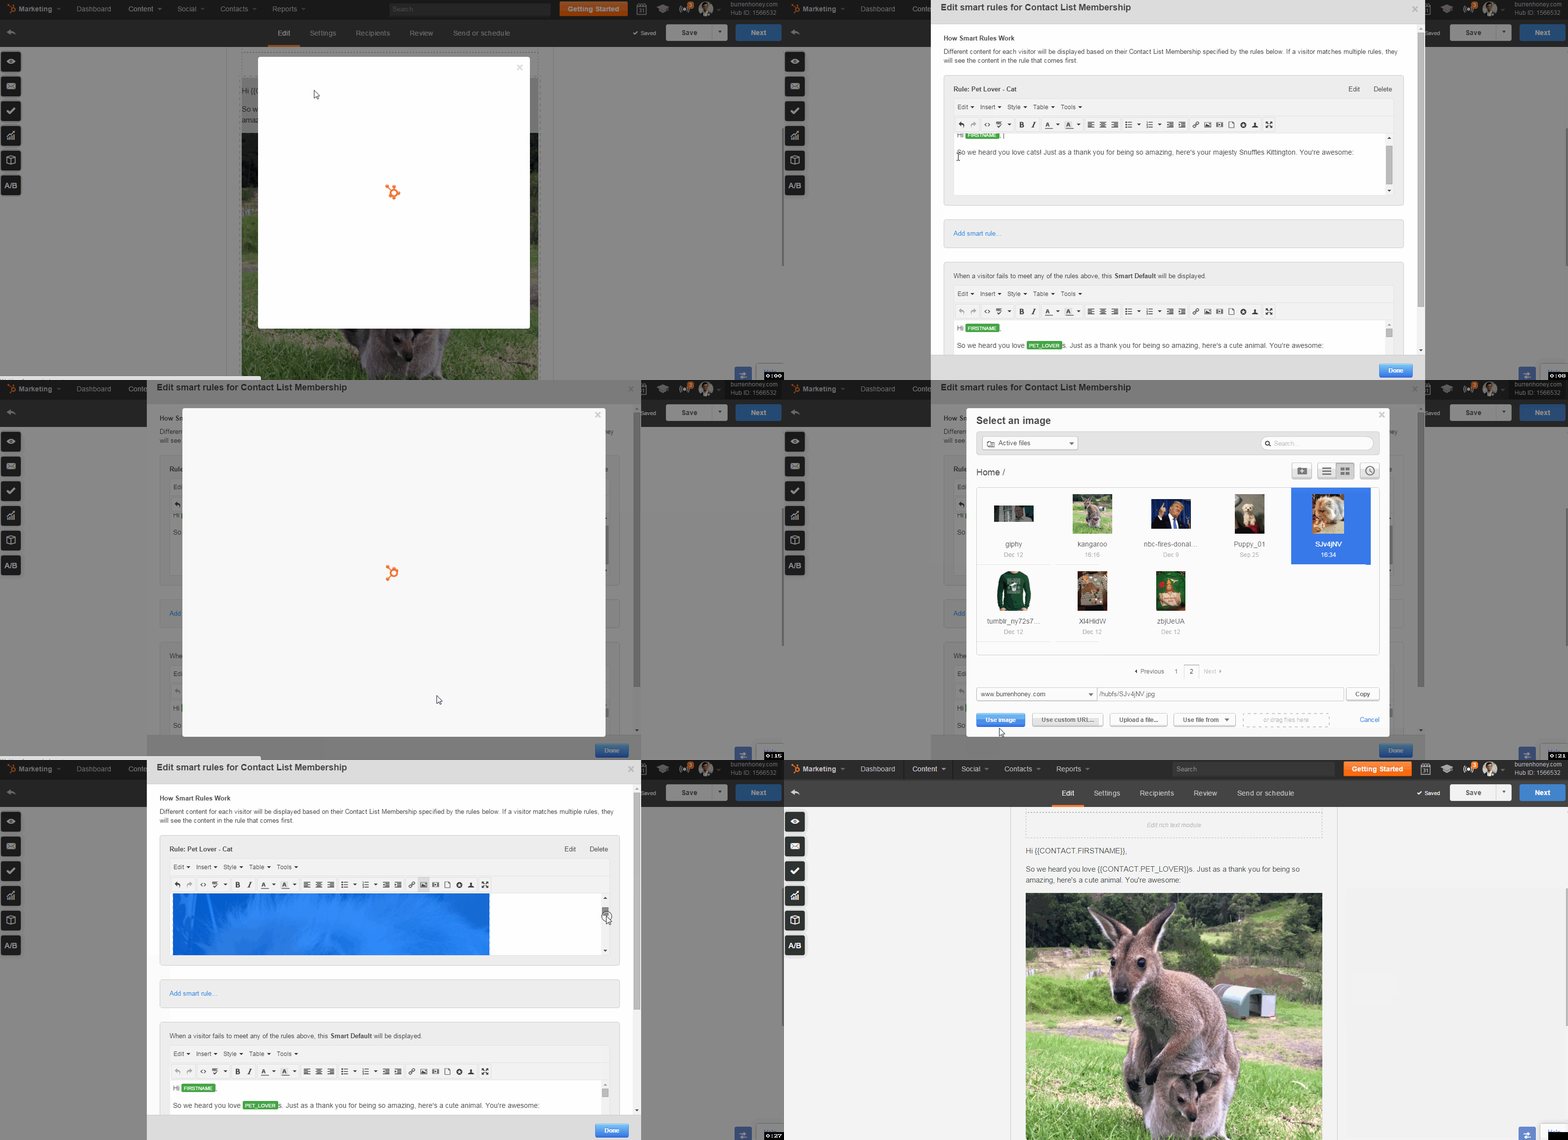
If you’d like to edit the Smart rules, or make changes to the Smart Content, just select the "Smart rules" button and you’ll be taken to the interface.
A cool way to check if your Smart Content is working and displaying is to preview this within the email editor by selecting the "Preview" tab. Select a contact who is part of one of the lists and you will see the correct targeted content:
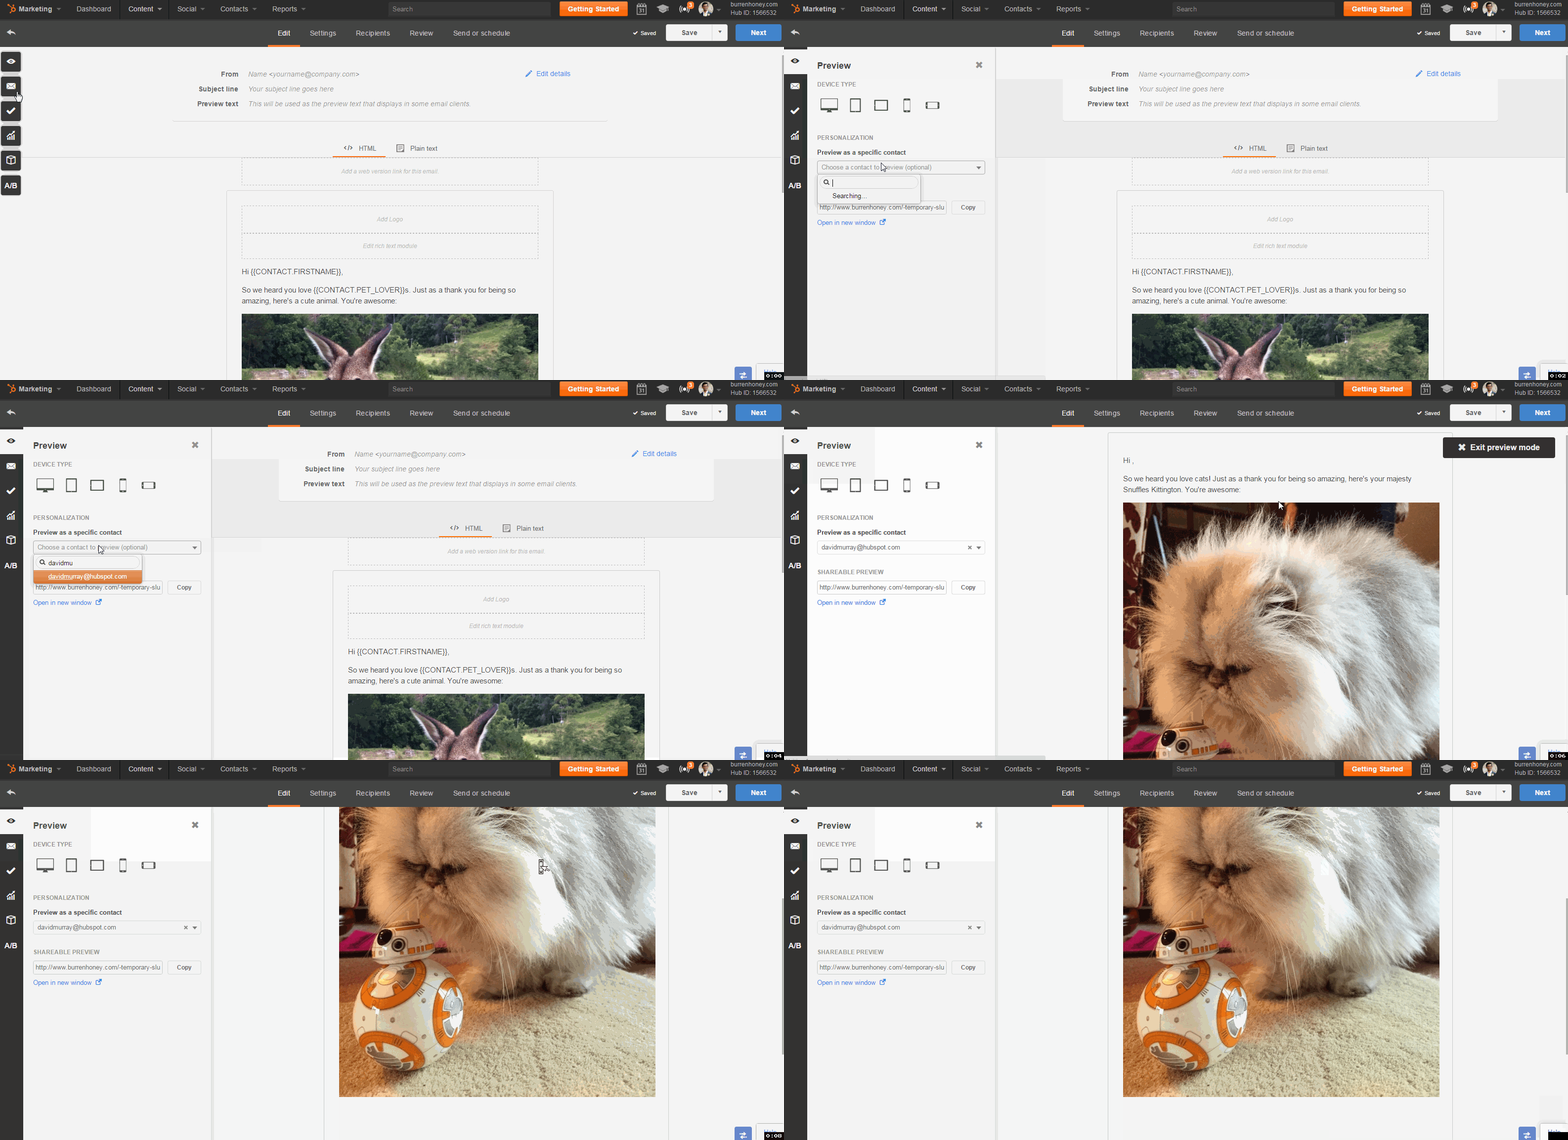
You can preview this for contacts in the other lists as well so that you are sure that the correct targeted content is visible to each list of contacts. If you want to be absolutely sure, you can also send yourself a test email and receive the email as a contact in the list.
There you have it. In three easy steps, you have entered the world of Smart Content. You can tailor the above steps any way you want. You can use personalisation tokens along with the Smart Content, you can use HubSpot's Workflows App to set the custom contact properties, or your Smart Content could even change the language of the email. There are endless opportunities once you start experimenting. It'll make you wonder how you even had a conversation before Smart Content!
How have you been experimenting with Smart Content? Let us know in the comments!

![3 Service-focused Workflows to Empower Your Support Team [Support Series]](https://blog.hubspot.com/hubfs/service%20button.jpeg)
![How to Add Your Branding to a Marketplace Template [Support Series]](https://blog.hubspot.com/hubfs/Support/Support%20Series%20User%20Blog%20folder%20copy%202.png)
![Creating a Custom Date-Based Property Report [Support Series]](https://blog.hubspot.com/hubfs/Support/HubSpot%20Support%20Series%20Horizontal-603978-edited.png)
![Advanced Troubleshooting: The Network Tab [Support Series]](https://blog.hubspot.com/hubfs/HubSpot%20User%20Blog/HubSpot%20Support%20Series%20Horizontal.png)
![How to Update an Incorrect PDF Title [Support Series]](https://blog.hubspot.com/hubfs/HubSpot%20User%20Blog/Photo%20editors%20using%20laptop%20in%20meeting%20room%20at%20office-1.jpeg)
