As marketers, we all do a lot of different things each month, all with the end goal of driving new revenue. But one of the age old challenges that marketers have faced is proving the actual end value of all the campaigns, the blog posts, the landing pages, and the leads they generate. It’s tough work tying your efforts to the bottom line, especially in sales cycles that are long and span across dozens of different touch points.

The good news? Using Salesforce and HubSpot together makes measuring the ROI of your efforts easy. Let’s take a look at how you can use the Campaigns tool in HubSpot together with Salesforce campaigns to track and attribute actual revenue numbers back to the marketing efforts you are engaging in.
First - what’s a campaign?
For most marketers, the word “campaign” also refers to a specific marketing effort they are working on during a set period of time. You might already know what your campaign encompasses, but if you don’t, you can find everything you need to structure and run an inbound marketing campaign right here.
For our purposes, we’ll use the word “campaign” to refer to two different tools that you would use to organize and track such a marketing effort. We’ll take a look at the campaigns app in HubSpot, and Salesforce campaigns. Both of these tools allow you to track different assets and their connection to the contacts, customers, and revenue you generate. While these tools share a name and essentially help you do the same thing, they are different in a couple of ways. We’ll touch on that in a minute.
How it all works
Before we step through how to set up campaigns and use them to track ROI, let’s take a minute to outline how it all works together. For our purposes, you can think of a campaign in Salesforce as being similar to a “tag” or a label. Once you’ve created a campaign in Salesforce, you can attach the campaign “tag” to the landing pages and forms you create inside of HubSpot. When leads convert on your landing pages or forms that are tagged with a specific Salesforce campaign, that landing page or form becomes associated with the lead or contact. You can then run reports to see the number of leads, opportunities, and ultimately revenue that each campaign is generating.
Step 1: Create your campaign in Salesforce
As a first step, you’ll need to create a new campaign inside of Salesforce [Salesforce documentation]. Give the campaign an intuitive name that represents the effort you are working on. You can create a campaign for something as big as a year-long marketing effort (“Product Launch 2014!”) or as small as an individual piece of content (“How-To Ebook!”). When choosing how you should structure your campaigns, think about how much granularity you’ll ultimately need when reporting on the ROI of your efforts.
Step 2: Create your campaign in HubSpot
Creating a matching campaign in HubSpot will make it easier for you to organize and track the performance of all of the individual assets that are a part of your larger campaign. Because the campaigns report in Salesforce isn’t connected to the campaigns report in HubSpot, we recommend setting the same name across both, for the sake of organization.
Creating a new campaign in HubSpot is easy - just go to Content > Campaigns, and click “Create a New Campaign”. Follow the on-screen instructions to get your campaign set up.
Step 3: Set both campaigns on your HubSpot forms & landing pages
Once you’ve created your campaigns in Salesforce & HubSpot, you’ll need to tag the assets that are a part of your campaign inside of HubSpot. When creating a landing page you’ll use to capture and convert leads, be sure to choose your HubSpot campaign from the “Campaign” dropdown on the Options tab, and your Salesforce campaign from the “Salesforce Campaign” dropdown on the Content tab. (Again, these are two separate entities, but using them both will give you a greater level of granularity in your reporting. You’ll see in a minute.) If you have multiple landing pages or forms that are part of the same effort, be sure to tag them all with the same campaign.
You can tag a lot more than just landing pages with the HubSpot campaign tool. If your effort also includes blog posts, keywords, calls-to-action, or other assets, you can tag those too to track them all in the same report - so get tagging!
Step 4: Promote your landing pages & forms
Once you’ve built & tagged your landing pages and forms, promoted them, and started generating conversions, you can move on to the next step of analyzing their performance. Just one thing to remember - depending on the length of your sales cycle, your revenue & ROI reporting may not be all that interesting immediately after launching your efforts. Give your campaign some time to help pull new customers through your funnel!
Step 5: Report on detailed metrics in HubSpot
After you’ve launched your campaign and some time has gone by, you’ll want to report on the effectiveness of your efforts. We’ll do that in two places - in HubSpot, and in Salesforce. HubSpot is best at showing you the details of performance of the individual assets of your campaign - the landing pages, emails, blog posts, calls-to-action, keywords, social messages, PPC, and other components of your campaign. When you created your campaign in HubSpot, you built a campaign report too - go back and find it by clicking Content > Campaigns. Here’s a look at what you should see -
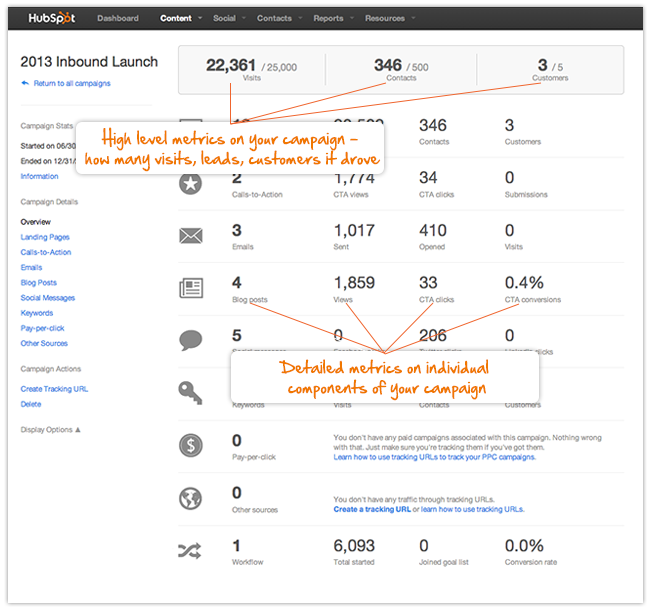
This view gives you a great high level overview of all the assets that were a part of your effort. You can easily click through to see a list of each type of asset, and even drill in to see the granular metrics behind every component of your campaign.
Step 6: Report on ROI & revenue in Salesforce
While HubSpot shows you the granular marketing metrics on each asset in your campaign, Salesforce excels at giving you the top line revenue and ROI numbers your campaign generated overall. By visiting the “Reports” tab in Salesforce and searching for “Campaigns”, you should be able to find a folder of default campaign reports that come with Salesforce out of the box.
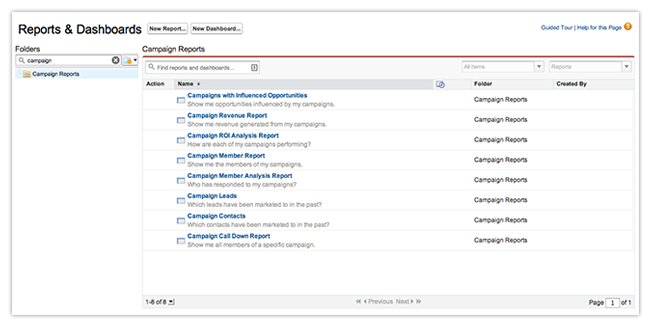
There are a number of reports in the folder, but only a few of which most folks need. Here is a rundown of some of the more popular campaign reports -
- The Campaign ROI analysis report - This report gives you a clean, simple view of the campaigns you’ve run, and the number of responses, opportunities, won opportunities, revenue, and ROI attributed to each one.

- The Campaign Leads or Campaign Contacts reports - These reports list the leads or contacts associated with your campaigns. If your campaign generates a smaller number of high value targets that you plan to manually review or assign, this can be an easy way to drill into your results.
- The Campaigns with Influenced Opportunities report - This is a little bit more of an advanced report that helps you attribute relative value to each of your campaigns in situations where your opportunities are regularly touching multiple campaigns.
Together, HubSpot and Salesforce can give you a clear picture of all the components of your campaigns and how they actually impact the bottom line. Do you have any custom reports you’ve built, or interesting insight into the performance of your campaigns you’ve gleaned from Salesforce or HubSpot? Tell us in the comments!