Today, I listen to a wide range of podcasts on business, pop culture, and current events, like The Nod and "Louder Than a Riot." So, what does it take to start a podcast in 2022? We’ll cover that in more in this article.
- What is a podcast and how does it work?
- What is a podcast host?
- What equipment is needed to start a podcast?
- How to Start a Podcast
- Find a unique and compelling topic or theme.
- Set up your show format.
- Leverage your network.
- Record and edit your episode.
- Finalize your creative assets.
- Set up a website.
- Build a promotion strategy.
- Track your metrics.
- Learn how to monetize your podcast.
What is a podcast and how does it work?
A podcast is an audio series that a user can download to a personal device and listen at their leisure. It centers around one theme or topic, with each episode typically ranging from 20 to 60 minutes.
Think of a podcast as the audio version of any television series. It follows the same production format: It has a specific theme or topic, it’s episodic and can have several seasons, plus can be reality- or fiction-based.
One thing that sets podcasts apart from TV series is the use of a podcast host. Every podcast needs a host who can narrate the story and guide the listener through the episode. In addition, podcasts are only audio. Otherwise, the two mediums are very similar.
The most popular platforms to listen to podcasts include Apple Podcasts, Spotify, and Google Podcasts.
Google Trends shows that podcasts have gradually become more popular, peaking around the fall of 2019 and the spring of 2020 worldwide.
Today, 28% of the U.S. population over 12 years old listens to podcasts on a weekly basis, according to the 2021 Infinite Dial study – a 17% year-over-year increase.
Want some pro tips to help you create a successful podcast? Check out this video.
Podcasts vs Standard Audio Files
The difference between a podcast and standard audio files is the same as the difference between a video and a television series.
An audio file is a file format used to store audio on a digital device. A podcast, on the other hand, is a produced show that involves storytelling, formatting, and audio sourcing. You need audio files to create a podcast, but the same is not true the other way around. If you don't want to do all the work yourself, there are some great podcast agencies to help you start and manage your own podcast.
What is a podcast host?
A podcast host is a platform that stores your podcast and distributes it to publishing platforms like Apple Podcasts and Spotify. Here’s how it works: You first upload your audio file to your hosting platform, then they create an RSS feed and send your episodes to various directories (AKA publishers).
The most popular podcast host platforms include Casted, CoHost, Podcastle, Castos, Buzzsprout, Captivate, Libsyn, and PodBean. Here are the top features you should look for as you evaluate your options:
- Transcription integration
- Unlimited storage and bandwidth
- Custom website
- Analytics
- Text editor for show notes
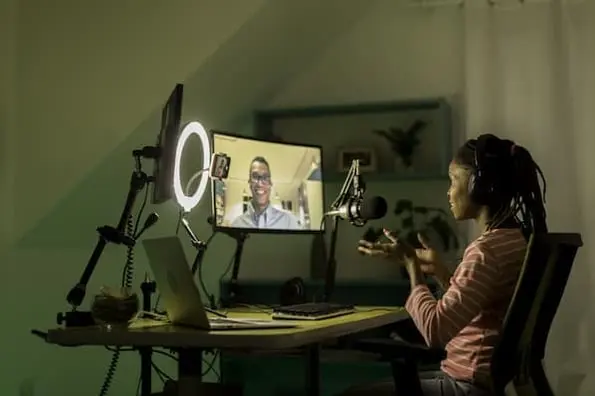
What equipment is needed for a podcast?
One of the best things about starting a podcast is that it doesn’t take much to get started. All you need are these high-quality items:
- A microphone – While you might be tempted to use your computer’s or phone’s built-in microphone, invest instead in an XLR or USB mic that will offer better sound quality. If you’re just starting out, you might opt for a dynamic mic that’s less sensitive to ambient noise. If you have a studio set up, a condenser mic might be better.
- A studio or soundproof room – When recording a podcast, you should minimize ambient noise as much as possible as that can distract listeners. Because of this, it’s important to create a quiet, soundproof space to record.
- Editing software – Once you record your episode, you will need to edit it to add in music and ad spots and remove any content that may not fit. There are various audio editing software that you can use, including Audacity, Adobe Audition, and Descript – each ranging in editing features.
- Noise-canceling headphones – Headphones are important both during production and in post-production as they allow you to monitor and detect sounds during the recording.
- A hosting platform subscription – Before you can distribute your episodes, you must first upload your files to a hosting platform first.
How to Start a Podcast
- Find a unique and compelling topic or theme.
- Set up your show format.
- Leverage your network.
- Record and edit your episode.
- Finalize your creative assets.
- Set up a website.
- Build a promotion strategy.
- Track your metrics.
- Learn how to monetize your podcast.
1. Find a unique and compelling topic/theme to cover.
The first thing you need to start a podcast is an idea. For an individual, it can stem from a passion for or expertise in a particular topic/industry. For a brand, this can come from research you’ve gathered about your audience.
At the core, your podcast should speak to a particular audience. Because if there’s no interest in it, then you’ll be speaking into an empty room. And if you’ve ever done an 8 a.m. PowerPoint presentation in college, you know exactly what that’s like.
If you’re reading this article, there’s a good chance you already have an idea for a podcast. In this case, the goal is to dive deeper into your idea and see if it’s worth pursuing.
To do this, here are the questions you want to ask yourself:
- Has this been covered before in another podcast? If so, is there another angle I can take?
- Is this idea relevant and timely?
- Is there an audience for this? If so, what type of listeners will it attract?
- Is there enough content to create a season?
You’ll know you have a winning idea when you have a clear answer to these questions. Your idea may go through some changes as you develop it but the foundation starts here.
During this step, you may be tempted to secure your name and logo but we recommend waiting on that. More on that in step five.
2. Set up your show format.
The great thing about podcasts is that they can follow just about any format.
Some are interview-based and conversational with one or several hosts bringing on guests while others focus on storytelling (fictional and non-fiction). It’s up to you to decide which format will suit your theme the best.
From there, start brainstorming your episode segments, which break down your show into sections to make it easier for listeners to follow.
Segments aren’t always clearly stated either. Sometimes, it’s as simple as act one, two, and three. It’s all about finding the best way to tell the story in a way that captures and maintains the audience’s attention.
3. Leverage your network.
Once you’ve figured out which format you want to follow, you might need to reach out to your network.
Perhaps you need a co-host, or you need to line up a few high-profile guests for upcoming shows. This is when you reach out to your network.
In addition to posting on your social platforms, you should also reach out to your network in shared interest groups, like Facebook Groups, as members may have a special interest in your project.
4. Record and edit your episode.
Now that you’ve worked out all the editorial details of your podcast, it’s time to record your first episode.
While this may seem nerve-racking, see it as a dry run. Once you review the recording, you can work out any kinks in the episode regarding segments, flow, storytelling, etc.
Don’t be afraid to ask for feedback from others. While you’re in the early stages of developing your podcast, this is the perfect time to get notes on where you can improve and implement them before it officially launches.
5. Finalize your creative assets.
So, earlier I mentioned not finalizing your name and logo during the initial development stages. That’s because, from idea to production, your idea may have evolved into something different from what you originally thought.
In addition, you may get more inspiration after creating your first episode and having a clear product to name.
You may find that you had a name for your podcast from day one, and that’s great. But if you need something more concrete to get your juices flowing, that’s fine too.
6. Set up a website.
Consider your website as your home base for your podcast.
It’s where all information surrounding your podcast will live, including show notes, transcripts, episode descriptions, host descriptions, and more. It also allows you to get more listeners by increasing organic traffic to your website.
By following SEO best practices, you can reach consumers who may be interested in your content and make them convert once they land on your website.
7. Build a promotion strategy.
Having a great podcast concept won’t be enough to attract users. You have to build a robust promotion strategy to get it in front of your target audience. Because how will they listen to something they don’t even know exists?
First, the pre-launch. Promotion doesn’t start after your first episode has aired, it should start before.
Why? It builds anticipation surrounding your show and can help you start out with a strong listenership right out of the gate. Share on platforms you’re already on along with those you haven’t yet explored.
For instance, you might start by securing your handle on social media and sharing a few posts to count down the air date for your first episode. If you already have a captive audience elsewhere, like a newsletter or a blog, prioritize promotion on those channels as well.
Once your show launches, be consistent about promoting the episodes and don’t be afraid to test various methods.
You may find that posting audio snippets from episodes get higher engagement rates than posting about your guests. Or vice versa.
Once you identify what your audience responds to, stick with it.
Pro-tip: Reviews can go a long way in gaining new listeners. During your post-launch strategy, consider incentivizing your audience to leave a show review by hosting a giveaway.
8. Track your metrics.
If you’re not tracking it, did it even happen?
Once your podcast launches and is in full swing, start monitoring its performance. Here are the metrics you want to keep an eye on:
- Subscriber count
- Monthly episode downloads
- Unique page views to the podcast page
- Average listening time
Every piece of data you track will offer insight into your listeners and inform your strategy for future episodes.
For instance, say your top episode is on a particular topic, you could cover that more. Here's an in-depth piece on how to grow a podcast.
9. Learn how to monetize your podcast.
Finally, it’s important to figure out how to earn an income based on your podcasting.
The most straightforward way is through sponsorship. Ever heard "This episode is brought to you by [insert brand]"? Well, it means the show has set up a partnership with the brand to increase brand awareness or meet another marketing goal.
In some cases, the sponsorship will also include ads pre-roll (at the beginning of the episode) and mid-roll (in the middle of the episodes). However, that’s not always the case.
Affiliate marketing, which refers to the process of promoting a product or service in exchange for a commission on the sale. Podcasts hosts will often do this by offering a unique discount code that includes the show name.
With both strategies, you’ll have to actively seek out these brands in the beginning. Create a pitch explaining the benefits of partnering with you. It’s easy to do this once you have a few episodes under your belt and can show metrics to support your points.
Another podcast monetization strategy is offering paid membership tiers for exclusive, bonus content through services like Patreon and Castos Commerce. For instance, say your podcast is interview-based.
You could promote extended interviews at the end of each episode and encourage your listeners to join your membership platform.
If you join a podcast network or advertising network, some of this work is done for you. But it also means you don’t have full control over which ads are placed on your show. Additionally, you may not receive the full profit from the ad, as that may be split between you and the network.
Lastly, you can also maximize your podcast by publishing it on YouTube. If you have a good at-home setup or a studio setup, consider recording both video and audio – particularly if your show is educational or conversational.
This way, you can publish it on YouTube, access a wider audience, monetize your channel, and diversify the ways in which you promote your show.
How to Podcast

![How to Start a Podcast on Spotify for Free [+ Expert Insight]](https://53.fs1.hubspotusercontent-na1.net/hubfs/53/spotify%20podcasts.png)


.jpg)