With a document management system, you can keep your assets organized, accessible, and ready for collaboration — giving you and your team time back for selling.
Here, we'll cover different types of document libraries and how to create one for your sales team.
A defined document management system makes it easier to share files with your colleagues and prospects, bringing you closer to the sale. For instance, you may need to send prospects pertinent information or respond to emails with the correct files.
By integrating your document management system with your CRM, you can draft, send, and store all of your assets in one place, making it easier to stay organized throughout the sales process.
Types of Document Libraries
To create a document library for your sales team, you first need to decide where your library will live. You have two main options:
- A cloud-based library, such as DropBox and Google Drive
- A CRM with document management software, like HubSpot or Zoho
If your sales team already works from a CRM, it's worth exploring its data management capabilities. It's better for your sales reps to work from one interface rather than opening multiple windows to track relevant data. And, when all your data is available in a central location, you can easily share and retrieve info.
To state the obvious, you want to get the most out of your document library. So, before you commit to any software, check for the following features and capabilities:
1. Collaboration tools.
For the longest time, collaboration was only possible by attaching documents to emails and sending them to team members. Now, many platforms offer collaboration tools, such as document sharing, revision history, and simultaneous editing from one document. This allows your team to collaborate efficiently without duplicating files.
2. Scalable storage.
As your business scales, so too will your document library. For this reason, you'll need enough storage to handle your data. For example, Google Drive offers up to 15 GB of storage for free, but once you exceed this limit, you need to purchase more storage.
3. Permissions and Security.
In most cases, documents are meant to be shared. But unprotected data is dangerous, making security a top priority. Ensure your software has access controls and encryption tools.
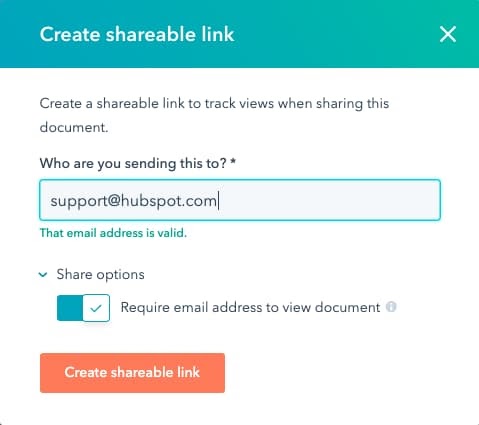
For example, HubSpot's Sales Document Tracking Software allows you to create shareable links to documents. You can set permissions on a file or folder for added security by customizing your sharing options.

4. Data backup.
Your library software should prevent files from being permanently deleted. Ideally, it will offer an archive option to remove obsolete files without deleting them. This is especially crucial if compliance factors are in play.
Now, let's cover how to build a document library from scratch.
How to Create a Document Library
1. Create categories and subcategories.
When it comes to creating a document library, the biggest hurdle is actually organizing your content in a logical way. It can be helpful to think of your document library as a filing cabinet, which has folders (categories) that contain files (subcategories).
Consider organizing your main categories by topic, asset type (such as case studies or whitepapers), or stage of the sales cycle. Or, by industry, region, or persona (such as job title or function). Ultimately, how you organize your content should be intuitive to your team.
2. Flag external and internal content.
Your document library will likely contain both internal and external content. For instance, training materials or market research are only helpful to your team. This type of content is known as internal assets, which provide sales reps with insights and processes to do their job.
On the other hand, external assets are collateral for leads or prospects — like sales decks, presentations, and pricing sheets. To avoid sharing private info, make your document library has a clear distinction between external and internal content.
3. Assign permissions.
The next step is creating permissions within your document library to identify:
- Who can add, edit, move, and update content (such as senior team members)
- Who needs read-only access (such as sales reps)
You can think of permissions as an added layer of protection for your document library. And, it saves a lot of headache down the road when files go missing, are misplaced, or have been edited without permission.
4. Develop an update process.
The second hurdle of building a document library is maintaining it. This is an impossible task unless you assign several members from your organization to update it. Ideally, these members are experts who can provide the most up-to-date information in their area.
For example, an expert from your marketing department can ensure your collateral is on-brand, an expert from HR can ensure your company information is up-to-date, and an expert from your product team can provide accurate info on common technical issues.
How to Create a Document Library in HubSpot
HubSpot users can easily create a library of documents and files that are easy to share with colleagues and contacts without leaving their CRM. This puts the content exactly where reps need it.
Let’s walk through how to create a document library with HubSpot’s Sales Document Management & Tracking Software.
Uploading a Document to HubSpot
To upload a document to your HubSpot CRM, go to Sales > Documents and select "Upload new document".

You can upload various document formats, including Word, PowerPoint, and PDF documents.
Managing Documents in HubSpot
Once you have uploaded documents to your library, you can create a naming and organizational system, so your assets are easy to find. An easy way to do this is to create folders to minimize clutter.
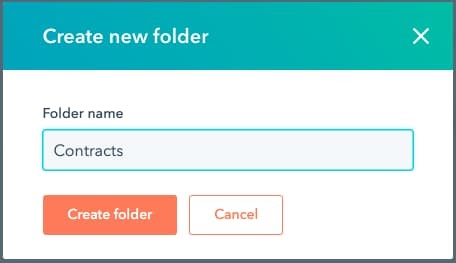
To create a folder in your document library, go to Sales > Documents and click the button that says "New folder." Then, enter a name for your new folder and click "Create folder."

I recommend creating folders named after the document categories you work with most often. Some common document categories include:
- Product Marketing Materials
- Sales Scripts
- Proposal Templates
- Invoices
- Sales Quotes
- Agreement Templates
- Contracts
When your folders are created and named, you can file your documents accordingly.
Examples of Libraries
1. Photo library.

As the name suggests, a photo library contains a collection of digital photos. This is a great option if you want to store, share, and edit pictures of product launches or team events. You can also pull images from your library for marketing collateral.
2. Digital asset library.

A digital asset library contains a collection of rich media, such as images, videos, and audio files. Users can tag these files with metadata, including the date, location, project name, and more. This means the correct files can be found in seconds.
3. Document library.
A document library can contain a variety of file types, including spreadsheets, presentations, and PDFs. For instance, your sales team may have a document library containing external documents (e.g., whitepapers, slide decks, and product descriptions) and internal documents (e.g., training materials, employee directories, and financial reports).
Simplifying your document management process can pay dividends when it comes to productivity and organization. But remember, not all content libraries are created equal. Ensure you have enough storage, security, and collaborative tools to get the most out of your effort.
Sales Process

.jpg)


![Want to Create a Sales Plan? Let Me Show You How [+ 10 Sales Plan Examples]](https://53.fs1.hubspotusercontent-na1.net/hubfs/53/how-to-create-a-sales-plan-1.jpg)
![The Ultimate Sales Cheat Sheet Template to Help Boost Rep Success [New Data + Templates]](https://53.fs1.hubspotusercontent-na1.net/hubfs/53/ft-cheat.webp)
![How to use battle cards in your sales process [+ templates]](https://53.fs1.hubspotusercontent-na1.net/hubfs/53/%5BUse-Oct-08-2025-10-11-09-0787-PM.webp)


.jpg)

