Considering a rebrand? You’re probably aware that it will be no easy feat. On top of the soul searching, repositioning, creative, legal headaches and everything else that’s involved, you’re going to have Google to reckon with.

So much of the work we do in marketing is based on building brand recognition and online visibility – and when not done properly, transitioning to a new name and domain can put that all at risk.
After years in business as Zizinya Web Solutions, we decided it was time to take the plunge. Over the years, we’d evolved from a local SEO and web design shop to a full blown digital agency, and we knew it was time our brand reflected that.
We wanted a new name that better communicated our true value proposition – eventually we settled on Bonafide. New name, new logo, new website.
But the work was far from over.
As we moved through the transition process, we identified ten crucial steps that are critical to maintaining your online visibility during a rebrand.
It’s important to note that not every rebrand involves a new name and domain - if your company is only planning on new positioning and an updated logo, most of the advice in this post won’t apply. But if you’re brave enough to overhaul your company name, logo and website all in one go; read on.
Step 1: Preliminary Work
Advance planning is key. Before diving in to the tactical steps, you need to make sure you’ve got everything you need in order to pull the trigger when the time comes. Skipping these steps can cause some hiccups down the road.
- Google Webmaster Tools. You’ll need to add and verify both sites in GWT to take advantage of Google’s Change of Address feature (more on this later). Make sure to do it in the same Google account.
- Google Analytics. Confirm that you have administrator access to the site in Google Analytics. If you don’t have the right permissions you won’t be able to update the old website information to the new one (we’ll cover this one later as well).
- Hosting and Registrar. Confirm that you have access to the hosting for both the old and new websites. You’ll also want to make sure that you’ll have the ability to host both the old and the new websites for the foreseeable future. Same with the old domain – you’ll want to register it for as long as possible in order to maintain control of it for years to come.
- Block the New Site. Your new website should be live and fully functional - but blocked from search engines for the time being. This is especially important to avoid duplicate content issues if the pages are mostly the same as the old site. You can do this easily with the Robots.txt file.
- Back up. Last but not least, make sure to back up your old site. It never hurts to be safe – and who knows, maybe you’ll get nostalgic down the road
Step 2: Benchmark Important KPIs
If you’re in the marketing industry, you probably already make a point of measuring everything, but a historical record of your analytics data becomes even more important during a rebrand.
Take the time to benchmark your most important KPIs leading up to the transition. A good place to start would be:
- Traffic. Break it down by channels like organic, referral, direct, etc.
- Rankings. Document positioning for 20-30 of your most important keywords – including both the new and old brand names.
- Links. Pull a list of all your backlinks – the sites that link to yours. I listed a couple of our favorite tools to do this in step 8.
- Citations. These are “mentions” of your old brand in important places online. You can record these by manually searching in Google or you can use a tool like BrightLocal or Yext.
All set? Let’s move on to the fun stuff.
Step 3: Prep Your 301 Redirects
To ensure an awesome user experience (and to keep the search engines happy), you’ll need to redirect every page from your old site to the most relevant page of the new one. Although you’ll be creating your redirects file in this step, you won’t actually be using it until you’re ready to go fully live with the new site.
Depending on the particulars of your rebrand, this step could be a piece of cake. Or not.
Do your old site and new site have the same pages and URL structure?
You’re in luck. You can use a couple of lines of code in your .htaccess file to simply route all the pages on the old domain to the corresponding page on the new one.
Here’s the code you would use – just swap out your domains accordingly:
RewriteEngine On RewriteCond %{HTTP_HOST} ^olddomain.com$ [OR] RewriteCond %{HTTP_HOST} ^www.olddomain.com$ RewriteRule (.*)$ http://www.newdomain.com/$1 [R=301,L]
Do your old site and new site have different pages and URL structure?
If that’s the case, you’ll need to take a few extra steps. And if you have a website with lots of pages (if you’ve been practicing inbound marketing, you almost certainly do), this step might take some time.
You’ll still be using the .htaccess file, but in this case you’ll have to redirect each page on your old site to the most relevant page on the new site.
Here’s how you would do this with some sample code again:
Redirect 301 /old-sample-page.html http://www.newdomain.com/new-sample-page.html
Redirect 301 /old-sample-page-2.html http://www.newdomain.com/new-sample-page-2.html
Since our new website is completely different than our old one, this is the route we had to go. We found it easiest to manage this process with a spreadsheet. We listed the URLs for every page on the old site in one column, and then dropped in the corresponding URLs on the new site in the next column. Of course, any pages that generate a lot of traffic or have a lot of backlinks should take priority, so organize your spreadsheet to update the most important pages first.
It’s important to note that if you have a blog, landing pages or any other content on a different subdomain that is hosted elsewhere; you’ll have to create a separate .htaccess file for those URLs. Fortunately, our blog is hosted on Hubspot and they have a seamless URL mapping tool that took care of all that for us.
Step 4: Deploy!
Ready to pull the trigger? It’s time for all that hard work you’ve done to finally pay off – this is the easiest step!
- First, upload the .htaccess file you created in step 3 to the old domain hosting. The results will be instantaneous, and it’s a good idea to test several of the old URLs to make sure they point to the right pages on the new site. Don’t forget to test the home page.
- Then, remove the Robots.txt command on the new site that’s blocking it from search engines. That’s it!
Don’t be tempted to take down the old website too soon. It can take DNS a few days to update, so some searchers will continue to see your old site after your redirect is set up. Taking down your site too early could end up with a bunch of 404s - confusing your customers and jeopardizing your traffic.
Step 5: Update Google Webmaster Tools and Analytics
After setting up your 301 redirects, you’ll want to let Google know that you’re moving your website. Google Webmaster Tools has a handy change of address feature that you can use to do just that. Just navigate to the old site and click on the gear at the top of your screen:

Once you let them know which site you’re moving to (it has to be a site in your account – this is why we had you verify both sites in step 1), you’ll go through a couple of quick verification steps and – boom, you’re done.
Next, you’ll want to let Google Analytics know that your site URL has changed. This step is also a breeze. Just log in to your GA account and navigate to your site’s account. Head on over to the Admin tab and you’ll see the following screen:
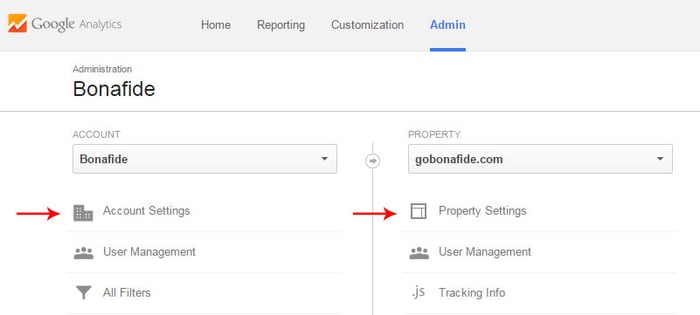
You’ll probably want to update the info in two places. Under Account Settings update the Account Name field; and under Property Settings update both the Property name and the Default URL fields.
While you’re at it, you might want to add an annotation in Google Analytics on the day you do this so you have an easy reference point when comparing traffic before and after your switch.
Bonus: Create a sitemap.xml file on your new site and submit it to Google through Webmaster Tools. It should help them crawl your site faster.
Step 6: Give the Search Engines Signals to Connect the Old and New Names
The search engines will eventually figure out the connection between your old and new company names, but you can send them signals in a number of places to help make it clear.
We used some variations of Bonafide (formerly Zizinya Web Solutions) and dropped it into a few different places including:
- Our title tags and meta descriptions
- The footer of our website
- A custom 404 page
- Our social media account handles and/or descriptions
- Guest blog posts on high-authority websites like this one :-)
Here's an example of how we used our old name in our title and meta tags:

“About Us” pages typically include some information about a company’s history, which makes them a good spot for mentioning your previous brand name if it makes sense.
While this “information scent” is important for SEO, it also helps make the transition less confusing for your visitors. Someone who searches for your old brand and ends up on an unfamiliar website with a new name and look could end up really confused. And confusion = bounces.
Step 7: Update Your Directory Listings
If you do any local business (and who doesn’t really) you’ll want to show up for local searches that involve your products or services. One of the strongest local ranking factors is the consistency of your business NAP – that is its Name, Address and Phone number – across the scores of local, regional and industry business directories. In the SEO world these are called citations.
That said, you’ll need to go back and update every listing with your company’s new information. Yes, it’s tedious – but your local SEO efforts depend on it.
Be warned, this is not a “once and done” type of undertaking. You’ll find that many of the directories take what seems like an eternity to update the listing (if at all), and once they do it could be weeks before Google crawls the new info.
Tip: Start with the data providers like Infogroup, Acxiom, Factual and Localeze because they feed many of the other directories their business info.
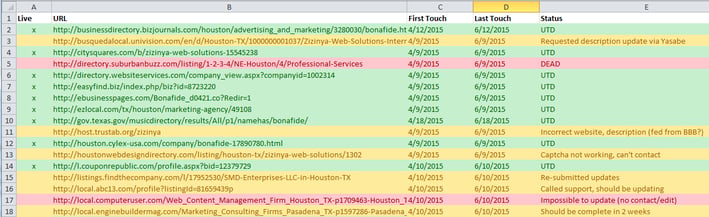
A well-organized spreadsheet is a great way to plan, document and track your progress. Here’s a screenshot of ours:
There are also a bunch of great tools to help take some of the grunt work out of this process. BrightLocal and Moz Local are two of our favorites.
Step 8: Do Some Link Update Outreach
Much like updating your directories, this part of the process is likely to take a little time. The goal here is to get all the strong links that point to your old site and/or mention your old name updated to the new information.
The first step is determining all the websites that have mentioned your old company name or included a link to it. Luckily, there are several tools that can help with this process, including Ahrefs, Majestic, and Moz’s Open Site Explorer.
Next, compile all of those links into a spreadsheet, dedupe and start working your way down the list. Using a template email is definitely quicker, but as with all outreach efforts, a personalized approach is best. Use the spreadsheet to keep up with which links and mentions have been updated – and who to follow up with.
Tip: While this step is certainly time-consuming, it also doubles as an opportunity to turn some of those mentions into links. Score!
Step 9: Promote Your New Brand
Time to get the word out. If you do this well, you could actually end up with more traffic and overall visibility than you had before.
- Email announcement. Tell everyone – customers, vendors, suppliers and friends. You want to get people to start searching with your new brand name.
- Press release. Write a compelling release that includes your new brand’s story and send it out via a PR distribution platform. Be sure to include your old brand name and the new NAP because the release will likely get picked up by multiple sites.
- Guest posts. In spite of the past year’s controversy surrounding Matt Cutts’ comments on spammy guest posting, it’s still one of the best techniques for brand promotion when done right. Pitch relevant blog posts with sites whose audiences can learn from your rebranding experience.
- Social Media. Update your social media profiles with your new brand information and use them to get your new name out there. This is a great time to invest in paid social to expand your reach.
- PPC. If you did a good job of marketing your old brand, people will probably continue to search for it for a while to come. Buy some PPC ads for your old business name and use the ad copy to communicate the rebrand.
Step 10: Follow-up and Monitor
Nope, you’re not done yet. For the next couple of months you’ll need to do a lot of monitoring and follow up. Here are some key areas to focus on:
- Directory listings. I mentioned in step 7 that this was not a “once and done” process. Since it takes the data providers a while to update your information, you’re going to see lots of listings pop up with the old brand name. Much like a game of whack-a-mole, you’ll need to periodically find, claim and update the old listings. This could go on for months and it’s important that you catch them as they surface.
- Links. It’ll probably take you a couple of outreach attempts to get your links updated to the new brand information. In many cases you probably won’t succeed. Focus on getting the most important, authoritative and relevant links updated – don’t worry about the crappy “made for SEO” directories.
- Crawl errors and 404s. No matter how much prep work you do, you’re bound to see some of these. Thankfully, Google Webmaster Tools tracks all of them for you. Keep an eye on 404s (pages that are not found) - as they surface, you should redirect them then “mark as fixed” in GWT.
- Traffic and rankings. Keep a close eye on the KPIs you benchmarked in step 2. If you see a big tank in either your traffic or your rankings, you’ll want to dig deeper and find the problem. Expect to see rankings steadily improve for your new brand name – how long it takes will depend on how competitive the term is.
Be aware that even after completing these steps, you might experience a dip in traffic for a month or two while all your updates are indexed by search engines. Play your cards right, and that should only be temporary. Play them exceptionally well, and you could actually end up with even more traffic and visibility once the dust settles.


![8 SEO Challenges Brands Face in 2023 [HubSpot Blog Data]](https://blog.hubspot.com/hubfs/seo%20challenges_featured.png)
![Should Marketers Optimize for Bing? [Data + Expert Tips]](https://blog.hubspot.com/hubfs/BING-SEO%20%281%29.png)