Whether you’ve just started building out your website design or are looking to refresh your website’s appearance, the Marketplace can be a great place to start, with templates offered from both HubSpot and marketplace providers alike.

Now, let’s say you’ve picked out a template or template pack from the Marketplace that suits you—so far so good. However, now you may be asking yourself, “How can I add my company branding to this template?" In most cases this requires some level of CSS knowledge, but you don’t need to be a web developer or a CSS expert to make a few simple changes to your templates.
In this post, I’m going to show you how to add your company branding to one of the most downloaded HubSpot templates: Stratus Landing Page. We’ll be using HubSpot’s branding as the example.
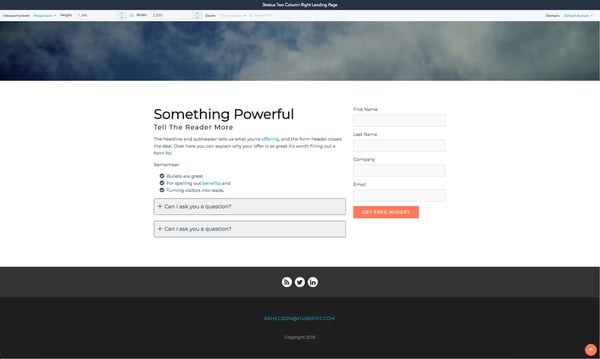
Here’s what we’ll be starting with:

Font Color
First, to change the base font color for your page you’ll need to open the stylesheet. You can find the stylesheet attached to a template in the right sidebar under Linked stylesheets - select Edit to open the stylesheet.
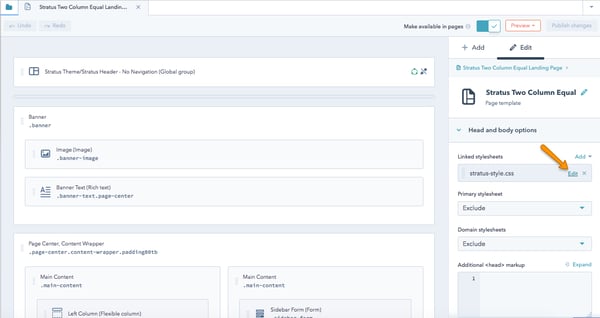
You’ll be faced with a wall of code, but don’t panic. You’re only going to be making a few quick changes. Plus, HubSpot stylesheets include useful comments to help point you in the right direction and make sure you’re editing the right CSS.
The color used for the body font is on line 94. It uses the variable {{ baseColor }}. By default, that’s set to a dark grey, rgba(25,26,26,.7). We want to change it to a slightly darker grey. So I’m going to delete that value and replace it with the hex color code #33475b.
Before:

After:

Link Color
Congratulations, you just edited your first line of CSS! Now it’s time to do another. Right below that {{ baseColor }} variable you’ll see another variable for {{ linkColor }}. Edit this to change the link color on your pages. By default it’s set to #c43235 which is red, but let’s change that to a nice turquoise: #00a4bd.
Before:

After:

You’ll also notice there’s another variable beneath {{ linkColor }} on line 96 called {{ linkHover }}. As the name implies, this is the color your links turn when a visitor hovers their mouse on them. What this CSS is doing is making the {{ linkColor }} slightly darker on hover. So you’ll want to swap #c43235 for #00a4bd there as well.
Before:

After:

Now that we’re halfway through our update, let’s hit Publish Changes on the stylesheet and check out how our template is looking so far.

Not bad! But let's change that red button to fit our company branding better.
Button Color
To change the default button color, look to the next line on the stylesheet, line 97. This is your first accent color {{ accentColor1 }} which is used as the background color for all buttons (excluding CTAs). We’re going to change this red to a HubSpotty orange, #ff7a59.
An important note here: The variable {{ accentColor1 }} is used on several components in the stylesheet in addition to your buttons. To find out where it’s used, hit Control + F (or Command + F on Mac) to search your stylesheet for {{ accentColor1 }}. Changing the color on line 97 will change it for every one of these components. This is great news, because it means you only need to make one edit to add your company color to lots of content.
Before:

After:

Great! Let’s see how our template is looking now.
That looks more on-brand for HubSpot already. With just a few quick changes, we were able to make a huge impact on the appearance of all the Stratus templates using this stylesheet.
Your logo
The last piece of the puzzle is the big logo in the upper left of the template. How do you get rid of that and replace it with your own company logo? This step will take us out of the stylesheet and actually out of the Design Tools entirely.
Navigate to Settings > Marketing > Web Pages where you’ll see a section for your logo and favicon.
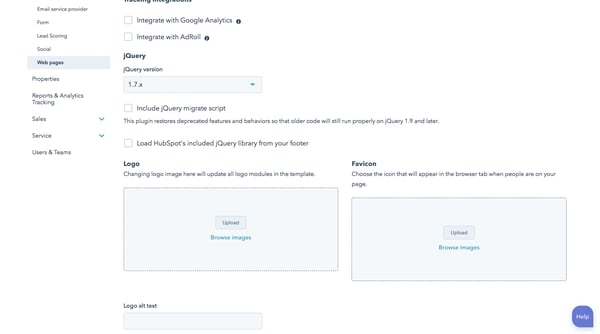
When this is empty, the template’s default logo will fill its place, which is what’s happening to my template right now.
Before:

Add in your logo from your File Manager or upload it directly to the Settings page. Once you hit “Save” it will automatically update the logo on your template.
After:
 And there you have it: by just changing a few lines of CSS in your stylesheet, you’ve replaced the default colors of the Stratus template with your brand colors. Plus you’ve added your company logo, which will appear across all content in your account where the default logo is enabled (read more about that in this article).
 If you’re looking to learn more about using CSS in HubSpot, check out my 4-week guide on the HubSpot Community and the HubSpot Design Certification.
![Troubleshooting Guide for Email Design Issues [Support Series]](https://53.fs1.hubspotusercontent-na1.net/hubfs/53/Hand%20typing%20on%20keyboard%20with%20digital%20tech%20icons%20and%20symbols-1.jpeg)
![3 Service-focused Workflows to Empower Your Support Team [Support Series]](https://53.fs1.hubspotusercontent-na1.net/hubfs/53/service%20button.jpeg)
![Creating a Custom Date-Based Property Report [Support Series]](https://53.fs1.hubspotusercontent-na1.net/hubfs/53/Support/HubSpot%20Support%20Series%20Horizontal-603978-edited.png)
![Mastering Media Queries [Support Series]](https://53.fs1.hubspotusercontent-na1.net/hubfs/53/Support/Support%20Series%20User%20Blog%20folder%20copy%202.png)
![Advanced Troubleshooting: The Network Tab [Support Series]](https://53.fs1.hubspotusercontent-na1.net/hubfs/53/HubSpot%20User%20Blog/HubSpot%20Support%20Series%20Horizontal.png)
![How to Update an Incorrect PDF Title [Support Series]](https://53.fs1.hubspotusercontent-na1.net/hubfs/53/HubSpot%20User%20Blog/Photo%20editors%20using%20laptop%20in%20meeting%20room%20at%20office-1.jpeg)