For many marketers, marketing automation is an essential part of their healthy inbound diet. When used for lead nurturing, it can be an incredibly powerful, time-saving tool to have running behind the scenes. However, while half the challenge is figuring out what to automate in the first place, the other half is measuring what is working and where there are opportunities to improve.

Solving both these challenges comes down to setting your workflows up correctly from the start, so that you are able to measure them as accurately as possible. This post focuses specifically on how to set up your lead nurturing workflows to better organize and measure how your contacts are engaging with your brand and content.
Let’s dive in. At the heart of measuring your nurturing workflow’s performance is the goal list.
Goal Lists
Think about your goal list as the destination for the contacts that are in your workflow. It is the end point you have in mind with each automated email you send in your workflow and act as a reminder of what they workflow is trying to achieve. While not all of your contacts will make it to the finish line, the ones that do will need to be removed from the workflow so they stop receiving emails that push them to that point. A goal list is designed as a smart list so that as new people meet the it’s criteria, they are dynamically added to the list and then removed from the workflow.
A good goal list is a smart list that includes the criteria representative of the ultimate objective for your workflow. Simply put, it’s the list of all the people who did what you wanted them to as a result of the emails you sent them.
After you have determined what your goal list should be and have built it in the HubSpot Lists App, you can go into the Workflows App and add your goal list to your workflow here:

Contacts will automatically be added as they meet the list’s criteria. It is important for each goal list to be appropriate for the specific workflow it is associated with. In other words, the goal for your leads who have just downloaded their first piece of content should probably not be “becoming a Customer”.
Once your goal list is added, you will notice the top of your workflow has changed to collect performance data:

If you’re unsure if your goal list makes sense for your workflow, ask yourself: “Is it likely that this workflow alone has the power to help people meet the goal list criteria? Are there any other steps along the way that are important for them to take before reaching this goal?” Having an unrealistic goal for your workflow can lessen the value of your performance data and make it difficult to know if your workflow is working.
Now, if you’re doing some light math as you read this, you may be wondering how many lists and folders of lists you will accumulate over time… Fear not, clutter-phobic friend! When done correctly, many of your goal lists can be used for multiple workflows and can then become the starting condition for a subsequent workflow. This eliminates the need to have a unique starting list and goal list for each workflow you have your sights set on building. Reducing, reusing, recycling your lists for a cleaner, more organized HubSpot - way to go!
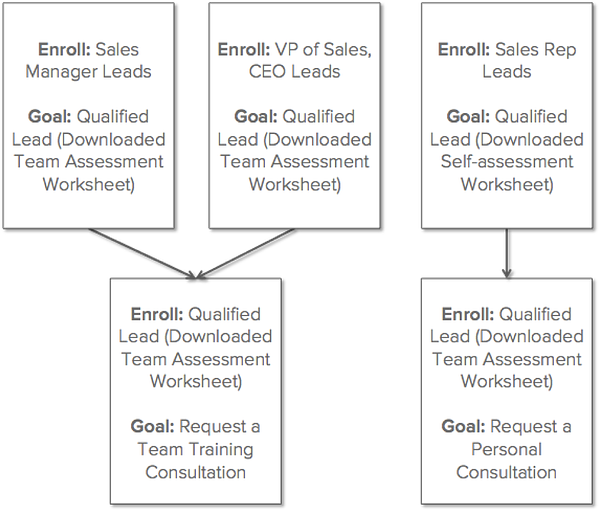
In the example below, the starting list is what enrolls the contacts into the workflow and the goal is what removes them and adds them to the next workflow.

Notice that these contacts are segmented by their role, and an intermediary goal is provided before reaching the consultation. This is to ensure that contacts are getting the most customized series of messages as possible, based on both their persona and where they are in the buyer’s journey. In this case, it is unlikely that contacts who are not interested in the self-assessment are going to want to meet for a consultation.
By introducing an intermediary goal, you are breaking the path to purchase into two smaller paths, limiting the number of contacts who may fall through the cracks, becoming disengaged with your communications and, as a result, unqualified for the emails they are receiving. In doing this, you are also making it easier to measure each step along the way.
Content Mapping & Organization
Given the how important goal lists are to the overall measurement of your workflows, understanding what makes an appropriate goal list is critical. Before even getting started with using the Workflows App for lead nurturing, it’s important to consider how you may be able to logically group your content offers together. Grouping similar content can make it easier to analyze your successes and opportunities to improve your nurturing efforts.
Let’s start by thinking about the stages of the Buyer’s Journey: Awareness, Consideration and Decision. The Buyer’s Journey is the active research process a potential buyer goes through leading up to a purchase.

The downloadable content you have on your website should fall into one of the above categories. Identifying which stage your content falls into is the first step towards better mapping out more effective workflows. You can use a template like the one below to organize your content for each persona by stage.
Your content is there to connect the dots for contacts as they move through the Buyer’s Journey and your workflows can measure how successfully people are able to move from stage to stage.
Once you have listed all of your content out by stage, you can start to visualize how workflows could be developed to bridge the gap between stages.

Consider the chart above. If a contact downloads a resource in the Awareness stage, the next step would be to provide them with a resource from the Consideration stage. The idea is not to send them every piece of content you have but, rather, to create a path to guide them towards the information that will be most helpful with their purchasing decision.
Let’s use Jimmy Gym Owner as an example. Once new resources are added to our content map that tie closely with a specific topic, those resources can be grouped together as the starting condition or goal of a workflow.

In this case, whether someone downloads “The Ultimate Reference for Strength Training Equipment: Free Weights, Kettle Bells and Benches”, OR the “Beginner’s Guide to Buying Gym Equipment [Ebook]”, OR the “New Gym Owner’s Glossary of Terms”, we can enroll them into the same workflow with a goal of downloading the “Purchasing Timeline for Gym Equipment: What Should You Buy First? [PowerPoint worksheet]”.
However, if someone first downloads “New or Used: When to Stretch Your Gym Equipment Budget & When to Splurge [Infographic]” OR “Biggest Budgeting Mistakes New Gym Owners Make”, we can assume that budgeting is more of a priority and the goal of this other workflow should be to download the “Gym Equipment Budget Template [Excel spreadsheet]”.
Doing this eliminates the need to have a unique workflow for each content download and streamlines the flow of information to a contact, minimizing confusion and optimizing conversion. Not to mention it can give you a clear picture of where along the way your contacts may be getting hung up in automation limbo.
Below are some examples of starting conditions and goal lists that typically go well together. Go ahead and test them out with your specific business model.

*Determine the criteria of this list by talking with Sales, looking at historical lead intelligence and behavior data of customers and good ole fashioned trial and error with your list creation.
Personalization
In some cases, the effectiveness of a single (under-performing) email can significantly be improved with the use of personalization. Personalization can come in a few forms:
-
Tokens: Details about an individual contact that can be incorporated into the body of an email, like first name, company name or job title. They look like this in our Email App:

-
Smart content: Alternate versions of an email or call-to-action button that change based on what we know about the recipient. For exmaple, your contacts in one industry can see a different version of a call-to-action button or email than those in a different industry. To do this, insert a smart call-to-action or look for the "Make Smart" link in your email:

When it comes to measuring the success of your workflows, the way in which you use personalization can change the data you have to analyze. For example, while personalization tokens do not impact your performance metrics, it is not possible to see a breakdown of how each smart rule for an email performed differently. On the other hand, it is possible to see such a breakdown in the performance of smart calls-to-action. Rather than using smart content emails throughout an entire workflow, consider using smart calls-to-action, or include smart content in a single automated email, to customize a specific message within a workflow to improve performance.
Settings
Now that you’ve taken the time to rethink your starting condition(s), goal list(s) and the way you are organizing your workflows (and the actions within them), the last thing you likely want to do is sabotage the analytics on your automation. And who can blame you! Before you flip the switch to take your workflow live, it’s important to take a minute to double-check the settings. You can find the Settings link in the left-hand navigation menu in the Workflows App:

In some cases, there are workflows that certain groups of contacts should not be included in. Contacts that could fit this criteria might include customers, competitors or even people who do not meet the criteria for a specific promotion you are running. In the settings for each workflow you can add a suppression list of these people. Here's where to find that on the Settings page:

It is recommended that your suppression list is a smart list so that as new people join that list, they are removed from the workflow (similar to when they join a goal list). With that said, it’s extremely important that your suppression list is never the same as your goal list. If that happens, people will be suppressed before they will be recognized as having joined the goal list and your conversion will be 0%.
Still have some questions? Check out similar posts like Your Top 10 Workflows Questions Answered, ours Workflows User Guide or reach out to Support through the bottom right-hand “Help” button in your HubSpot account!


