DISQUS is a widely used blog comment management system that can be easily integrated with a HubSpot blog.
The instructions below explain how to integrate the two systems, but keep in mind that by enabling DISQUS to manage your blog comments, you will be disabling your native HubSpot blog comment management. This also means that your HubSpot Blog Analytics will not be able to detect comments correctly.
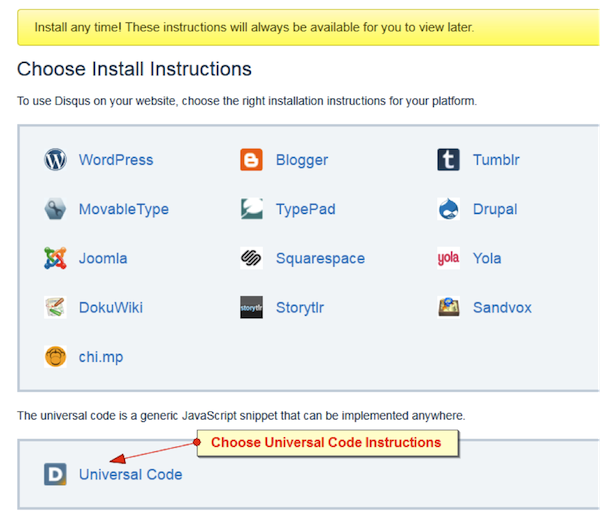
First, you'll need to set up an account on DISQUS and follow the instructions that they provide. When you are given the choice of platform to enable for your DISQUS account, choose and copy the Universal Code to your clipboard.

Now that your code is ready, you can paste it into your Blog Entry Footer section, which is found in your Blog Optionsunder General Options.
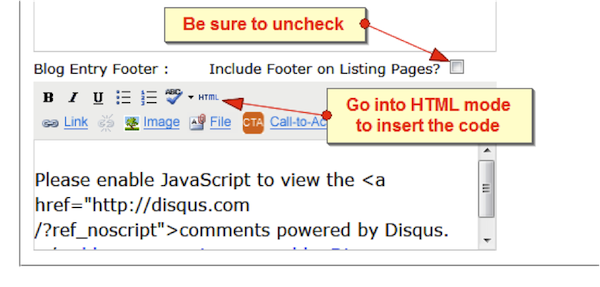
First, uncheck the Include Footer on Listing Pages option. Then click on HTML in the blog footer edit menu to paste in your code.

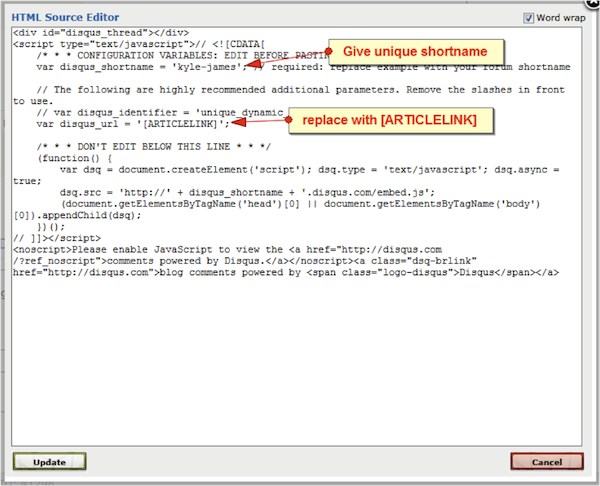
Paste the code into the HTML window that opens up.
You will need to make two changes to this code before saving it.
1. You must insert the shortname that you created when you created your DISQUS account.
2. You must replace the disqus_url parameter in the code with [ARTICLELINK]. Note that ARTICLELINK needs to have brackets around it, and it must be in all capital letters.

Now you'll need to turn off your native HubSpot blog comments.
Under Blog Options, click on the General Options tab and uncheck the Allow Comments option. This will allow DISQUS to handle all of your Blog comments for future posts on your HubSpot blog.
Finally, now that you have made the changes to the Blog Entry Footer and Comments, scroll down to the bottom of the page and click Update to save your settings.
How to Enable DISQUS for Blog Comments on HubSpot
Updated:
Published:
DISQUS is a widely used blog comment management system that can be easily integrated with a HubSpot blog.
The instructions below explain how to integrate the two systems, but keep in mind that by enabling DISQUS to manage your blog comments, you will be disabling your native HubSpot blog comment management. This also means that your HubSpot Blog Analytics will not be able to detect comments correctly.
First, you'll need to set up an account on DISQUS and follow the instructions that they provide. When you are given the choice of platform to enable for your DISQUS account, choose and copy the Universal Code to your clipboard.
Now that your code is ready, you can paste it into your Blog Entry Footer section, which is found in your Blog Optionsunder General Options.
First, uncheck the Include Footer on Listing Pages option. Then click on HTML in the blog footer edit menu to paste in your code.
Paste the code into the HTML window that opens up.
You will need to make two changes to this code before saving it.
1. You must insert the shortname that you created when you created your DISQUS account.
2. You must replace the disqus_url parameter in the code with [ARTICLELINK]. Note that ARTICLELINK needs to have brackets around it, and it must be in all capital letters.
Now you'll need to turn off your native HubSpot blog comments.
Under Blog Options, click on the General Options tab and uncheck the Allow Comments option. This will allow DISQUS to handle all of your Blog comments for future posts on your HubSpot blog.
Finally, now that you have made the changes to the Blog Entry Footer and Comments, scroll down to the bottom of the page and click Update to save your settings.
Don't forget to share this post!
Related Articles
How to tailor your landing page with dynamic content
How to insert a LinkedIn Share button on a HubSpot page
NEW BETA FEATURE: Search Grader
Using The Google +1 Feature On Your HubSpot Site
Inputting Leads at a Tradeshow or on Your Own
Integrating Feedburner with HubSpot