The Importance of Video Marketing
Video marketing started in earnest in 2005 with the launch of YouTube. Google bought YouTube in October 2006, and by 2009 there were seven different ad formats on the platform.
As the technology to create quality videos gets easier, it’s become more popular with marketers. But that’s not the only reason video is the dominant form of communication today.
First, there was the rise of smartphone technology that made watching videos easier and more convenient. Then the pandemic boosted online media consumption by 215% in the U.S.
Fast forward to 2024, and audiences are spending an average of 17 hours a week watching videos online. We’re a part of that statistic. Between the two of us, we watch dozens of hours of video a week. Ignoring video marketing is no longer an option for brands who want to excel. Here are some of video marketing's biggest benefits.
Video marketing encourages social shares.
Video is the second most popular content type on social media for increasing engagement. Platforms like YouTube and TikTok have always been about video. Meanwhile, platforms like Instagram and Face8 4book are focusing on video.
Even platforms that don’t offer native video uploads emphasize the value of video marketing.
- Tweets on X get 10x more engagement.
- 68% of video marketers plan to use LinkedIn video this year.
- Almost a billion videos are watched per day on Pinterest.
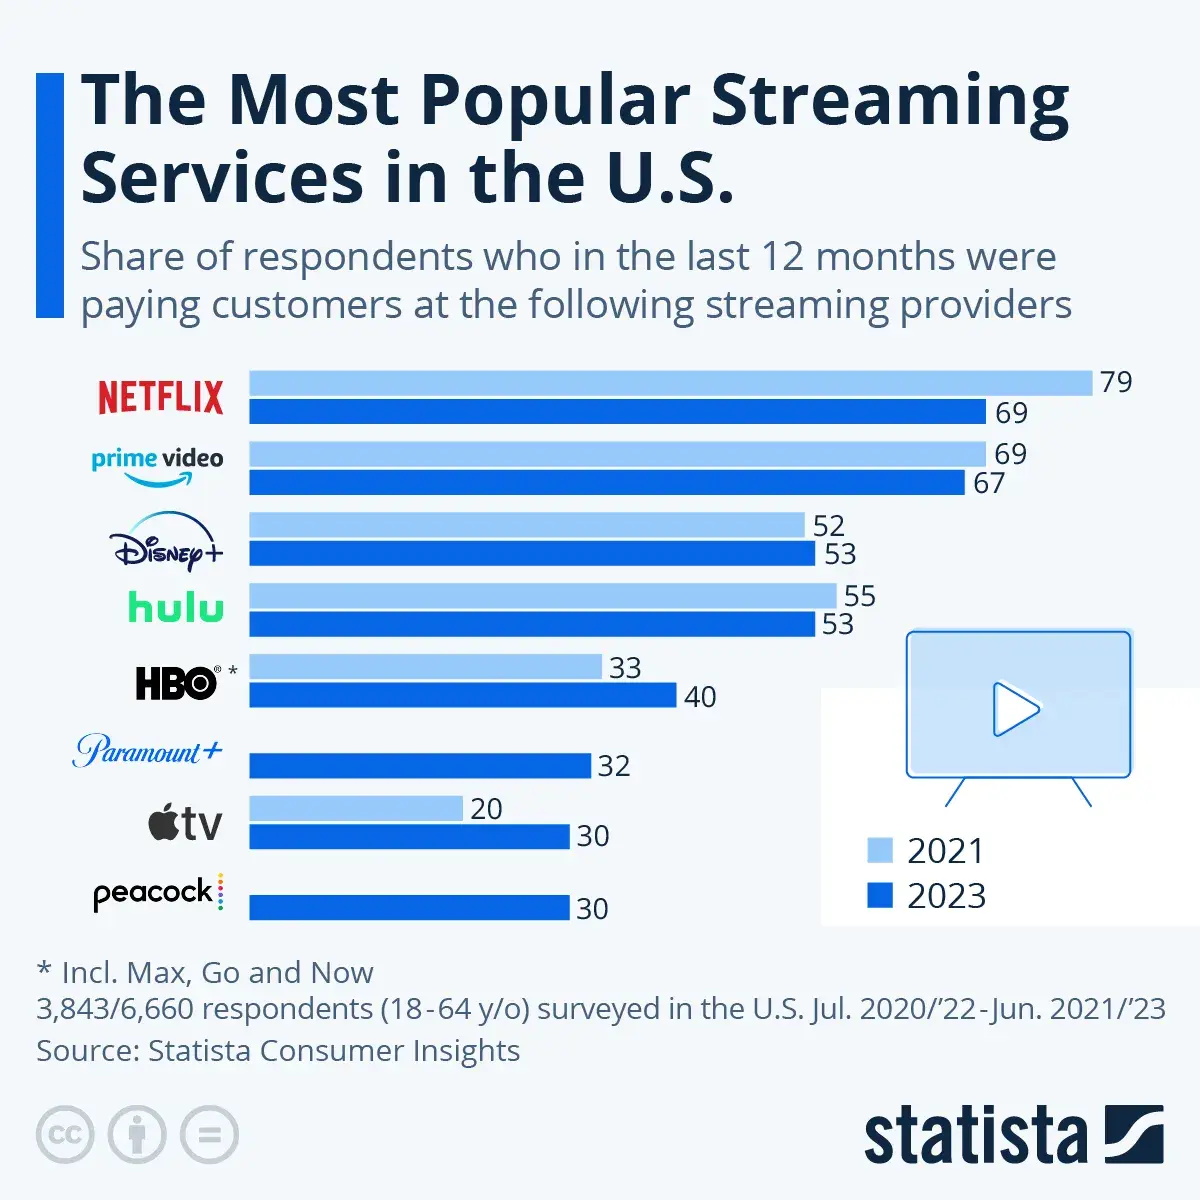
Video marketing improves SEO and boosts conversions and sales.
Of marketers, 31% add video to improve SEO. Websites see a search engine boost when they add video because it increases page quality and the time visitors spend on the page.
More than 60% of marketers say their customer acquisition cost has gone up. At the same time, 83% of video marketers say that video helps them generate leads.
That’s because video hasn’t only transformed how businesses market and consumers shop. It’s also revolutionized how salespeople connect with and convert prospects and how service teams support and delight customers. In short, video is incredibly useful throughout the entire flywheel — not just to heighten brand awareness.
“In a previous role, our sales team would send out personal videos to potential subscribers,” says HubSpot’s Kaitlin Milliken of her previous role at a B2B magazine. “We were able to make personal connections with our prospects, which was especially helpful if we connected with them in-person at an event.”
Video can be a versatile tool for salespeople throughout the entire customer buying journey, and it can do much more than increase engagement. Backend analytics also help salespeople qualify and prioritize cold or unresponsive leads.
Video marketing appeals to mobile users.
Mobile users are a driving force for video consumption. According to a Statista study, 77% of those surveyed use a smartphone or tablet to watch online videos. And Facebook says it’s 1.5x more likely for people to watch video every day on a smartphone than on a computer.
We’ve done it too! Laying down in bed and scrolling through video is both easy and satisfying.
Video marketing is great for educating and building trust.
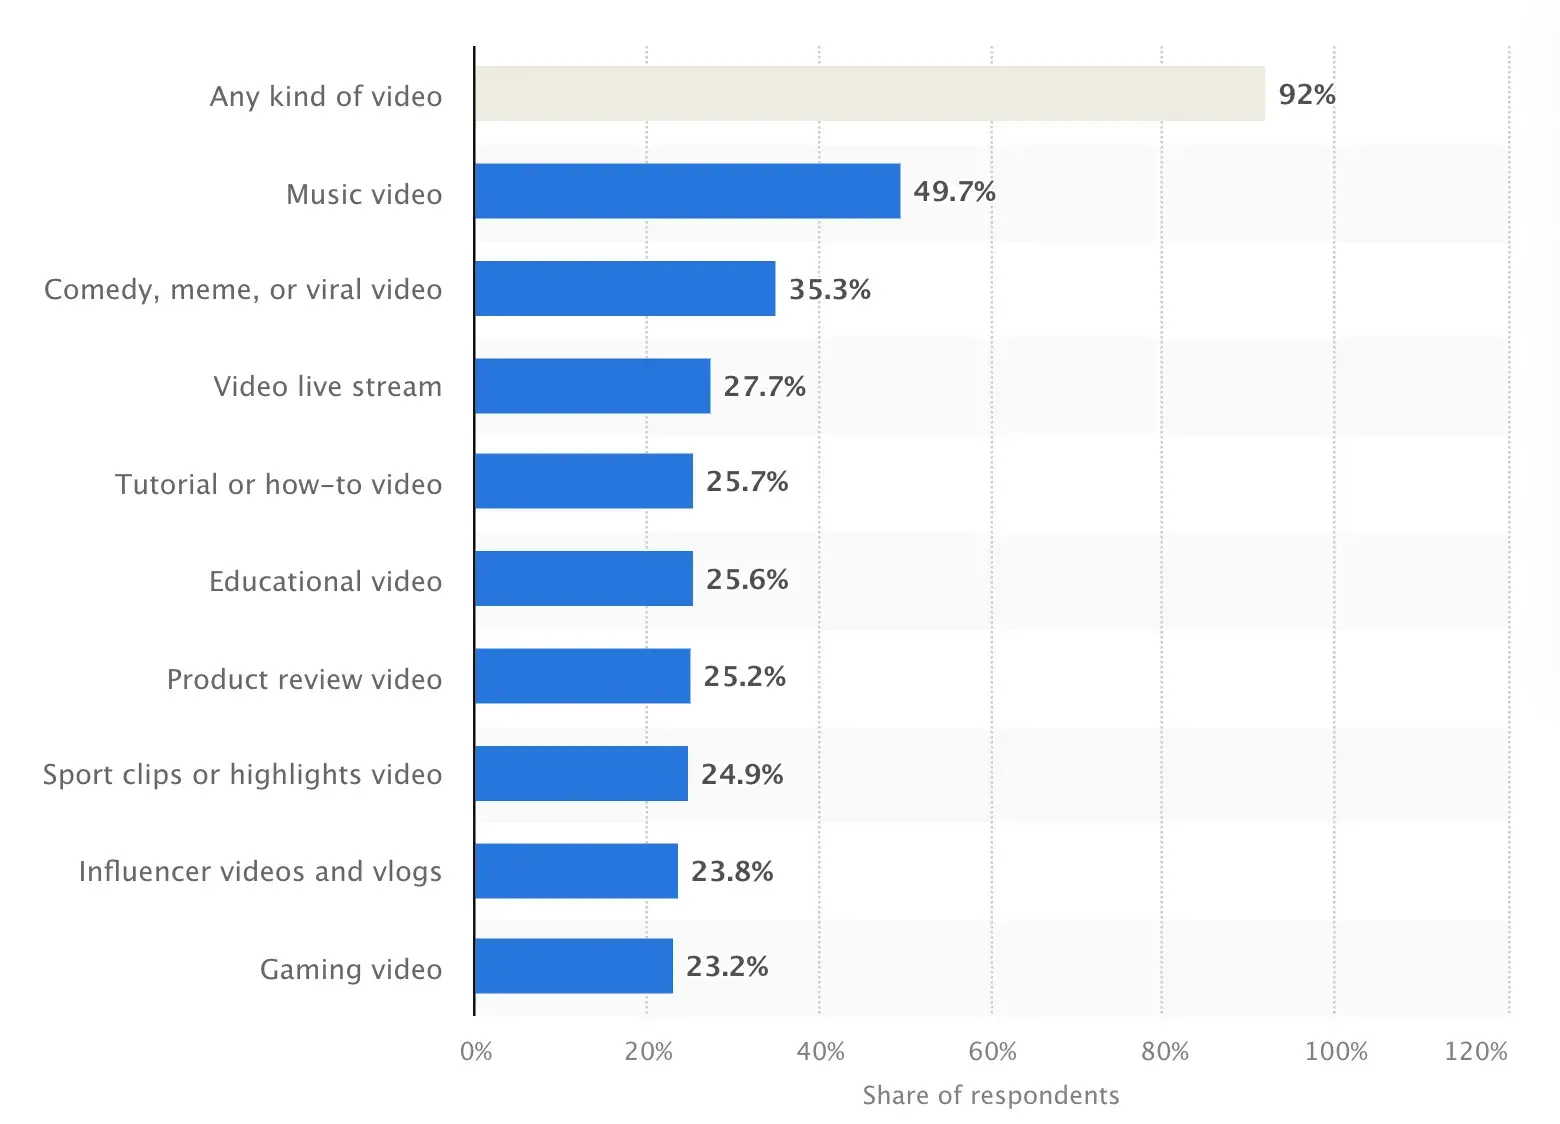
While 91.9% of users are content to watch any type of video at all, 31.3% want how-to videos and another 29.8% want educational videos.
The options are also endless for service teams — onboarding videos, knowledge-based videos, meet the team videos, support video calls, and customer stories are just a few ways that video can create a more thorough, personalized customer support experience.
And users aren’t just learning from brands. Millennial and Gen Z users are different, but most of them want to learn from each other. According to HubSpot Research, consumers and customers prefer lower quality, “authentic” videos over high-quality videos that seem artificial and inauthentic.
This is part of the reason influencer marketing has grown from $9.7 billion in 2020 to an estimated $24 billion in 2024.
Video is within reach for businesses of virtually any size — team and budget alike. The data is clear. To succeed, your business needs a solid video marketing strategy.
1. Define your goals.
Before you set up, record, or edit anything, start with a video marketing goal. Why? Because every decision made during the video creation process will point back to your video’s purpose and what action you’d like your audience to complete after watching it.
Without a clear purpose agreed upon by your team, you’ll find yourself in a whirlwind of re-shooting, re-framing, and editing. That wastes a lot of precious time. So, begin the process with a clear strategy.
Our team spends time writing out our goals for a video campaign before we get started. That allows us to pinpoint exactly what we hope to achieve before cameras role. We can then align our creative vision to the goals.
2. Choose your target audience and find out where they spend their time.
The popularity of video and user-generated video content means that you need to target a specific audience with each video. If you don’t already have strong buyer personas, start creating them now. If you already have a set of buyer personas, make sure to update your personas to include the most recent video research.
For example, when TikTok gained popularity, we added short form video for the platform to our rotation at HubSpot. We could use the same videos on YouTube Shorts and Instagram. These platforms target different age groups and help us gain recognition with a larger audience.
Hopefully you’re already on the social platforms that your target audience is and all you need to do is incorporate video there. However, you should be aware that different platforms are more suited for short-form or long-form video.
Moreover, each video should target your audience at specific stages of the buyer journey. Consider whether you’re aiming to increase brand awareness for prospects or making a direct ad for leads. Or maybe you want to provide testimonials to those in the consideration stage or make how-to videos for existing customers.
3. Connect with stakeholders to align on a plan for the video.
There are typically a lot of players when making a video. How can you ensure they’re all aligned?
Create a questionnaire using Google Forms or SurveyMonkey and pass it along to the stakeholders of the project. This way, you can ask the same questions of everyone and keep their responses in one place.
At this stage, it’s important to agree on a clear set of goals. Is your video marketing to increase brand awareness? Sell more event tickets? Launch a new product? What do you want your audience to do after watching the video? What will your call-to-action (CTA) be?
While connecting with stakeholders is important for any campaign, we’ve found that getting buyin is especially important for higher-production, more expensive videos. If we want to test out an idea, a social video made in house will be more likely to garner support.
4. Set a timeline and budget for your video.
Think of video as a shorter, quicker, and less expensive version of your favorite film. While a video needs fewer resources to succeed, it can still be a time-consuming and expensive process. You can save time and money with planning and project management.
Create a clear timeline for every step of the process and plan for occasional delays. Even a small animated video production relies on the skills of many different people. So, you want to make sure that even with unexpected challenges and changes you can still deliver your video on time.
“I cut my teeth early in my career as a multimedia video producer,” says Kaitlin Milliken. “I spent hours perfecting our production plans. That attention to detail and adherence to deadlines still sticks with me in my current role as a program manager.”
5. Choose the best platform to distribute your video.
Before you start making your video, think about where you’re going to broadcast it. YouTube SEO is becoming as important as website SEO. Think about what people on that platform are looking for. You’ll also want to consider:
- Average view time.
- Size and sound limitations.
- Communities.
- Budget.
- Promotion.
While videos are often used for advertising, a video doesn’t just promote itself. Some platforms have built-in vehicles for promotion, while others will need you to put in some time and effort to get more eyes on your video content. We suggest thinking about the resources you have dedicated for marketing and picking your platform from here.
6. Develop messaging and choose the right types of video for your personas.
It’s important to communicate a message with your videos. If you’re not sure where to start, use one of these examples of marketing videos to inspire your video strategy. If you’re not sure what kind of message is best for customers at different stages in the buyer journey, align your video messages with the flywheel.
Kate Ross, a marketer at beauty company Irresistible Me, emphasizes the importance of understanding your audience before creating your videos.
“We make sure our videos speak directly to different customer groups,” says Ross. “Whether it’s a quick how-to video or an in-depth product review, customizing the content keeps viewers interested.”
With your budget, skills, and resources in mind, think about the creative roadblocks that might arise. Do you need a designer to create lower-third graphics? Are you going to create an animated video or a live-action video?
7. Decide which metrics you want to track and how you will measure success.
Before you dive into production, you need to define your video goals and find the best metrics to help you understand whether you've accomplished those goals.
You can default to using the metrics available in your platform of choice. But this can make it difficult to figure out if your video strategy is performing over time. It can also make it difficult to measure the effectiveness of multichannel video strategies.
Instead, we suggest choosing several key performance indicators (KPIs) that correspond with your video goals. This list of metrics is a good place to start if you’re not sure where to start with tracking your video marketing.
Your Video Marketing Guide Through the Flywheel
Too often, companies jump at the opportunity to create their first video without thinking. They spend the whole budget on an explainer video for their homepage, but as soon as the project is complete, all future video plans screech to a halt.
Other businesses churn out a slew of social videos. But they often just copy fads they've seen, so their videos don’t connect to their audience’s challenges or habits.
Video marketing can’t be an impulsive guessing game. Instead, we suggest that teams create a comprehensive video marketing strategy that applies to every part of your flywheel.
Start with the inbound methodology.
The inbound methodology is the marketing and sales approach focused on attracting customers through content and interactions that are relevant and helpful. Each video you create should address your audience’s challenges and provide a solution.
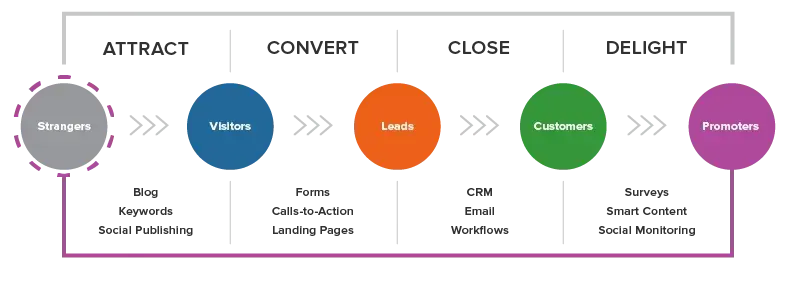
In the following sections, we’ll cover the types of videos we create for each stage in the flywheel. To start, we suggest that you create at least two videos for each section.
Don’t forget to include CTAs to help lead your audience through their purchase journey and into the role of “promoter.” Over time, you can improve based on conversion rates and the content gaps you discover.
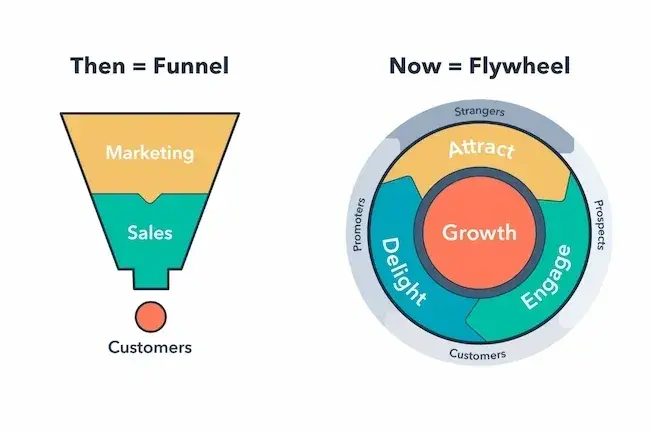
Attract
In the attract stage, our goal is to turn strangers into visitors. Consumers at this stage are identifying their challenges and deciding whether they should seek out a solution. So, the videos we create empathize with their problems and introduce how HubSpot presents a possible solution.
In our experience, the goal of this kind of video is to expand reach and build trust. Because we are looking to garner video, we focus on entertaining and evoking emotion. It’s also important to provide enough information to establish authority on the topic.
Examples of videos in the “attract” stage include:
- Short videos that show off your brand’s personality.
- Thought leadership videos that show your leaders are a source for industry news and insights.
- Brand films that share your values and mission.
- Explainers and how-to videos that provide relevant tips for solving your audience’s pain point.
When we’re working with a new audience, our team avoids speaking too much about our product. Instead, we let the brand values and personality take center stage.
Pro tip: Because these videos can live on a variety of channels, keep the strategies of each platform in mind. This overview of video and social media platforms can help.
Convert
Once we’ve attracted video viewers and website visitors, it’s time to convert these visitors into leads. With most inbound marketing content, this means collecting contact information with a form.
Video can aid this process by offering a solution to the buyer’s problem. Our goal in the convert stage is to educate and excite.
“Convert” videos may include:
- A webinar filled with tactical advice.
- Product demos sent by email.
- Landing page promotional videos.
- Case studies.
- In-depth explainer and how-to videos.
For example, while an “attract” video might provide a quick tip for nailing a sales pitch, a “convert” video could be an animated explainer video that breaks down the inbound sales methodology.
Close
Once we’ve converted the right visitors into leads, it’s time to solidify those leads into customers. At this point, the consumer is weighing their options and deciding on the purchase. So the goal of these videos is to make our audience visualize themselves successfully using HubSpot.
There’s a reason that 88% of marketers report positive ROI with video. Videos can explain how a product works and trigger emotions in ways that a product description can’t.
Great “close” videos include:
- Testimonials of customers with relatable stories.
- In-depth product demos.
- Culture videos that sell viewers on your quality of service.
- Personalized videos that explain exactly how your product could help their business.
Delight
After a sale has closed, video can be a helpful tool. While we don’t make these videos on our team, our HubSpot colleagues use video in the post-conversion stage of your flywheel.
During the “delight” stage of the inbound methodology, your goal is to continue providing remarkable content to users that add value to their experience with your product or service.
You also want your customers to tell their connections about their experience or promote your brand themselves. So, the goal of this type of video is to encourage your customers to embrace your brand and become brand evangelists.
Your first opportunity to delight comes directly after the purchase. Consider sending a thank you video to welcome them into the community.
You can also send an onboarding video to get them rolling with their new purchase.
Then, build out a library of educational courses or product training videos to cater to consumers who prefer self-service or simply want to expand their abilities.
As you develop your video marketing strategy, there are other types of marketing videos you can create for every stage in the flywheel.
Video Marketing Strategy Tips
To find out what video marketing strategies are working well out in the real world, we asked a few experts for their top video marketing strategy tips.
1. Measure your performance.
A lot goes into making and distributing videos. To make sure your efforts aren’t wasted, it’s essential to analyze your video marketing results.
Lee Moscowitz, director of growth marketing at SmartPass, emphasizes the need to analyze metrics like video impressions, click-through rate, and conversions — and to pay special attention to video completion rates.
“I always recommend establishing certain milestones in videos,” says Moscowitz. “Did the person watch long enough until our CTA showed? Are people only watching 15 seconds of our two-minute video? View rates and milestones help you track if your video is telling your story or if people are dropping off too soon.”
Moscowitz adds, “This data will tell you if you need to shorten your video, revise the script to bring up the value proposition sooner, and any changes like that.”
2. Repurpose video content.
After spending valuable time and resources on creating marketing videos for your business, the last thing you want is for them to be a one-and-done piece of content. To get the most out of your video marketing efforts, David Ciccarelli, CEO of Lake, an online vacation rental company, suggests repurposing your video content.
“Creating long-form and short-form videos is labor intensive, so we focus on repurposing our video content in as many ways as possible to keep it fresh,” says Ciccarelli.
One way to repurpose your videos is by being creative about the different marketing channels you distribute them on.
“We recently started integrating video into newsletters and are seeing great results,” Ciccarelli. “People’s attention spans are short, but video provides a rich experience for people who want to hear regular updates from us but don’t necessarily want to read a long-form newsletter every few weeks.”
3. Experiment with several video types.
After creating your video marketing strategy, Haley Wells, social media team lead at seoplus+, recommends identifying which videos you believe will gain the most traction and working off of that.
“Start with three to five videos, and after a couple of weeks, see which videos your audience interacted with the most,” says Wells. “Look at which video gains the most comments, likes, or impressions from the top level. Knowing what kind of content your audience enjoys the most will help you refine your strategy in the future.”
4. Incorporate audience feedback.
Your team may have an idea of which video types will perform well, but your audience is the deciding factor. Pay attention to which videos they interact with most and adjust your strategy based on their feedback.
Wells’ team saw great success when they paid attention to audience comments.
“Our team noticed that one of our videos had a comment that had received significant attention,” says Wells. “With around a thousand likes, we took advantage of TikTok’s capability to respond directly with a video. This strategy re-engaged those who interacted with the original comment and amplified the conversation further.”
5. Refine and optimize.
Your video marketing strategy is only as good as its reach. If your target audience doesn’t see or interact with your content in the first place, then you know something needs to change. Make sure your videos are optimized for search, says Ross.
“When uploading videos to platforms like YouTube, we focus on making it easy to find what they need,” says Ross. “This includes choosing the right titles, writing clear descriptions, and tagging relevant keywords.”
12 Types of Marketing Videos
Before you begin filming, you need to decide what type of video you want to create. Check out this list to better understand your options.
1. Demo Videos
Demo videos showcase how your product works — whether that’s taking viewers on a tour of your software or unboxing and putting a physical product to the test.
Learn how to use video in each stage of the buyer’s journey.
2. Brand Videos
Brand videos are typically created as part of a larger advertising campaign, showcasing the company’s vision, mission, or products and services.
Brand videos aim to build awareness of your company and intrigue and attract your target audience.
3. Event Videos
Is your business hosting a conference, round table discussion, fundraiser, or another type of event? Produce a highlight reel or release interesting interviews and presentations from the gathering.
4. Expert Interviews
Capturing interviews with internal experts or thought leaders in your industry is a great way to build trust and authority with your target audience. Find the influencers in your industry and put these discussions in front of your audience.
The video above is more than just a surface-level interview, it’s a deep dive with HubSpot’s CEO offering concrete takeaways for viewers. Don’t be afraid to get tactical with your interviews — your audience will grow from your hard work.
5. Educational or How-To Videos
Instructional videos can teach your audience something new. These marketing videos can also build the foundational knowledge they’ll need to better understand your business and solutions. Your sales and service teams can use videos like this as they work with customers.
6. Explainer Videos
This type of video can help your audience better understand why they need your product or service. Many explainer videos focus on a fictional journey of the company’s core buyer persona who is struggling with a problem. This person overcomes the issue by adopting or buying the business’s solution.
7. Animated Videos
Apple created this animated video to share its carbon neutrality goal.
Animated videos can be a great format for hard-to-grasp concepts that need strong visuals or to explain an abstract service or product.
8. Case Study and Customer Testimonial Videos
Your prospects want to know that your product can solve their specific problem.
One of the best ways to prove this is by creating case study videos that feature your satisfied, loyal customers. These folks are your best advocates. Get them on camera describing their challenges and how your company helped solve them.
9. Live Videos
Live video gives your viewers a special, behind-the-scenes look at your company. It also draws longer streams and higher engagement rates as live-stream interviews, presentations, and events encourage viewers to comment with questions. Plus, according to Statista, live stream videos reach nearly 23% of the world’s population.
10. 360° & Virtual Reality Videos
With 360° videos, viewers “scroll” around to see content from every angle — as if they were physically standing within the content.
This spherical video style allows viewers to experience a location or event, like flying down a hill with Olympic skiers.
Virtual reality (VR) allows viewers to navigate and control their experience. These videos are usually viewed through devices like an Oculus Quest 2 or a Valve Index.
11. Augmented Reality (AR) Videos
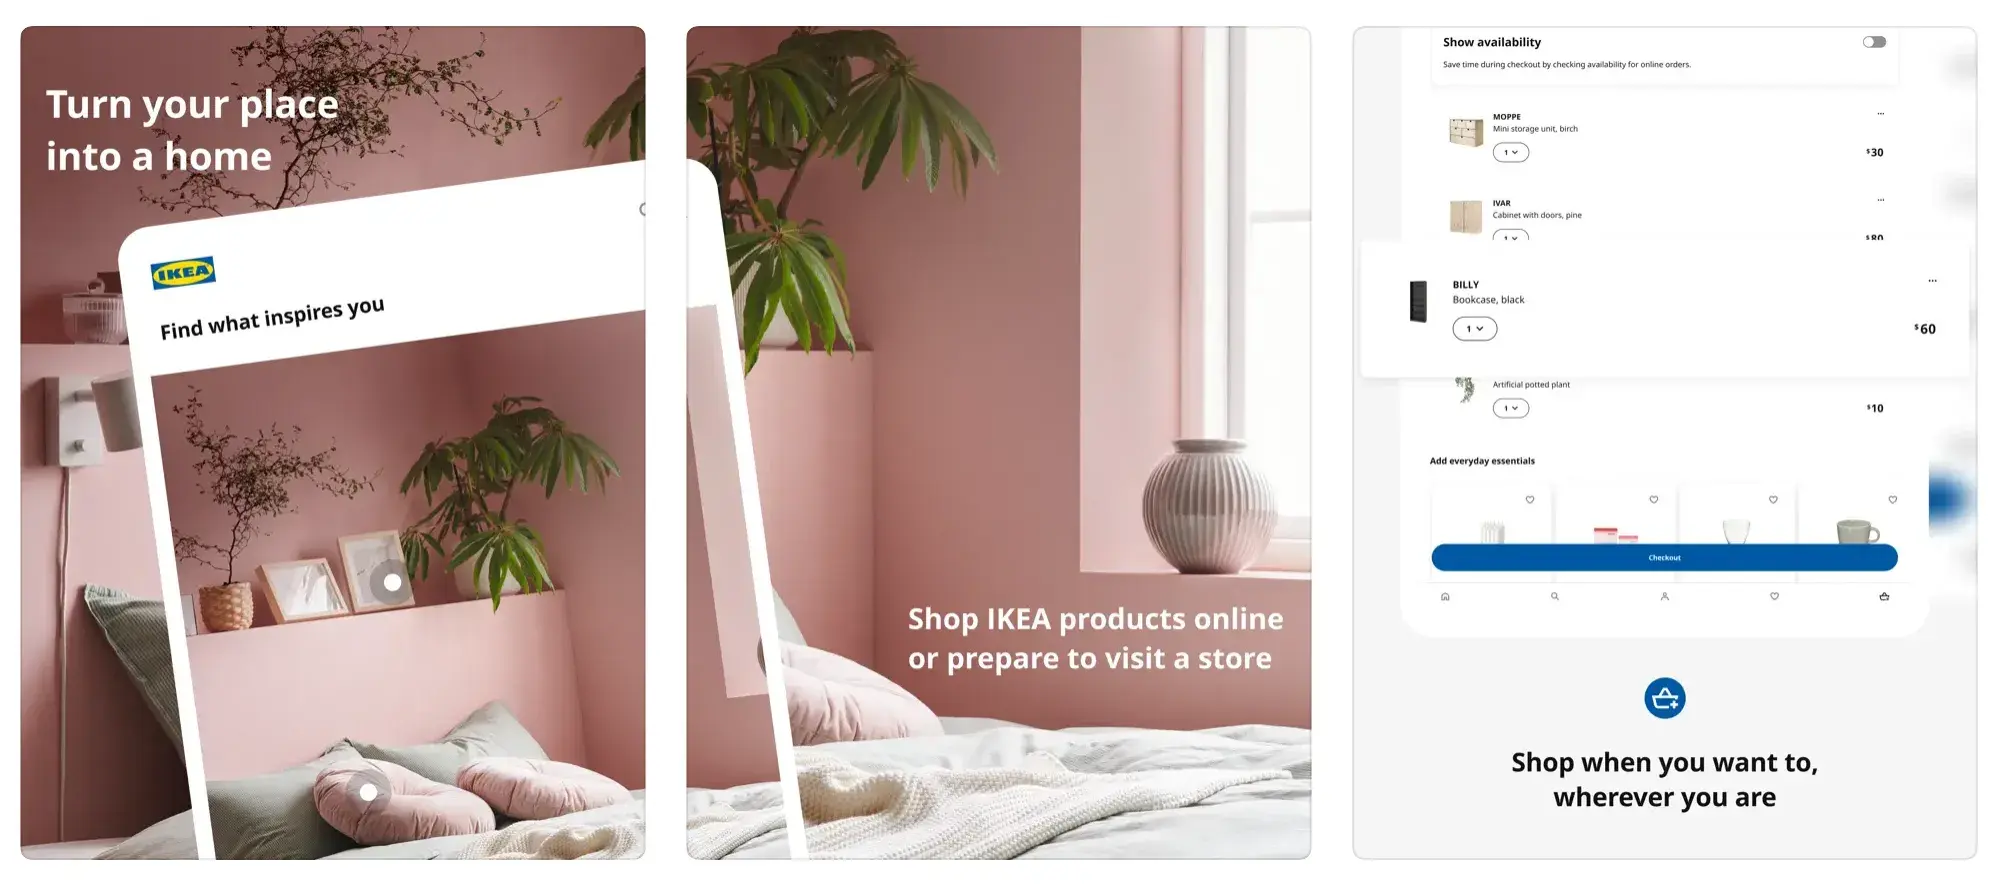
AR videos add a digital layer to what you are watching.
For example, you can point your phone’s camera at your living room and AR would allow you to see how a couch would look in your space. The IKEA app is a great example of this.
12. Personalized Messages
Video can be a creative way to continue a conversation or respond to someone through email or text.
Use HubSpot Video Hosting or Loom to record yourself recapping an important meeting or giving personalized recommendations. These videos create a delightful, unique moment for your prospects and can drive them deeper into the purchase journey.
Now that you’ve planned your video marketing strategy, it’s time to start making your first video.
There’s a lot that goes into making a video. This section will walk you through the detailed process of creating and publishing a video for your business.
1. Script your video.
While there’s a time and place for videos to be off-the-cuff, most video marketing needs a script. If you skip this step, you’ll find yourself editing more than you need to, releasing a video longer than it should be, and probably losing your audience along the way.
When we approach a script, we start it like any blog post — with an outline. Here we list out our key points and order them logically.
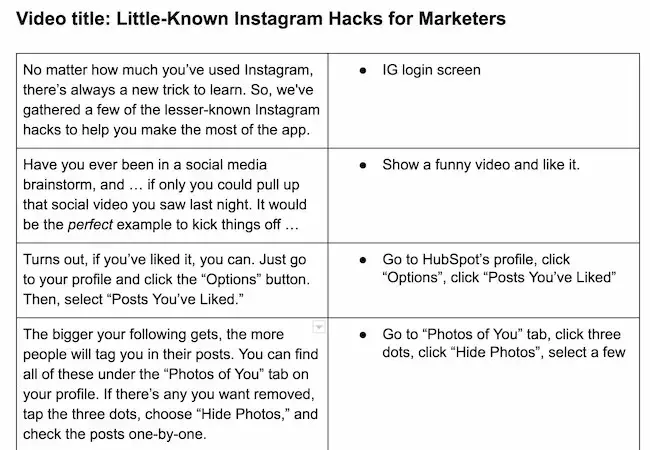
We often work in Google Docs to promote collaboration and real-time commenting. We use the “Insert > Table” function to create a two-column script. This allows us to write our audio script in the left column and insert matching visual ideas in the right column.
Two-column scripts are a common practice in television because they help you organize how the audio and visual parts of your script work together.
Don’t make the viewer wait until the end to understand the purpose of your video. They won’t stick around. Be sure to include a message near the beginning that states your video’s purpose, especially for educational and explainer videos.
As you begin creating videos, you’ll notice a key difference between video scripts and your typical business blog post — the language.
Video language should be clear, relaxed, and conversational. We suggest avoiding complex sentence structures and eloquent clauses. Instead, connect with your audience by writing in first person and using visual language. Keep the language concise, but avoid jargon and buzzwords.
Most video scripts are probably shorter than you think. Keep a script timer handy to check your script length as you write and edit. For example, we found that a 350-word script equates to a video that’s nearly 2 minutes long.
Words on paper sound different from when they’re read out loud. That’s why we organize a table read of our script before we start filming. The point of a table read is to smooth out the kinks of the script and nail down inflection points.
Have your writer and talent gather around a table with their laptops and read the script multiple times. This is a great time to make script changes so that the language sounds more natural.
2. Set up your studio.
When you begin creating your in-office studio, purchases can add up quickly. You might need a camera, tripods, lights, microphones, and more. But setting up your studio doesn’t have to be overwhelming. There are plenty of cost-effective ways to create professional videos in your space.
Basic Equipment
When it comes to video, we recommend shooting with a tripod that can help you maintain a steady shot. The type of tripod you choose should depend on the camera and lens you’re using.
If we’re recording with a phone, we use a table mount like the Arkon Tripod Mount or a full-size tripod like the Acuvar 50" Aluminum Tripod. For a DSLR, we switch gear. Manfrotto makes a variety of trustworthy tripods starting with the Manfrotto BeFree and increasing in quality and price from there.
We also recommend that you stock up on camera batteries and SD cards. Recording video will cause you to run through these quickly.
Audio Equipment
While many cameras have an internal microphone to record audio, you’ll want to invest in some quality sound equipment. Most internal microphones aren’t powerful enough to adequately record audio.
When we shoot with an iPhone, we opt for an easy-to-use and inexpensive microphone. For example, the Movo VXR-10 PRO microphone has been a helpful plug-and-play solution for capturing audio on the move.
There are even more options for recording audio with a DSLR. Lavaliers can be wired or wireless. You’ve likely seen many videos that use a lavalier microphone — the small piece that clips below the collar of the talent’s shirt.
However, lav mics aren’t our favorite. They can be uncomfortable and distracting for the talent (who has to have a wire threaded down their shirt) and for the viewer (who has to see a microphone for the whole video). Instead, we use a shotgun mic. They’re reliable, remain out of the shot, and record background noise in a natural-sounding way.
To set this up in your office studio, you’ll need a shotgun mic like the Rode VideoMic NTG. You’ll also need:
The Zoom recorder will allow you to record audio separately on an SD card and adjust the gain for the space you’re shooting in. Plus, we found that this is an easy-to-use option that we can set up quickly.

These audio purchases may sound expensive. But a shotgun mic setup is a sound investment that will last for years. If you’re looking for a more cost-effective solution, the Rode VideoMic is a great alternative.
Lighting Equipment
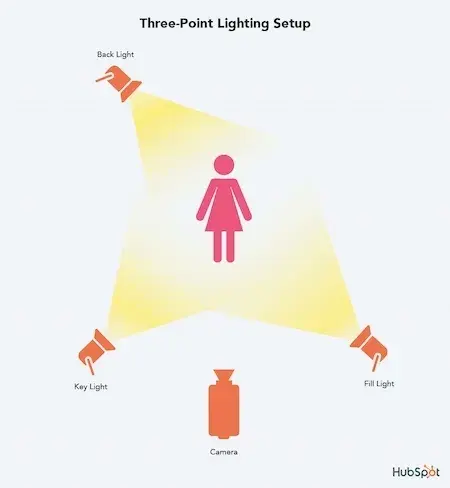
You have a camera. You have audio. Now, let’s talk about lights. We always use the three-point lighting method. We’ll describe this set up below.
To outfit your studio without breaking the bank, head over to your local home improvement store. Pick up extension cords and a few clamp lights with bulbs. You’ll also need three light stands, which are available on Amazon.
Three-point lighting is a traditional setup for video lights. It involves three lights placed strategically around the subject. This approach creates a soft light that makes your subjects look their best on camera.
First, you’ll need a key light. Place this at a 45-degree angle to the left or right of the subject. Lift the light above their head and aim it downwards.
This light should be bright enough that it could be the only light in the scene.
Next, place the fill light at a 45-degree angle on the other side and lift it close to or just above eye level. The purpose of the fill is to soften the shadows created by the key, but without getting rid of them completely.
The fill should be dimmer than the key light. If you have to use the same type of light for both, scoot the fill back and diffuse it by clipping a clear shower curtain onto the clamp light with clothespins.
Finally, the backlight will add a third layer of dimension. Move your subject away from the background. Lift a light above the subject’s head and place it behind them and off to the side so it’s out of the frame.
Aim the light at the back of their head. This creates a line of light that separates them from the background.
Setting Up Your In-Office Studio
Once you have all your equipment, you’re ready to create your office studio.
We’ve found that studios save our team hours of prep time for each shoot. Plus, you don’t need to find a new space. You can turn any room into a great studio, just make sure it isn’t too empty. You can bring in a couch, chairs, or blankets to minimize the echoes in the room.
Try to find a room with minimal noise. Think about buying photography paper to create a background that’s a little more appealing than a white wall.

When it’s time to shoot, turn off the overhead lights. With your three-point lighting setup, there will be no need for harsh fluorescent lights.
Show your talent that you value their time, and don’t ask them to wait while you turn lights on and test your camera. When everything is in place, you’re ready to move to the next step.
3. Prepare your talent.
If you have experienced, confident actors in your company, you’re lucky. Video talent is a rare resource. But with a little bit of coaching, you can help your teammates thrive in front of the camera.
Don’t forget that getting in front of the camera can be scary. Give your talent the script early and let them know they don’t need to memorize it. Instead of memorizing, we have our actors use a teleprompter.
To make a teleprompter, we place a laptop below the eye-line of the camera. We then break the script into short paragraphs and record each section until we capture a great take. We can then have our talent read those lines directly off the laptop, like a voice over for those sections.
4. Plan your shot list and get used to your equipment.
Before and during your video shoot you’ll want to maintain a list of shots you want to get and an inventory list to make sure you cover every aspect of the plan.
For example, if our marketing team wants photo stills from our video shoot to use for the blog, we get those photos before breaking down the set. This helps our team get more value out of our time and resources.
You may not be familiar with everything it takes to get great shots for your video, so let’s go over some basics.
Composition Basics
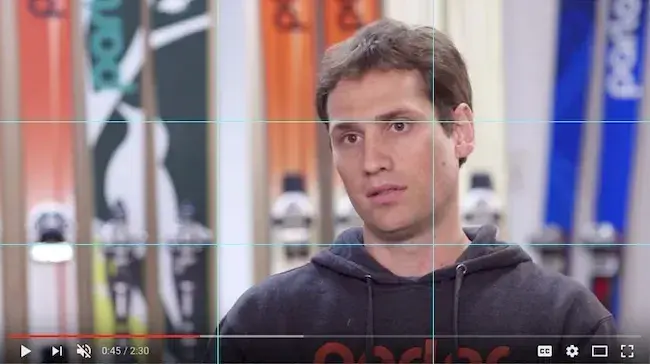
Composition is one way to create a visually powerful video. The rule of thirds is a simple composition technique that can improve your videos. In this technique, you’ll place key elements at the intersection of two horizontal and two vertical lines, like in the example below.

In this example, the woman’s eye lines up with the top horizontal line on the right. This is a good screen composition for interviews.
For this “talking head” shot, you can also improve your composition by leaving some empty space between the person’s head and the top of the screen.
Another way to improve the look of your video is to include b-roll. B-roll is the supplementary footage included as a cutaway.
This might include shots of:
- A customer service rep talking on a phone.
- A designer editing your website.
- Visuals of your office.
- Screenshots of your product.
The key with b-roll is to make sure every piece enhances the story. Create a shot list of more b-roll ideas than you think you’ll need and mark them off as you record them.
When you’re collecting b-roll, include a mix of shots from varying angles and distances. Try a mix of the following common video shots:
1. Establishing Shots
These are wide shots that allow the viewer to see the entire scene. These are great to use at the beginning of a video or scene.
2. Medium Shots
These are shots like the one in the interview example above.
3. Close-ups
Close-ups are tightly cropped shots zoomed in to show detail. These might feature someone’s hands typing on a keyboard or pouring a cup of coffee.
For practice, try telling a story with your b-roll and planning out a shot sequence.
For example, your subject might open a door from the hallway, walk into their office space, sit down at their desk, open their laptop, and begin typing.
A shot sequence showing this 10-second scenario could include six or more different b-roll clips.
4. Create Continuity
Continuity is the process of combining shots into a sequence so that they appear to have happened at the same time and place.
A key part of continuity is making sure any extra objects in the scene, like a cup of water on a desk, stay in the same place through every one of your shots.
Understand your camera.
Fear of new equipment can keep businesses from video marketing. But learning to shoot video doesn’t have to be overwhelming.
You probably have a great, easy-to-use camera right in your pocket: your iPhone.
Recording With Your iPhone
Before filming with your iPhone, make sure your device has enough storage. And don’t forget to enable your iPhone’s “Do Not Disturb” feature to avoid distracting notifications while filming.
Once you open the iPhone’s camera, flip your phone horizontally to create the best possible viewing experience. Then, move close enough to your subject so you don’t have to use the zoom feature — it often makes the final video look pixelated and blurry.
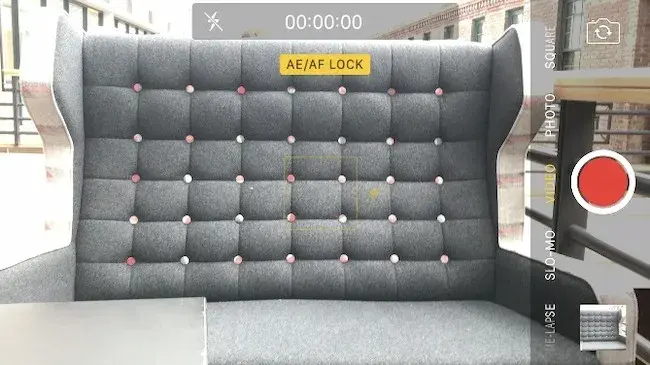
Your iPhone might do a great job of focusing on the subject when you take photos, but when it comes to video the camera will adjust as you move around the scene.
To solve this problem, lock the exposure before you press record. Hold your finger down on the subject of the video until a yellow box appears with the words “AE/AF Lock.”
Shooting With Prosumer and Professional Cameras
While iPhones are great for filming when you need to or getting used to video, you may want a more advanced tool. There are a ton of digital cameras to choose from. These are a few options we like.
If you’re interested in going the prosumer route, we suggest that you look at the Canon PowerShot ELPH 360. The GoPro HERO 10 is also fun for adventurous shoots with lots of movement.
Considering the expense of a DSLR camera, research your choices and read plenty of reviews. Top cameras (from most expensive to least) include the Sony Alpha 7 IV, Nikon D810, and Canon EOS R5. For a more cost-effective choice, check out some of these DSLRs.
If you’re not sure which type of video camera will work best for you, there are some key differences we recommend you consider.
Prosumer cameras are easy to use. They’re perfect for someone who wants the option to just press record. Most have a fixed lens because these make it easier to see what you’re recording.
Professional cameras, like DSLRs, give you fine control over the manual settings when you’re recording video. They allow you to create the shallow depth of field (background out of focus) that people rave about.
DSLRs are small, work great in low light situations, and pair with a wide range of lenses — making them perfect for video. But, DSLRs do require some training and you may need to buy more add-ons, like lenses.
Understanding Your Camera’s Manual Settings
If you choose a DSLR, there are a few settings you need to understand before your first shoot.
This is a high-level overview of each setting. There will be a different method for adjusting these settings based on your specific camera. If you want to learn more, refer to your camera’s instruction manual.
Frame Rate
Most videos have a frame rate of 24 frames per second (fps) or 30fps.
Video experts often credit 24fps with a more “cinematic” look, while 30fps is more common, especially for videos that need to be projected or broadcast on a larger screen. Ask the end-user of your video what they prefer. Then, be sure your resolution is at least 1920 x 1080 to maintain quality footage.
Once you’ve set your frame rate and resolution in your camera’s settings, it’s time to get to know your aperture, shutter speed, and ISO. These three variables work together.
Be sure to turn your camera to manual mode to control these settings.

Aperture
Aperture refers to the size of the opening in the lens. Like a human eye, a lens opens and closes to control the amount of light reaching the sensor. Aperture is measured by f-stop. The smaller the f-stop number, the more open the lens is. A larger f-stop number means the lens is more closed.

What does aperture mean for your video? When a lot of light comes into the camera, you get a brighter image and a shallow depth of field. This is great for when you want your subject to stand out against a background.
When less light comes into the camera you get a deep depth of field and can focus across a larger portion of your frame.

Shutter Speed
Shutter speed is a term from still photography. When taking a photo, shutter speed is the length of time the camera’s sensor gets exposed to light. Think of it as how quickly or slowly the camera blinks.
If you want a perfectly timed photo of a hummingbird frozen in time, shoot with a fast shutter speed. If you want to shoot an image of blurred headlights at night use a slow shutter speed.
Shutter speed is measured in seconds, or in most cases, fractions of seconds. So, 1/1000 would be faster than 1/30.
But what does shutter speed mean for video? To pick the right setting, you’ll have to do a little math.
Here are some common shutter speeds and how to calculate them:
- At 24fps, 24 x 2 = 48, equalling a shutter speed of 1/50
- At 30fps, 30 x 2 = 60, equalling a shutter speed of 1/60
- At 60fps, 60 x 2 = 120, equalling a shutter speed of 1/20
Remember, this is just a guideline for choosing shutter speed. There’s always room to tweak shutter speed to achieve the desired effect.
ISO
In digital photography and videography, ISO measures the camera sensor’s sensitivity to light.
On your camera, you’ll see the settings referred to with numbers in the hundreds or thousands (e.g., 200, 400, 800, 1600).
The higher the number, the more sensitive your camera is to light. The lower the number, the less light-sensitive it is.
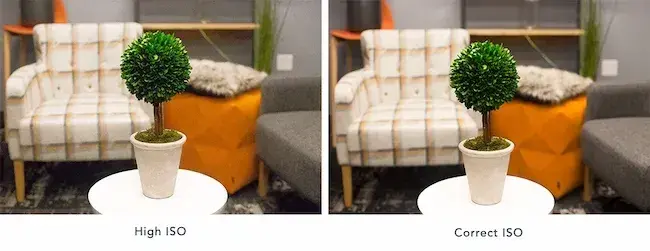
ISO also affects the graininess of the image. Low ISOs produce a crisp shot, while high ISOs create a more noisy, grainy shot.
When choosing an ISO, consider the lighting. If your subject is well-lit, like when you’re outside, you can get by with a lower ISO, around 100 or 200. If you’re indoors in a low-light situation, you’ll need to bump up the ISO — just be careful of how grainy it makes your shot.
This is how the three factors of the Exposure Triangle work together. When you have a low-lit situation, for example, you may choose a lens that can shoot with a low f-stop to let more light into the camera and avoid making the shot too noisy with a high ISO.
If you’re just starting out with manual video settings, don’t get overwhelmed. It takes time and a lot of practice. While understanding aperture, shutter speed, and ISO can help you shoot great videos, there is one more important factor: white balance.
White Balance
White balance tells your camera the color temperature of the environment you’re shooting in.
Different types of light have different colors. For example, incandescent bulbs (like what’s in most living room lamps) have a warm color. Fluorescent lights (like office lighting) are a little bit cooler. Daylight is cooler yet.
Before you begin recording, you have to adjust your camera’s white balance according to your setup.
Most cameras have an auto option, presets, and a custom setting for white balance. Try to avoid auto white balance and opt for a preset or custom setting instead.
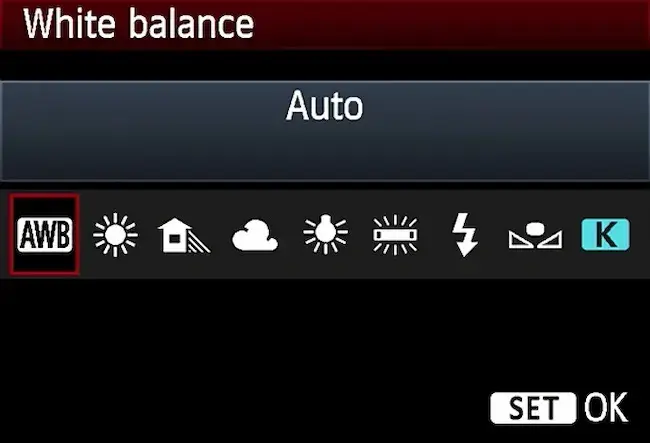
To understand the importance of setting your white balance, take a look at these two photos. The space is lit with yellow fluorescent lights. You can see how the appropriate setting looks natural, while the daylight setting adds a blue tint to the scene.

Focus
Focus is also important to keep in mind. With a DSLR, you can shoot with autofocus or manual focus.
Manual focus is usually best. Use the (+) and (-) buttons to enlarge the viewfinder and move close to your subject’s face. Then, adjust the focus on the lens.
For shooting setups like interviews, make sure the subject’s eyelashes are in focus — that way, you can be certain your footage is clear and sharp.
5. Shoot your video.
Recording a video is tricky because you need to balance many different ways of thinking. A great video should have:
- An emotional draw.
- An interesting storyline.
- Strong visual cues.
- Compelling sound.
- A clear message and call-to-action.
To accomplish this, you need to be a coach. Balance critical feedback with support and encouragement after each take. This is why conducting a table read during the scripting process is so important: It’s easier to give feedback when there’s not a camera in the room.
Try to get a little silly during the shoot or your talent will be on edge and uncomfortable and it will show in the footage.
In the hectic rush of shooting a video, it can be easy to forget crucial details. Video marketing is more than the art of communication. Marketers creating video marketing also need to:
- Stick to a budget and schedule.
- Work with the cast and crew to follow a plan.
- Maintain clear communication.
- Factor in extras like props and special effects.
So, while you’re maintaining the fun level on set, pay attention to the little things. For example, make sure all your mics are on and watch for any lighting changes.
Record each section many times and have your talent experiment. When you think they’ve nailed the shot try to get one more.
If you can, try to circle back to the beginning of the script at the end of your recording. Chances are your subject got more comfortable throughout the shoot. Since the beginning is often the most crucial part of the video, record that section again when they’re feeling the most confident.
Shoot for the edit.
Some video marketers are better at recording while others are better at editing. It’s a good idea to understand the process and pain points of each.
For example, as the person behind the camera, you may believe you collected ample footage and asked all the right interview questions. But to the editor, you may have gotten too much of one type of shot and missed out on some that would make their job easier.
So, shoot for the edit. Remember that you’ll need to edit all the footage you record. This can help you make decisions that will save you countless hours in the editing room.
Here are a few different strategies for shooting with the edit in mind:
1. Leave a buffer at the beginning and the end of each clip.
This can keep you from cutting too close to an important shot.
2. Record extra footage for jump cuts.
As a producer, your job is to capture plenty of b-roll to make sure your editor never runs out. In the section on preparing talent, we talked about recording your script in short sections.
If the editor stitches these sections together, the subject’s face and hands might abruptly switch between clips. This is called a jump cut, and you can see an example below.

Extra b-roll can help mask these jump cuts so that your video looks and feels more natural to viewers. Another way to mask jump cuts is to shoot with two cameras. This strategy is helpful if you’re recording an interview without a script.
If you plan to shoot with two cameras, try this setup:
Make Camera A a traditional, straight-on shot. Then place Camera B at a 30- to 45-degree angle.
With this setup, the editor can flip between these two views to make the cut appear natural. You can see how to cut these two camera angles together in the example below.

A note about shooting with two cameras: Your editor will need to sync the footage between the different views. To help them do this, clap your hands loudly in the view of both cameras right before you ask the first interview question. Modern editing software has auto-sync features, but this loud clap will help you initially line up the clips.
3. Mark your good clips.
Even if you’re recording a scripted video, you might have to record a section 10 or more times. This can be a lot of footage for an editor to sort through.
So, when your subject nails a take, wave your hand in front of the lens like in the example below. Then your editor can look for this visual cue when they review your footage.

6. Edit your video.
This phase will sometimes overlap with your video shoot, but not always. During this stage, you’ll edit a rough cut of your video, and forward it on for stakeholder reviews.
Some videos go through several editing reviews before they get to the final product. This is also the phase where the team adds visual effects, music, and sound design.
Let’s walk through these important steps for editing your video.
Organize your footage.
File organization can be boring. But it’s essential for video marketing.
As you organize your video footage, we suggest you keep these things in mind.
First, video format files are incredibly large, so it’s unlikely you’ll want to store them on your internal hard drive. You’ll quickly run out of storage, and your computer’s processing speed will begin to lag.
Instead, I recommend investing in an external hard drive like one of the Lacie Rugged models and store your project files on this hard drive. This method also makes it easier to collaborate with teammates because you can easily share the drive.
Second, video editing programs are very particular about where you keep your files. If you don’t stick with the original file structure, you may get a lot of error messages.
On your external hard drive, think about creating a separate folder for each project.
Within this folder, there should be a prescribed set of “buckets” to store your video footage, audio, design assets, and more.
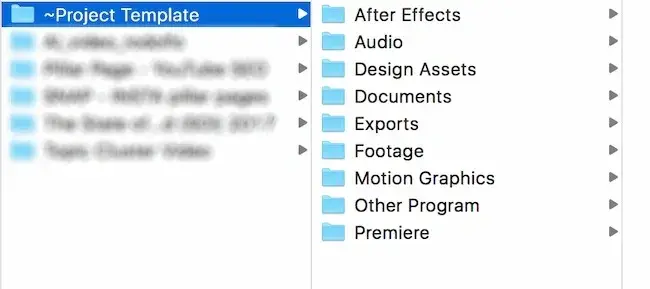
For example, when you import your footage from your camera, place it in the “footage” folder on your hard drive.
Then create a template project folder that you can copy and paste for each project using the image above as a guide.
It’s also important to back up your files. Without backups, you’ll risk losing hours of video footage. It’s not unusual for video marketers to have an external hard drive for everyday work, another for backups, and a third set of backups in the cloud with Dropbox or Google Drive.
Edit your video.
You’ve filmed your video footage, now it’s time to talk about editing.
Video editing can be confusing. But I’ve found there is a range of great options for video editing based on your skill level, operating system, and budget, including free programs and mobile apps. Let’s go over some of our favorites.
Beginner: HubSpot Clip Creator
If you want AI to do the work for you, HubSpot’s Clip Creator is a great option. With easy-to-follow instructions, templates and soundtracks available, you can quickly and efficiently make marketing videos.
Intermediate: Apple iMovie
iMovie is Apple’s video editing software. iMovie is simple, user-friendly, and free on all Apple products. iMovie allows you to create and edit your videos by cutting clips together. iMovie also makes it easy to add:
- Titles
- Music
- Sound effects
- Basic color correction
- Filters
- Special effects
It also has helpful templates that simplify the editing process. The platform supports high-quality clips like 4K video footage and makes it easy to share your work directly to a video hosting platform.
This software isn’t commonly used by professionals, because it has limited access to advanced color correction and editing features. But iMovie is a great option if you’re just getting started. Suppose you’re on Windows or thinking of switching. In that case, you can still enjoy the same video editing experience on your computer as there are plenty of alternatives to iMovie for PC that have a similar set of features or even more.
Advanced: Adobe Premiere Pro
Adobe Premiere Pro is a leading video editing software program used by amateurs and professionals. With a customizable interface and advanced editing tools, the platform is an industry-standard for video editing.
Premiere makes it easy to collaborate with other editors, organize your material, and sync with other programs in the Adobe suite like After Effects and Photoshop. The platform supports high-quality footage (4K and higher) and includes advanced, built-in color correction and grading tools that set it apart from cheaper or free software like iMovie.
The only downside to Premiere is the cost. A year-long subscription to the latest Premiere Pro CC costs about $240. If you’re new to video editing, you may want to experiment with a less expensive tool like iMovie or Adobe Premiere Elements before investing in the Premiere Pro. If you’re trying to decide if this software is your best option, you can check out some Adobe Premiere Pro tutorials here.
Choose your music.
Music is a powerful tool that can alter your video’s mood and tone. The right music can elevate an at-home project to a professional piece of content. The right music and sound effects can help keep your viewer’s attention, evoke emotions, and define your overall editing style.
Adding music to your video marketing takes more than one step, so let’s walk through the process.
1. Set a music budget.
Before you start filming, set a music budget and research your local copyright laws. Copyright law can be difficult to decipher, especially when you’re dealing with digital content. Most music isn’t free. If you use another artist’s music without permission or proper licensing, you risk video removal and legal action.
2. Figure out what music your target audience responds to.
Think about your audience and the overall feel of your production. While some videos feel unfinished without background music, others just need a few tunes to tie the project together. Pay attention to videos that have a similar style to see how other brands use music.
Are you targeting a small audience that will appreciate the newest hip-hop track, or do you need something that will appeal to many demographics? Are you creating a practical tutorial or an upbeat event recap? Be sure to choose music that lines up with audience expectations.
3. Decide what kind of music and sound effects you’ll need.
Next, think about the purpose of the music. Do you need background music or something with real impact? Will you be narrating or speaking in the video? If so, don’t let the music get in the way of your content. Sometimes the best music is the music you don’t remember at all.
Finally, decide whether you want to add intro and outro music. Intro and outro music can serve as a theme for your content. These are a great choice if you don’t need music throughout your entire video.
Bookend music can help set the tone for your video, naturally split your content into chapters, and leave your viewers feeling they had a complete experience.
If you’re looking for music for your video, you have a couple of options. You can pay a composer to create an original score, but most video marketing uses royalty-free music.
Royalty-free songs aren’t free to use; they’re quality songs available for a single flat fee. This means you don’t have to worry about paying extra licensing fees or royalties in the future. YouTube, Pond5, and PremiumBeat are all great sites to find royalty-free music.
4. Choose the right song.
After you know what type of music you need and where to get it, it’s time to start analyzing potential songs.
Consider the song’s pacing. Songs with a steady rhythm are easy to change to suit your video style.
Try to choose simple songs that are easy to loop. And think about whether instrumental music or something with digital samples is best for your audience. The wrong song can make your video feel unprofessional and out of date.
Record your voice over.
Once you have your video footage and music, it’s time for voice overs.
A voice over is the narration that’s not spoken by someone on-camera. Voice overs are an effective tool that can help make your content more relatable, emotional, and fluid.
You don’t have to hire a professional to record a great voice over. Below are a few tips to capture audio on a budget.
If you can’t go to a professional studio, try to pick a quiet room away from distracting sounds like sirens, opening and closing doors, and people talking on the phone.
Try reading your script aloud in the space, and pay attention to the room’s acoustics. Does your voice echo or sound muffled? If so, consider recording in a different space or adding furniture to fill in the room.
Do a practice read before recording.
Read through your script a few times and take note of any difficult pauses, transitions, and words.
We recommend running through your script a few times, especially the first few paragraphs, to ensure that your voice is fully warmed up.
You’ll also want to invest in a good pair of headphones because they make it easier to hear recording errors. For example, if you hear popping or hissing sounds, try standing further away from the mic or invest in a pop filter.
Record, test, and listen.
Think you can record the perfect voice over in just one take? Even professional voiceover actors can need 10 or more takes to record a voice over. That may seem like a lot, but it’s easier to get a new take of audio than it is to try and fix a voice over during the editing process.
On the day you plan to record, be sure to avoid wearing noisy clothing or jewelry. Also, use a stand, laptop, or teleprompter while recording so you aren’t rustling through a printed script.
Remember to relax, read slowly, pause, and take breaks while recording your voice over. Sometimes all you need is a sip of water to get back on track.
You’re ready to publish your video. You shot the footage, edited it together, and added sound. Now it's time to export your video and get it online so your audience can start viewing, sharing, and engaging with it.
Now it’s time to post your video.
7. Upload Your Video
Your video is ready, but you need more than a brilliant video to get eyes on your video marketing. Every video hosting platform will have slightly different requirements, but let’s talk about a few things you should know before you upload your first video.
Video File Formats
There are many file formats for videos, and you want to be sure that your favorite platform supports your format of choice. These are some common formats that most platforms accept:
- MP4
- MOV
- WMV
- AVI
- FLV
Other file formats for videos include:
- MPEG4
- MPEG PS
- 3GPP
- WebM
- DNxHR
- ProRes
- CineForm
- HEVC (h265)
After you export your video in the right format for upload, there are some extras you can add to your video upload that will make it easier for your audience to find your videos organically on platforms like YouTube.
Add Text
You’ll want an eye-catching headline and a description for your video. Your description can be up to 5,000 characters, and the keywords in your title and description can make it easier for your audience to find your video.
Visual Add-ons
Design an eye-catching video thumbnail image. You can also design and add unique end screens and cards to increase video engagement.
Closed Captions
Some platforms let you add closed captions to your videos. There are many free captioning tools you can use to create captions that will make your video marketing more accessible. When you upload you’ll just need to choose the language and upload your file.
Video Hosting Platforms
Video marketing isn’t just about what people are watching, it’s where they’re watching. There are many places to host videos online, and in this section, we’ll walk you through some of the best ones.
YouTube
When we asked our friends which online video platform they use, the answer we heard the most was YouTube. That makes sense. YouTube is the largest video hosting platform, second largest search platform, and the most visited website in the world.
Every single day, people watch over five billion videos on YouTube. It’s also free to upload your videos to YouTube and optimize them for search.
In addition to its massive audience, YouTube offers several other features that make the platform a good choice for hosting your video:
- Build an audience of subscribers. Because you can host YouTube videos on individual channels, users who follow your channel are more likely to see other videos you upload.
- Organize your videos into playlists. You can add videos in your channel to playlists. This makes it easy for your audience to search within your content.
- Target and engage a specific audience. As a social platform, viewers can engage with your videos by liking and commenting on them, providing you another chance to interact with your audience. YouTube also offers a variety of advertising strategies for more sophisticated targeting.
Although YouTube offers the benefit of reaching a large audience with no cost to upload and host videos, there are several downsides to the platform.
While video ads can be a great tool for promoting your content, the number of ads on the platform from other advertisers can detract from your viewers’ experience.
Vimeo
If your friends aren’t watching YouTube they’re probably using Vimeo, the second largest video hosting platform.
Vimeo’s audience is much smaller than YouTube’s, with 1.38 million subscribers in 2023. But there are still many benefits that make it a favorite for content creators and viewers alike. These features include:
- Fewer Ads and Commercials. Vimeo has limited ads and commercials that would otherwise detract from your viewers’ experience.
- More Professional Content. Videos on Vimeo also tend to be higher quality than on YouTube, and the audience on the platform is likely to be more professional.
- More Options for Businesses. Vimeo offers several different premium account choices for businesses. The premium accounts provide more storage, advanced analytics, customer support, player customization, access to lead generation tools, and much more. Besides premium accounts, Vimeo also partners with businesses to produce quality marketing content.
If you’re looking to showcase high-quality, artistic content, Vimeo might be the platform for you. But if you want to increase your reach, let’s explore some other platform options.
Vidyard
Vidyard is an online video platform for business. They offer tools to create, host, and share videos to enable sales and service teams to connect with customers.
Tools that can enable your video success on this platform include:
- Native publishing. This platform allows you to post and update video content to multiple online channels from a central location.
- Data Reporting. Their tool also offers analytics of viewer insights. That data can connect directly to your marketing automation software or CRM. For example, if that prospect you’ve been monitoring views your latest case study video, they’ll let you know right away.
- Video personalization. Vidyard also helps businesses personalize videos with the viewer’s name or company. This is a creative addition as you work video into your marketing and sales strategies.
Video Marketing for Social Media
Now that we’ve covered the biggest video hosting platforms, let’s drill down into best practices for social media.
Expect viewers to watch your videos without sound.
Did you know that Instagram was the first social channel to show silent, auto-playing videos? This type of video is popular on social media because it makes it easy for viewers to watch videos when they are in public.
Here are a few best practices we use to make silent videos engaging:
- Start with action to grab your viewers’ attention.
- Videos that feature people speaking are great for landing pages or your website, but try to stick to visually stimulating videos for social media.
- Add text or include captions so that viewers can follow along with or without audio.
Short videos are best.
The most popular videos on social media vary in length by platform. While some strategies call for a longer video, shoot your video in a way that makes it easy to break into more bite-sized pieces. This will help you get more traffic and engagement from your video marketing.
Grab attention fast.
When you’re posting to social media, your video content is competing with a lot of information on the screen. If your viewers are watching from their mobile devices, there’s even more competition. So, it’s a good idea to get into your content quickly and to make it clear what your video is about in the first 8-10 seconds.
Shoot video that works on many different screen sizes.
As you shoot your video, be sure to compose each shot for a range of screen dimensions and shapes.
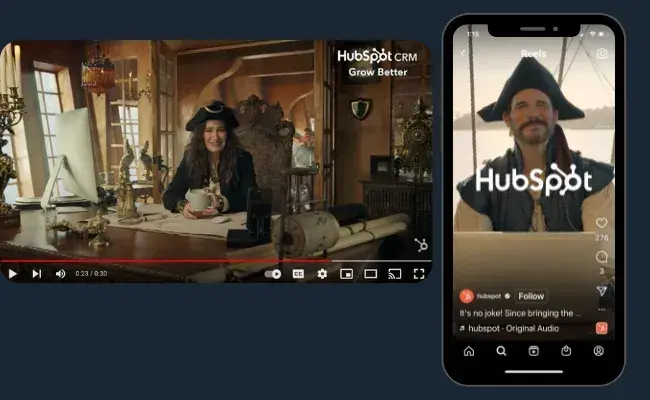
For example, your audience can watch a widescreen video on their mobile phone while scrolling on Facebook or LinkedIn, but the same video might cut off important visual information if it’s posted as an Instagram story.
Follow best practices for each social media platform.
Facebook Video Best Practices
In 2016, Facebook emphasized video content with a dedicated video tab, and the platform’s focus on video has grown from there.
Using video on Facebook seems to give brands greater reach in the newsfeed. This is probably because they emphasize viewer engagement in their algorithm. And according to recent Biteable research, their video ad test got 480% more clicks than a still image. This shows that audiences are currently more engaged with videos on the platform.
Brand awareness videos that are light-hearted and entertaining tend to perform well on Facebook. They also offer a detailed best practices guide that outlines how to succeed with video on the platform. It includes recommended video length and priorities for mobile viewing.
Their goal is to better surface videos that are most relevant to the viewer. This means that creating the right content for your audience is more important than churning out videos to keep up with what’s popular.
It’s also a good idea to upload videos directly to Facebook because their algorithm considers a user’s previous video-related actions when determining what videos to show them on later visits.
Instagram Video Best Practices
Instagram’s latest strategy is prioritizing video and social selling. This makes it a perfect platform to launch your latest marketing video.
To impress viewers on Instagram, offer your viewers something they value. IG’s content best practices recommend videos that are consistent, original, and full of personality.
There are three different video formats on the platform:
Reels
Reels are 15-30 second videos that you can edit with in-platform tools including:
- Timed text
- Filters
- Timer and speed controls
This IG video format also lets users add sound to their videos from an in-platform audio library.
Stories
Stories are 15-second videos, or 15-second sections of a longer video, that disappear after 24 hours.
You can also save Stories to your profile. Stories give brands a chance to post direct links that make it easier for people who see your products on Instagram to start shopping.
Instagram Video
Instagram video replaced IGTV in 2021. These videos can be as long as 60 minutes, which gives you a lot of room to experiment.
Instagram offers live video too.
Instagram is also the most popular social media platform for influencers. You may want to work on some collaborative videos if you want to make the most of Instagram for video.
X Video Best Practices
Daily video views on X increased 95% from 2020 to 2022.
Brevity is a core factor on this popular channel. So, when teasing a blog post or piece of content on X, always keep your video short and to the point.
Short clips that are easy to consume tend to perform the best. According to X, short means 6-15 seconds. They don’t recommend you make videos longer than that.
If you want to get a little more experimental with using video on X, you can try making custom videos to engage with your audience. Personal, one-on-one response videos are a smart way to make your brand more human while building personal connections with your followers.
Some other recommendations from X’s team include:
- Try pinning your video to the top of your profile for some added exposure.
- Show your logo and keep it in a permanent placement in the upper-left or upper-right corner of the frame.
- Open your video with your products and services.
LinkedIn Video Best Practices
LinkedIn users love video, and video has been a focus on the platform since 2017. This is a professional platform, and users spend a lot of time networking and searching for jobs. Keep that focus in mind as you create videos for LinkedIn.
For example, if you have a time-saver or just learned something new that might help other people in your network, video is an effective medium for sharing that knowledge.
Industry news is another relevant topic on this platform. If you have thoughts on a recent announcement or news article, let people know what you’re thinking in a video.
And if your company has some news like a great recent hire, a video can offer a personal take that you can add to a press release.
If you’re looking for more inspiration, check out these ideas:
- Showcase new technologies in video format.
- Offer tutorials on how a new physical product works.
- Broadcast from industry conferences and events.
TikTok Video Best Practices
TikTok hit 1.7 billion monthly active users in 2023 and was the most popular app in the U.S. in 2021. While this app started as a spot where Gen Z teens could learn the latest dances, it’s become a force for users of all ages.
Trending content with a high number of views gets priority with TikTok ’s algorithm. Frequent posting, humor, and authenticity are key on this platform.
If you’re interested in advertising as well as organic posting, they have a helpful guide for top niches like gaming and ecommerce.
Pinterest Video Best Practices
Pinterest added video to their platform in 2016 and added live streaming in 2022. Pinterest loves creativity, and they recently launched Creator awards to emphasize this focus.
If you're not sure if Pinterest is the right platform for your audience, take another look. Product searches increased by 20x in 2020 on the platform, and 75% of surveyed users say they’re always shopping.
So, promote a new blog post, engage with your audience, or even drive viewers to a landing page with Pinterest videos.
To drive traffic on Pinterest, create videos that encourage viewers to act, whether it’s saving a pin, reading a blog, or buying a product. Don’t forget to include visual cues for your brand and to create consistent and visually stunning videos for your pins.
Live Video
Live features on social media let users post live video streams of what they're doing at that very moment.
And live video is more popular than ever. According to Statista, live streaming is the video content of choice for over 30% of viewers.
Most social media platforms offer live video streaming, including Facebook and Instagram. To get the most out of live video, make sure you’re maintaining the same production values for your live video as your pre-recorded videos. High-quality live videos will set you apart from other videos on social media.
For example, If you’re recording live video footage on the go, keep in mind that background noise is easily picked up by microphones. You may want a more controlled environment if you’re recording a more serious or professional broadcast.
Here are a few more tips to make your live videos stand out:
Think about timing.
Keep in mind that your live video will be broadcast from the platform itself, so that’s mostly where you’ll be promoting your broadcasts. Do some research on your target audience to find out when they’re most engaged with your posts.
Even if some of your followers miss out, most apps will save your videos to the app by default. You can delete them manually if you want to, but they’ll usually be available for viewing by your followers after your live stream ends.
Come up with a compelling title.
Your title should describe what your video is and why people should either tune in now or replay your stream later. Adding the word “exclusive” to your title lets users believe they’re seeing footage no one else has seen before. This can make your video more exciting for potential viewers, so they’re more likely to tune in.
Respond to comments live.
On many platforms, people who are watching your stream in real-time can comment and “like” the broadcast.
Other viewers can see these comments and the number of likes your video has. Acknowledge or respond to these comments on the live broadcast to encourage engagement. This makes the experience feel like more of a two-way conversation.
Experiment and keep an eye on your data.
Be sure to experiment with different ways of using live video and what types of content your audience likes most.
Most platforms will offer data that you can analyze to figure out what works.
Video Marketing Distribution
During this final phase, you’ll share your video with the world. Some videos will be broadcast on many platforms, while others will be just for a specific platform or campaign.
Channels for Video Marketing: Owned
Owned marketing channels are properties that you have free access to and can control. These channels give you the freedom to experiment with your video content and test what works before investing in paid channels.
Besides organic social media, think about posting on these channels:
Website
Adding relevant videos to your website can bring a boost in traffic. It also offers an opportunity to educate prospects about new products and the best ways to use your products.
Blog
Many of the most popular blogs teach readers something new. Adding a video to your most popular blogs can give viewers another way to quickly learn about a topic and another way to engage with your brand. Videos can also improve traffic because of their influence on SEO.
Email clicks go up by 300% when you add video to your emails. If that’s not enough, videos convince people to buy a product or service and they can decrease the number of incoming support calls. This makes them excellent add-ons for customer and prospect emails.
Channels for Video Marketing: Paid
Paid channels aren’t an extra anymore, in my opinion — they’re a necessity. Brands new to paid media need to be smart about where and how they go about it.
Marketers’ top priority is generating leads, and 86% of marketers say that video is effective for lead generation. Whether you’re posting retargeting campaigns or using PPC to build your audience, videos can help. And paid social media ads aren’t your only option.
But what are the best choices for paid media placement?
Display ads
Display ads are text, image, or video advertisements that compel the viewer to click to a landing page and take action like signing up for a free trial or buying a product.
Outstream Video Ads
Outstream ads are video ads that automatically play on mobile devices in a large format player. Users navigate to them in on-page, banner, and text content. For example, news websites and blogs often feature outstream video ads.

Instream Video Ads
Instream ads are the opposite of outstream ads. In instream video ads, the advertisement is part of existing video content, like a TV commercial.
Instream ads play before, during, or after other types of video content.
Interstitial Video Ads
These popup video ads are another consideration. In these ads, a user can navigate past your ad by clicking the ad or closing it to continue what they were already doing.
Native Advertising
Native ads will match the look and feel of the media format where they appear.
For example, if you sell sunglasses and partner with a bathing suit company, you can place an ad on their site.
Native ads feel more natural than some other paid ads. They can be expensive, but also have high conversion rates because they often align with something the viewer is already looking for.
Sponsored Content
Sponsored content is like native advertising because it matches the tone and feel of where it’s placed.
It’s media that a business pays for, but it’s created and shared by another brand or publisher.
Influencer Marketing
You can ask influencers to create your videos or collaborate with a favorite influencer to create videos together. From there, you can decide which channels are best for distribution. This is an excellent strategy to grow your brand reach.
Defining Your Goals and Video Analytics
Before launching any marketing campaign, it’s important to decide your primary video goal. You built goals into your initial video marketing strategy, but these goals can sometimes change during production.
We think it’s a good idea to pick out just one or two goals for each video. Any more than that, your video will seem unfocused, making it difficult for viewers to understand what they should do next.
For example, a single video can bring awareness to a new product and your brand, but adding the story of your founder to that same video could be too much.
Next, let’s talk about metrics. Understanding video analytics will equip you to define and measure your success.
When you post a video, it’s easy to get obsessed with one metric — view count. While view count can be an important metric, other metrics may be more relevant to your campaign.
As you choose which video analytics to track, try not to collect more data than you can analyze. Choose the metrics that are most relevant to your video marketing goals.
These are some popular metrics you’ll see when you publish and track video.
View Count
View count is the number of times users have seen your video. It’s also referred to as reach.
This metric is great to track if your goal is to increase brand awareness. But it’s important to remember that every video hosting platform measures a view differently.
For example, most articles state that a view on YouTube is 30 seconds while a view on Facebook is only 3 seconds — but no one is really sure. So try to read the fine print before reporting on your video view count.
Play Rate
Play rate is the percentage of people who played your video divided by the number of impressions it received.
This metric helps figure out how relevant or appealing your video is to your audience. If thousands of people see your video, but only a handful of people play it, it’s probably time to optimize your content.
Social Sharing and Comments
If you’re on social media, you’re probably familiar with sharing and commenting. Social shares and comments are good indicators of how relevant your content is to your target audience.
If a viewer watches your video and takes the time to share it with their network, you probably created a great piece of content. Social shares are also important because the more times your viewers share your video, the higher your view count will be. If your goal is to reach a lot of people, social shares are a good metric to track.
Video Completions
A video completion is the number of times users play your video in its entirety. This metric can be more reliable than view count when trying to gauge your video’s success.
Completion Rate
The completion rate is the number of people who completed your video divided by the number of people who played it.
Completion rate and other engagement metrics are a great way to gauge a viewer’s reaction to your video. Do you have a low completion rate? Are people all dropping off at a certain point? This might be a sign that your video content isn’t resonating with your target audience.
Click-Through Rate
Click-through rate (CTR) is the number of times users click your CTA divided by the number of times it’s viewed.
CTR is a great indicator of how effective your video is at encouraging people to take your desired action. If your CTR is low, consider revising the design or copy of your CTA.
Conversion Rate
Conversion rate is the number of times visitors completed your desired action divided by the number of clicks on your CTA.
If your goal is to have your viewers complete an action like signing up for a free trial, try adding a video to your landing page to see if your conversion rate increases.
Bounce Rate and Time-On-Page
Are you thinking about adding a video to a web page? Take note of the page bounce rate and how long people stay on the page before you add the video. Be sure to check the metrics after you place the video to see if your video changes the way people interact with your other content.
How to measure the effectiveness of your video marketing strategy.
Measuring performance on each platform and channel provides valuable information. This can help you decide whether a video is the right content type for your audience.
Across all platforms, in addition to the metrics above, be sure to measure views over time to determine the lifespan of your videos. You may find that you need to refresh your videos every few weeks or months to stay relevant to your audience.
Keep tracking and comparing engagement with your videos. This will help you find which topics encourage the most sharing and have a better lifetime value.
Ready, Set, Action
Video marketing can be overwhelming at first, but with a little practice and patience, you can easily produce high-quality video content that is unique to your brand.
Pick up a camera, start filming, and watch your engagement levels increase. It’s time to make video a key part of your marketing strategy.
We suggest taking one step at a time and keep learning. You never know how a new idea or strategy can help you meet your goals.
Editor's note: This post was originally written in August 2018 and has been updated for comprehensiveness.
Video Marketing


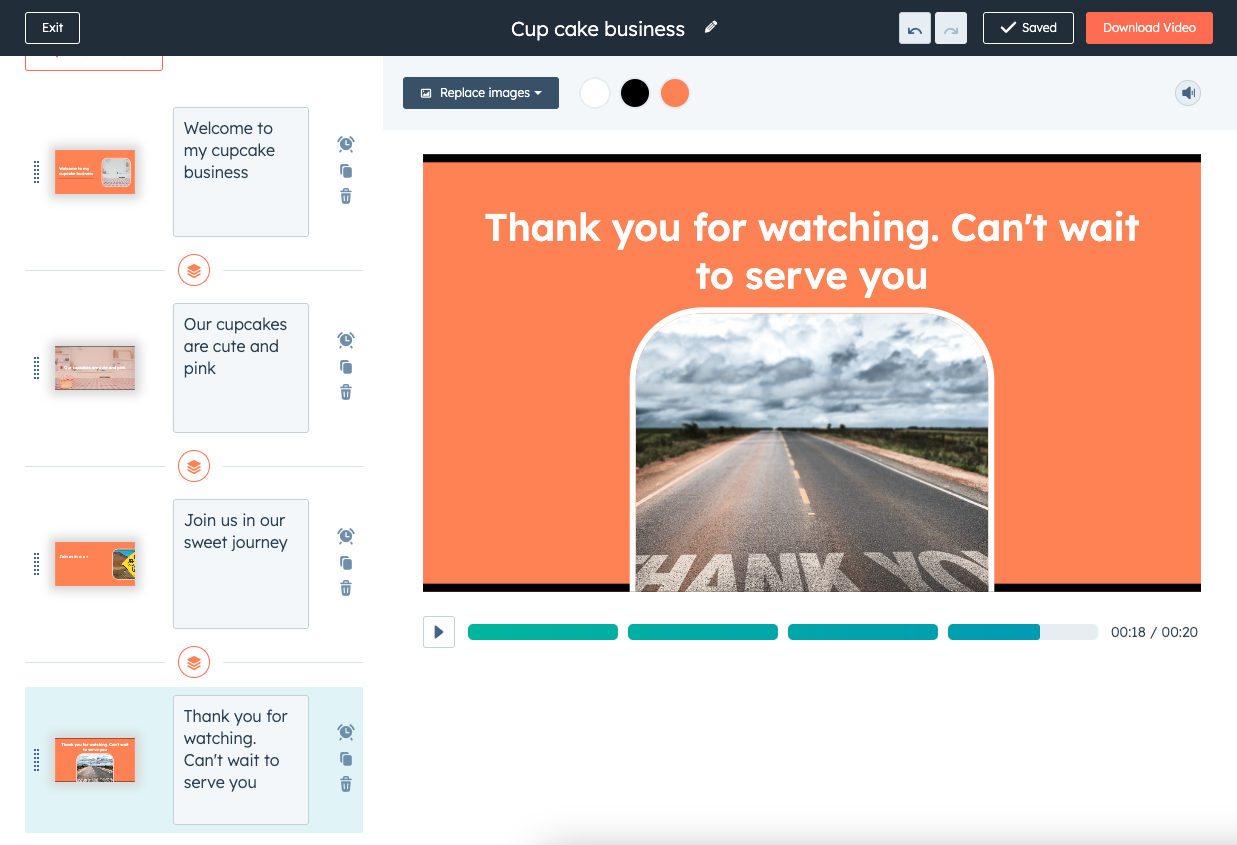

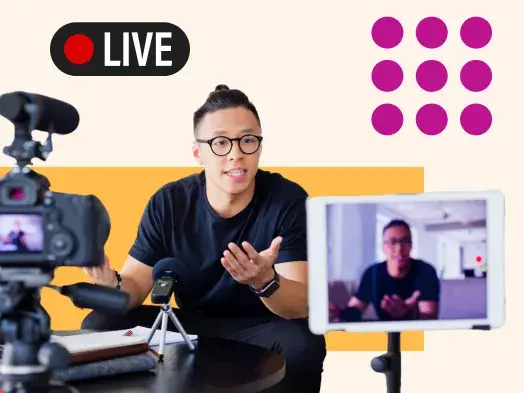
![The best social media platforms for video content in 2025 [consumer data]](https://53.fs1.hubspotusercontent-na1.net/hubfs/53/img-1-20250516-9399498.webp)


![3 Short-Form Video Trends Marketers Should Watch in 2025 [New Data]](https://53.fs1.hubspotusercontent-na1.net/hubfs/53/ft-short-form-video-trends.webp)
![Are In-Stream Video Ads Worth the Investment? [Benefits & Best Practices for Marketers]](https://53.fs1.hubspotusercontent-na1.net/hubfs/53/in-stream-video-ads-1-20250314-6407067.webp)
![45 Video Marketing Statistics for 2025 [New Data]](https://53.fs1.hubspotusercontent-na1.net/hubfs/53/video-marketing-statistics-1-20250227-6425117.webp)
![Why You Should Leverage Interactive Videos [Data from 500+ Marketers]](https://53.fs1.hubspotusercontent-na1.net/hubfs/53/interactive-video-1-20250216-406926.webp)
![Silent But Mighty: How Soundless Videos Are Winning Social Media [+ 2025 Data]](https://53.fs1.hubspotusercontent-na1.net/hubfs/53/Soundless%20Videos%20We%20Love.png)