Nowadays, businesses need tight sales and marketing alignment to beat out their competition and hit their goals--no bots about it. Well, actually, bots all about it! With the rise of website chat bots aiding prospects throughout the buying process, marketing and sales teams have a new means of tightening alignment to achieve their shared goals. Read further to learn how to implement a bot strategy for lead qualification that marketing and sales teams will love using HubSpot’s Conversations and Bots tools.

Step 1: Define your business’s qualified lead.
A pillar of good sales and marketing alignment starts with a comprehensive definition of a qualified lead that is shared between both teams. That’s right: in a perfect world, the Lifecycle Stages of Marketing Qualified Lead and Sales Qualified Lead should be no different from each other on paper. Naturally, however, some MQLs that flow into HubSpot will be a better fit to purchase your business’s product or service based on the data collected on their contact record and past engagements with the website. Sales reps should should feel comfortable only accepting those leads they want to actively pursue by changing the lead from a MQL to a SQL on the Lifecycle Stage property.
The best way to determine what a qualified lead looks like for your business is to take a twofold approach. First, list out the must have fit characteristics that a qualified lead should have and ensure there is a contact property to store that information on each contact record in your HubSpot CRM. You might include properties like First Name, Last Name, Email, Phone Number, Company Name, Industry, Job Title, Persona, Team Size or Budget, and many of these exist as default properties in HubSpot out-of-the-box. During this step, it’s also important to create any custom properties specific to your business within Contact Property Settings to be able to store that custom information on each contact record moving forward.
The second part of your qualified lead definition should include an action that a prospect takes to indicate they are in an active buying process. It’s a good idea to audit your website and make a list of all the pages a lead might interact with to show they’ve raised their hand to speak with a sales rep in your company, let’s call this an MQL indicator page. Examples of an indicator page might include a Request a Consultation page, Request a Quote, Contact Sales, Demo Request, Free Trial, View Pricing, or Product Comparison page among many others in the Decision stage of the Buyer’s Journey.
The combination of fit characteristics and interaction on any one of those MQL indicator pages you’ve just listed out should yield a good quality lead for marketing to hand over to the sales team for further qualification. An example of a quality lead based on our twofold approach might look like these:
First Name = is known AND
Last Name = is known AND
Email = is known AND
Phone = is known AND
City = is known AND
Company name = is known AND
Job Title = is known AND
Interaction on Demo Request Page
OR
First Name = is known AND
Email = is known AND
Phone = is known AND
Country = United States AND
Company name = is known AND
Persona = Operations Ollie AND
Interaction on Request a Consultation page
Keep your MQL definition handy because we’ll be referring back to it in the later steps.
Step 2: Set up your team’s Conversations Inbox.
Before we can translate our MQL definition from theory into a technical filtering system on our website, we need to set up the necessary tools in HubSpot starting with the Conversations Inbox. Conversations allows a team to filter contact interactions via email, live chat and bot interaction into a shared inbox that lives inside of HubSpot. Depending on the incoming question or request from a contact on the website, the Conversations Inbox makes it easy for the right HubSpot user to take ownership of that interaction and reply to it accordingly--when everyone has visibility into how to best help a prospect or customer, we all win in the long run.
To set up your Conversations Inbox, navigate to Conversations>Inbox, find “Email” on the left hand side and click the “+” button to connect a new email alias. If you don’t already have a team alias set up where all inbound requests from the website get filtered, you’ll need to do this outside of HubSpot first. Creating a new alias using Gmail is the option that will most easily integrate with HubSpot but if you do have a shared alias set up in a separate email client you have the option to forward all emails from that client over to a new Gmail account that you create. Walk through the setup steps to completion to finish integrating your inbox with Conversations.

Step 3: Set up live chat on your website & target your MQL indicator pages.
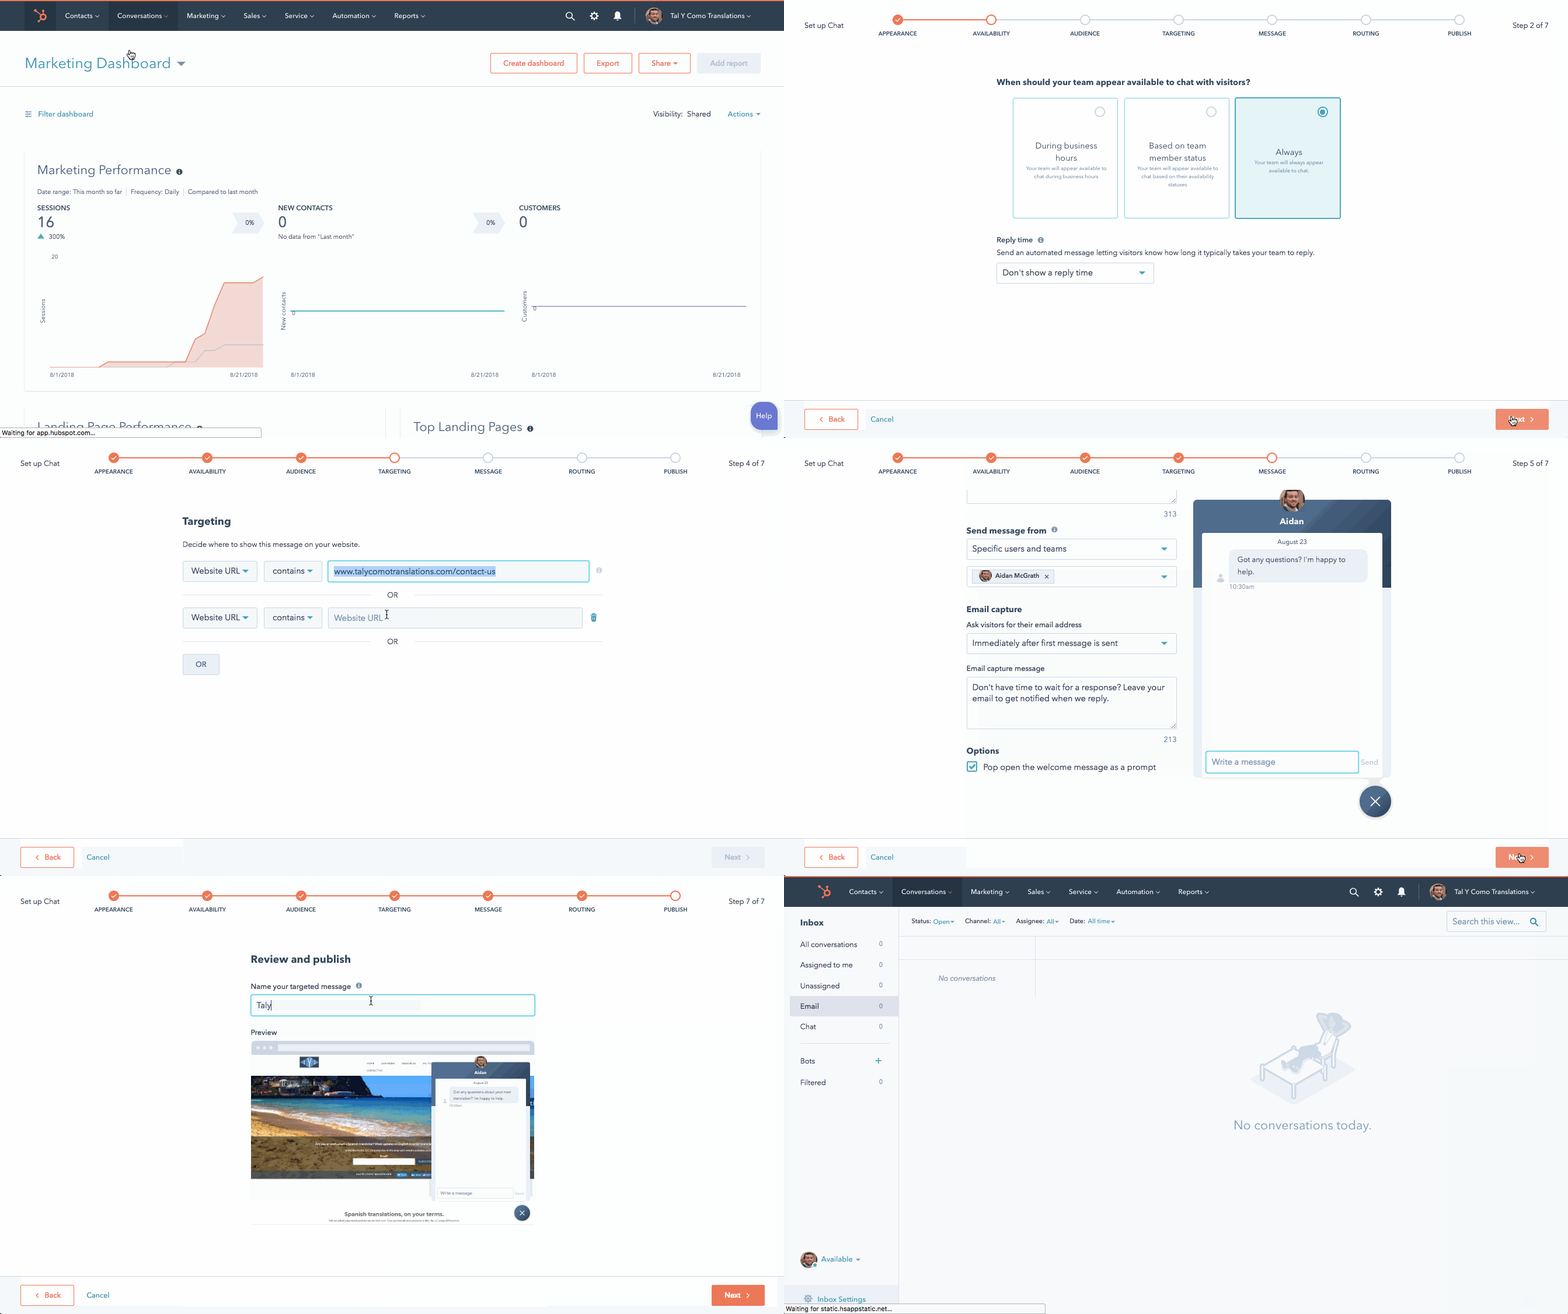
HubSpot’s live chat messenger also has an easy setup. Again, navigate to Conversations>Inbox and this time find the dropdown for “Inbox Settings”. Choose “Chat” and you will be brought to the Chat settings where you can customize how the chat functionality works across your site pages. Choose the orange “Create targeted message” button on this screen to bring up the live chat setup wizard.
- You'll first be prompted to set up an audience to show a targeted chat message when a visitor sees the messenger icon appear on the pages of your site. Since we’re focusing on sales and marketing alignment, we’re going to set up a targeted message to show everyone that visits our MQL indicator pages. Choose “Everyone” for the Audience step unless you’d like to target specific visitors to our MQL indicator pages. Progress to the next step.
- Next, the targeted chat message setup asks us to limit the message to either our whole website or we can choose specific pages on which to show the message (which is why they're called "targeted messages"). Here’s where our MQL indicator pages come in to play. Clear out the default home page URL that appears by default in the text box and paste in the URL of your first MQL indicator page. Hit the OR button and continuing adding in your other MQL indicator pages until you’ve added them all. Move to the next step.
- Continue by choosing a “Welcome” message that will appear to entice someone to reach out via live chat on each page. Think of a good message but keep in mind that this will actually be taken over by a bot to help us qualify our site visitors before putting them in contact with sales. Choose a person or team the message should come from and move to the next step.
- The final steps of the process involve choosing which teams should be routed the incoming conversations from these pages and also publishing the targeted chat message live on the website. Be sure to route these conversations to your sales team that’s been previously set up in HubSpot. You can learn how to set up teams here if you haven’t already.

Step 4: Set up a Lead Qualification Bot for your MQL Indicator Pages.
HubSpot’s Bots tool works much like the Workflows tool in that you can set up automated actions based on a trigger event. When a user engages with the live chat messenger, a bot can be triggered to send a series of automated replies, gather data or perform other behind-the-scenes actions. Think of a bot as the automated first line of defense to help a visitor out if they are looking for a resource, answer a question or are trying to get in touch with a live rep. A lead qualification bot can actually gather important pieces of data from a visitor, contact properties that you tell the bot to ask for, so a sales rep can better qualify if this is a viable lead before introducing themselves.
A lead qualification bot is exactly what can help better align sales and marketing teams. Up to this point, we’ve created a targeted message to show on all of our MQL indicator pages, essentially helping us target visitors that are in the decision stage of their buyer’s journey. The last step is to set up a lead qualification bot on these pages to act as an MQL filter for filling in any gaps in our lead’s fit characteristics before handing them over to a sales rep.
To set up a lead qualification bot, go to Conversations>Bots, click the orange Create Bot button, choose Lead Qualification Bot and immediately give a name to your newly drafted bot. Clicking Create Bot will bring up a drafted series of pre-programmed interactions the bot will have with any site visitors.
It will start by gathering their Name, Email, Number of Employees, Location and Job Title before handing the lead off to a live agent, or sales rep. Here’s where customization comes in: you can edit the pre-programmed steps to either add a customer question, remove a question, edit the language a bot uses when interacting as well as insert contact tokens to reference in its speech to dynamically populate known information about the visitor and provide a personalized touch. Be careful not program the bot to ask too many questions before involving a rep--much like filling out a form, your site visitors may get fatigued from giving too much info and decide to give up. Ask the most important questions a sales rep might need answered to provide them with as much detail before the agent handoff occurs.The last step of your bot flow should be a handoff to a live agent or a message telling the lead that someone will reach out them shortly. You can choose for the bot to automatically assign new chat leads to a queue of Unassigned chats for sales reps to take over, to an individual sales rep or to a team of sales reps to share. When you toggle the On/Off switch of the bot, the system will ask for you to choose a targeted message to associate with the bot. You should choose the targeted message for your MQL Indicator pages that you created in Step 2. Choosing your targeted message will immediately put the bot live on those pages to start qualifying your site visitors according to the MQL definition shared between your marketing and sales teams.

And there you have it! We started with the theory of fleshing out what a qualified lead is for both your marketing and sales teams and ended by setting up a bot to help us gather information from our visitors and qualify them against that same definition of quality. There’s really nothing more satisfying than automating what used to be a tedious task, especially when it comes to removing friction between marketing and sales. Just remember folks: break old ha-bots by building new chatbots. Thank you, I’ll be here all night.