Marketers have a love-hate relationship with ads. On one hand, ads can be incredibly effective: driving traffic to your site, building trust with your audience, and leading to increased sales.

On the other hand, many worry their ads will be interruptive and annoying, leaving prospects with an unfriendly view of your business — the exact opposite of your advertising goal.
Traditional ad strategies often leave marketers filled with self-doubt, worried their ads are costing them good money only to turn away potential customers.
Get Started with HubSpot's Ads Management Software for Free
Journey-Based Advertising (JBA) eliminates this anxiety by combining paid advertising with the Inbound methodology. In short, JBA is a digital advertising strategy where you tailor your ad targeting and ad creation to align with the buyer’s journey. By meeting prospects in the right place, at the right time, JBA turns paid ads from a disruption into a helping hand.
This means you don’t have to worry that your ads will be a nuisance to your prospects. Instead of a distracting pop up they can’t wait to “X” out of, your ads will help visitors by providing timely solutions to their problems. This builds trust while placing your content right in front of them.
To harness the power of JBA, we suggest creating a campaign for each stage of the buyer’s journey. If you’re unfamiliar with the Buyer’s Journey or just need a refresher, check out the chart below.
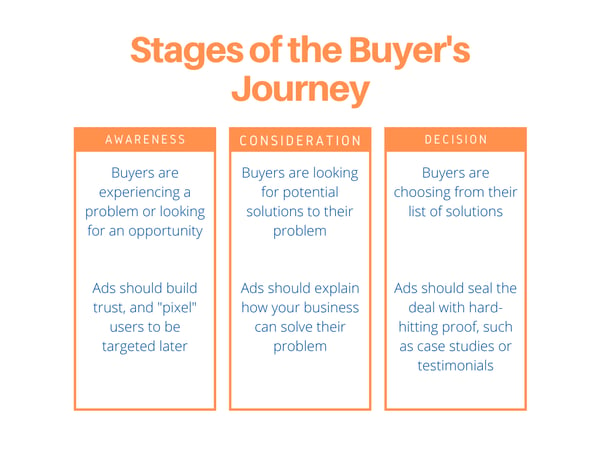
At each stage, we want to meet buyers where they are. During the Awareness stage, ads should break the ice with a cold audience and build trust. During the Consideration stage, you want to prove you’re a worthy contender.
And finally, when the buyer has reached the Decision stage, your ads should seal the deal by showing how your solution is the best option. To be effective, these ads need to reach the right people, at the right time, all without conflicting messages or going over budget.
If this sounds intimidating and complex to you, you’re not alone. There are a lot of moving parts to the process. So, to help you construct the best campaign possible, HubSpot built the Ad Sequence tool. Let’s take a look at how Ad Sequences assists you in creating A+, non-intrusive ad campaigns.
Pro Tip: Social vs. Search
It’s important to differentiate between search and social ads. When placing ads on search, users are looking for an answer, so ads should be informative and helpful. On social, users are looking to be entertained, so ads should be aesthetic and based on buyer persona demographics.
Creating a 3-stage Ad Strategy with Ad Sequences
From your Ads tool, click “Create Ad Campaign.” Choose “Facebook Ad Sequence,” then select the desired Facebook ad account and Facebook page.
Stage 1: Attract
The goal of this first ad is to attract the right people without asking them for anything in return. This is Inbound in action. We recommend boosting an already existing Facebook post, particularly a video post. We want to get Likes, comments, and views as these interactions will help you better convert in the second stage. The videos are listed from highest to lowest engagement. Choose whichever one you like.
Under “Targeting,” choose location and “a look-a-like audience.” We want to cast a wide net for later conversion, so we’ll exclude contacts with the lifecycle stage “customer” and anyone who submits a form via our other ads.
Next, set your budget and schedule. You’ll notice you have a few options for “end date.” You can end your ad on a certain day, when you get a certain number of engagements, or you can leave it running for a continuous, evergreen source of leads.
Stage 2: Convert
Now that our first ad is complete, we’ll create a second one designed to convert viewers. Our goal here is to gather contact information. And because we’re using a lead ad, the user won’t have to leave Facebook to submit. This creates a seamless, non-disruptive ad experience.
Here we see the power of the Ad Sequencing tool in action. This second ad will automatically target the prospects who interacted with your first ad. These are users who watched the video in the Attract stage, or if a non-video was selected in the Attract ad, users who Liked or commented on the ad or your Facebook page. We know these people are interested in your business, so showing them another ad will be well-timed and contextual, avoiding the intrusive nature of traditional advertising. And because this targeting is done automatically for you, you don’t have to worry about it.
Instead of struggling with complex retargeting criteria, you can focus on creating an A+ form. Think of an attention-grabbing headline and add the desired form fields, e.g., first name, last name, and email. Then, customize your CTA to entice prospects. For example, you could have your CTA be “Claim Your Free Ebook” and provide value through the offered ebook.
For targeting, we want to continue targeting the prospects who interacted with the first ad, while avoiding those excluded from the first stage.
Next, set your budget and date. With the brand-new Ad Sequences automation feature, you can set the second ad to start after the first ad reaches a desired level of engagement (we recommend 2,000 interactions). This ensures you’re not wasting money with your convert ad without a base built from the first stage. You can stop the ad after an allotted time or after it has created a certain number of contacts. You can also choose to be notified when the ad has started and ended, giving you increased visibility into your Journey-Based Advertising strategy.
You’ll notice we built an automation section right in the Ad Sequence builder — here you can build a workflow to send internal emails, marketing emails, or emails welcoming your new leads.
Stage 3: Close
After creating our Attract and Convert ads, it’s time to make our last one. This final ad is designed to close. We want it to retarget those who filled out the form but who haven’t gone from Facebook to our landing page.
For this ad, we’ll pick a website traffic ad. First, choose which of your HubSpot pages to send prospects to. When choosing, think about which of your landing pages is most likely to close. For example, this would be a good time to show a case study or some other type of social proof, like customer quotes. Previous ads might have given prospects our ebooks, or shown them helpful tips, so it’s a great time to seal the deal with hard-hitting social proof.
You’ll notice there’s no need to set up retargeting — Ad Sequences does that for you by retargeting prospects from the second stage. Set up your budget, start date, and close date. Just like before, you can end your ad after a certain amount of engagements occur or contacts are created.
And that’s it. Congratulations! By using HubSpot’s Ad Sequences, you’ve engaged in textbook Journey-Based Advertising to deliver contextual, appropriate ads to your customers. Through Ad Sequences, not only have you not annoyed your customers, you’ve actually helped them find the information they’re looking for. This leads to more conversions for your ads and more closed deals for your sales team, all while ensuring your marketing is delivered under budget and on-schedule.
Ad Sequences for Facebook is now in Public Beta and available to all Marketing Hub Pro & Enterprise users. And because we know you’re always looking to grow better, we're looking to expand Ad Sequences to even more networks in the coming months.
Check out this video to learn more about the Ad Sequence builder and ask your CSM about getting access to the beta today.