Deals are a great tool for tracking your opportunities, revenue sources, and most promising clients. But do you ever hit a wall with deals and can’t quite find a workaround to achieve your goals?

Here are three common deal-stumbling blocks that users might face at some point during their HubSpot lifespan, along with three tricks that’ll help you overcome those obstacles and maximize the full potential of your deals.
1. Reassign a Deactivated User’s Deal (and Contact and Company) Records
We recommend reassigning all CRM records before a user is removed. If you remove a user before reassigning the records, you’ll find yourself stuck with a bunch of contact, deal, and company records owned by a deactivated user. Now what?
If you have access to workflows, then you’re in luck. Simply create a list to pull in all contacts that are owned by the deactivated users, run that list through your workflow to change ownership, and you’re good to go! However, if you’re a HubSpot Sales/CRM user only, that’s not an option for you. Instead, you can use Trick #1.
Trick #1: Identify and reassign with filters
You can use filters to create a custom view that will pull in all contacts owned by a deactivated user. You can then reassign ownership in bulk.
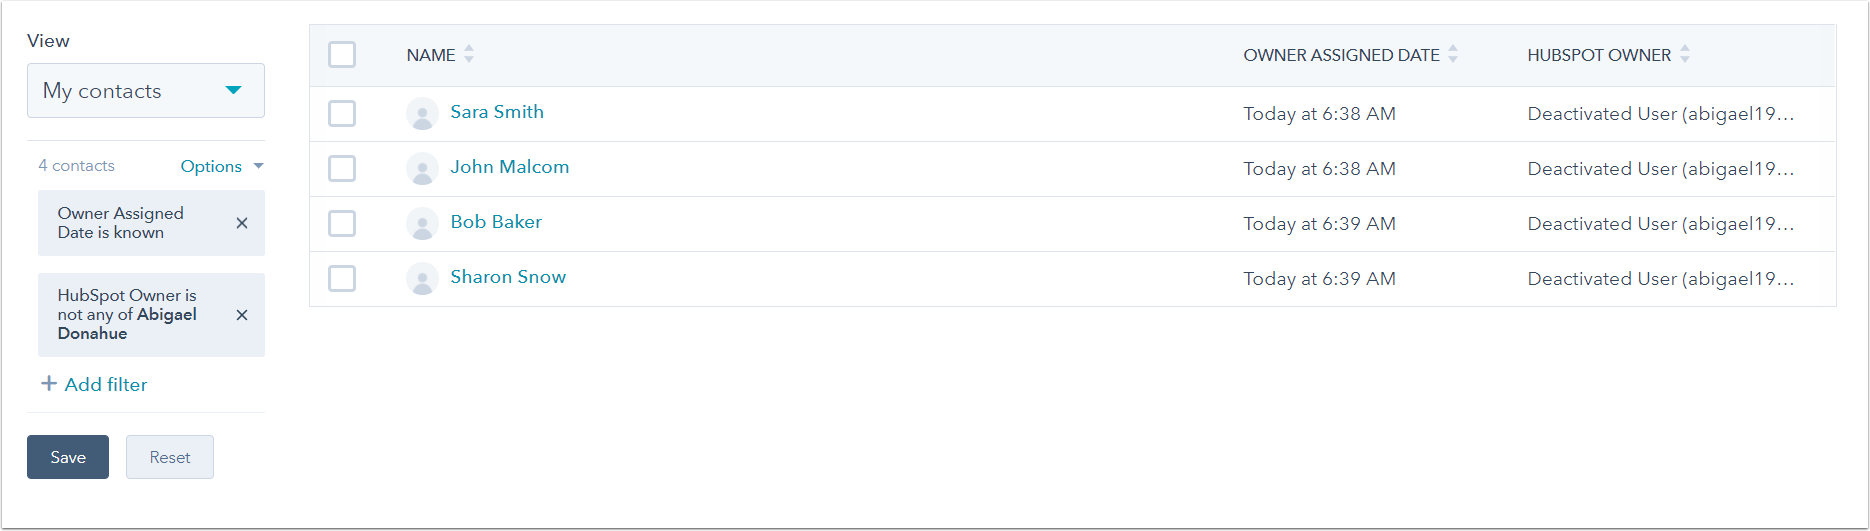
Navigate to Contacts and hit Add filter on the left. Your filters will be:
- Owner Assigned Date > is known
- HubSpot Owner > is not any of > [select all users in the portal]
After applying those filters, you'll be left with all contacts that have a known owner, but the owner is not any of the users in the portal. As a result, all of the deactivated user's contacts will appear.
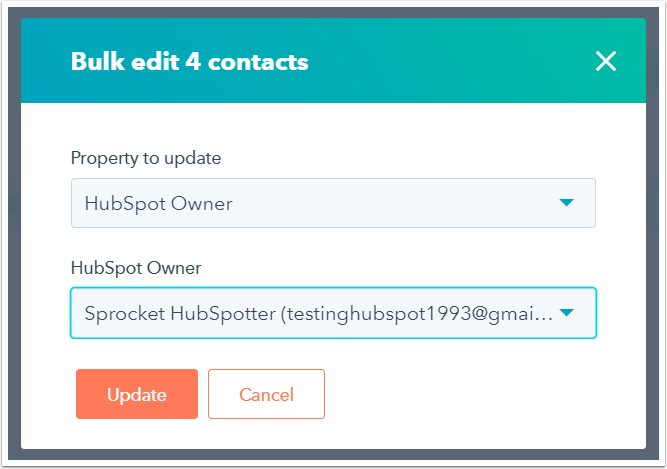
You can then bulk edit to reassign ownership:
- Select all the contacts in your view
- Hit Edit
- In the window that appears, your Property to update will be HubSpot Owner
- From the HubSpot Owner dropdown that appears, select a new user to own the contacts
- Click Update
Follow the same steps as above for companies and deals. This Academy article walks through reassigning ownership in a bit more detail.
2. Report on the Date a Deal Entered a Deal Stage
The date which a deal enters a specific stage in your pipeline can provide insight into how your deals are moving along the funnel, when they're getting stagnant, and where more attention is needed in your pipeline.
The date a deal enters a stage is stored in the history of the Deal Stage property for each deal, but since it is not saved as a property itself, that data can't be pulled into your sales view. However, to report on this data, you can store this information as a custom deal property. In comes Trick #2.
Trick #2: Create a custom deal property to track deals moving into specific stages
Create a custom deal property for each deal stage. For example, if you have four stages in your pipeline (New, Meeting Booked, Presentation Scheduled, and Closed), then you will create four deal properties (Date Entered New, Date Entered Meeting Booked, Date Entered Presentation Scheduled, and Date Entered Closed). To create a custom property:
- Navigate to Settings (beside Sales Tools)
- On the left, click Properties
- Select the Deal properties tab
- Click Create a property

In the sidebar that appears, fill in your deal property's details and select Date picker for the Field type.
Now you have four new properties, one for each of your deal stages. Every time you move a deal to another stage, record the date in the corresponding custom deal property. Then you can create views and reports based on the date a deal entered a specific stage.
For example, the instructions below walk through how to create a view based on the date that deals entered the Appointment Scheduled deal stage:
- Navigate to Deals
- Select Add filter on the left
- Select Date Entered Appointment Scheduled > is between > 05/01/2017 and 08/01/2017 (doing so will pull up all deals that entered the Appointment Scheduled deal stage within that date range)

You can save this view and share it with your team.
Pro tip: If you're using the Reporting Add-on, select Options > Create report from view to create a reporting widget that can be added to your dashboard.
3. Ensure Deals are Created with an Associated Contact and Company
If you have multiple users in your portal creating deals, deal records could be added without any associated contacts or companies. While you can set required fields for creating deals, there's currently no way to require an associated contact or company record. Deals without any associations can leave you with guesswork and a messy CRM to sift through. Prevent a mess with Trick #3.
Trick #3: Create mandatory custom deal properties for associating contact and company records
Create two custom deal properties entitled "Associated Contact?" and "Associated Company?," making each one a single checkbox. Make those properties mandatory for deal creation. They'll serve as a reminder for users to associate their deals with a contact and company record when necessary.
- Follow the steps in the first section of this post to create a custom deal property
- Create two single checkbox properties: Associated Contact? and Associated Company?
Once the properties are created, make them mandatory for deal creation:
- Navigate to Settings and select Sales > Deals on the left
- Click Manage beside Set the properties your team sees when creating deals

In the window that appears, search for your "Associated Contact?" and "Associated Company?" properties on the left. Select them and make them required by clicking the checkbox on the right in the Required column.

With these properties required, each time a user creates a deal, they will need to select either Yes or No for both properties.

This will serve as a reminder for users to associate a contact and a company record to their deals when needed.
With the three tricks above, you can rest easy after deleting a user too soon, maximize your deal reporting capabilities, and keep your CRM streamlined with mandatory association properties.
Have any deal tricks of your own? Let us know in the comments!

![Troubleshooting Guide for Email Design Issues [Support Series]](https://53.fs1.hubspotusercontent-na1.net/hubfs/53/Hand%20typing%20on%20keyboard%20with%20digital%20tech%20icons%20and%20symbols-1.jpeg)
![3 Service-focused Workflows to Empower Your Support Team [Support Series]](https://53.fs1.hubspotusercontent-na1.net/hubfs/53/service%20button.jpeg)
![How to Add Your Branding to a Marketplace Template [Support Series]](https://53.fs1.hubspotusercontent-na1.net/hubfs/53/Support/Support%20Series%20User%20Blog%20folder%20copy%202.png)
![Creating a Custom Date-Based Property Report [Support Series]](https://53.fs1.hubspotusercontent-na1.net/hubfs/53/Support/HubSpot%20Support%20Series%20Horizontal-603978-edited.png)
![How to Update an Incorrect PDF Title [Support Series]](https://53.fs1.hubspotusercontent-na1.net/hubfs/53/HubSpot%20User%20Blog/Photo%20editors%20using%20laptop%20in%20meeting%20room%20at%20office-1.jpeg)