HubSpot is a global business working with companies located all over the world, often working in different languages. It comes as no surprise that many HubSpot users have more than one blog, differentiating by language, to serve the various audiences they market their products and services to.

Creating multi-language blog content in HubSpot's CMS looks something like this:
- You create a blog post on your primary HubSpot blog.
- You copy, translate, and paste that post into your secondary HubSpot blog to provide those audiences with that content in their intended language.
The downside?
The post is “new” in the secondary or additional blogs, so the SEO value is at a disadvantage. Not to mention, this process requires some extra manual entry.
Multi-language blog functionality has been a highly requested feature for HubSpot’s global customers for quite some time. We HubSpotters developed a solution.
Before we get started, please note that this article is for experienced developers who are familar with JS and HubL. If you need support or have questions about the steps in this article, please reach out to the HubSpot Developers Forum.
The Language Switcher Module
James Cutler on HubSpot’s Technical Services team has made this process a little easier by creating a blog language switcher module.
You’re probably wondering what this is.
This module allows for multi-language blog functionality, similar to managing multi-language content in CMS Hub for your website and landing pages. Using custom HubL and JavaScript programming, this module is intended for users who post blogs in multiple languages. Additionally, this language switcher module helps you generate SEO value in your secondary blog and other blogs you’ve created.
The benefits of this module are twofold:
- Enhanced SEO: This module enhances the SEO value on the posts that are tied to the module. As a result, you can publish your blog posts using URLs specific to the post’s language, without devaluing the SEO credit you may have lost. Search engines are better able to deliver the correct translation to the blog post reader, matching the language they have set in their browser. More information on that specific attribute, or the hreflang tag, can be found here.
- Easy integration for flexibility: The second benefit of this module is that it integrates with your existing HubSpot language switcher module. With this flexibility, you can have any work you’ve created in terms of CSS styling for your HubSpot pages applied simultaneously.
Sounds great, right?
While this module has some nice benefits, let’s take a step back for a moment to cover what this module can and cannot do:
1. Out with the old, in with the new
Those who wish to use this module must be using the new design manager (the version released after February 2018). This is because custom modules built in the new design manager are not supported for use in the old design manager (the one that existed before February 2018).
2. No language-specific topics
Blog translations will exist as different blog objects within the HubSpot blog tool. So if you’re using language-specific topics, the custom module will not be able to directly translate that current listing because it won’t have a second or alternative listing(s) to translate to. The default behavior of the module is therefore to direct the translation link on the blog topic listing to the blog homepage for that language.
3. Language abbreviation
Your language abbreviation must be the first part of your subdirectory for each blog URL. For example, if you have a blog with the URL www.yourwebsite.com/blog, a French version of this blog should read www.yourwebsite.com/fr/blog so that the the module locates the translated post as you’re posting. Your primary or chosen language can be set without the subdirectory needed.
4. Crunch the numbers
The manual linking required from this module to all of a particular post’s translations can amount to a significant amount of work, depending on how many blog posts and languages you’re working with. So make sure to get an idea of the manual work you’ll need to do.
To equate the number of translations needed from your languages into blog posts can be calculated with the equation (n-1)2, where n is the number of languages you blog. For example, if you blog in 4 languages, you’ll need to provide 9 translations [(4-1)2]. The retroactive action of applying the translation links to each of your posts will take time, so be aware of the commitment in advance.
Setting Up the Module
Time to get started!
If you’re new to building modules in your HubSpot design manager, check out this article on getting started with modules.
This blog language switcher module integrates with HubSpot’s default language switcher module. If you’re not already using the default language switcher module to translate your website, you’ll need to add it to your blog template wherever you want the blog language switcher links to appear.
But hold up. There’s actually a caveat with this step: The default language switcher module is only built for use on page templates — HubSpot’s multi-language feature is only for pages. The solution here is to add the default language switcher module to your global header or footer. If that doesn’t align with your design goals, then just clone the default language switcher module, and set the clone to be used on blog templates.
Once you’ve built the blog language switcher module, add it to your template just above your global footer. Do not add the blog language switcher module inside a global group, as this will prevent you from translating your posts.
Adding Functionality to the Module
The following section outlines exactly what you need to add to the module in order for it to function.
Add the following fields to your newly created module:
1. Primary Language
Type: Text
Required HubL variable name: primary_language
Options:
- Help Text: For the blog in your website's primary language, enter the blog root URL and the language abbreviation, separated by a comma. Example: www.englishdomain.com/blog , en
- Prevent editing in content editors: Enabled
2. Blog Languages
Type: Text
Required HubL variable name: blog_languages
Options:
- Default text: http://www.domain.com/blog | lang_prefix : Module not configured
- Prevent editing in content editors: Enabled
- Help text: Enter the languages as a comma-separated list of blogRootURL|LanguagePrefix:LanguageName. This field is the module's reference for which translations will show in the language switcher menu on the live page. Links in the language switcher menu will show in the order they’re set within this field.
3. Translate Posts
Type: Boolean
Required HubL variable name: translate_posts
Options:
- Check by Default: Enabled
- Prevent editing in content editors: Enabled
- Help text: Check this for the ability to link posts to their associated translations. Leave this unchecked if you want the language menu items to point to your blog listing page for each language.
4. Field Group: Post Translations
Required HubL vairable name: post_translations
Field Group Options:
- Help text: Make sure there’s a published post at the translations you provide. If there’s no published post, the link you provide will lead to a page-not-found; adding a translation here will not automatically create a translated post.
- Display conditions enabled: translate_posts | is equal to | true
- Repeater options: Enabled
- Object sorting label: Translated Post Language
Fields in Group
4-1. Translated Post Language
Type: Choice
Required HubL Variable Name: translated_post_language
Options:
- Choices: Set the labels and values of all your different blog languages. These should correspond with the values you set in the Blog Languages field.
Example - Label: French, Value: fr - Make this field required: Enabled
4-2. Override Default Language Name
Type: Boolean
Required HubL Variable Name: override_default_language_name
Options:
- Help text: Check this if you want to set a custom language name on the live post. Note that this name is specific to this post only (does not apply to other translations), and will be seen only when the visitor is on this blog post.
4-3. Language Name
Type: Text
Required HubL Variable Name: language_name
Options:
- Help text: This field can be used as the language name to display (only applies to this blog post).
- Display conditions enabled:
post_translations.override_default_language_name | is equal to | true
4-4. Translated Post URL Path
Type: Text
Required HubL Variable Name: translated_post_url_path
Options:
- Default text: ‘/name_of_post’
- Help text: Enter the URL path of the translated blog post. For example, if the post you’re linking to is published at www.yourdomain.com/es/blog/name-of-post, you should enter ‘/name-of-post’ in this field.
- Make this field required: Enabled
Once you’re done adding all the fields to your module, the fields should be arranged as shown below:

HTML/HubL/CSS/JS within the module
Copy the code here and paste it into the HTML + HubL section of your module
Add the code here to the CSS section of your module. Do not add this code if you’ve already applied your own custom styling to the default language switcher module. The blog language switcher module has the same HTML classes/structure as HubSpot’s default language switcher module, so your current CSS styling should also be applied here.
Add the code here to the JavaScript section of your module.
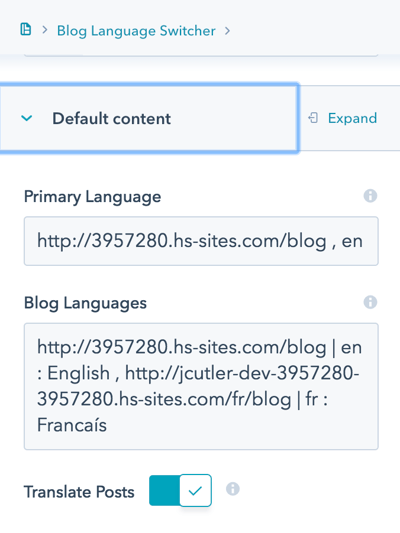
Once you’ve added the blog language switcher module to your template, click on the module to see its options. Set the default content for the fields Primary Language, Blog Languages, and Translate Posts, as seen below:
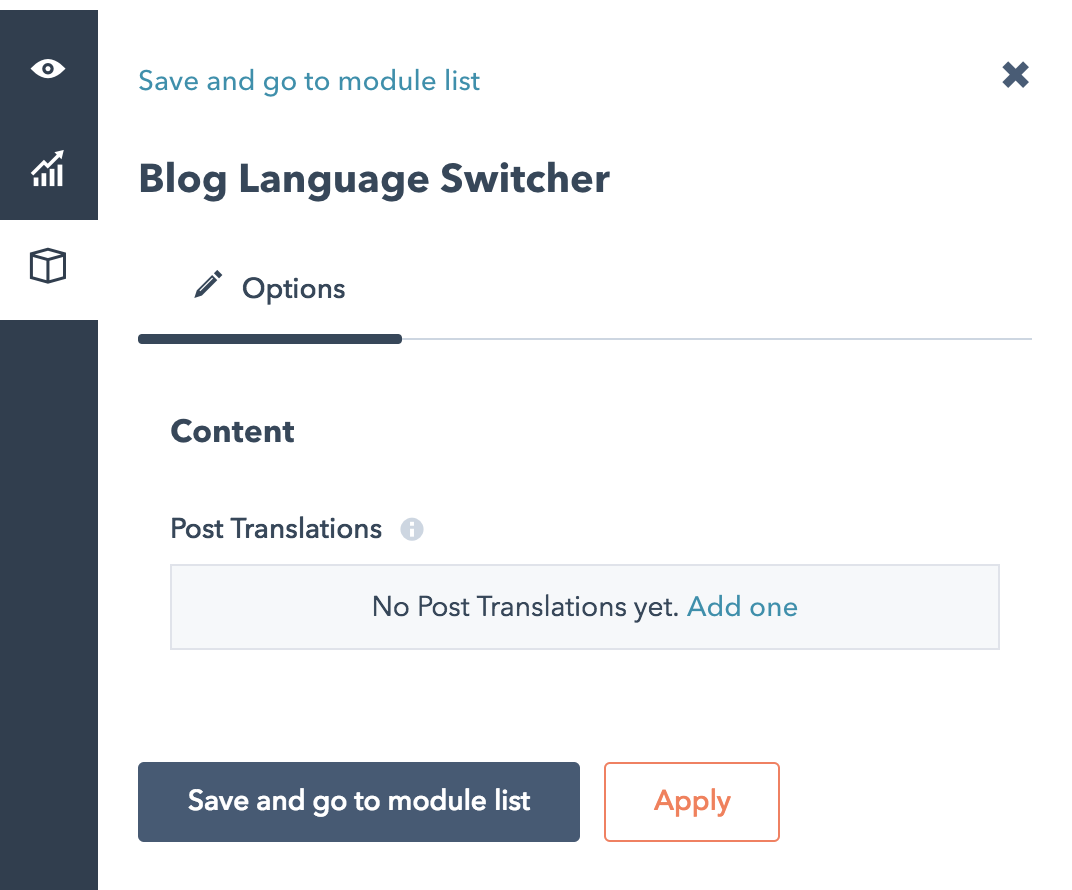
After publishing the changes to your template, your blog language switcher will automatically link your blog posts and blog listing pages to the blog homepages of each language listed in the Blog Languages field. To link your blog posts, the blog language switcher module is accessible in each of your posts:
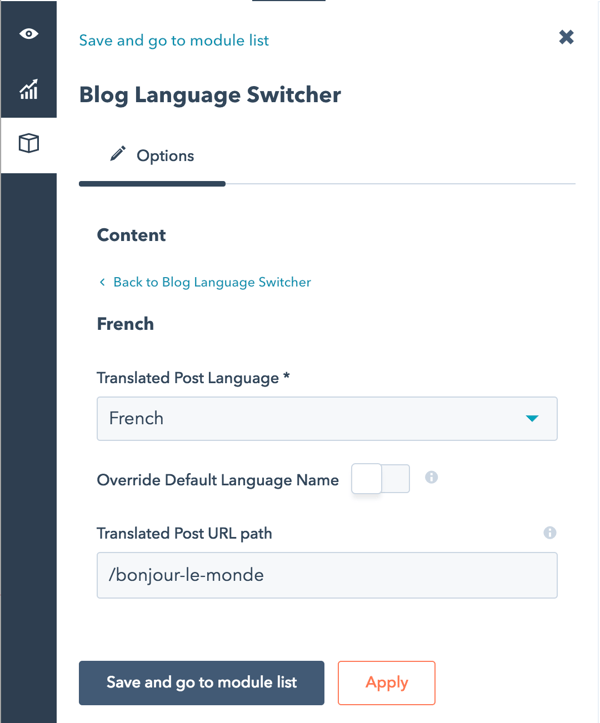
Add a translation link for each of your different language blog posts:
Final Thought
While this module isn’t a perfect solution for creating multi-language blog content, it’s a step in the right direction. Using the module, you’ll gain some flexibility and ease when posting content for your global audiences, expanding your brand awareness in multiple languages.
On top of that, this module exemplifies HubSpot’s commitment to incorporate more of these additions into the software to better serve our customers’ global audiences.