Webinars are a great tool to have in your marketing tool belt. They provide an opportunity to teach your leads and help them understand why your products or services are valuable.

As more businesses take their marketing and sales online, developing a webinar strategy can give your organization the ability to reach your audience no matter where you are.
These steps will walk you through how to run a webinar using HubSpot tools and the HubSpot ecosystem.

TIME TO COMPLETE: 6 HOURS OVER 3 WEEKS
Overview
How do you run an inbound webinar?
A webinar is a video presentation, seminar, lecture, or workshop delivered via the internet. They are typically live events, but can also be pre-recorded. All webinars should include an interactive element that allows viewers to participate, ask questions, make comments, or collaborate with the presenters and/or hosts.
Step One: Select a Goal
What is the goal of your webinar and how are you going to achieve it? Some ideas for your webinar could be to generate more leads, educate current customers on an offering or strategy that you are an expert in, or re-engage leads.
Set a SMART Goal
- Set a SMART goal for your webinar.
- Use this template to set the SMART goal for your webinar.
Step Two: Set the Buyer Persona for Your Webinar
With your SMART goal in mind, define the target audience (your buyer persona) that should be attending the webinar. This will be the audience that you market to and invite to the webinar with the goal of achieving your SMART goal.
Steps for setting a buyer persona:
- A buyer persona is a semi-fictional representation of your ideal customer. Identify which buyer persona(s) you would like to attend the webinar. The buyer persona you identified will guide all of your decisions in the following steps, so it's critical to have your persona clearly defined.
- It can also be helpful to decide on which lifecycle stages the webinar will be for — subscribers, leads, marketing qualified leads (MQL), and/or customers.
Want a refresher on how to utilize your buyer personas?
- Review how to create your buyer personas in HubSpot by checking out Using Buyer Personas in HubSpot on HubSpot Academy.
- Or make your persona here with the HubSpot Persona tool.
Step Three: Select the Software You Will Be Utilizing for Your Webinar
You will need access to software that enables you to host the webinar as well as promote it through your marketing channels. You can explore options for webinar hosting on the App Marketplace for Webinars.
In this example, we’ll use Zoom to illustrate the webinar set-up process in HubSpot. Zoom allows you to have group meetings up to 40 minutes, but anything longer requires a paid subscription, so keep in mind that the additional software may require you to have a paid subscription plan.
Steps to select a webinar software:
- Use Zoom to host your webinars that integrate into your HubSpot CRM.
- See Zoom webinar data on the timeline including if someone registered, attended, registered but did not attend, attendance duration, number of webinars attended, total webinars registered for, and average attendance duration. Use all this great data to segment lists based on your marketing needs.
- Promote your webinar utilizing the automation tools inside of HubSpot with Zoom.
- As a marketer, you want to make sure people who register for your webinar actually show up, right? Create a workflow in HubSpot that sends reminder emails to folks before the Zoom webinar. After the webinar, send follow-up emails to keep growing those meaningful relationships with your leads.
- Download Zoom Integration from the HubSpot App Marketplace and get started utilizing Zoom for your webinar.
- Watch an overview of how to use and set up Zoom.
Step Four: Outline Your Webinar
You might already have an idea of what you are covering in your webinar based on your target audience and the SMART goal you have set, but now it’s time to outline how you will be conducting your webinar and setting up the learning outcomes for your attendees.
Steps for outlining your webinar:
- Select a learning outcome for your webinar. What do you hope your attendees will walk away with? An example learning outcome could be that attendees will be able to create a landing page using Hubspot's free landing page tool.
- Make sure your learning outcome has an action verb in it (you can explore some of these verbs using Blooms Taxonomy).
- Using your learning outcome, begin to outline the rest of the webinar. Make sure to include the following:
- Stick to one major topic per webinar to avoid confusion and keep attendees engaged.
- Establish a format for the webinar (e.g. panel, FAQ, single or multi-presenter, demonstration, interview, or discussion).
- How much time do you need for each section.
- What each section will cover and how it relates back to your learning outcome.
- Clear activities and objectives for the interactive elements for your attendees.
- Time for questions.
- Selected follow-up resources that you can share.
- Create a short and long description for your webinar with the key learning outcomes and takeaways for a learning to help with your promotion assets.
- Select a date and time for your webinar and keep in mind the time zones of your potential attendees.
Step Five: Create Your Webinar and Prepare for Promotion
Now that you have your goal, the personas, the software, and your learning outcomes, you will build out the assets used to promote your webinar. The first step here is to create the webinar, so you can include the registration link in your promotional assets.
Note: Depending on the webinar software that you chose, the instructions may differ on how you get set up for promotion.
If you are using Zoom Webinar:
- Log in to your Webinars page and schedule a webinar with registration on. Read more about scheduling a webinar with registration.
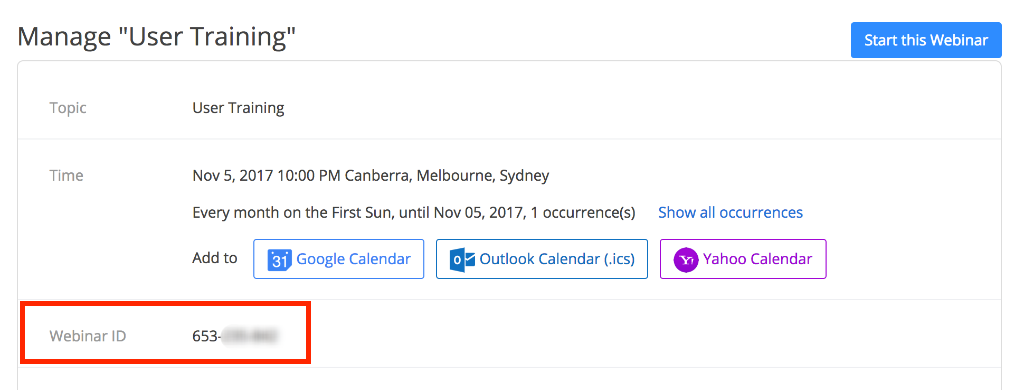
- Once you have scheduled your webinar, copy the Webinar ID (9 digit number) for use on a later step.
- Scroll down to the “Invite Attendees” section and click “Edit” on the right. Make sure “Automatically Approve” is selected. Once confirmed, click “Save All.”
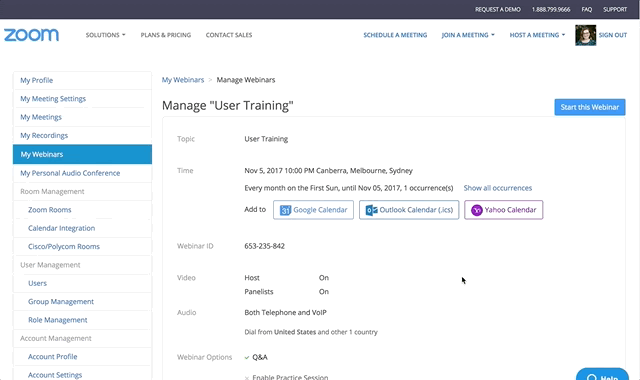
- Scroll down to “Email Settings,” click “Edit” next to “Confirmation Email to Registrants: Send Upon Registration.” Uncheck the option to “Send Confirmation Email to Registrants” and click “Save.” Note: If you do not want to automate emails from HubSpot and would prefer to have Zoom send the confirmation email, you can leave this setting as is.
Step Six: Create Your Registration Assets
There is a lot that goes into promoting your webinar. You will need a registration form, a landing page, thank you page, and an automated email to send out after your webinar is over. If you're using Zoom, you'll also need a workflow to connect your contacts to your Zoom registration.
Step 1: Write a description for your webinar that resonates with your buyer personas. You will use this for your landing page, email, and other assets.
Your description should include:
- The presenter of your webinar and their bio
- The goal or learning outcome of the webinar
- An agenda
Step 2: Create your registration form. Remember that depending on what webinar software you use, you may have to create that in their software not HubSpot.
Create a form to capture data on your attendees including email address and anything that might be of value to you. This form will be filled out, so that a visitor can initially register for your webinar, and after the fact, watch it on demand.
Tips for creating a registration form:
- Name the form something that will be easily recognizable.
- Keep in mind that the more perceived value your webinar has to the persona(s) you are focusing on, the more fields they will be willing to fill out.
Create a form in HubSpot.
Step 3: Create the landing page your visitors will land on when they are interested in attending your live webinar.
- Navigate to the Landing Page tool.
- Create a new landing page and select a landing page template that is similar to the one you used when creating your thank you page.
- Name the landing page and be sure it's consistent with your campaign name, webinar, and your thank you page name.
- Make note in the title that this landing page is for the live webinar.
- Include "Landing Page" or "LP" at the beginning of the name to keep things organized.
- Write a clear, action-oriented header at the top of the page.
- There should be no menu navigation or links on the page.
- Explain the webinar and its value in 1–5 sentences within the body of the landing page — use numbers, bullets, and bolding in the copy, and include a relevant image or graphic of the content offer or topic.
- Highlight the date and time.
- Include speaker bios and headshots.
- Select the registration form that you created previously.
- Select the live webinar thank you page as the page that a person will be redirected to after submitting the form.
- Tag the landing page with the campaign name that you created previously.
- Under the “Publish” tab, check the “Page Expiration” box.
- Select the thank you page to redirect the page to and enter in the start date and time of your webinar.
- Copy the landing page URL to use in a future step.
Create your HubSpot Landing Page or explore the instructions for creating a landing page.
Once someone has filled out the registration form, you can automatically add your contacts to Zoom registration via workflows.
Add your contacts from HubSpot to your Zoom webinar using a workflow action:
- In your HubSpot account, navigate to Automation > Workflows.
- Create a new workflow or hover over an existing workflow and click “Edit.”
- In the workflow editor, click the (+) plus icon to add a new action.
- In the right panel, select “Add contact to Zoom webinar.”
- Enter your Webinar ID, then click “Save.”
- Add any additional workflow actions.
- Click Review, then click Turn on to activate your workflow and add contacts to your webinar.
Note: The Webinar ID value must be formatted with hyphens, like in this example ID:123-456-789.
When a contact is added to a webinar, the contact property “Last registered Zoom webinar” will be updated with the URL of that webinar.
You can use this property as a personalization token in your emails, or segment contacts in a list by webinar URL.
For example, you could create a list using the criteria "The contact property Last registered Zoom webinar contains [webinar URL]" and create a list of all of your webinar registrants for that particular webinar.
Note: The “Last registered Zoom webinar” property is a single text field and will be overwritten if the contact is enrolled in another workflow that adds them to a Zoom webinar.
Registration Confirmation Email
You can also add an action to this workflow to send the attendee a registration confirmation email by creating automated emails.
Create a confirmation email in HubSpot.
Step 4: Create a thank you page.
Thank you pages are built in the Landing Pages tool. A thank you page will be the location your leads are sent to when the webinar is completed and the recording is available.
Steps for creating a thank you page in HubSpot:
- Navigate to the Landing Pages tool.
- Create a new page and select an appropriate thank you page template.
- Name the thank you page to be consistent with your campaign name and webinar.
- Include "Thank You" or "TYP" at the beginning of the page name to keep things organized.
- Write a clear, action-oriented header at the top of the page.
- Confirm that the navigation is showing on the page.
- Leave space for where you will embed the webinar recording after the live webinar takes place.
- Include social sharing options — they will default to the thank you page, so you'll want to go back and change this to the landing page that you'll create in a future step.
- Tag the thank you page with the campaign name that you created previously — this is found in the “Options” tab in the tool.
- Save the thank you page.
Step 5: Create a reminder email campaign (through HubSpot or webinar provider). Remind your attendees of their registration a week, a few days, and the day of to keep them engaged and excited about your upcoming content.
Step Seven: Create Promotion Assets
Set up your webinar campaign and use your registration assets to get people to sign up for your webinar. Notify your current website visitors, leads, and social media followers that you have a new webinar available that they can attend.
Step One: Identify which segment of your contact database will be most interested in attending the upcoming webinar. Create and send an email to them encouraging them to sign up.
Tips for creating an email:
- Create a new email and keep the name of the email consistent with your campaign name and content offer.
- Determine the “From Name” and “From Email Address” — make sure emails are sent from real people.
- Create your email subject — this will be the first thing your recipient sees, so make sure it grabs their attention and invites them in to read your email and engage with your content.
- When your email is complete, determine your send date and time within the “Sending” tab of the Email tool.
- Sending two invites to the same list with a 1–2 week period in between should increase registration without coming off as "spammy."
- If you want to increase your reach, consider sending the email to leads who might know or manage someone who should attend, even if they won't attend themselves.
Want to review what makes a great email?
Check out Creating High-Performing Email from HubSpot Academy.
Step Two: Write a blog article on a topic related to the webinar or that the webinar will cover. That way, when you include the call-to-action at the end of the post to promote the webinar, it will be a natural fit.
Consider repeating this two or three more times. You should have a few blog posts that cover the same topic to help promote your content offer. Schedule these blog posts at separate times and be sure to share them on social media.
Create a HubSpot blog post here.
Want to review what makes a great blog post?
Check out Blogging in HubSpot from HubSpot Academy.
Step Three: Draft and schedule social media posts to promote your webinar. Be sure to include links to the landing page and consider using a hashtag on Twitter.
A common mistake is to think that the social media promotion ends when the webinar does. Make the most of this offer by scheduling posts even months after your webinar campaign has ended. Be sure the posts link to a blog post or website page with a CTA to watch the webinar recording or that links directly to the webinar recording landing page.
Start publishing in HubSpot.
Want to review what makes a great social post?
Check out Social Media in HubSpot from HubSpot Academy.
Step Eight: Create and Practice Your Content
As attendees are getting registered, you will now focus on getting your webinar ready to be delivered.
Think through and organize what you will cover in your webinar by creating an outline. A hour-long webinar typically has three to seven agenda items, depending on the complexity of the topic selected.
Steps for creating a slide deck draft for your webinar:
- Use Microsoft PowerPoint or Google Slide to build your webinar deck.
- Use the slide deck to develop the outline of what you plan to cover, focusing on the text and organization of your thoughts — don't spend too much time on the design during this step.
- Organize the slides to tell a clear and engaging story aligned around your agenda items.
- Edit the text as needed to ensure the story flows from slide to slide and from one agenda item to the next.
- Add images to slides from sites such as Free Stock Photos, Skitter Photo, Travel Coffee Book, Magdeleine, Pexels, and public domain archive.
- Review your deck and re-organize slides as necessary.
- Figure out how you'd like to engage with your attendees
- Engage with your customers via the chat feature
- Start with an ice breaker question.
- Ask them to do activities and post responses in the chat.
- Use Zoom features to engage with your audience such as Zoom Polling.
You will need to practice your webinar and delivery as well as get the technology setup to execute your webinar.
- Select a microphone that you will use.
- Review the room and computer setup you will use.
- Identify a location that allows for minimal sound.
Step Ten: Deliver Your Webinar
You will need to deliver your webinar now. Get set up about one hour before the webinar's start time. You are bound to identify an issue during setup. An hour gives you plenty to time resolve most issues, including contacting your webinar platform provider if needed.
After setting up, ask team members to log in and watch the webinar. They will be able to give you feedback afterward on how you can continue to improve your facilitation skills.
Steps for executing the webinar:
- Start the webinar one hour prior to the start time.
- Dial in and check that the audio is working.
- Put yourself on mute.
- Double check that you are on mute.
- Have your presenter dial in no less than 30 minutes prior to the webinar start time.
- Check the audio again by unmuting yourself and asking anyone who has joined if they can hear you.
- Put yourself on mute again.
- Share your screen so the first slide appears, then pause the screen share — this will confirm to attendees they are in the right place at the right time.
Step Eleven: Follow Up and Continue to Nurture Your Attendees
Once the presentation is over, give attendees access to the webinar almost immediately by uploading it to the thank you page.
Steps for uploading the recording:
- Upload the recording to YouTube, Wistia, Vidyard, or Vimeo.
- Add the recording or video embed code to the thank you page you built previously.
- Publish the thank you page.
- Publish the landing page that you created to collect leads who want to view the recording.
Send a follow-up email to thank the attendees for attending and to provide them a way to review the recording.
Steps for creating an email for attendees:
- Navigate to the Email tool.
- Create a new email and keep the name of the email consistent with your campaign name and webinar topic.
- Add "attendee follow-up" to the name.
- Determine the “From Name” and “From Email Address” — make sure emails are sent from real people.
- Tag the email with the campaign name that you created previously.
- Create your email subject — this will be the first thing your recipient sees, so make sure it's clear that the webinar recording is included.
- Write a simple follow-up email thanking the attendees for attending the webinar.
- Provide a link to the recording on the thank you page you created previously.
- Import the list of attendees from your webinar platform into HubSpot — if you used the GoToWebinar integration, this list was automatically created.
- Set the email to send to the attendees list.
- Send a test email to review your email.
- Make any necessary changes.
- Send the email to the attendees.
Create an email in HubSpot.
Not everyone who signs up will be able to attend. Don't assume that the people who registered but didn't attend are uninterested or disengaged. Be sure to follow up with them with a way to view the recording.
Steps for emailing registrants a link to the recording:
- Navigate to the Email tool.
- Create a new email and keep the name of the email consistent with your campaign name and webinar topic.
- Add "registration follow-up" to the name.
- Determine the “From Name” and “From Email Address” — make sure emails are sent from real people.
- Tag the email with the campaign name that you created previously.
- Create your email subject — this will be the first thing your recipient sees, so make sure it's clear that the webinar recording is included.
- Write a simple follow-up email explaining that, even though these people didn't attend the webinar, they can still view the recording.
- Provide a link to the recording on the thank you page that you created previously.
- Import the list of attendees from your webinar platform into HubSpot.
- Set the email to send to the registrants list.
- Send a test email to review your email.
- Make any necessary changes.
- Send the email to the registrants.
Create an email in HubSpot.
Congratulations!
You have just created a webinar with HubSpot. What did you learn? What worked well? What didn’t?
Head over to the HubSpot Community to share your examples, learnings, and successes with other inbound members.