So you’ve got an idea for a great offer, but are still a little unsure how to navigate the process of delivering it to your prospects?

The best method when building a connective thread between a Call-to-Action, Landing Page, Thank You Page, and offer is to build everything backwards.
Think about it: if a Call-to-Action acts as a door to the buyer’s journey, it doesn’t make sense to build a door before building the rest of the house first. By starting at the end of the process -- the offer -- we are better able to link everything together and ensure our visitors are easily directed to our content.
In this post, we'll go through the four steps to making your offer live to your prospects and customers. Before we begin, a useful tip to keep all the steps organized in your portal is to use consistent names. This will make it easier to remember which items should be linked together.
1) Upload the Offer
Nobody knows your customers better than you. Once you’ve created a stellar piece of content your customers can’t refuse, it’s time to upload it to the File Manager. I often get questions about the best format to use when creating an offer: the answer is almost always PDF. What makes PDF files so great? They’re easily compressed (so they’re faster to download than bulky Word or Powerpoint files), easy to secure, and easy to create (you can just save your Powerpoint and Word files as PDFs!). If you’re looking for a quick and easy way to make a stand-out offer in PDF format, Canva is a great resource.
To upload your offer, first navigate to File Manager (Content > File Manager). Once you’re there, click on the blue “Upload files…” button in the upper right corner.

When your file is uploaded successfully you should see a message in the bottom right corner of your screen telling you that “[file name] was successfully uploaded.”
While you’re in File Manager, it’s also a good time to upload a preview image for your offer. Think of this like a cover page for your content, providing your visitors with an idea of what they’re getting when they hit that ‘download’ button. The simplest way to get a good preview image of your offer is to simply snap a screenshot of the first page of the PDF, and save it as an image (.jpeg, .png, etc.)
2) Build the Thank You Page
Now that the content is uploaded, it’s time to give it a home. The Thank You Page is where you will deliver the offer and direct your new contact to further content that will continue their journey through your site.
Make a new page by navigating to Content > Landing Pages (or to Content > Site Pages), and click on the big blue “Create a new page” button in the upper right. Pick a template (we want one with a navigation bar!), give it a name, and we’re ready to start adding content.
Wondering whether you should build your Thank You Page as a Landing Page or as a Site Page? This article can help.
First things first: we need to add a document link. A document link is a direct download link to your offer. In your rich text editor, type up a simple message that prompts your visitor to download the offer. Highlight the text that you want to be a download link (e.g. “click here to download!”). From the “Insert” menu in the rich text editor, click on “Document Link”:
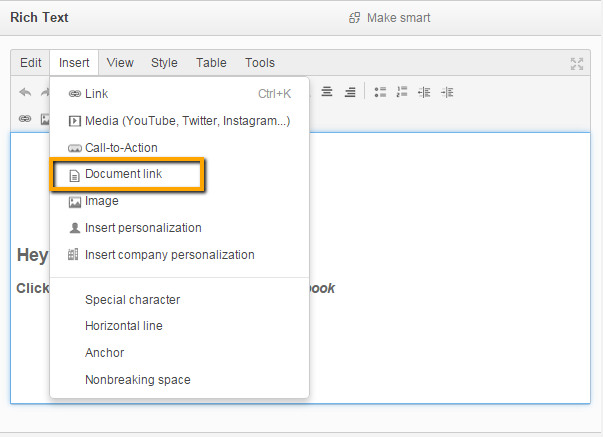
A box will pop up with all the files you’ve uploaded to HubSpot. Find your .PDF file, click on it to select, and then click “Use Document”. Now, anyone who clicks on your link will start immediately downloading your offer.
Once your download link is good to go, it’s time to flesh out the Thank You Page. Here are three pro tips to make your Thank You Page shine:
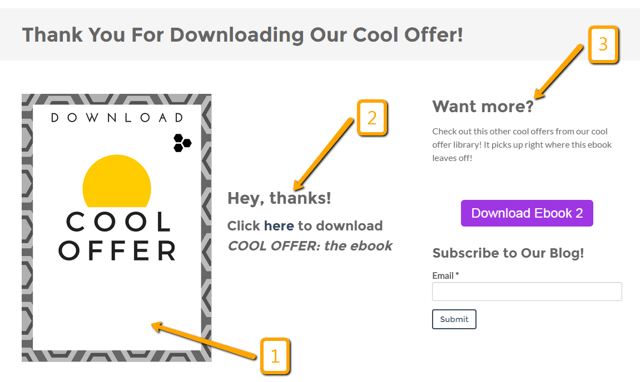
- Let them judge the book by its cover: Your customer wants to know what they’re downloading, so remember to add in the preview image of your PDF we uploaded earlier.
- Clear download link: The main objective of a Thank You Page is to deliver the offer, so make sure that your download link takes center stage here. Include a simple, brief message that directs them to download the offer.
- Keep the ball rolling: Devote a section of your Thank You Page to related offers and content on your site. Don’t go overboard here - think carefully about where the visitor downloading this offer lies in the buyer’s journey, and offer suggestions that will move them along to the appropriate next phase.
You can learn more about the anatomy of a Thank You Page from this knowledge article.
Make sure to click “Publish” (not just “Save”) in the page editor after you’ve put the finishing touches on your brand new Thank You Page. We need the page to be published so we can link to it in the next step!
3) Create the Landing Page
Once we have our Thank You Page set up, the next step is to create a Landing Page. The Landing Page should be simple, with no distractions, so the visitor knows exactly how to reach the piece of content they’ve been promised.
First things first: we need to make sure that our Landing Page has a form. The form is where the visitor will share some valuable information with you in exchange for your offer.
You can build a form by navigating to Contacts > Forms.

Here are a few things to remember when building a form for a Landing Page:
- Required fields: Clicking the asterisk to the right of each form field will make that field required. Visitors will have to fill out this field in order to submit the form.
- Consider the smart field: If your offer lies later in the buyer’s journey and you expect that the people filling out this form are already contacts in your database, consider adding some smart fields. Smart fields will only appear on the form to visitors who have not yet given you that particular piece of information. For a deep dive on smart fields, check out this knowledge article.
- Always Include Email: The only required field for contacts on HubSpot is email address. Each unique email address = one unique contact profile. By making email a required field, you ensure that anyone submitting the form becomes a contact in your database.
Once the form is built, we’re ready to build your Landing Page.
Navigate to Content > Landing Pages and create a new page. Your Landing Page template shouldn’t have a navigation bar, so all the focus is placed on the offer. Also important to remember is that your Landing Page template needs to include a form module (for a refresher on adding a form module to a Landing Page template, check out this knowledge article.)

Once you’ve got a fresh Landing Page with a place for a form, it’s time to connect our form to our Thank You Page in the Landing Page editor. We want anyone who fills out the form to be redirected to the Thank You Page.
- Select the form we just created from this dropdown menu.
- Select “Redirect to another page.” In the dropdown menu directly below (“select a page or enter an external URL”) and find your Thank You Page. Not seeing your Thank You Page? Make sure it is published! Unpublished pages will not show up in the dropdown menu.
- Want to be informed via email whenever someone fills out this form? Check the box for “Form submission notifications” and enter the email addresses you want to be notified. It’s important to note that you can also set up form submission notifications on the form itself in the form editor.
- You can also directly add anyone who submits this form to a workflow, or send them a follow-up email.
4. Design Your Call-to-Action
The Call-to-Action (or CTA, as we call it around here), is the button that a visitor clicks to visit a Landing Page. CTAs have all sorts of cool tracking features that give you a ton of valuable info on your prospects and leads. They are also the first gateway to the buyer’s journey, and therefore our last step when building out an offer.
The most important element of a CTA is that it links to the right place. We want our CTA to draw our prospect in, entice them to click, and transport our new friend over to the Landing Page.
Once you’ve created your CTA (by navigating to Content > Calls-to-Action and clicking on “Create a CTA” in the upper-right corner), we can link it directly to our Landing Page.
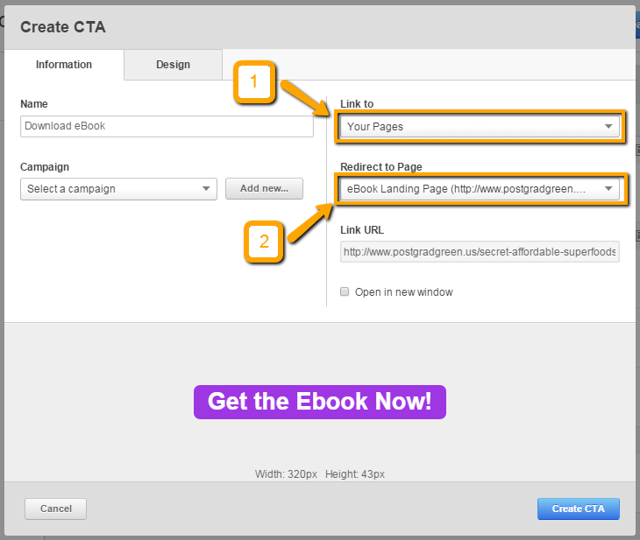
- Set “Link to” to “Your Pages”
- In the dropdown that appears below, “Redirect to Page,” you can select from a list of your pages to find the name of your Landing Page. Not seeing your Landing Page? Double-check that it is published (not just “saved”). Only published pages will be available for selection here.
And that’s it, folks! We’ve successfully created a path to lead prospects to our offer. All that’s left is to place the CTA on our site for visitors to discover.
What's your process for getting your content offers out into the world? Let us know in the comments!
![How to Size Images for Your Blog Content [HubSpot Support Series]](https://www.hubspot.com/hubfs/375_Size%20Images.png)
![3 Service-focused Workflows to Empower Your Support Team [Support Series]](https://53.fs1.hubspotusercontent-na1.net/hubfs/53/service%20button.jpeg)
![How to Add Your Branding to a Marketplace Template [Support Series]](https://53.fs1.hubspotusercontent-na1.net/hubfs/53/Support/Support%20Series%20User%20Blog%20folder%20copy%202.png)
![Creating a Custom Date-Based Property Report [Support Series]](https://53.fs1.hubspotusercontent-na1.net/hubfs/53/Support/HubSpot%20Support%20Series%20Horizontal-603978-edited.png)
![Advanced Troubleshooting: The Network Tab [Support Series]](https://53.fs1.hubspotusercontent-na1.net/hubfs/53/HubSpot%20User%20Blog/HubSpot%20Support%20Series%20Horizontal.png)
