It’s no secret that engaging content is essential to attract potential customers and capture their attention. Yet, when you use mediums like ebooks, infographics, blogs, or other types of written content, too many questions go unanswered.

Has your lead actually even read your content yet? If so, did they read the whole thing? Was there a specific section that caught their attention more than others? These are important questions that could give you priceless insight into your audience and the effectiveness of your content.
So how can you gather this valuable information to execute a successful marketing strategy? Here’s the short answer: with a video workflow.
As you already know, videos are the most engaging type of content online. So, it isn’t so much a matter of if you should use them. Instead, the question you need to ask yourself is How can I use videos in the way that’s most effective for my business?
Well, hold on to your seat. We’re going to walk through the most effective ways you can use video content and Hubspot to create a killer video workflow that enhances the rest of your marketing.
Why Video?
Digital marketing being what it is today, chances are your business has already used video content of some kind. Maybe you have a customer story video on your website or an explainer video to show how your product or service can help your customers.
After all, video content is an amazing marketing tool, given our brain’s predisposition for visual stimulus over words. The average person retains 95% of a message when it’s watched, as opposed to only 10% when it’s just read.
However, while there’s a lot of talk about the benefits of video (and that’s cool), there’s not so much info about how you can use it to your benefit.
Through video content, you get to know what specific video your leads watched, how much time they spent watching, number of times they did so, and even which parts of a video they found most relevant.
These insights represent the holy grail of marketing research and customer behavior data. It grants you access to your leads’ patterns once they leave your website, and that’s precisely the kind of power you need to create a workflow that really works.
Let’s get to the nitty-gritty of your video workflow and how it all comes together.
Pro tip: Not all videos are created equally, and different types of video content will be more effective than others when trying to attract different kinds of leads at various stages of their buying process. Keep this in mind as you work on your own video workflow strategy.
HubSpot and Wistia Integration
The first step in our video workflow recipe will be integrating Wistia with HubSpot.
I’m currently using Wistia as my default private video hosting service because their video heat map shows me viewer interaction data on my videos.
The integration process is pretty straightforward, so I won’t go over it in this article. However, just in case you have any doubts on how to go about it, here’s an easy-to-follow detailed guide on how to integrate both platforms.
What about YouTube?
I know! I know… you’re probably making a quizzical face and asking yourself Shouldn’t I be hosting my videos on YouTube?
Personally, I use Wistia as a private hosting option for every video I have on my site. It gives me a lot of advantages as far as data analysis that I just can’t get from YouTube. That being said, any video content I produce, I also upload to my YouTube channel to achieve more exposure and build brand awareness for my company.
Best advice I can give you on this front: Use both.
Workflows have never been this easy!
Once you’ve integrated Wistia with your HubSpot account, you’ll be able to trigger specific actions and segment your audience based on a number of criteria: videos watched, percentage watched, forms filled, annotations clicked… just to name a few. This lets you take advantage of the full potential video content has to offer.
Now, with that in mind, let’s move on to the fun stuff: creating a workflow using video.
Making a Successful Workflow Using Video
Log in to HubSpot and in the main menu bar, select Automation > Workflows. In the upper right-hand corner, click Create workflow.
You’ll need to determine the purpose of the workflow first. What’s the goal? Why does it exist? What do you want to accomplish with it, and what will you do with the information you gather? If you need a bit of help figuring these things out, take a look at this article on workflow goals.
For example, a goal that I like to use is for when the lifecycle of a lead turns into MQL or even SQL. You get the picture. This way, I’m using the workflow to segment my leads and push them a bit further down the funnel.
Pro tip: Always keep in mind that every lead in your Hubspot database is at a different stage in their personal buyer’s journey. Some are closer to the purchase stage than others.
You should always try to make things as automated as possible. Using this workflow recipe helps me focus my attention on the leads that matter most.
Video enrollment triggers explained
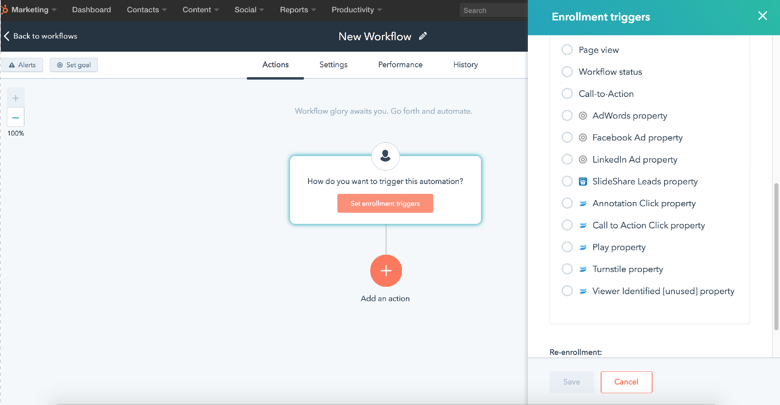
Click on Set enrollment triggers, and you’ll see a window to the right with a number of options. For now, let’s focus on the last ones which relate to video content:
● Annotation Click property: Making an annotation inside Wistia will create a short text with a hyperlink in the top-right corner of the video. When someone watches the video, the annotation appears without interrupting the viewer. The person gets to decide if they want to be directed to a new website for more information, which is a great tool to enhance a viewer’s learning phase. This option will set the trigger on the people who have clicked on the annotation on a specific video.
● Call-to-Action Click property: Creating new opportunities for deeper engagement, CTAs inside Wistia allow the viewer to take action as they’re watching the video. Basically, a screen pops up with a short text that links to a specific action you want your lead to perform. You might want to point them to a trial download or an assessment form. This option will set the trigger based on the people that have clicked on the CTA.
● Play property: This one’s the most common property you’ll be using, and it relates to the moment a person clicks on the video.
● Turnstile property: A turnstile is a form within Wistia. Activating this option refers to obtaining the data from that form. Also, you can use a form created in Hubspot, and embed it inside a video. This is a great tool to gather information and drive action right on the spot. This option will set the trigger on the people who have filled out a specific form inside a video.
Now, once you click on any of the options above, you’ll see a dropdown menu. Let’s go over each option quickly:
Event UUID: A universally unique ID for this instance of the event. You should only pay attention to the first instance.
Hook ID: The ID of the webhook used to transfer the info.
Media ID: Wistia ID for the media watched.
Media name: Name of the video/media watched.
Media URL: URL of the video/media watched.
Occurred: When the event occurred in Wistia. This is always in ISO-8601 format and always in UTC.
Percentage watch: How much of the media was watched.
Viewing session ID: Object containing the ID of the viewing session.
Visitor ID: Wistia ID for that specific visitor.
And that pretty much covers the basics! Now, let’s go through a couple of examples of what you can do using videos in your Hubspot workflow.
Example #1: Segmentation based on viewing behavior
For this first example, let’s segment our leads based on whether they have consumed our video content. If so, we’ll change their lifecycle from Lead to MQL.
First, we’ll set the trigger that will make the leads enter this workflow. Keep in mind, we’re going to focus on leads that have watched the video, but not only that, we’re also going to select a specific percentage of the video that has to have been watched as a trigger. Let’s get to it!
Click on the Set enrollment triggers button.
On the right you’ll see a new window with different options. Click Play property.
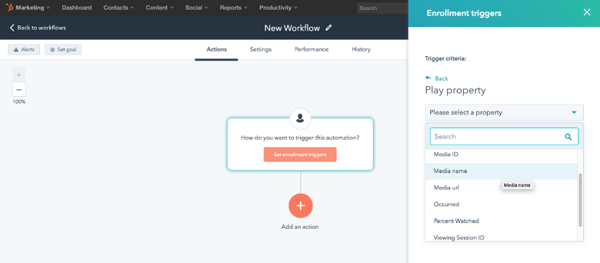
From the dropdown menu, select Media name. Click on Contains and write some relevant part of the title of your video below.
Pro tip: This option can also come handy if you have several videos with the same name since it will refer to all of them.

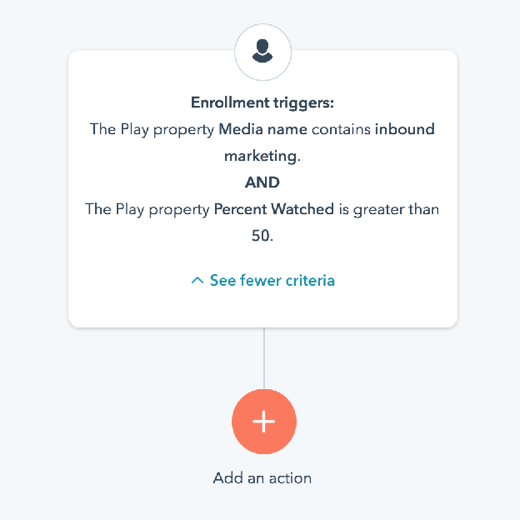
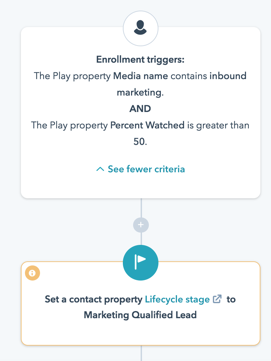
I wrote the word “Inbound marketing” because that’s part of the title of the video I want my leads to watch. By doing so, they’ll be entering this workflow. At the bottom, click Done.
Now click on AND to set a secondary property. Select the Play Property again.
From the dropdown menu select Percent Watched, click on is greater than, and write a number from 1 to 100. In this case, I wrote 50 so that once a viewer watches the first half of this particular video, they will enter this workflow. Now click Save.
It should look something like this:
Now that the enrollment triggers have been set, we need to add the action that will transform these leads into MQLs. And here’s how you do it:
Click on the Add an action button. In the right window panel, go to the option Contact properties. Then click on Set contact property value.
Select the option Lifecycle stage from the first box and Marketing Qualified Lead from the second box (or the option you prefer based on your own strategy).
Congrats! You’ve successfully segmented your leads based on their viewing behavior. From here on there are plenty of things you can try out based on who you’re targeting and why.
Are you after different types of buyer personas? Simple: Create videos that appeal to each group to boost your marketing efforts. Then use the tools we just went over to segregate the leads those videos will generate not only based on who they are and their interests, but also by their level of engagement with your content.
Pro tip: When you send emails or offers using workflows, make sure you add a small delay between the triggers and the actions you set them to. That way, you don’t come off as “too pushy.”
Example #2: Nurturing leads
For the second example, we’ll focus on the MQLs that have shown a strong interest in our company by watching any series of videos found on our site. We’ll entice them with other marketing actions.
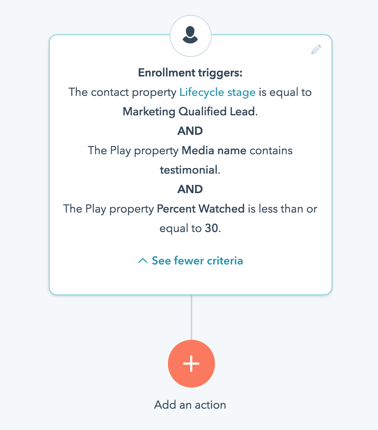
After clicking Set enrollment triggers, click Contact property and select the option Lifecycle Stage from the first box. Click on the option Equals to and select Marketing Qualified Lead.
With this setup, we’re making sure that the only people who enter our workflow are MQLs.
Click the AND button to include one extra trigger. Click the Play property and select Media name.
In this case, I wrote the word “testimonial” because I wanted to enroll the MQLs that have watched any of the five testimonial videos I have on my site. All of them have the word testimonial in the title, which is where that Media Name option pays off, since it includes all those videos by default. I also made it so the Play property is less than or equal to 30 percent.
Now I have an enrollment trigger set up that only reacts to the MQLs that have watched any of the five video testimonials up to 30% before including them in this workflow.
If you’ve been following along, your screen should look like this:
Once we have the enrollment triggers ready, we can focus on nurturing these MQLs, now that we know they are interested in learning more about our company. Here are some ideas of what you can send them at this stage:
- Case studies
- Other customer story videos to entice them to watch the rest
- Free trials
- Demo offer
- Assessment call
- Product deep dives
- Special deals
Before You Go...
I know you’re probably eager to go start implementing these fantastic strategies into your marketing videos. But before you leave, I’d like to give you a final nugget of insight on this whole topic.
Video can play a crucial role in any successful marketing strategy, especially when it’s used alongside a marketing automation software as powerful and versatile as Hubspot. Both video content and platform fit together seamlessly. With this combo, you can not only capture new leads but also nurture them in each step of their buying process up until they’re ready to engage.
Implementing a workflow that has been optimized with video will increase your chances of attracting the right leads at the right time, every time. It has never been this easy!