But what if your goal is to reach audiences who are already prime to take action? With Google Discover ads, you can reach them – up to 3 billion of them to be exact.
Let's dive into what Google Discovery ads are, how they work, and how to set one up today.
Using customer intent signals, Google uses machine learning to determine when users are most likely to engage with a brand. According to Google, brands should use it to:
- Scale their conversions.
- Reach new customers.
- Reconnect with previous customers.
Another thing that sets Google Discovery ads apart from other campaigns is the limited campaign settings. Advertisers cannot adjust:
- Ad rotation
- Frequency capping
- Delivery method
- Device targeting
- Placement targeting
- Contextual targeting
- Manual bid strategies
This campaign type offers automated campaign settings for bidding and targeting so that advertisers can focus on optimizing campaign performance.
Discovery Ads vs. Display Ads
The key difference in these ads is who they're reaching and where.
Discovery ads reach those exhibiting high-intent behavior, as determined by Google's algorithms. For instance, they're great for ecommerce businesses looking to acquire new consumers and introduce their audiences to products and/or services.
Display ads, on the other hand, are not always meant to drive this type of action. In addition, display ads deliver ads in the Google Display Network whereas Discovery ads are only on Google feeds.
To launch a Discovery campaign, you first have to gather your creative assets, such as your copy, images, and logo. Next, you need a daily budget high enough to cover at least 10 times your target CPA bid.
Then, you'll need to enable sitewide tagging in your ad account along with conversion tracking. Lastly, you must review and ensure you comply with Google's personalized ad policies.
Once you've completed these key steps, you can start setting up your campaign.
Step 1: Set up a Google Discover ad campaign.
-
Sign in to your Google Ads account.
-
Click 'Campaigns' located on the left of the page menu.
-
Click the '+' button, then select 'New campaign.'
-
Choose your marketing objective.
-
Click on the 'Discovery campaign' type.
-
Select 'Continue.'
-
Pick your geographic and language targeting for this campaign.
-
Select your audiences.
-
You can choose between customer intent, your data (i.e. remarketing list), and in-market audiences.
-
-
Set your bidding strategy and average daily budget.
-
Click 'Save and continue.'
-
Click 'Save.'
After setting up your campaign, the next step is setting up your single-image ad and multi-image carousel ad.
Step 2: Upload your creative assets.
There are two formats available for Discovery campaigns: single-image ads and multi-image carousel ads.
For this campaign, you must upload multiple versions of some assets, as Google will create different combinations to optimize your campaigns, such as:
- Headlines – You must upload between three to five headlines up to 40 characters each.
- Description – You can have anywhere from one to five descriptions up to 90 characters.
- Business name, CTA, and Final URL – You can only have one of each.
- Images – You must have at least one landscape image, one square image, and a square logo, with a maximum file size of 5MB.
For additional information on asset requirements for Discovery ads, click here.
Here are the steps to upload your creative assets:
-
Log into your Google Ads account.
-
Click on "Campaigns" and select your Discovery campaign.
-
On the left page menu, click on "Ads & Extensions."
-
Click on the "+" icon then select "Discovery ad" or "Discovery Carousel ad."
-
Upload.
Step 3: Undergo the "Learning" period.
Once your campaign goes live, you must allow two weeks for Google Ads to optimize your bids.
During this time frame, you may see the label "Learning" next to your bid strategy status. This is an indication that you should avoid making any bidding changes and assess once that time expires.
Google Discovery Ad Examples
Gmail Feed
One place Discovery ads will show up is in Gmail. When you navigate to the "Promotions" or "Social" tabs, you may see ads like this:

Once you click on one of the ads, it will open up like an email and show details on the offer from the brand – as shown below.

YouTube Home Feed
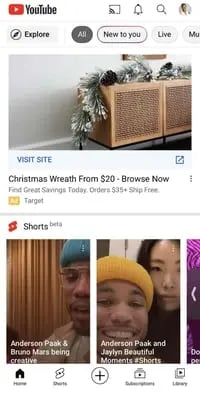
Another place you'll find Discovery ads is in the YouTube app.
As you scroll down the "Home" tab, you will likely see ads like these with the yellow "Ad" indicator.

Google App Discover
Have the Google app downloaded on your device? You may see Discovery ads if you have the "Discover" feature turned on.
The Discover feeds offers personalized content to users based on their web history, interests, and saved items. Here's an example of an ad on the app:

One thing to note about the Discover feed is that it's unavailable to consumers in Germany, Australia, and France. As a result, those consumers also won't see ads like these in their Google App.
Google Discovery Ads is Google's latest tool to help advertisers reach their target audience. As always, be sure to experiment and optimize your campaigns.
Google Ads


