Open Graph
Open graph is a protocol first created by Facebook in 2010 for extracting the title, images, URL, and meta-information from a webpage and displaying it in a social media post. Today, Facebook, Twitter, and LinkedIn all use open graph protocol to help publishers include more content on the front of their social media posts.
When you share a website or an article on Facebook or LinkedIn, or via Twitter Cards, you'll notice each of these social networks automatically pulls in a few pieces of information into your social post: the website's title, an image, the URL, and a short description. This is made possible using each social network's open graph protocol.
LinkedIn has since adopted the same protocol Facebook originally developed, while Twitter uses its own open graph system that's based on the same conventions -- although Twitter accommodates the Open Graph protocol if you already have it on your site. Also note that Twitter only automatically pulls in information from a link when you use Twitter Cards -- not for regular tweets.
How to Use Open Graph Protocol
Marketers need open graph (OG) protocol if they want to post better-looking content on social media. But where does each social network find that information? That's where open graph tags come in. When you put OG tags in the head section of a webpage, social networks have a much easier time finding the correct information for each part of the social post.
Open Graph Tags
Open graph tags are the specific pieces of information that publishers can insert into their webpages so social networks know which site attributes to pull into the social media post. Some CMS's include meta tags automatically, while other websites need you to add them manually through the page's HTML.
If your webpage doesn't have OG tags in the code, they'll take a guess on where to find the right information. Usually they'll do OK with the title, URL, and description, but they might have trouble picking the right image. OG image tags tell social networks exactly which image to pull.
If you plan to use certain webpages or blog posts in your social media posts, there are few OG tags you'll include most often in each page: one for the webpage title, one for the image you want displayed, one for the URL of the webpage, and one for a one- to two-sentence meta description that describes the page. Here's what they all look like below, with placeholder text in all caps denoting where you'd customize the content of each tag to reflect what you want the social media post to display.
- <meta property="og:title" content="TITLE OF PAGE" />
- <meta property="og:image" content="URL OF IMAGE ONLY" />
- <meta property="og:url" content="URL OF WEBPAGE" />
- <meta property="og:description" content="DESCRIPTION OF PAGE" />
See that "og: ... " text describing the meta property of each line above? The text that comes after it is the tag category of the OG tag, telling the social network you're posting to what type of content to look for on your webpage. For example, the first one says "og:title" because this tag dictates the title of the webpage you want to appear at the top of your social media post. Posting a blog article? The OG title tag will probably be the title of your article.
Depending on the type of media you're posting -- image, video, infographic, or just text -- you might find a need for other OG tags as well to further customize the OG that appears on your social media feed once you post your content. Here are a few of them:
- "og:image:width" -- This OG tag is nested within the image tag, allowing you to define the specific width of your feature image in your social media post.
- "og:image:height" -- This tag is nested within the image tag, allowing you to define the specific height of your feature image. We'll talk more about recommended image sizes for each social network in the next section.
- "og:article" -- This tag lets the social network know your post is an article, and there are several other tags you can nest inside this one to further promote the article in your social media post.
- "og:article:author" -- This tag is nested within the article tag, allowing you to promote the author (or the byline) of the article in your social media post.
- "og:audio" -- This tag allows you to promote and describe a playable audio file in your social media post.
- "og:video" -- This tag allows you to promote and describe a playable video in your social media post.
- "og:video:series" -- This tag is nested within the video tag, allowing you to promote and define a video series if your video belongs to a larger video campaign.
The list goes on for the OG tag categories available to you. Blog, game, city, book, company, hotel, and country are all categories of OG tags you can use to customize your Facebook, Twitter, and LinkedIn posts to best represent the content you're serving to your audience.
Open Graph Image Size
Although your images look similar when posted to Facebook, Twitter, and LinkedIn, each social network's open graph protocol has its own minimum image size requirements. Facebook, for example, recommends using images that are 1200 x 630.
Good news for HubSpot and WordPress users: If you use HubSpot for blogging, your social networks will pull in the featured image automatically -- just make sure you designate a featured image in each of your blog posts. (Pro tip: Try uploading your featured images to the COS as at least 610 pixels wide, which ends up looking better on Facebook, Twitter, and LinkedIn. Although LinkedIn's photo dimensions ask for a small image, the COS should resize it automatically.)
If you use WordPress, you'll need to install this plugin or one like it, but then you'll be set to go.
Ultimately, this post is for you if you don't use a content management system (CMS), as you'll need to do it manually for each page on your site. We'll show you step-by-step instructions for how to manually optimize images for social posting on the top three social networks for sharing content: Facebook, LinkedIn, and Twitter.
Facebook Open Graph
Here's what a Facebook link post looks like:
To ensure Facebook pulls the right image from your blog post into your Facebook posts, you'll need to first optimize the image size for Facebook and then add the proper OG tags to your website.
Optimizing the Image Size for Facebook Open Graph
Required: Facebook requires you to use an image that's at least 200 x 200 pixels.
Suggested: Although 200 x 200 is the absolute minimum, Facebook advises using an image that's at least 600 x 314 pixels. For the best display on high-resolution devices, the company suggests choosing an image that's at least 1200 x 630 pixels.
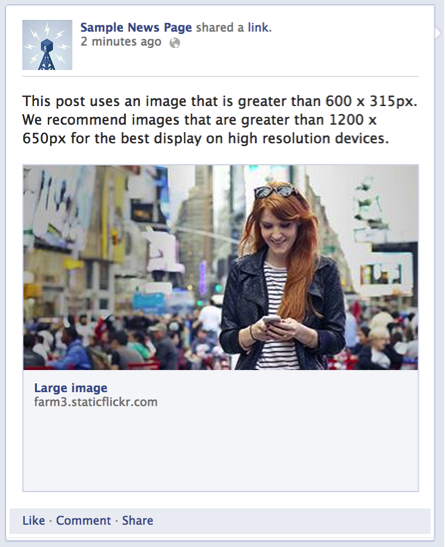
Image Credit: Facebook
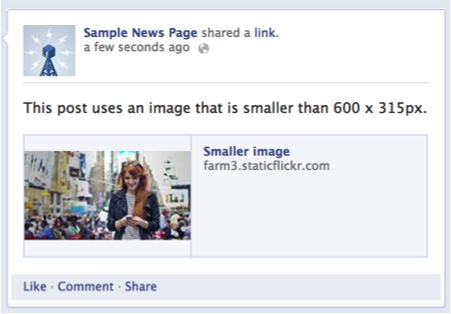
If your image is smaller than 600 x 314 pixels, it'll still display in your post, but appear as a thumbnail-sized picture. So, if your images carry a lot of important detail that would be lost in such a small frame, it's best to set your OG image tags to 1200 x 630.
Adding the Open Graph Tags
If your page is static and you don't use a Content Hub, you'll need to manually add OG tags to each of the pages your blog posts are on. The tags are meta data, so you need to add them to the head section of the page your blog post is on. (If you don't manage the code on your site, you'll need to ask your web developer for help.)
1. Copy the meta tags below.
<meta property=“og:image” content=“http://example.com/picture.jpg ” />
<meta property="og:image:width" content="1200" />
<meta property="og:image:height" content="630" />
2. Replace the placeholder text with your selected image's URL.
Next, remove the sample image URL above, highlighted in red, with the actual URL of your image. Do the same with the height and width numbers, highlighted in green, replacing them with the correct dimensions of your image. Keep in mind Facebook's image size requirements.
3. Copy the resulting code snippet into the HTML head section of your page.
Once you've filled in the code in step 1 with your own content's image URL and dimensions, open the source code (often denoted with this icon: "<>") and paste it into the top of the page's HTML.
4. Enter previously shared webpages into Facebook's Sharing Debugger.
(Don't worry about this step if the webpage you're working on has never been published before.)
If you've previously published this webpage without tags, or if you publish the page and then realize you messed the tags up and need to adjust them, you'll need to run the URL through Facebook's debugger once you make any changes. This is because Facebook caches its shared pages -- so if you don't refresh the cache, the thumbnail won't be corrected.
That's it! Now, when you post a link to your article to Facebook, the Open Graph Protocol will read the OG:image tag and display the image you point it to. (Learn more about OG tags for titles, descriptions, and more on the Facebook dev blog.)
LinkedIn Open Graph
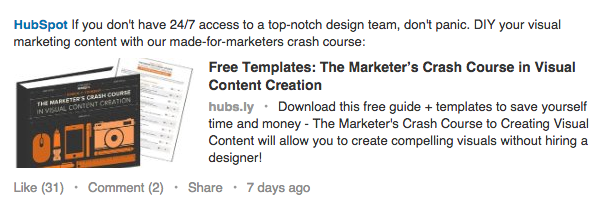
Like Facebook, LinkedIn also uses the open graph protocol. So, when you share a link with your LinkedIn network, LinkedIn scrapes the article for a title, images, and a URL, and then uses that information to fill our your LinkedIn post. (While they don't explicitly say they scrape for a meta description, their algorithm does pull this in as well.) Here's an example of a LinkedIn post by HubSpot with a meta description shown underneath the page title:
To ensure LinkedIn pulls the right image from your post to use as a thumbnail, you'll need to optimize that image's size and then add the proper OG tags to your website, much in the same way as you did for Facebook.
Optimizing the Image Size for LinkedIn Open Graph
Required: LinkedIn requires thumbnail images to be at least 80 x 150 pixels but no larger than 80 x 110. If your image doesn't meet these requirements, LinkedIn will automatically pull in an different image on your page that fits the right dimensions.
Recommended: LinkedIn's sharing module has the ability to promote wide, rectangular images, which can increase your post's clickthrough rate over a 80 x 150 thumbnail. To share an image like this, the company advises using an image that is 1200 x 627, and as close to a 1:91:1 aspect ratio as you can (i.e. rectangular, rather than square).
Adding the Open Graph Tags
Just like on Facebook, if your page is static and you don't use a content management system (CMS) like HubSpot, you'll need to manually add OG tags to each of the pages your blog posts are on. The tags are meta data, so you need to add them to the head section of the page your blog post is on. (Again, if you don't have control over the code on your website, you'll need to ask your web developer for help.)
1. Copy the meta tags below.
<meta property=“og:image” content=“http://example.com/picture.jpg ” />
<meta property="og:image:width" content="1200" />
<meta property="og:image:height" content="627" />
2. Replace the placeholder text with your selected image's URL.
Next, remove the sample image URL above, highlighted in red, with the actual URL of your image. Do the same with the height and width numbers, highlighted in green, replacing them with the correct dimensions of your image. Keep in mind Facebook's image size requirements.
3. Copy the resulting code snippet into the HTML head section of your page.
Once you've filled in the code in step 1 with your own content's image URL and dimensions, open the source code (often denoted with this icon: "<>") and paste it into the top of the page's HTML.
That's it! Now, when you post a link to your article to LinkedIn, the Open Graph Protocol will read the OG:image tag and display the image you point it to.
Important Note If You Plan to Post to Both Facebook & LinkedIn
You might notice there's a conflict in the required image sizes if you're optimizing your webpage for thumbnail images: LinkedIn requires your featured image be no larger than 180 x 110 pixels, while Facebook requires your image be no smaller than 200 x 200 pixels.
While you could technically size your featured image as close to 180 x 110 pixels as possible without going over, that would optimize for LinkedIn while resulting in a very small image on Facebook. Remember, although Facebook requires an image size of 200 x 200 pixels or larger, they recommend you don't go smaller than 600 x 314 pixels so the image in the post is large.
Instead, according to web developer Jay Holtslander, you can include two OG tags for the same image in two difference sizes in the head section of your page using this code (and you'd replace the code in red with the URLs of your differently sized images):
<meta property="og:image" content="image-180x110.jpg " /> <!-- 180x110 Image for Linkedin -->
<meta property="og:image:width" content="180" />
<meta property="og:image:height" content="110" />
<meta property="og:image" content="image-600x315.jpg " /> <!-- 600x315 Image for Facebook -->
<meta property="og:image:width" content="600" />
<meta property="og:image:height" content="314" />
Twitter Open Graph
Twitter uses a system similar to Open Graph tags called Twitter Card tags. (You need to have Twitter Cards already set up in order to use Twitter Card tags.)
If you already have OG tags set up on your website, the folks at Twitter made it pretty easy for you to generate a Twitter Card without duplicating your tags and data. According to Twitter's dev blog, "When the Twitter card processor looks for tags on your page, it first checks for the Twitter property, and if not present, falls back to the supported Open Graph property. This allows for both to be defined on the page independently, and minimizes the amount of duplicate markup required to describe your content and experience."
But Twitter Cards look pretty similar to link posts on Facebook and LinkedIn -- it pulls the title, an image, the URL, and a short description. Here's an example:
Research has shown that people perform best when they feel included—when they feel valued, empowered, and respected by their peers. https://t.co/ZfcdlULWfo
— HubSpot (@HubSpot) January 21, 2019
To set up Twitter Card tags, you'll need to optimize your image size and then add the proper Twitter Card tags to your website.
Optimizing the Image Size for Twitter Open Graph
Required: Twitter requires your image to be no smaller than 144 x 144 pixels and less than 1 MB in file size. The social network also says it'll automatically resize images larger than 4096 x 4096 pixels.
Recommended: Like LinkedIn, Twitter Cards support large images as well, not just the square-shaped thumbnail. To optimize your images for this open graph, format the image you want featured in your tweet to be no smaller than 300 x 157.
Adding the Twitter Card Tags
Just like on Facebook and LinkedIn, if your page is static and you don't use a Content Management System (CMS) like HubSpot, you'll need to manually add Twitter Card tags to each of the pages your blog posts are on. Like the other social networks' tags, Twitter's tags are meta data, so you need to add them to the head section of the page your blog post is on. (Your developer can help with this if you don't have access to your website's code.)
Step 1: Copy this tag:
<meta name=”twitter:image” content=" http://example.com/picture.jpg”>
Step 2: Replace the example image URL, highlighted in red, with your selected image's URL.
Step 3: Copy and paste the resulting code snippet into the HTML head section of your page.
That's it! Now, when you post a link to your article to Twitter, it'll properly display your desired image.


Graphic Design

![How to create an infographic in PowerPoint [free templates]](https://53.fs1.hubspotusercontent-na1.net/hubfs/53/Untitled%20design%20(85)-2.png)
![AI in Graphic Design: The Pros, Cons and What it Means for Designers [+ Expert Insight]](https://53.fs1.hubspotusercontent-na1.net/hubfs/53/Untitled%20design%20-%202024-10-15T175328.927.jpg)
![How to create an infographic in under an hour [+ free templates]](https://53.fs1.hubspotusercontent-na1.net/hubfs/53/create-infographic-fast-1-20251029-7083334.webp)


![How to Create an Infographic Using Poll & Survey Data [Infographic]](https://53.fs1.hubspotusercontent-na1.net/hubfs/53/00-Blog_Thinkstock_Images/Survey_Data_Infographic.jpg)