Well behind that process is an API call, and it's the backbone of how websites communicate with each other. API calls happen more often than you will expect, whether it’s gathering the latest stock prices or even streaming a video. In this blog post, I’ll show you how to make these API calls in 5 simple steps.
Let's get into it.
Table of Contents
- What are APIs?
- What does an API call do?
- Where does an API call go?
- Key Components of an API Call
- How to Make an API Call in 5 Easy Steps
- Test API Calls
- Can hackers use API calls for an attack?
- How to Protect API from API Call Attacks
- Making the Call
What are APIs?
APIs, short for Application Programming Interfaces, allow for software-to-software communication. They let different applications talk to each other and exchange information or functionality. This allows businesses to access other businesses’ data, code, software, or services in order to extend the functionality of their own products — all while saving time and money.
So, how you can exactly use an API to request and get data from another application? That’s where API calls come in.
Let’s say my app uses Facebook APIs to extract data and functionality from the platform. In that case, when broadcasting a live Facebook video stream, creating a post, or building a custom dashboard for my ads, I am actually making an API call to Meta.
What does an API call do?
An API call acts as a bridge between two applications, making communication possible between them.
Going on with my Facebook example, when my app broadcasts a live video, it sends a structured request (the API call) from my application to Facebook’s servers. This request specifies what action to perform and includes necessary details like authentication tokens or parameters.
Facebook’s servers then process the request, execute the task, and send back a response. This API call is what lets my app integrate Facebook’s features without accessing its internal codebase, ensuring security and scalability.
Where does an API call go?
When an API call is sent, the call goes to a predefined URL. This URL is provided by the application I am trying to interact with. The endpoint (URL) is hosted on a server owned by the service provider (e.g., Facebook’s servers).
Think of it like sending a letter: I need the right address (endpoint) to get my message successfully delivered.
Key Components of an API Call
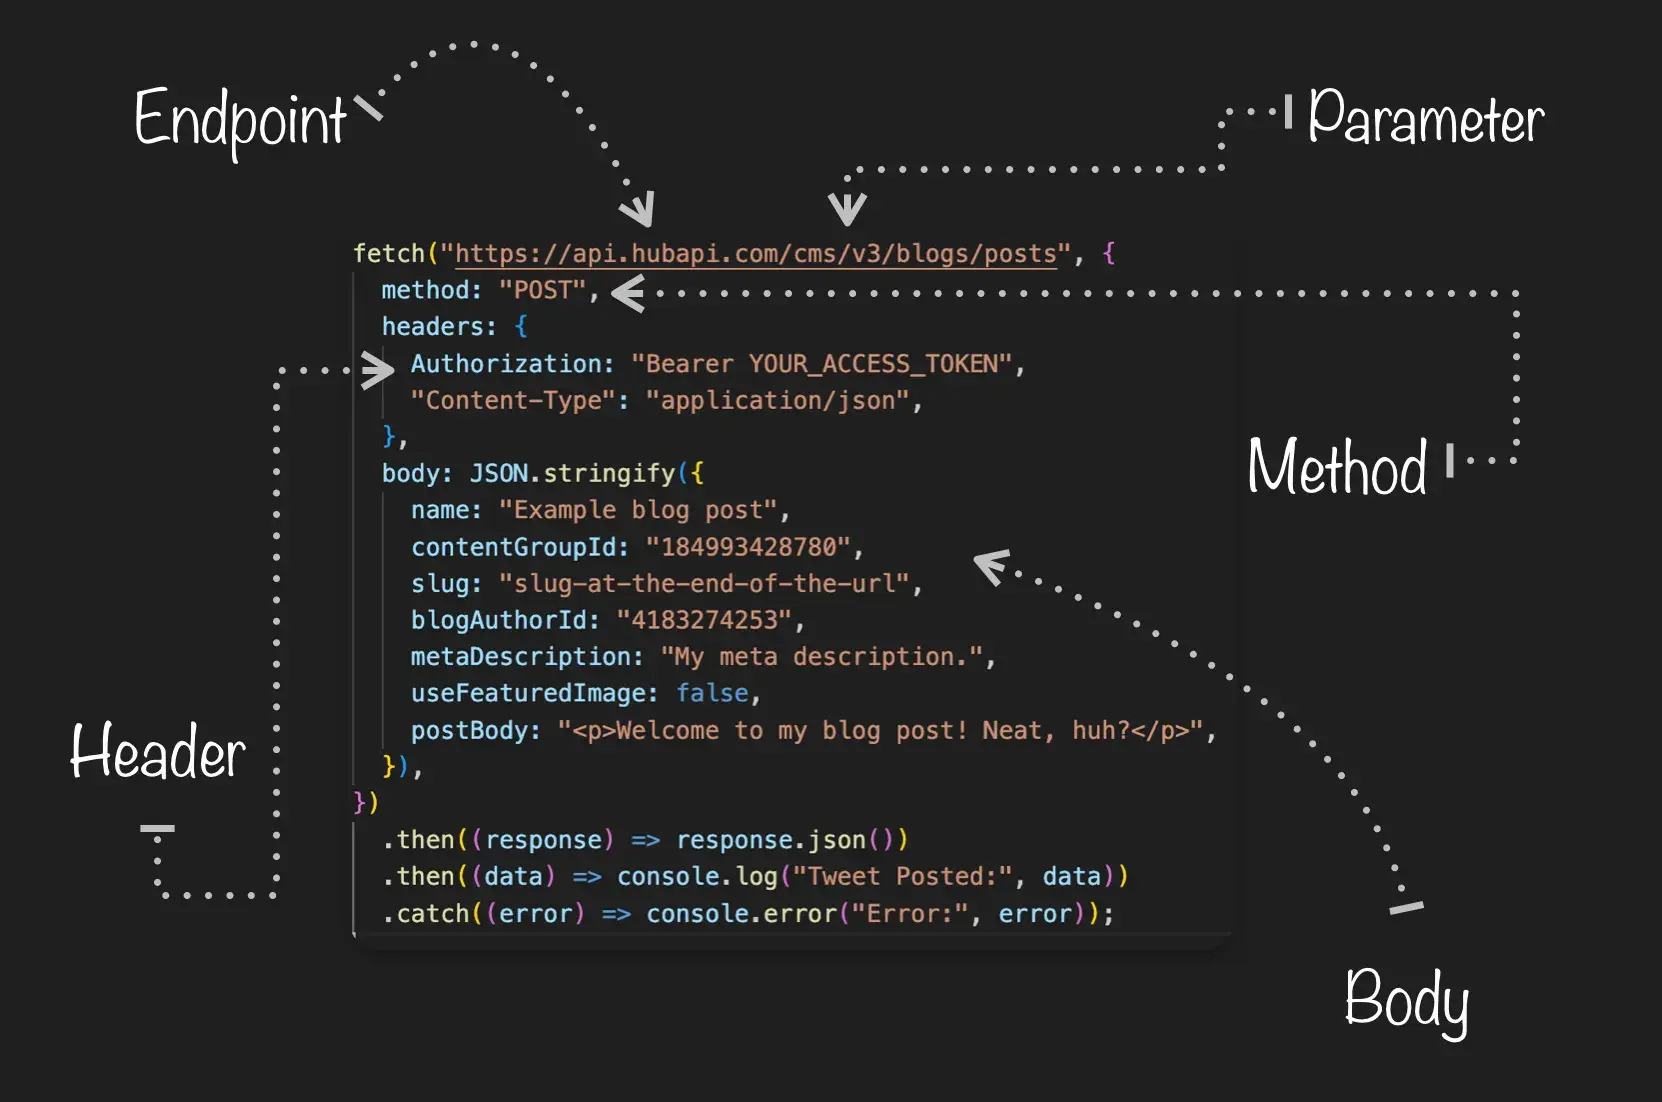
An API call is essentially made up of 5 key components.
- Endpoint: This is the URL where the API is hosted, and it specifies where the request is sent to. An API endpoint looks something like this “https://api.hubapi.com.”
- HTTP Method: This specifies the type of request you want to perform. The most common HTTP methods are GET (to retrieve data), POST (to create new data), PUT (to update existing data), and DELETE (to remove data).
- Header: The header tells the server how to handle requests and what to expect. They do not contain actual data but provide context for the server. Here are some common headers used in API calls:
- Authorization: Includes credentials (e.g., Bearer <token>).
- Content-Type: Specifies the format of the data sent (e.g., application/json).
- Accept: Defines the response format you want (e.g., application/xml).
- Parameter: This is the data sent to refine the request. I take parameters as a filter that customizes what data to retrieve or how to process it. There are primarily two types of parameters:
- Path Parameters: Embedded in the endpoint URL (e.g., /users/123).
- Query Parameters: Added after ? in the URL (e.g., ?category=books&limit=10).
- Request Body: This is usually a JSON or XML format that contains data to create or to update a resource. It is the payload sent to the server using the HTML method.
- Here is an example of a request body: { "name": "clinton", "email": "clinton@joy.com", "role": "developer" }
How to Make an API Call in 5 Easy Steps
1. Find the URL of the external server or program.
To make an API call, the first thing I need to know is the Uniform Resource Location (URL) of the server or external program whose data you want. This is basically the digital equivalent of a home address. Without this, I won’t know where to send my requests.
The HubSpot API’s URL, for example, is https://api.hubapi.com.
It’s important to note that most APIs have different endpoints, each with its own end path. For example, let’s say I want to stream public tweets in real time. Then, I could use X's filtered stream endpoint. The base path, which is common to all endpoints, is https://api.x.com.
The filtered stream endpoint is /2/tweets/search/stream/rules. I can either add that to the end of the base path or just list the endpoint in my request.
2. Add an HTTP Method.
Once I have the URL, then I need to know how to formulate the request.
The first thing I need to include is an HTTP method. The four most basic request verbs are
- GET: to retrieve a resource.
- POST: to create a new resource.
- PUT: to edit or update an existing resource.
- DELETE: to delete a resource.
For example, let’s say I use NREL’s Alternative Fuel Station’s API and want to see a list of the nearest alternative fuel stations in Denver, Colorado. Then I’d make a GET request that might look like:
GET https://developer.nrel.gov/api/alt-fuel-stations/v1/nearest.json?api_key=XXXXXXXXX&location=Denver+CO
This tells the server to search the database to find a list of alternative fuel stations in Denver. If that list exists, the server will send back a copy of that resource in XML or JSON and an HTTP response code of 200 (OK). If that list doesn’t, then it will send back the HTTP response code 404 (not found).
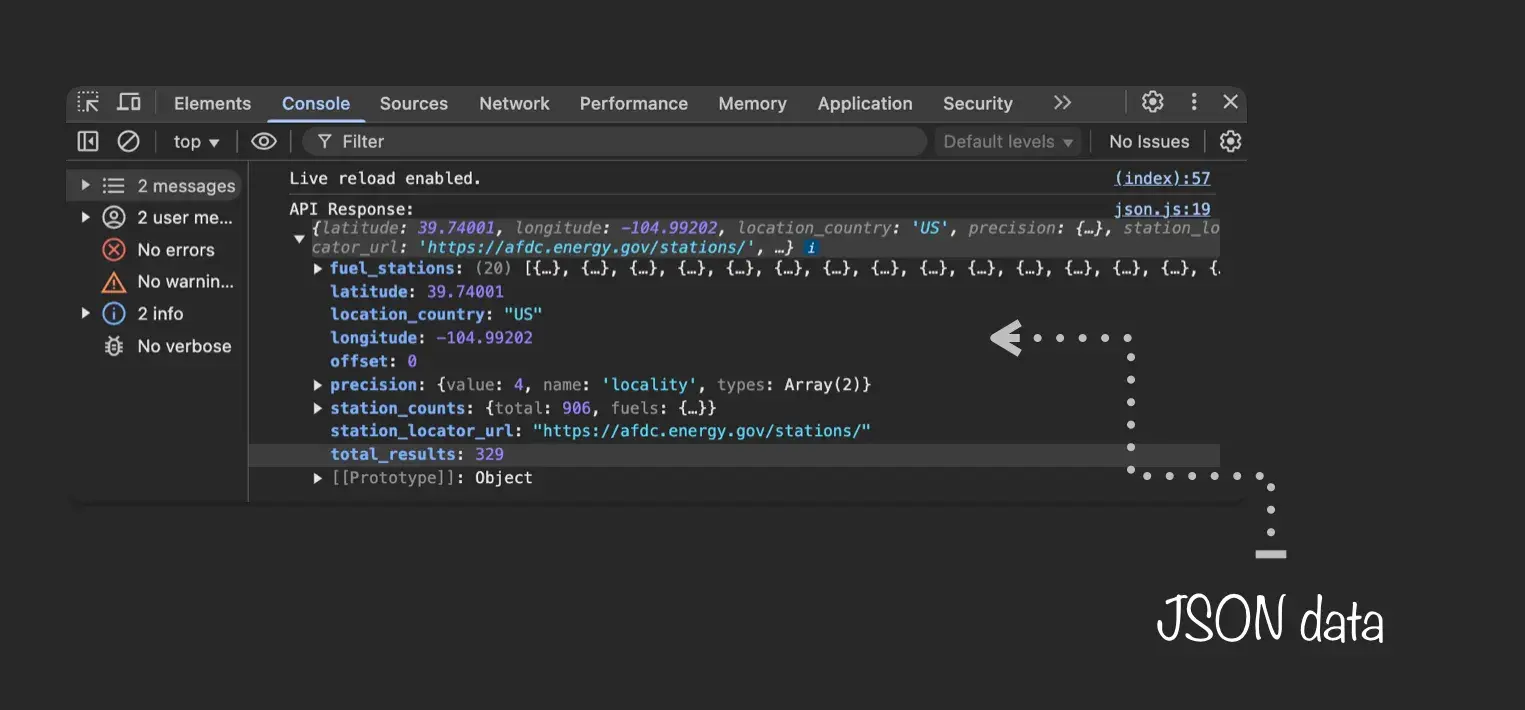
Here’s a look at the output in JSON:
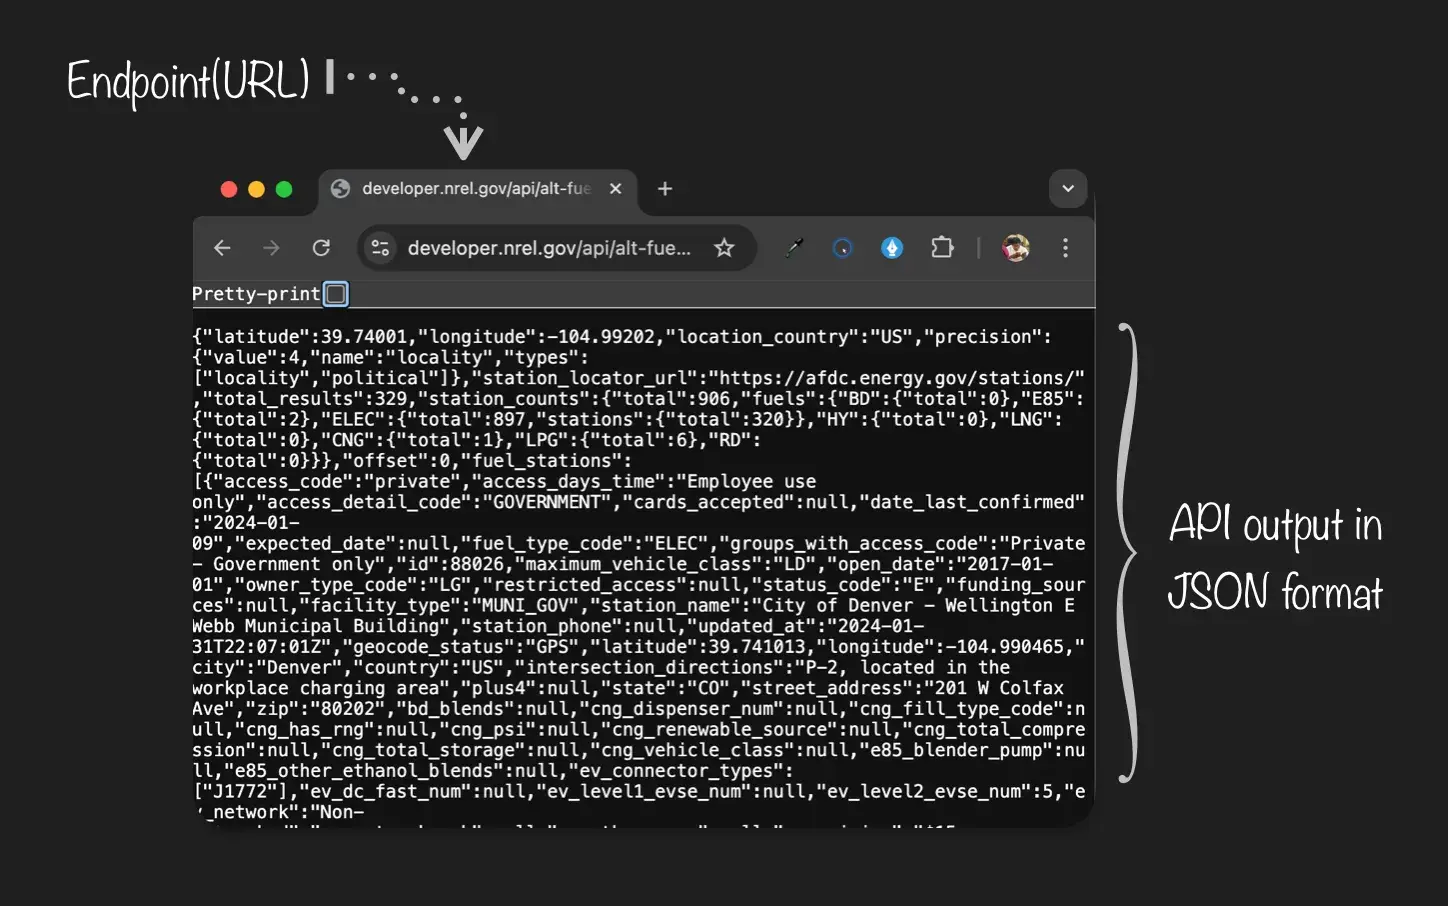
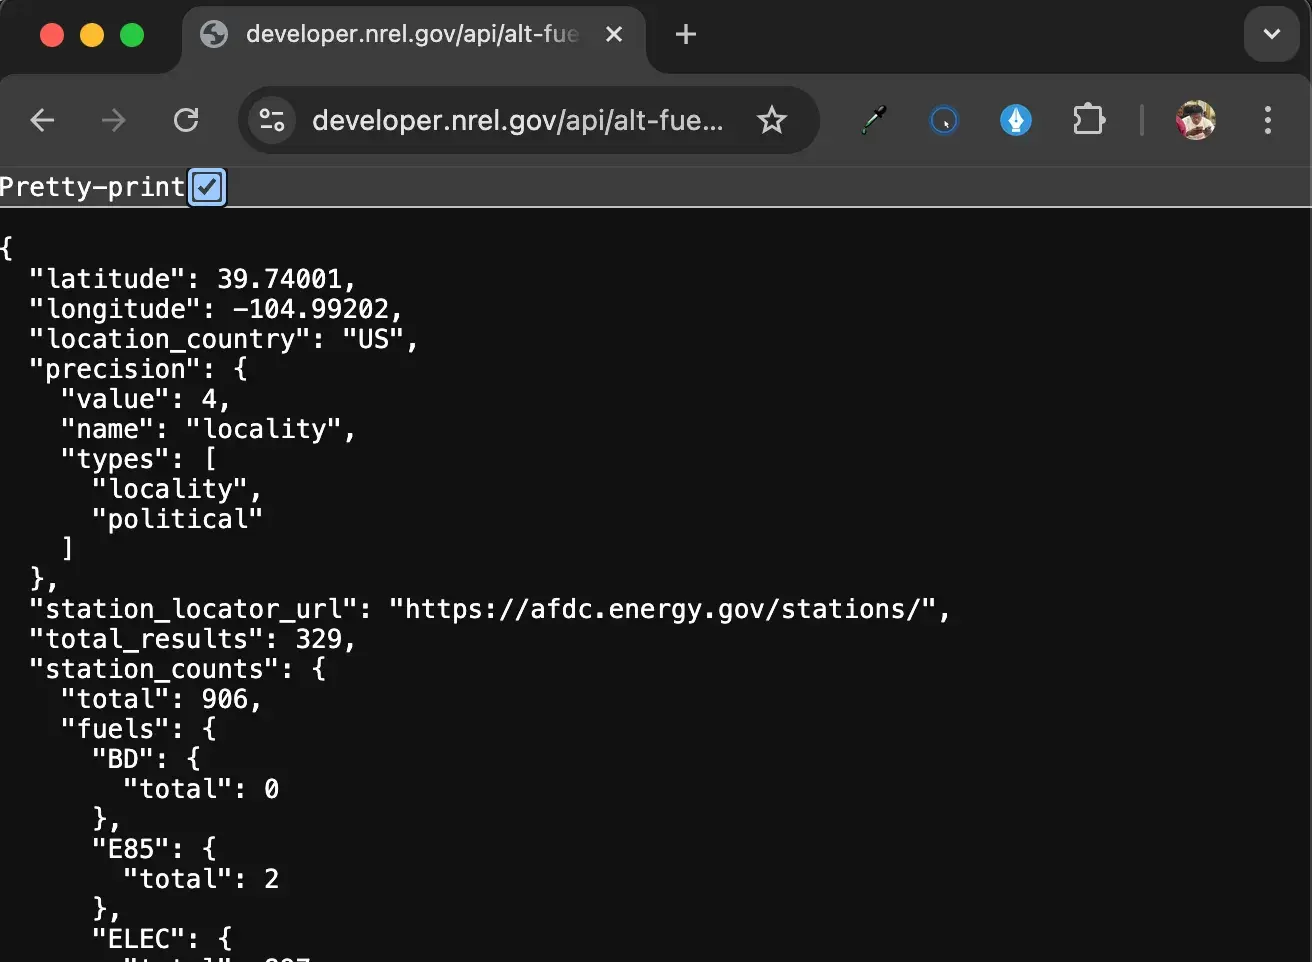
If you’re not familiar with JSON, that might look intimidating. Google Chrome has a pretty-print feature that organizes the JSON data.
3. Include the required headers.
The next thing I need to include is a header, which tells the API about my request and the response I’m expecting. Including a header ensures the API understands what I’m asking and responds in a way that’s easy for me to understand. Three common headers are user-agent, content-type, and accept. Let’s define each below.
User-Agent
This header enables servers to identify the application, operating system, vendor, and/or version of the user agent making the request.
For example, let’s say I want my application to work with New Relic's RESTful APIs. Then I need an HTTP agent to manage the information exchange between my application and New Relic, and I need to identify that integration. In that case, I’d submit the following user-agent header in Java using the GET HTTP method:
get.setHeader(“User-Agent”, “my-integration/1.2.3”);
Content-Type
This header explains what type of information is in the body of the request. It might explain that the request was formatted in XML, for example, or JSON. Without this header, the API might receive my request and not understand what it is or how to decode it. As a result, I won’t get a response.
Accept
This header explains what format I’d like to receive my response back from the API. Without this header, the API could return the data requested in XML when I wanted it in JSON, or vice versa.
Pro tip: It’s important to note that an API might not be capable of returning data in the format you requested. That might be frustrating, but you’ll still receive a response. So, you should always include this header in your API call in case you can get the exact response you want.
4. Send a Request.
Most applications that have APIs require you to have an API key or an access token. This is used to authenticate and grant users access to the API.
An API key and access token serve the same purpose: They are unique identifiers used to authenticate calls to an API. Made up of a string of letters and numbers that identify the client application making the request, an API key grants or denies requests based on the client’s access permissions. The key also tracks the number of requests.
To make an API call to NREL’s Alternative Fuel Station’s API, I must include an API key as a query parameter. To obtain an API key for any application, I must visit their developer page. Some applications may require payment, while others offer free services.
NREL’s Alternative Fuel Station’s API offers a free service, so I’ll use that.
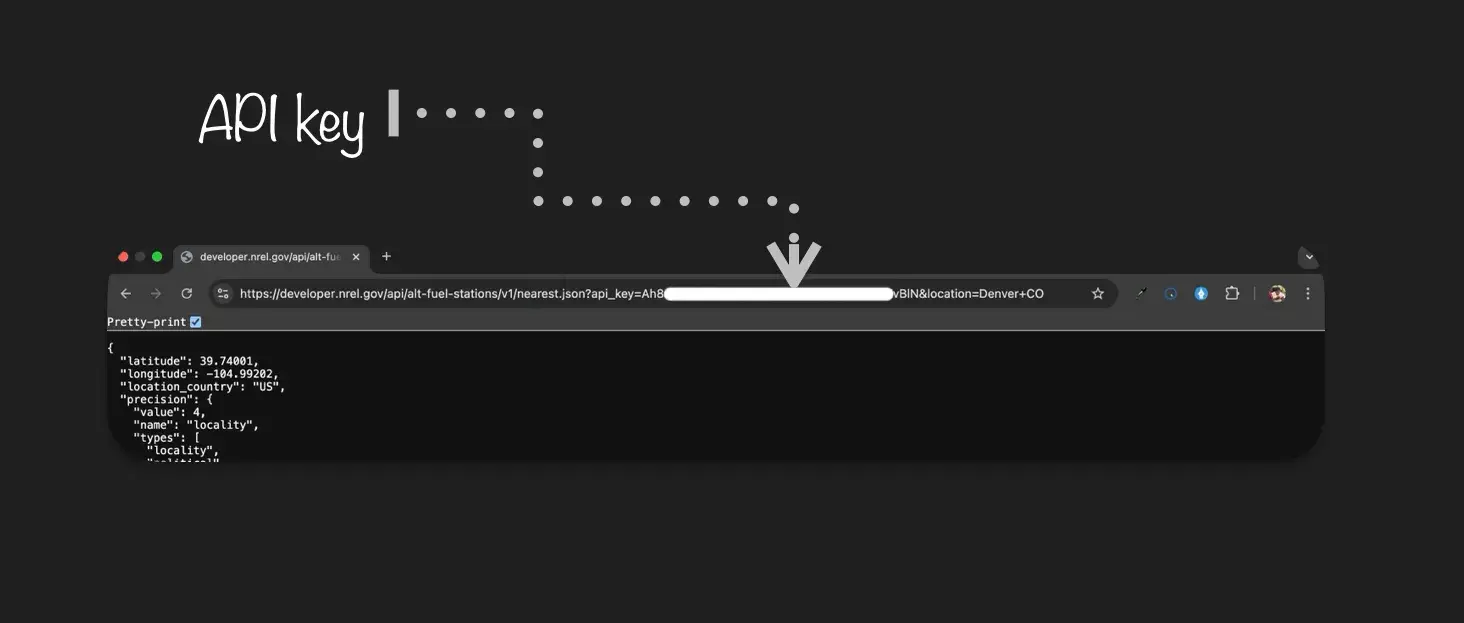
Now that I have my API key, I can now proceed to send a request.
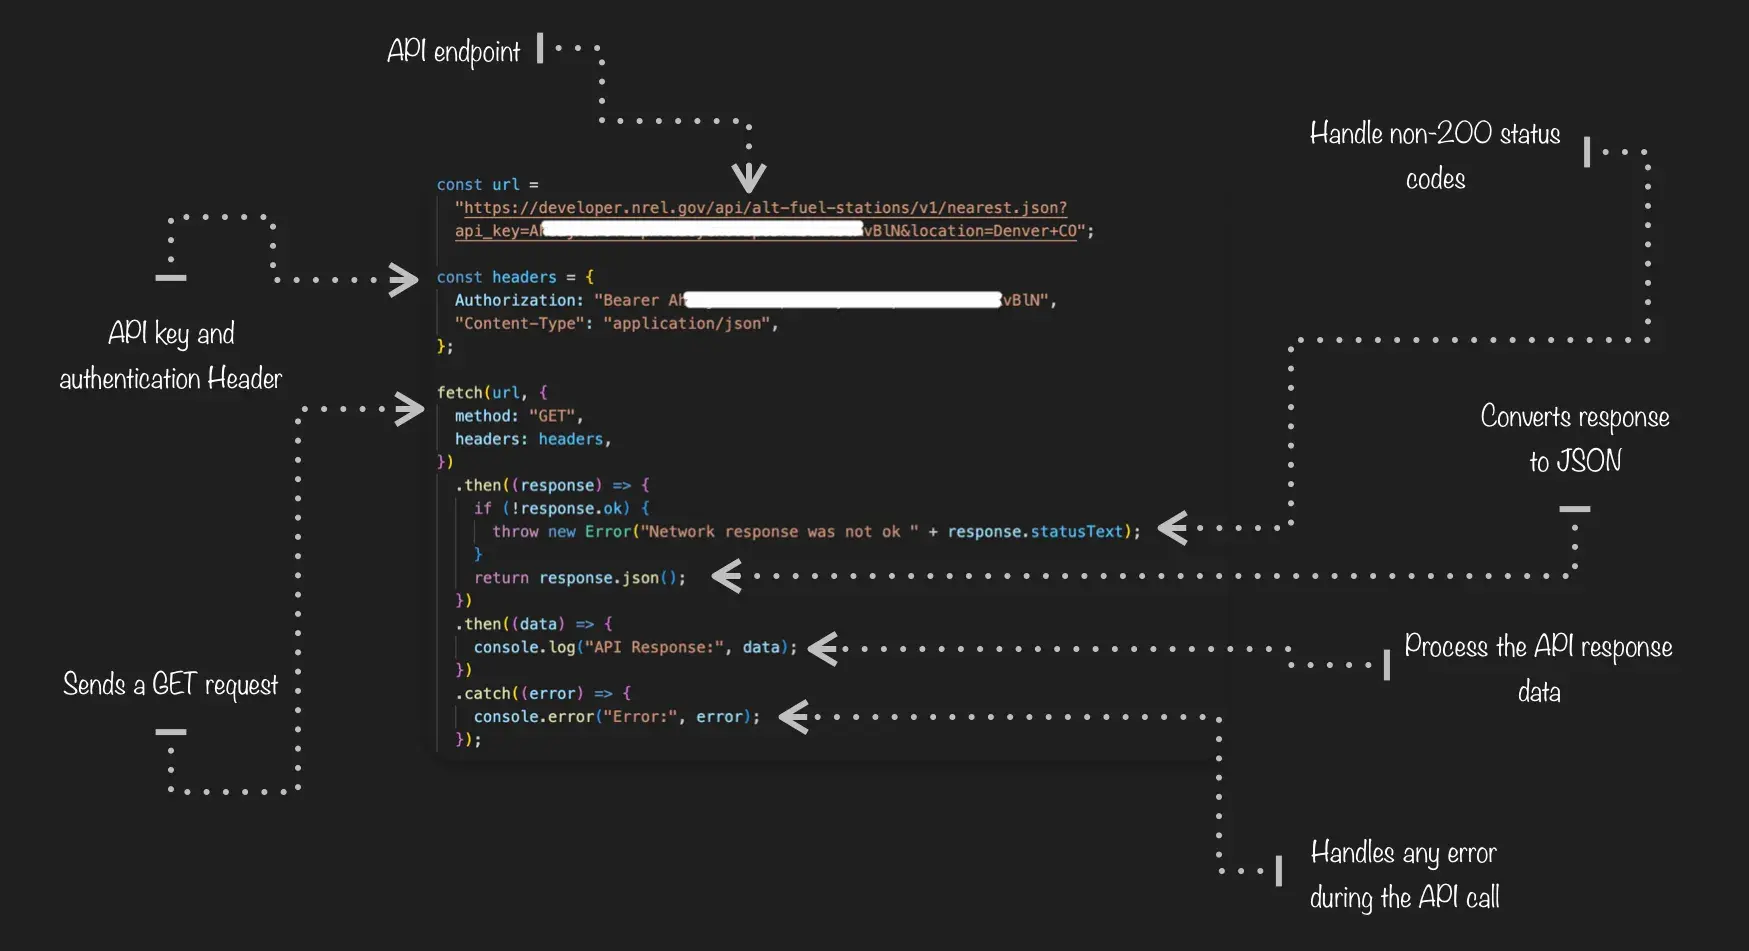
In the code above, the fetch() function is used to make the API request. It accepts two arguments:
- The API endpoint (URL).
- An options object that includes the HTTP method and headers.
Since this is a GET request, it retrieves data from the server. The response is then converted to JSON using .json(), and the final data is logged to the console. Also, any errors encountered are caught and displayed.
5. Handle the API response.
Now, all that’s left to do is wait for a response from the API. I can expect a status code that lets me know the request was either processed successfully or unsuccessfully.
In the latter case, the status code will explain the issue so I can correct it and try again. The most common codes are 2XX codes (“success codes”) and 4XX codes (“error codes”). Let’s take a brief look at some of the most common.
2XX Codes
These codes convey that the server has received the client’s request and processed it successfully. Here are the most common examples:
- 200 OK: The request was successful.
- 201 Created: The resource has been created on the server. This response is typically returned for POST requests.
- 202 Accepted: The request has been received but is still being processed.
- 204 No Content: The request has been successfully processed, but no content will be returned.
4XX Codes
These codes convey that the client’s request has an error. It’s possible that the request is written incorrectly, or the resource that the client is requesting doesn't exist.
- 400 Bad Request: There is something wrong with the client’s request.
- 401 Unauthorized: The client is not authorized to make this request.
- 403 Forbidden: The request is correct but can’t be processed. Likely, the problem is that the client does not have the required permissions.
- 404 Not Found: The resource being requested doesn't exist.
Regarding the request I sent in the previous section, below is the response I will get if the response is okay. I will get the JSON data from the NREL’s Alternative Fuel Stations API, and I can use this data as I please in my application.
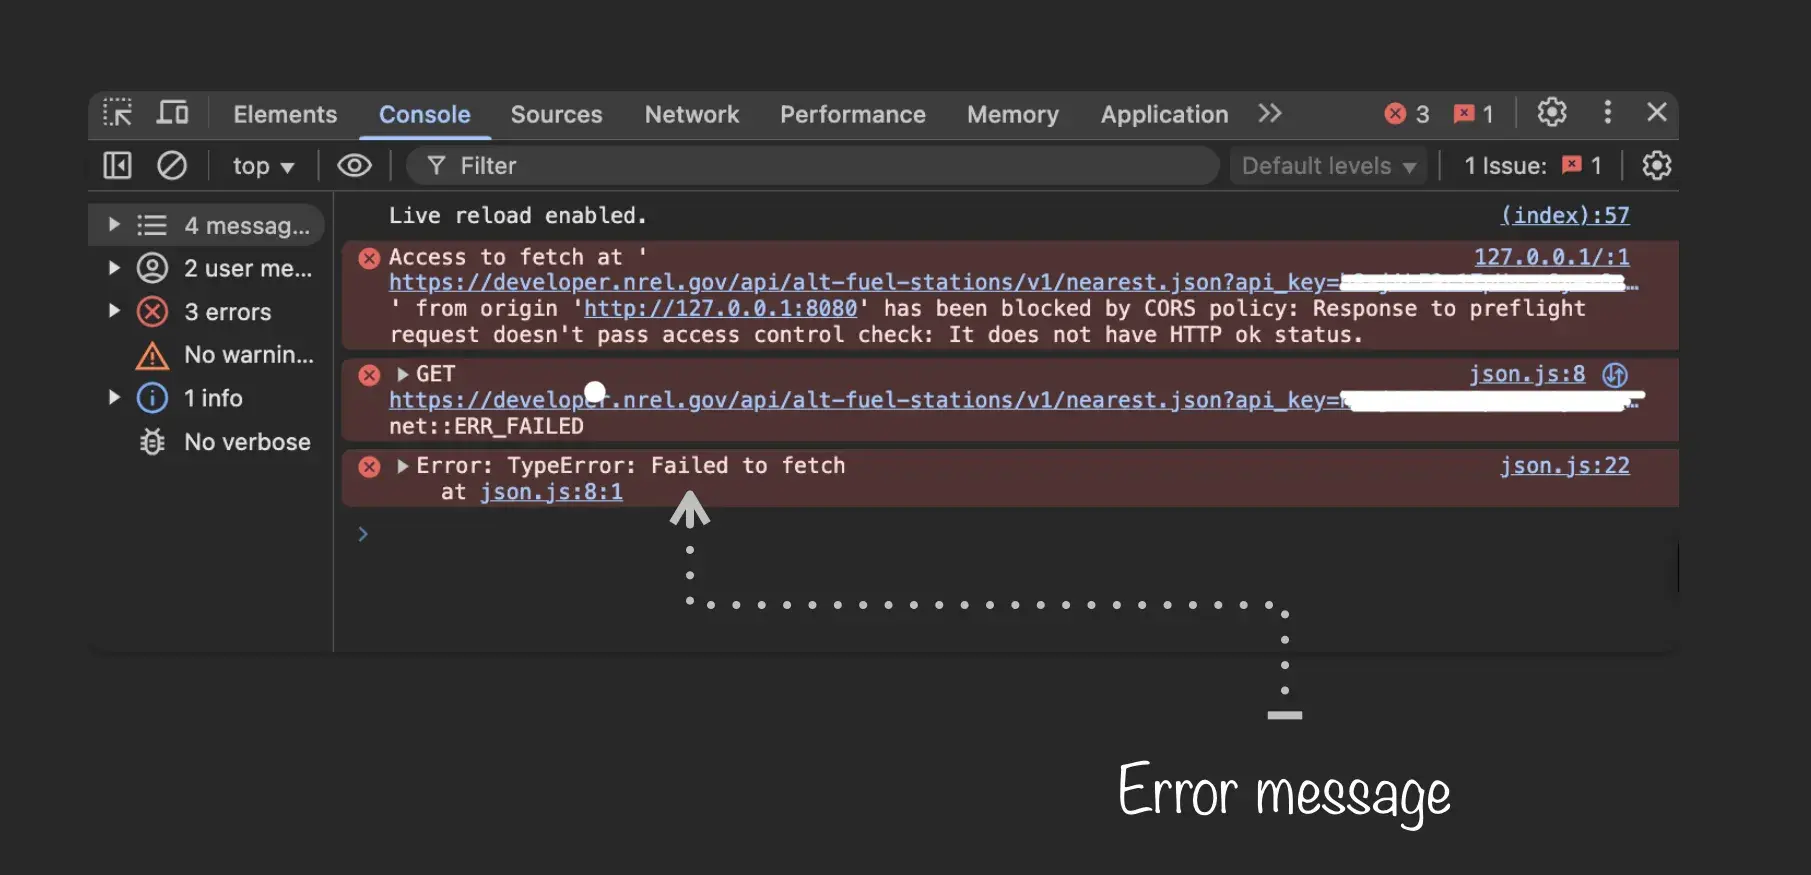
On the other hand, let's say I didn’t use a valid API key, or there were missing or incorrect parameters. In that case, I will get an error.
Test API Calls
There are APIs for seemingly everything today, from embedding Instagram photos on your ecommerce site to providing access to thousands of hotels on your blog.
With so many APIs to choose from, it’s important to evaluate them carefully in terms of functionality, reliability, performance, and security so you know they meet your needs. If you’re the one developing, providing, and maintaining an API, then testing is equally important. Testing frequently ensures the API is functional and meets consumer expectations.
How to Do API Testing
API testing consists of making API calls to different endpoints, getting responses, and validating the status codes, response times, and data in those responses.
This type of testing is usually performed by a software tool or web service, like ReqBin. The process is relatively similar, but the exact steps will vary depending on which tool or service I use. Below are the steps to test an API using ReqBin. For the sake of this demo, I’ll test a free and open API.
1. Enter the URL of the API endpoint.
Let’s say I want to use The New York Times’s Article Search API to look up articles by the keyword “dog.” Then, I’d use the following URL: https://api.nytimes.com/svc/search/v2/articlesearch.json?q=dog
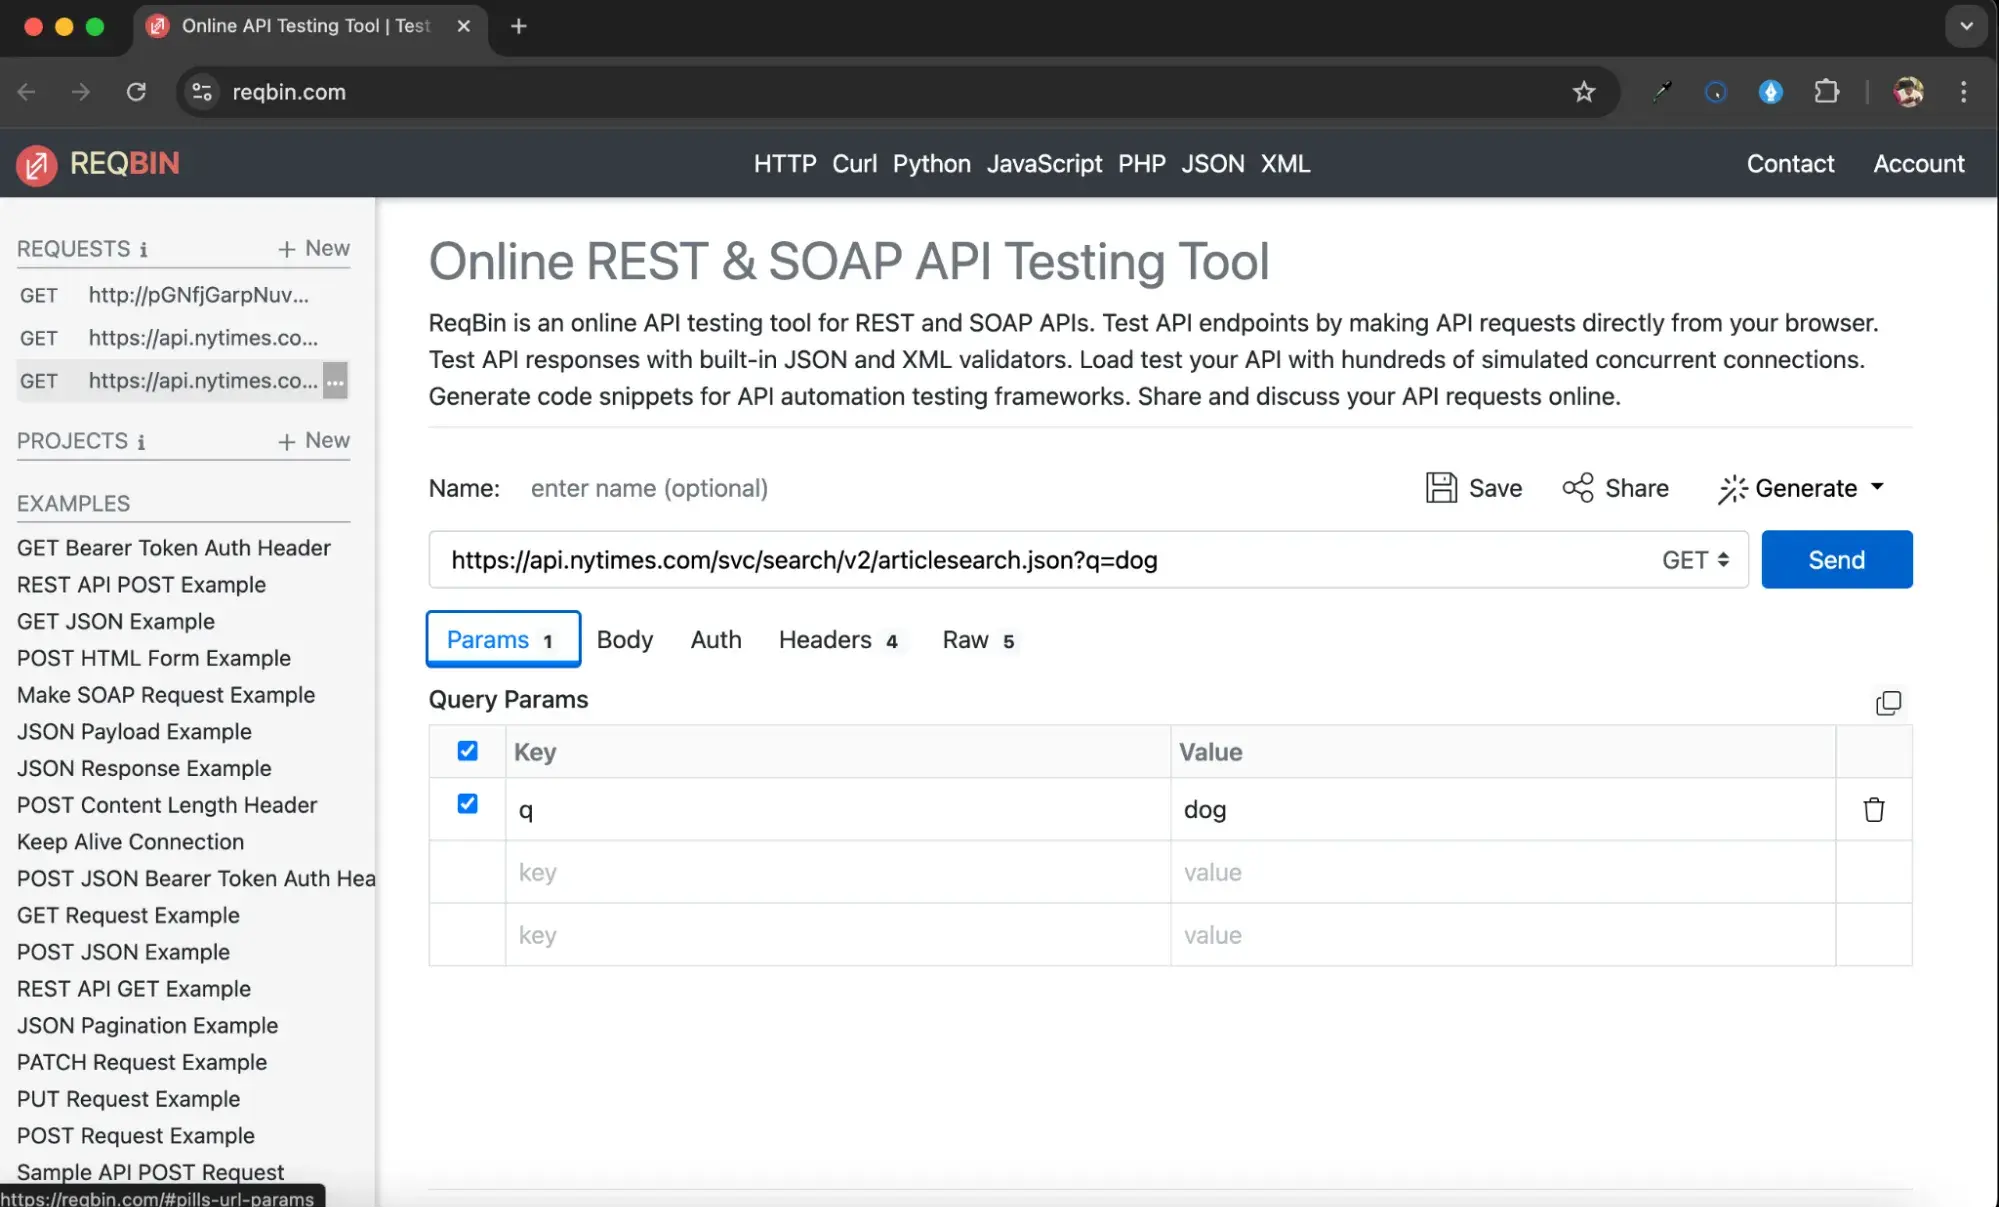
2. Select the appropriate HTTP method.
Since I want to retrieve the articles with this keyword, I’d use the GET method.
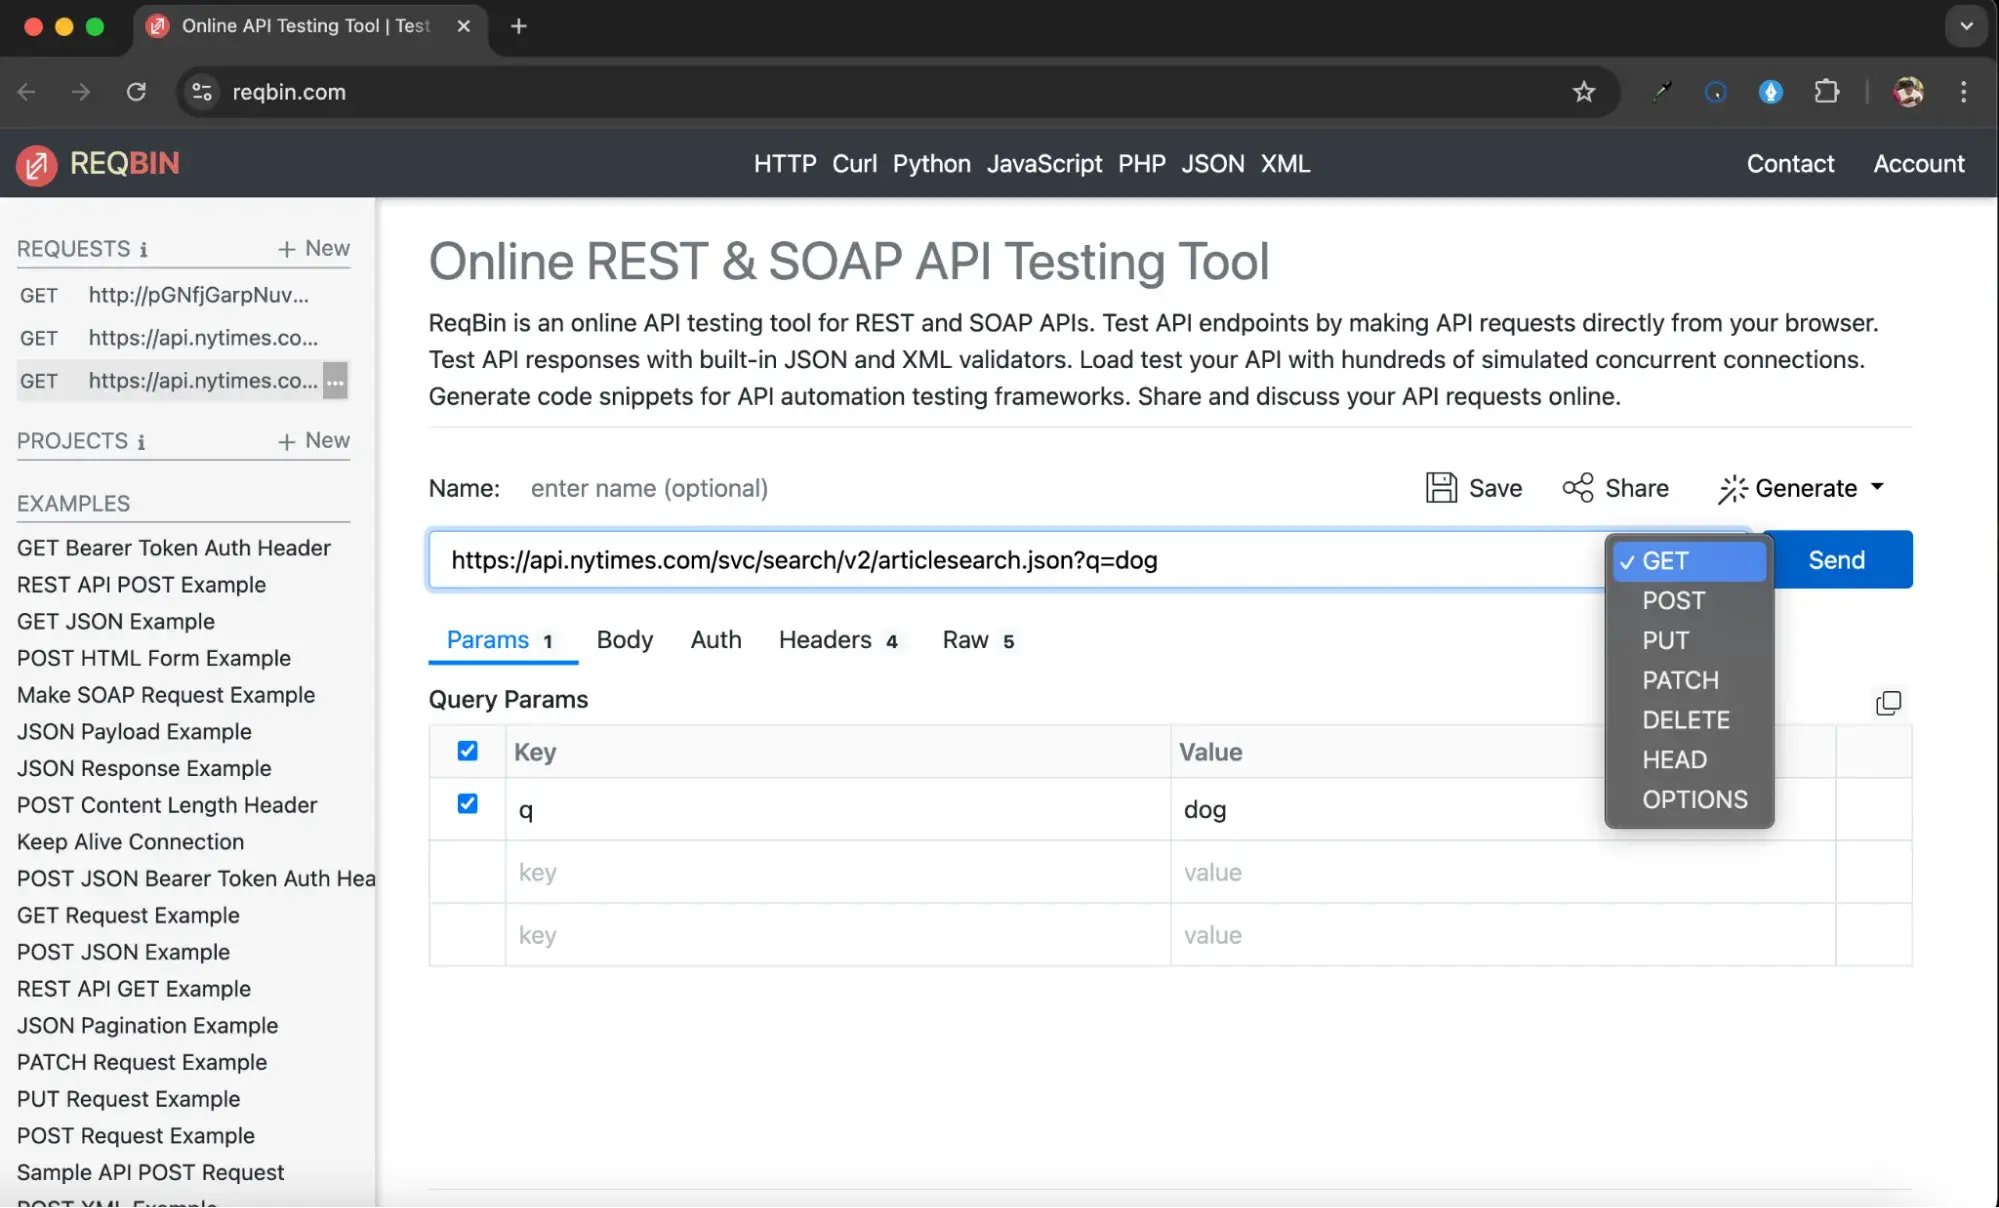
Note that if I were using the POST, PUT, or PATCH methods, then I’d enter data into the Content tab.
3. Enter your credentials in the Authorization tab.
If the API server requires authorization, then I will need to enter my credentials in the Authorization tab. Let’s see what happens if I skip that step.
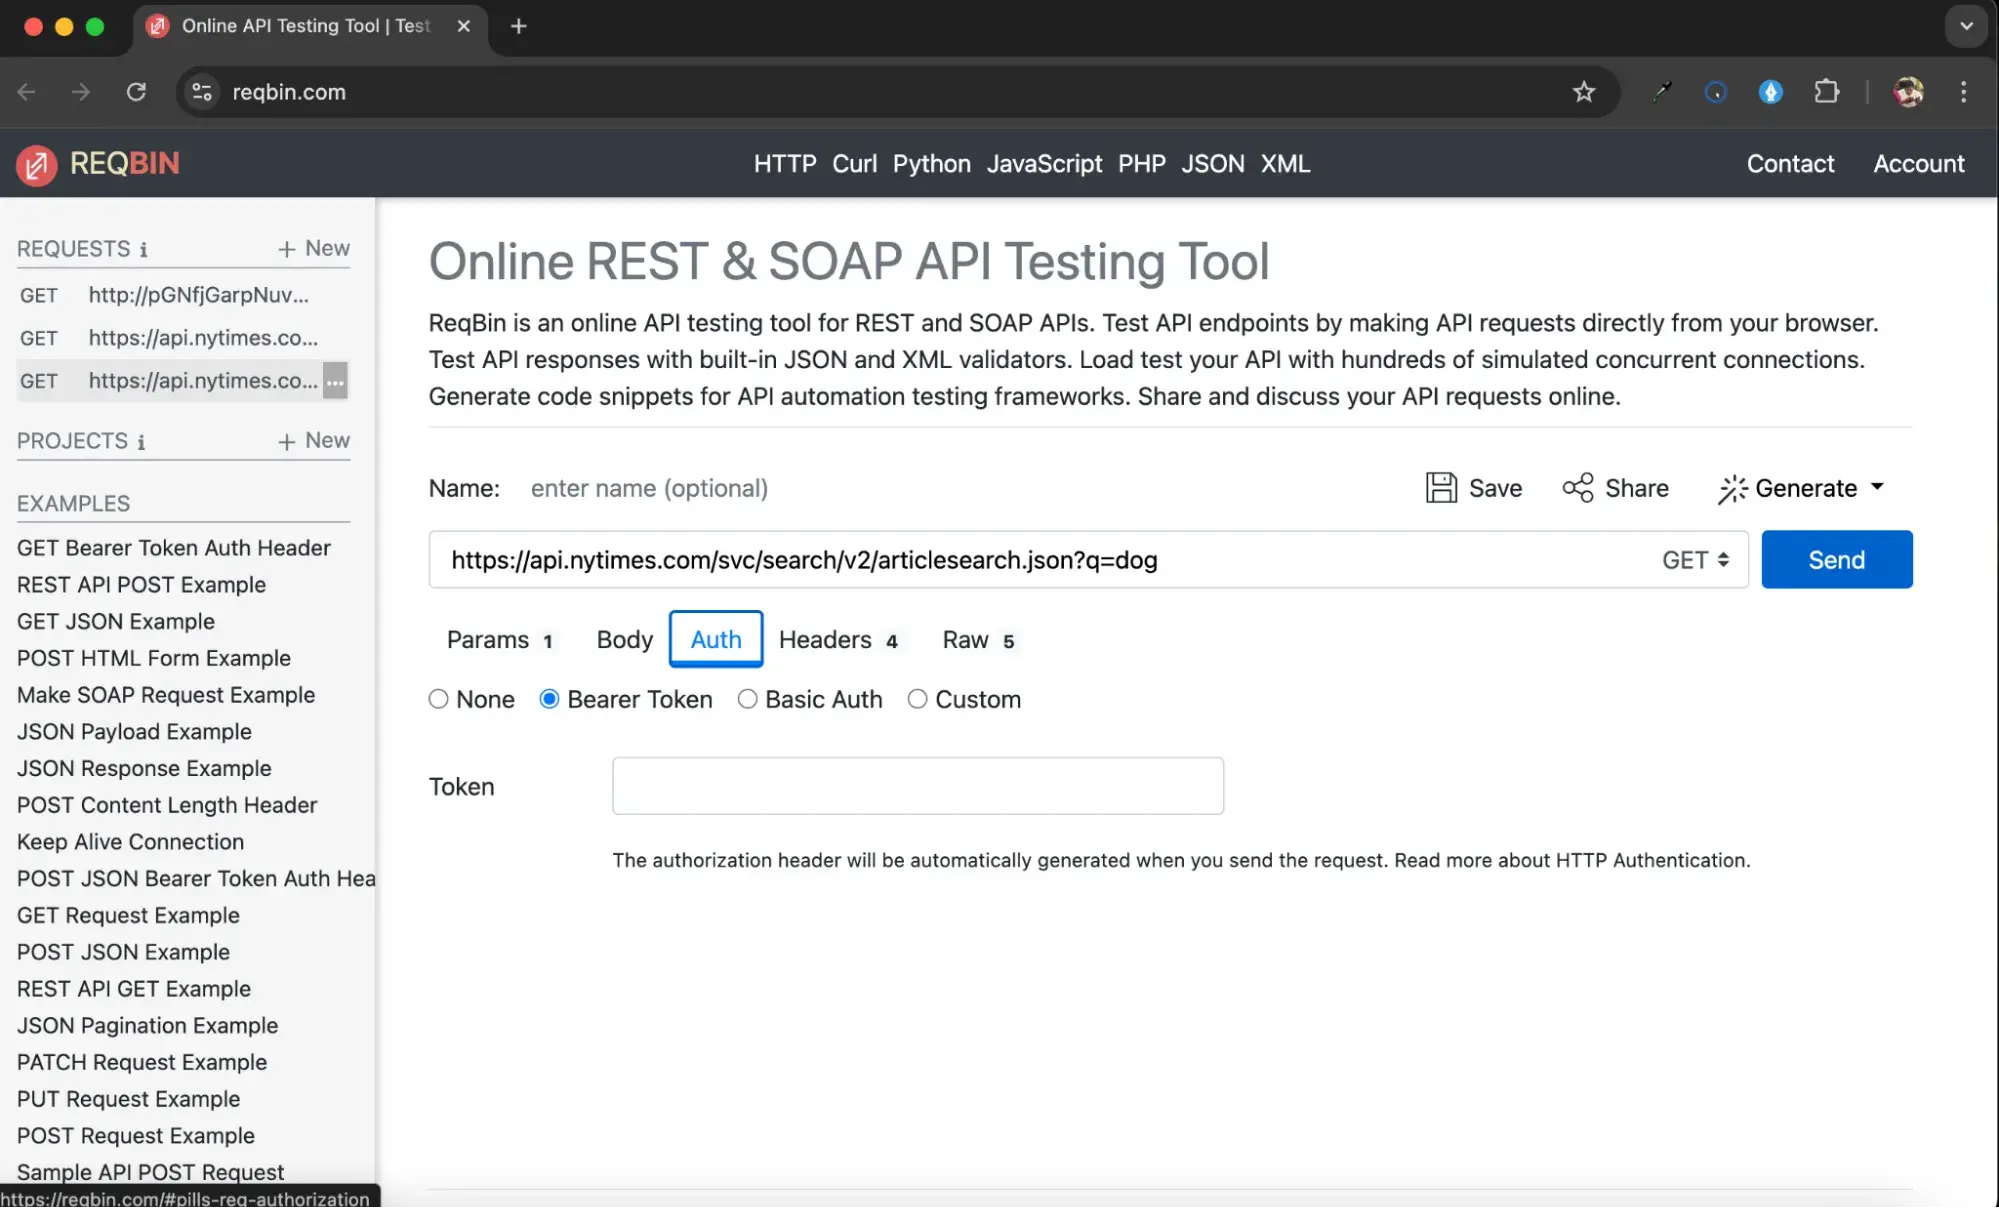
4. Click Send to submit API request.
Once I submit my API request, I can see the returned API status code, response time, and content.
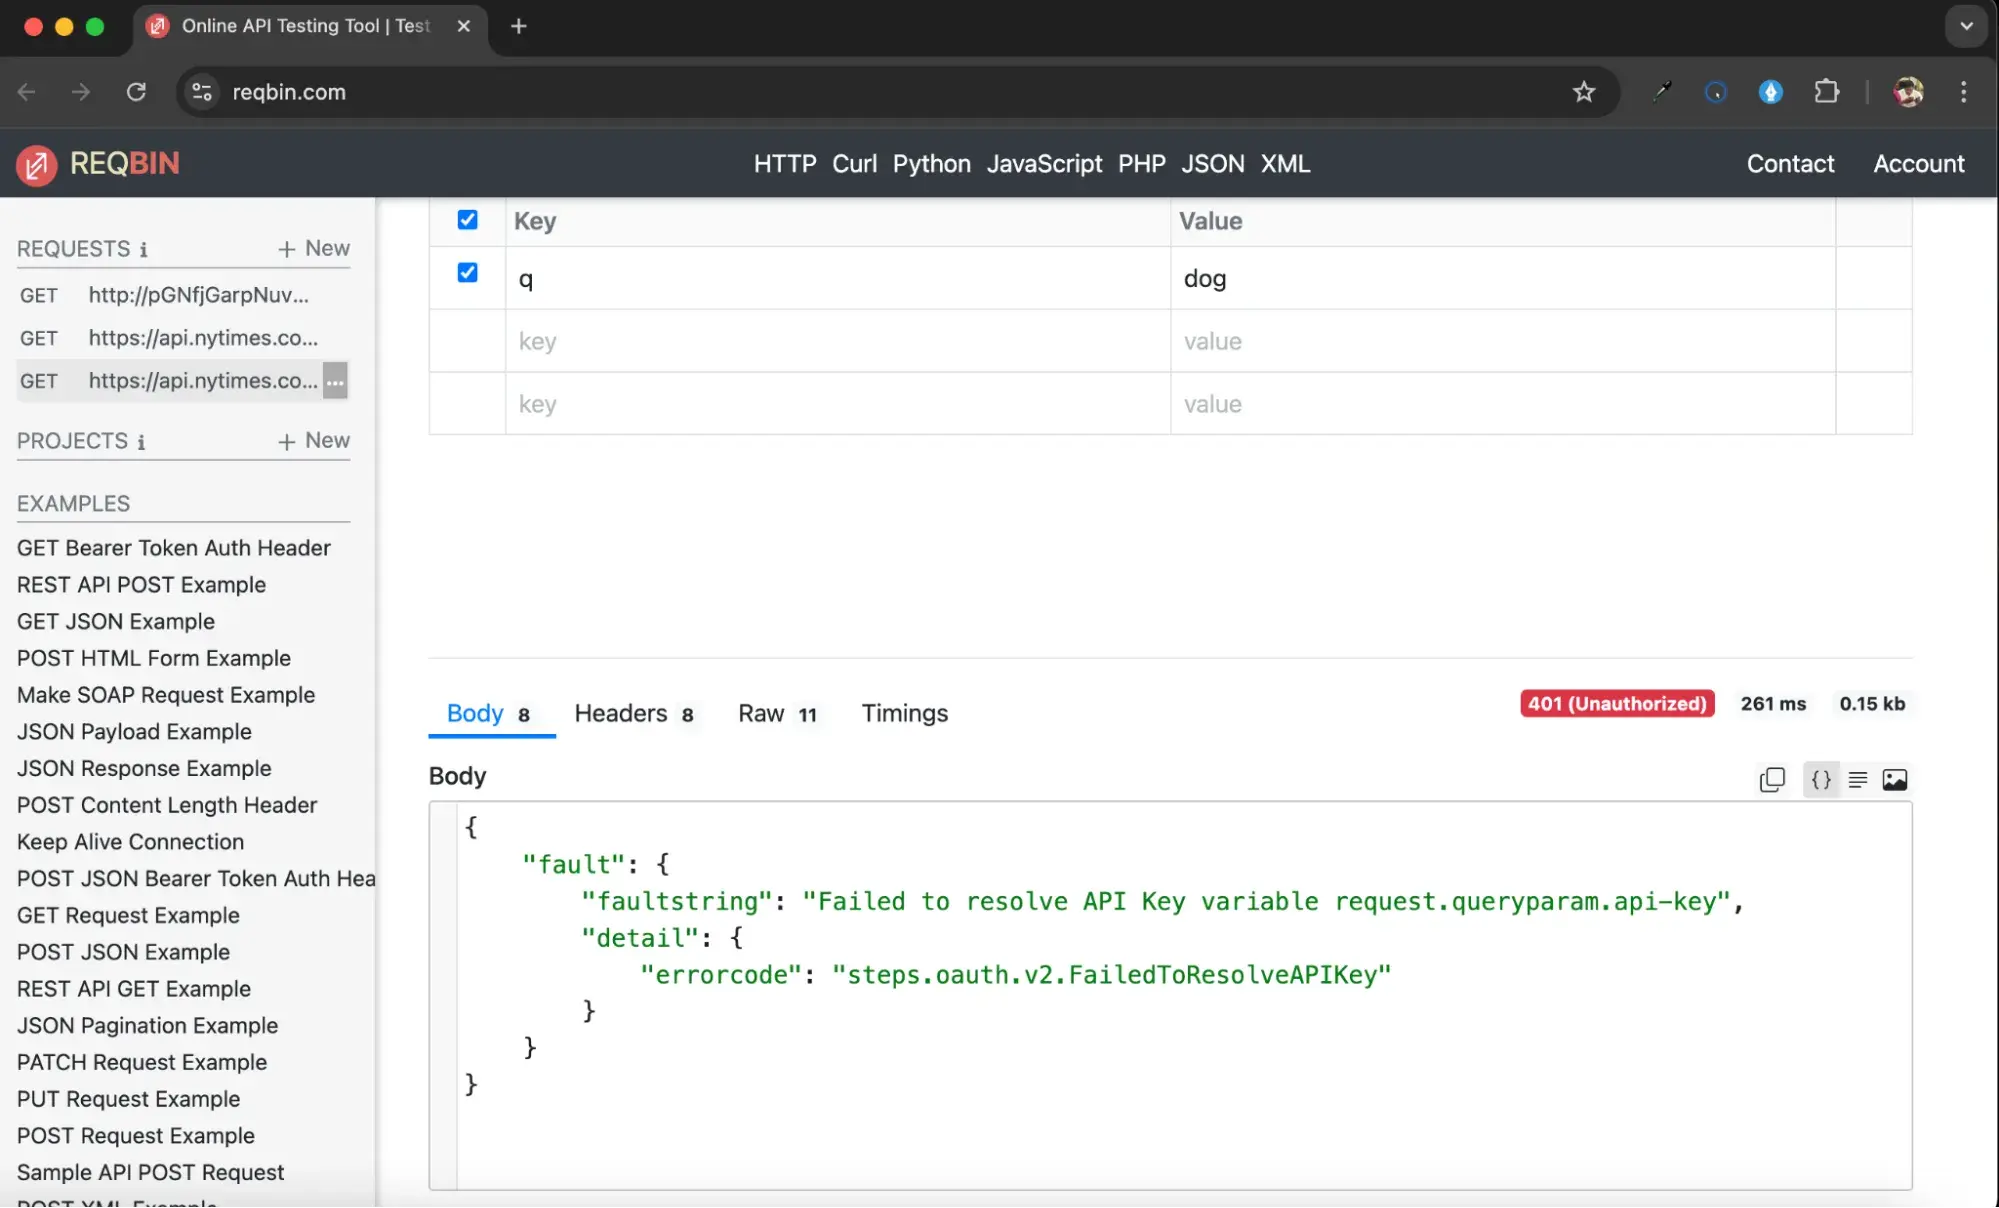
Notice in this case, I’ve received a 401 Unauthorized response. That’s because I need an API key to use this NYT API.
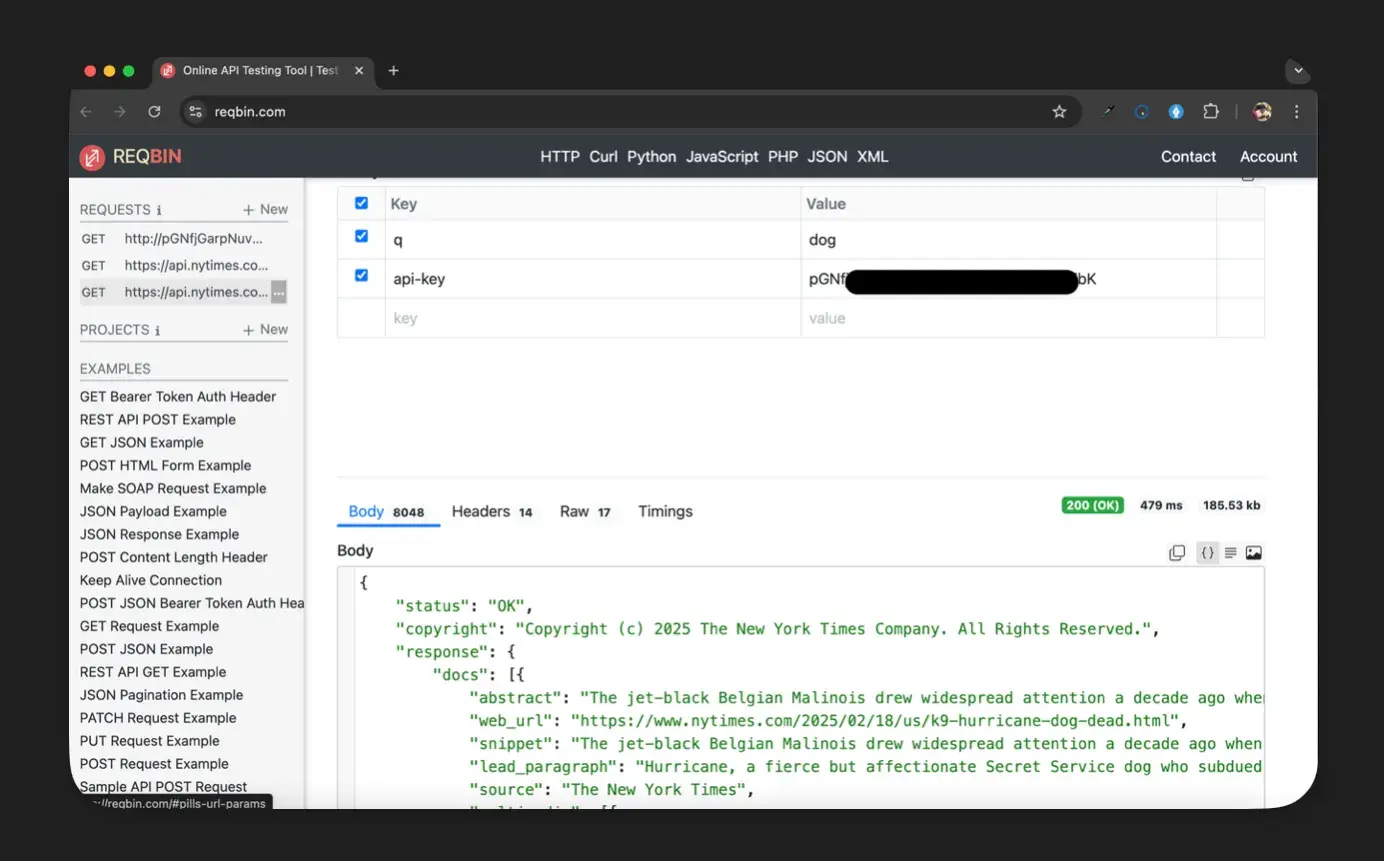
I’ve gotten an API key from the NYT. Using the same endpoint with my API added (https://api.nytimes.com/svc/search/v2/articlesearch.json?q=dog&api-key=******************) as a parameter here is the result I get:
Can hackers use API calls for an attack?
If an API call is a way applications communicate and share data with each other, can't this communication be intercepted? Well, the answer is yes. It is very possible for hackers to intercept API calls and exploit them for attacks if the API is not properly secured. Some common API security vulnerabilities are:
- API Key Leakage. API keys act as credentials to access an API, and if exposed, attackers can use them to make unauthorized requests. Keys can be leaked through:
- Hardcoding keys in frontend JavaScript or mobile apps.
- Exposing them in public repositories (e.g., GitHub, logs, or error messages).
- Insecure API documentation or client-side storage.
- Injection Attacks. APIs that don’t properly clean up input are vulnerable to SQL injection, cross-site scripting (XSS), or command injection. Attackers can inject malicious SQL queries to extract or modify data. They can also embed harmful scripts that affect users interacting with the API.
- Denial of Service (DoS) Attacks. Attackers can overwhelm an API with excessive requests for example, they can send thousands of GET /api/data requests per second, causing slow performance for legitimate users or even server crashes due to resource exhaustion.
- Data Exposure. APIs sometimes leak sensitive information due to
- Overexposed endpoints (GET /api/internal/users returning too much data).
- Improper access control allowing unauthorized data access.
- Unencrypted data transmissions that can be intercepted.
- Broken Authentication and Authorization. APIs without strong authentication can allow attackers to bypass security to access restricted resources, exploit weak API key-based authentication, and abuse misconfigured OAuth or JWT tokens.
How to Protect API from API Call Attacks
I believe that ensuring secure API interactions is a shared responsibility between the application using the API and the service providing it. Here are some effective ways to protect APIs as a developer from API call attacks.
Prevent API Key Leaks
If API keys are exposed in client-side code or public repositories, attackers can use them to make unauthorized requests. To prevent this I suggest educating users on the dangers of having their API key leaked. Then, make sure users rotate their API key periodically to reduce the risk of an API call attack.
Prevent Injection Attacks
APIs that don’t properly validate user input can be vulnerable to SQL injection, XSS, or command injection. This can be solved by:
- Using parameterized queries instead of raw SQL queries.
- Escaping user input to prevent script injection.
- Sanitizing all incoming data to ensure only expected values are allowed.
Alleviate DoS Attacks
Use web Application Firewall (WAF) to block malicious traffic. Also, implementing a rate limit to restrict how many requests a client can send in a given period can stop API call attackers from overwhelming the API with thousands of requests per second.
Secure Authentication & Authorization
If API authentication is weak, attackers can access or modify data without proper authorization. Here is my solution to this.
- Use OAuth 2.0 or JWT for secure authentication.
- Implement role-based access control (RBAC) to restrict sensitive API actions.
- Expire tokens after a certain period to prevent misuse.
Making the Call
Now that you understand how to test an API call, you can start evaluating different APIs and narrow down which suits your app and users best. Then, when you’re ready to connect your application to the rest of the software world, you can make the call.
Editor's note: This post was originally published in September 2021 and has been updated for comprehensiveness.



![How to get a YouTube API key [tutorial + examples]](https://53.fs1.hubspotusercontent-na1.net/hubfs/53/%5BUse%20(1)-4.webp)
.webp)


