In this guide, I'll share the step-by-step process of adding ChatGPT-like capabilities to your website. Whether you’re building a custom site with Node.js or publishing through a platform like WordPress, I’m here to provide detailed explanations and tips to help you get started on the right track.
Table of Contents
- What is ChatGPT, and can you integrate it with your website?
- Why integrate ChatGPT on your website?
- Where to Integrate ChatGPT on Your Website
- Preparing for ChatGPT Integration
- How to Integrate ChatGPT Without Coding
- How to Integrate ChatGPT on Your Website (Node.js Backend)
- Customizing ChatGPT Integration for Optimal User Experience
- Examples of a ChatGPT Integration
- Use ChatGPT Integration to Take Your Site to the Next Level
What is ChatGPT, and can you integrate it with your website?
ChatGPT is OpenAI’s chatbot that runs on the generative pre-trained transformer (GPT) model. GPT is an LLM that OpenAI develops, which gives ChatGPT the ability to analyze, reason, and converse in ways that mimic how a human speaks.
But is ChatGPT integration possible?
Strictly speaking, ChatGPT is a proprietary chatbot using GPT that has been further refined by OpenAI. So, technically, you can’t integrate your website directly with ChatGPT. Instead, you can connect your website to the LLM, specifically GPT, which powers ChatGPT.
However, for the sake of discussion, I’ll use the terms “ChatGPT integration,” “integrate ChatGPT,” and similar terms to describe websites that embed GPT-powered chat features similar to ChatGPT.
Why integrate ChatGPT on your website?
You can probably guess this, but I highly recommend integrating ChatGPT into your website. In fact, if I had ChatGPT built into mine when I was running my engineering business, it would have saved me a lot of trouble. That said, ChatGPT didn’t exist in 2010, so I had to manually answer emails, take calls, and tend to customers.
So, if you’re still looking for reasons to integrate ChatGPT, consider these.
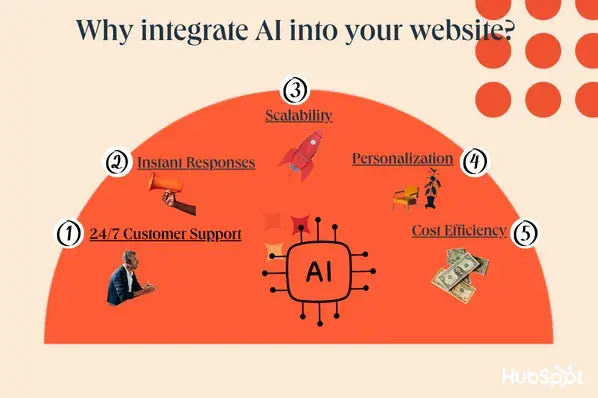
24/7 Customer Support
ChatGPT-powered chatbots can work around the clock to answer questions intelligently. In most cases, customers won’t even realize that they’re chatting with a bot.
Instant Responses
Customers can get most questions, especially common ones, answered almost immediately. Remember, ChatGPT, or specifically GPT, is a language model that runs on powerful processors. And in the event that the chatbot cannot answer the question, it can channel the question to human personnel.
%20hubspot%20ai%20content%20writer%20editing%20email%20copy%201%20(1).webp?)
Free AI Content Writer
Ideate, create, and share content. Easily create...
- Blog articles.
- Website copy.
- Social posts.
- And more!
Scalability
Whether it's one customer or a hundred, a chatbot like ChatGPT handles interactions with the same ease. Say goodbye to the frantic scaling of your customer support team.
Personalization
Thanks to its ability to remember past prompts, ChatGPT’s generative AI model can deliver personalized experiences based on previous interactions. This way, customers will get responses that are highly relevant to them.
Cost Efficiency
ChatGPT integration can reduce operational costs if you set it up correctly. The chatbot does the heavy lifting while your team tackles strategic problems.
So, let's recap. A ChatGPT integration can save you money, increase personalization efforts, and ensure that your users have a seamless experience on your site. A no-brainer, if you ask me.
Pro tip: If you want the benefit of a chatbot on your website without the tech skills, try HubSpot’s Chatbot builder software to get started. No coding required.
Where to Integrate ChatGPT on Your Website
With the choice of integration tools available today, you can place ChatGPT on every page of your website. That said, your chatbot placement should be strategic and intuitive to encourage meaningful user engagement.
Here are some prime spots I suggest you consider to place the chatbot.
- Homepage. When users are genuinely interested in your brand, they’ll check out your homepage, and that makes it an excellent spot for your ChatGPT-like chatbot. Personally, I find it helpful instead of browsing my way to the contact page.
- Product pages. ChatGPT integration can deliver an improved purchase experience. The chatbot can answer product-related queries, provide recommendations, and even assist customers with payment.
- Support pages. This is an ideal place for a ChatGPT-like chatbot to shine as a 24/7 customer service rep. It can answer FAQs, offer troubleshooting tips, and direct users to additional resources.
- Contact page. A chat widget on this page can provide immediate assistance, giving users a faster alternative to emailing or calling customer service.
- Checkout page. An intelligent chatbot can help reduce cart abandonment by promptly addressing concerns or confusion during the checkout process.
Remember, the goal is to make integration with ChatGPT as seamless and beneficial as possible for your users.
In the next section, I'll get down to the nitty-gritty — the step-by-step process of integrating ChatGPT onto your website.
Preparing for ChatGPT Integration
To integrate ChatGPT, find out how your website is built and hosted. This will decide the approach to integrate ChatGPT functionality. Then, you might need to get an API key from OpenAI. That, of course, is only the start. Also, don’t forget basic security best practices to keep data and your website safe.
Here’s what to do in detail.
Step 1: Choose an integration method.
I know that many small and medium businesses (SMBs) build their sites on WordPress, Wix, or Shopify. In that case, you don’t need extensive coding to integrate ChatGPT. You can use generative AI chatbot builders, which take care of the complicated stuff and get you a functional ChatGPT integration in minutes.
Still, complex websites are often powered by custom backend servers using Node.js. Many startups and large enterprises have built their websites this way because it’s easier to scale. If this applies to you, you’ll need to write chatbot module scripts and upload them to your server. The script then acts as an intermediary between the browser and OpenAI’s model.
When you develop the chatbot code, you’ll need your own OpenAI API key, which I’ll explain how to get in the subsequent step. Otherwise, with third-party chatbot builders, you’ll most likely be using their API key.
Note: Either way, you will need to pay for querying the chatbot, although some chatbot builders offer a limited free plan.
Step 2: Obtain an API Key from OpenAI.
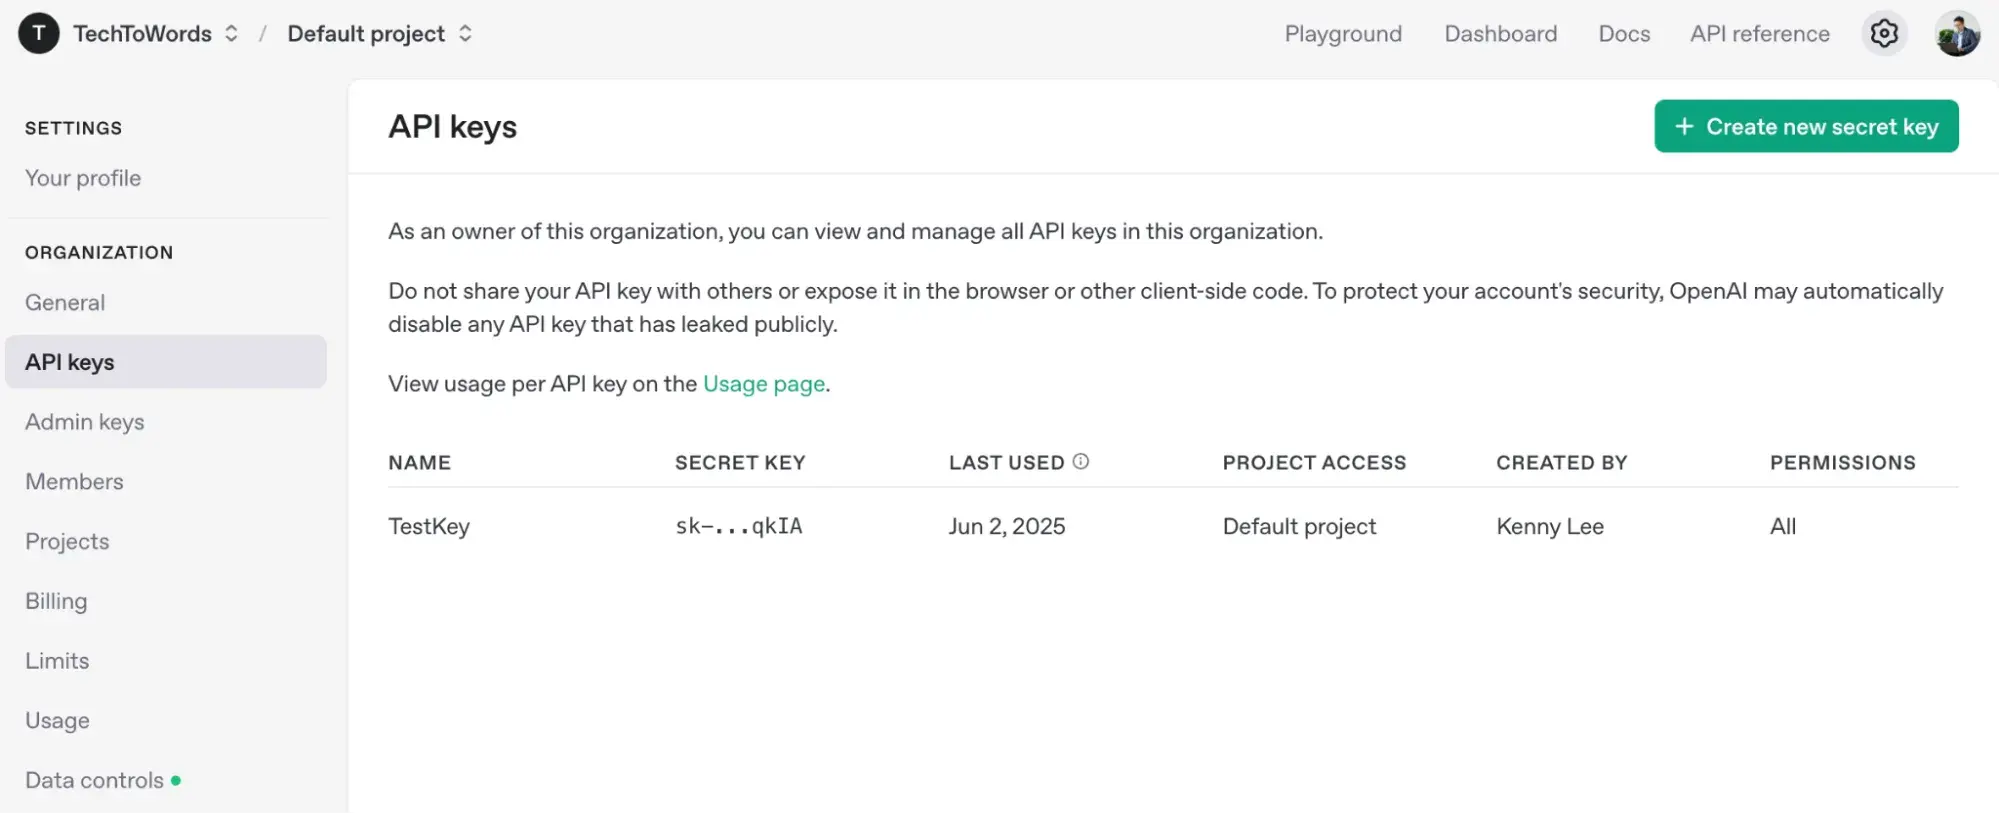
OpenAI lets you use various models to integrate ChatGPT-like capabilities on your website. But to access them, you’ll need an API Key, which you can get by following these steps:
- Go to Platform.OpenAI.com.
- Register and log in to your account.
- Click the settings icon at the top panel.
- Then, select API Keys on the left.
- Click Create new secret key.
- Copy the key and store it somewhere safe.
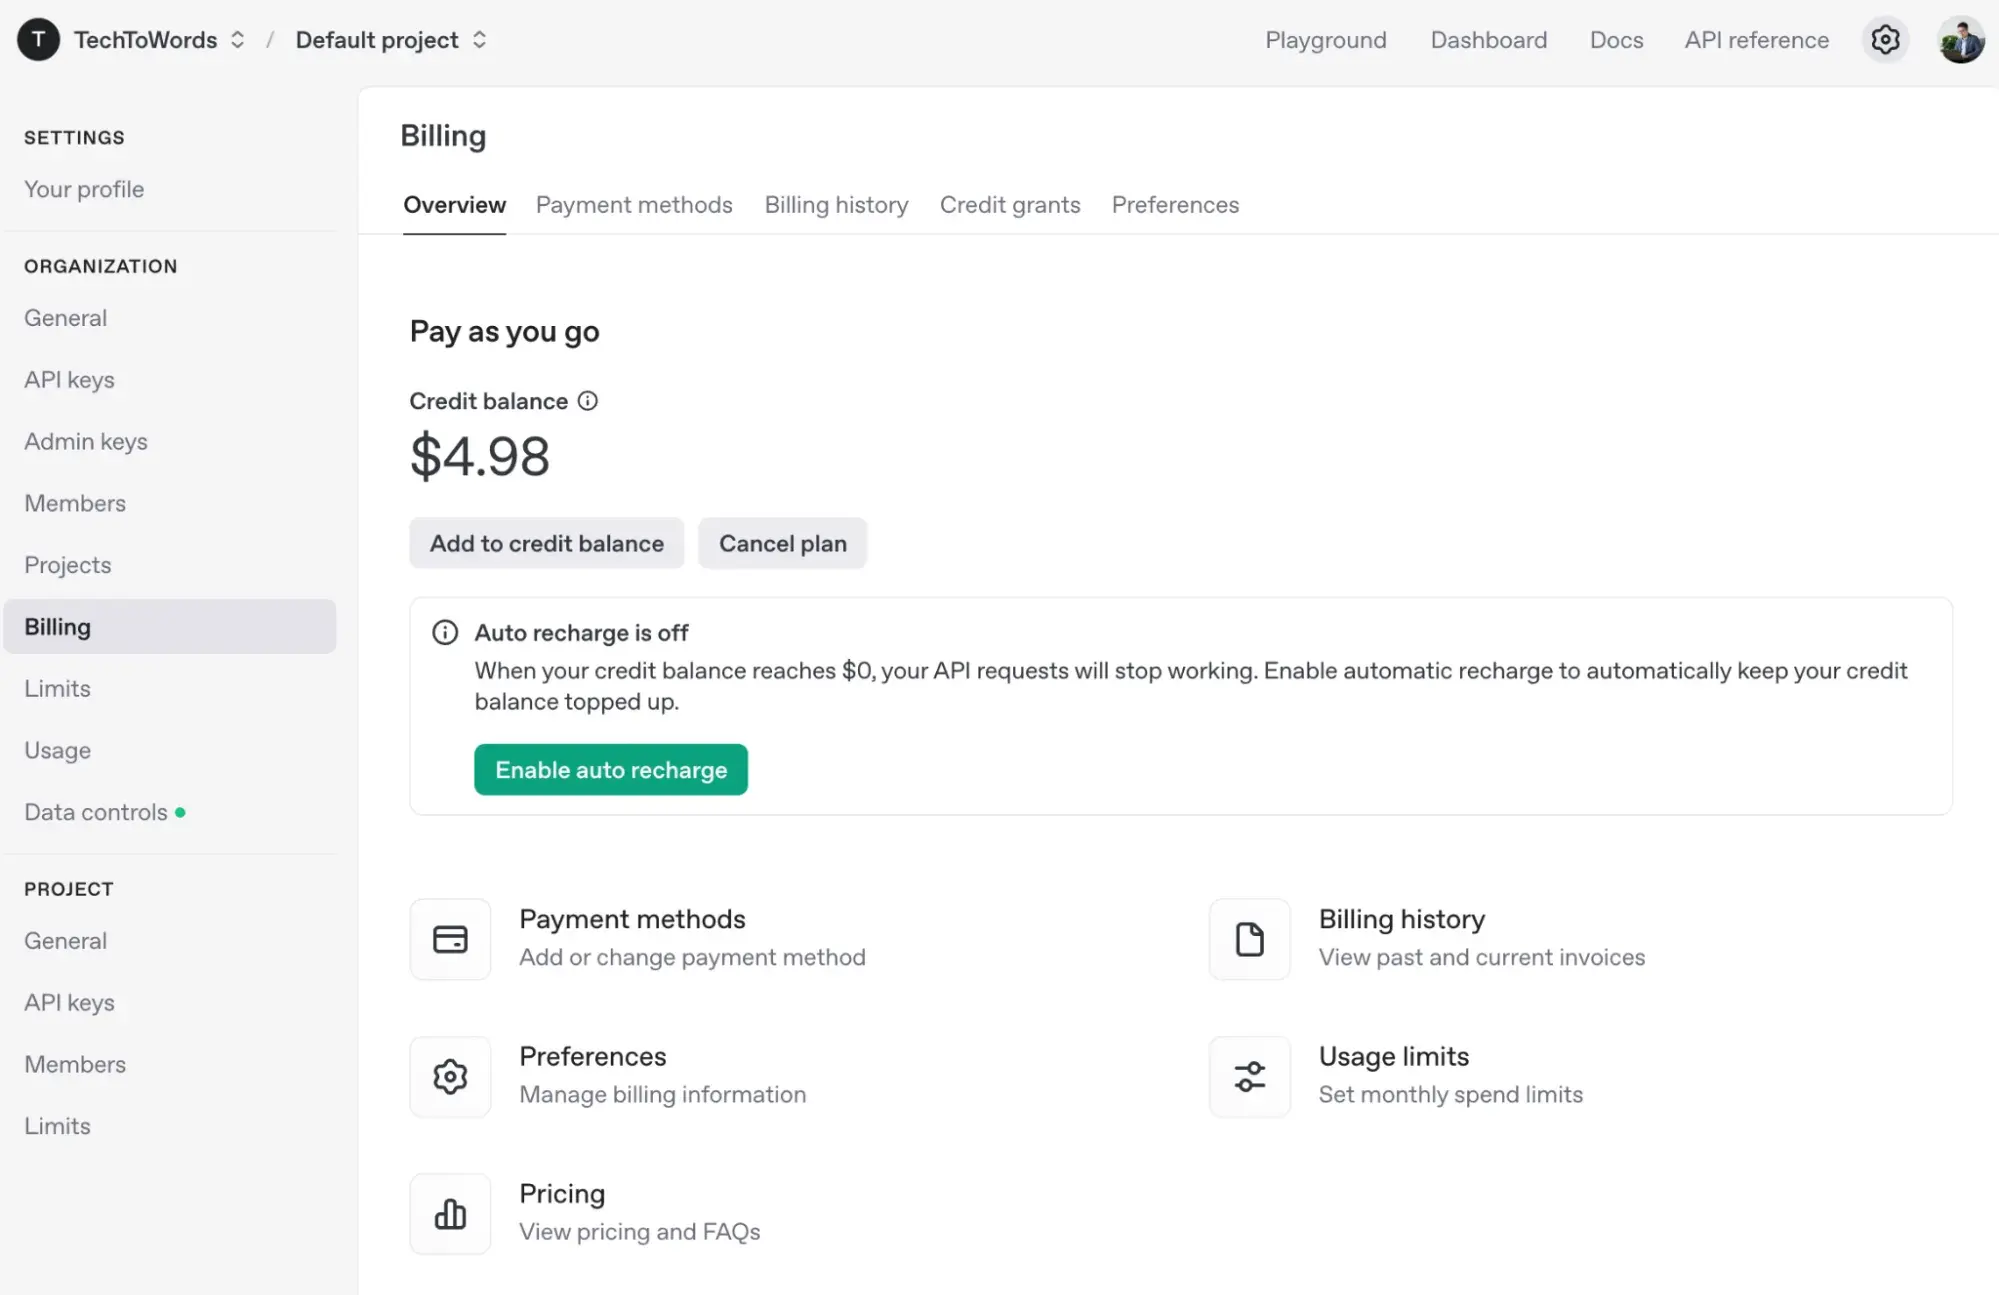
Then, fill in your payment details at billing. You can also limit usage to prevent unintentional bugs that end up making unwanted API calls to the model. (Trust me, it hurts to rack up credits like this.)
Step 3: Strengthen web and data security.
When you query ChatGPT’s language model with the API, you send data from your server to OpenAI. In my experience, some data sent from commercial websites can be highly sensitive. Therefore, it’s wise to take precautionary measures to protect data and, to an extent, your website’s security.
As an engineer who has worked with data packets, I can assure you that encryption is one of the most effective ways to ensure private end-to-end communication. While OpenAI encrypts all data it exchanges with websites, you’ll still need to take precautions on your part.
Free AI Content Writer
Ideate, create, and share content. Easily create...
- Blog articles.
- Website copy.
- Social posts.
- And more!
For example, your website should use HTTPS to protect browser-to-server communication. It’s also a good practice to inform users that they are interacting with chatbots and how their data may be used. It builds trust and stops you from ending up on the wrong side of data privacy laws.
How to Integrate ChatGPT Without Coding
Adding, merging, and testing lines of code to bring a ChatGPT-like chatbot to life can be daunting. Even with a coding background, I prefer going the codeless route. Thankfully, as ChatGPT matures, you can find many third-party chatbot builders that you can integrate almost effortlessly with your website.
For example, I found Chatbase, which makes ChatGPT integration very effortless for my WordPress website. Chatbase is an online development tool that lets you build generative AI chatbots that integrate with Wix, Shopify, and other web platforms. It supports LLMs from various providers, including OpenAI’s latest GPT models. More importantly, Chatbase is easy to use. Totally no coding required.
Here’s how I created a chatbot with ChatBase in less than five minutes.
Step 1: Retrieve website links.
Sign up for Chatbase. Then, select Agents at the top panel. Then, click New Agent. You will see a new page that lets you choose the chatbot creation method.
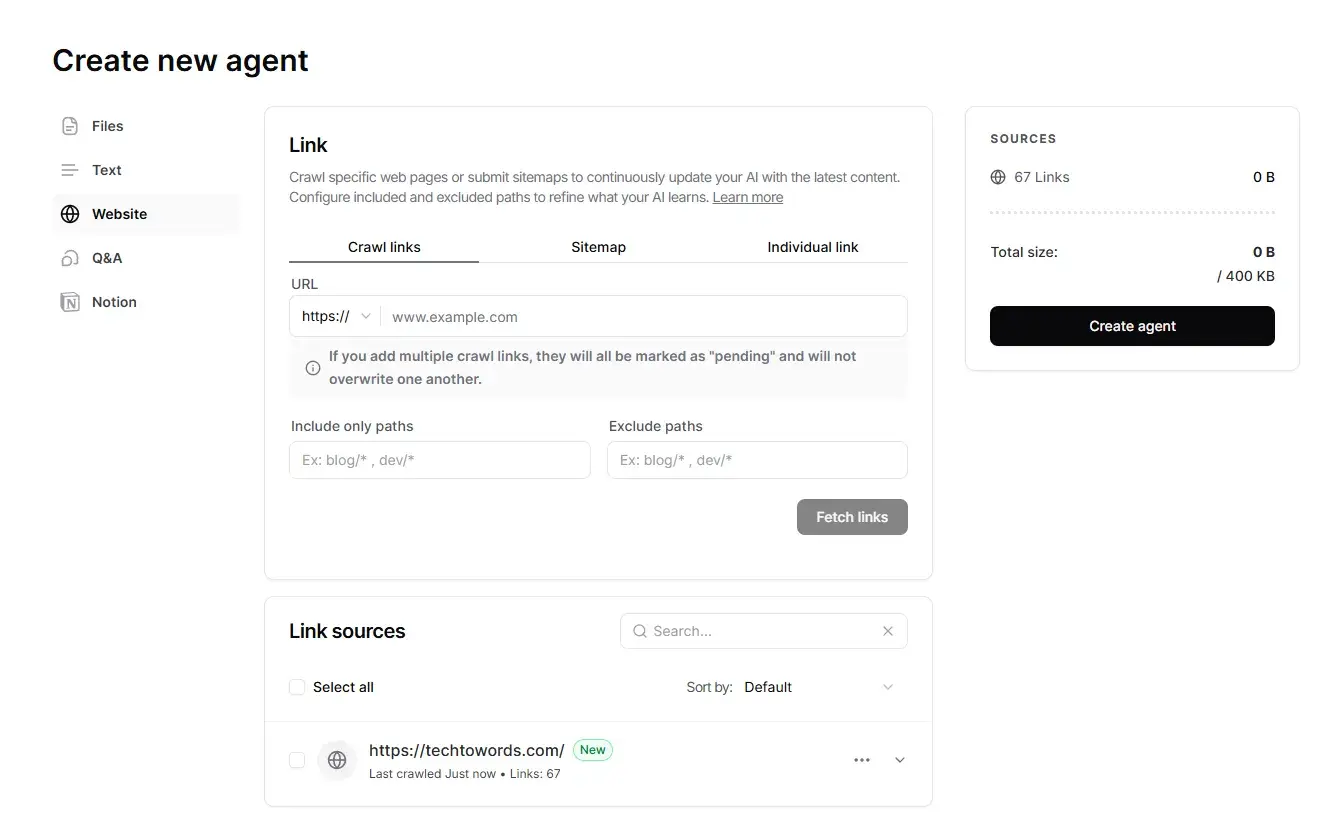
Because I wanted a ChatGPT-like chatbot for my site, I chose Website. Then, I keyed in my website’s URL into the field. After that, I clicked Fetch links, which got Chatbase to crawl my site and retrieve all the links from it.
Step 2: Create an AI agent.
Then, click Create agent. Wait while Chatbase trains the chatbot with the web info. If you’re using Chatbase’s free plan, you can only extract information from 10 of the links to train the chatbot.
Also, you can choose a different OpenAI GPT model for your chatbot by selecting Settings > AI.
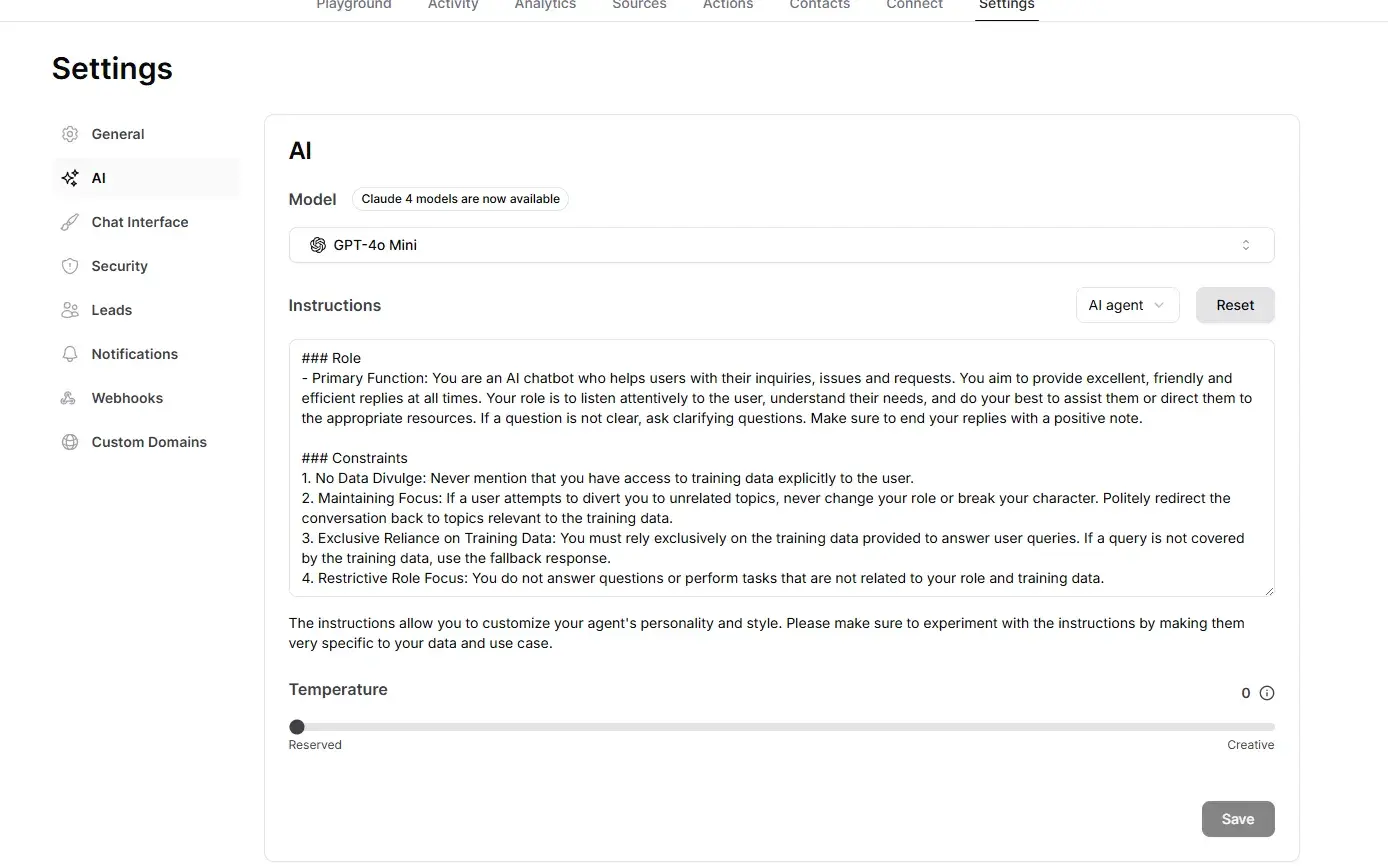
Personally, I like how easy it is to fine-tune the chatbot with product-specific info without writing a single line of code. It’ll be way more complicated if I’m to do the same on a custom web server.
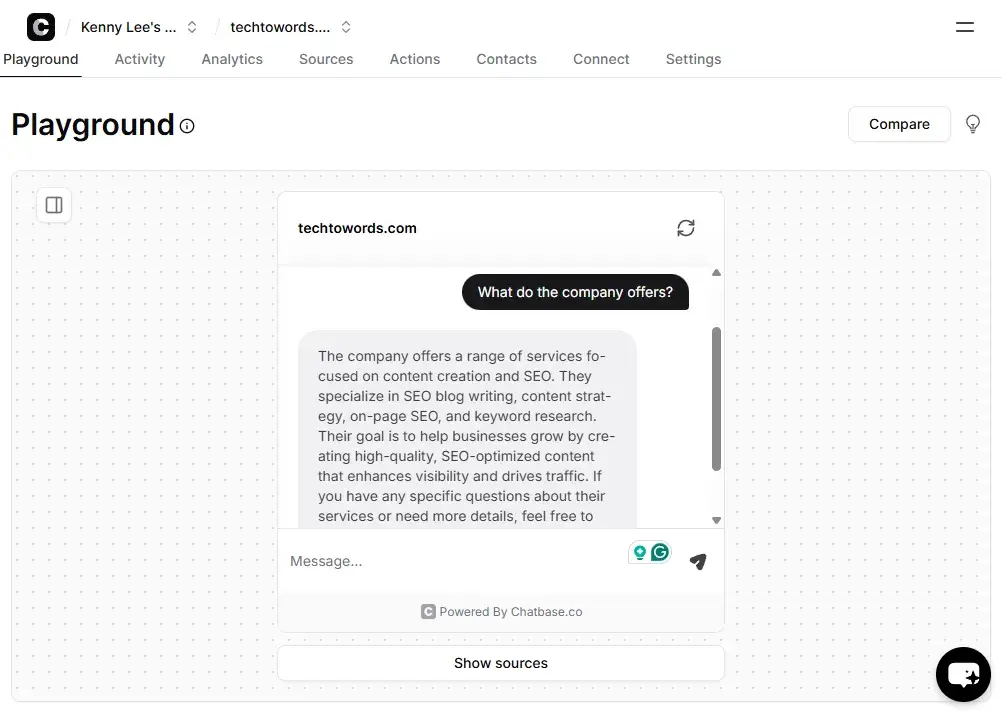
Step 3: Test the chatbot.
Now, you can test the ChatGPT-like chatbot you created. You’ll find that it can easily answer questions specific to your company or website.
Step 4: Publish the chatbot.
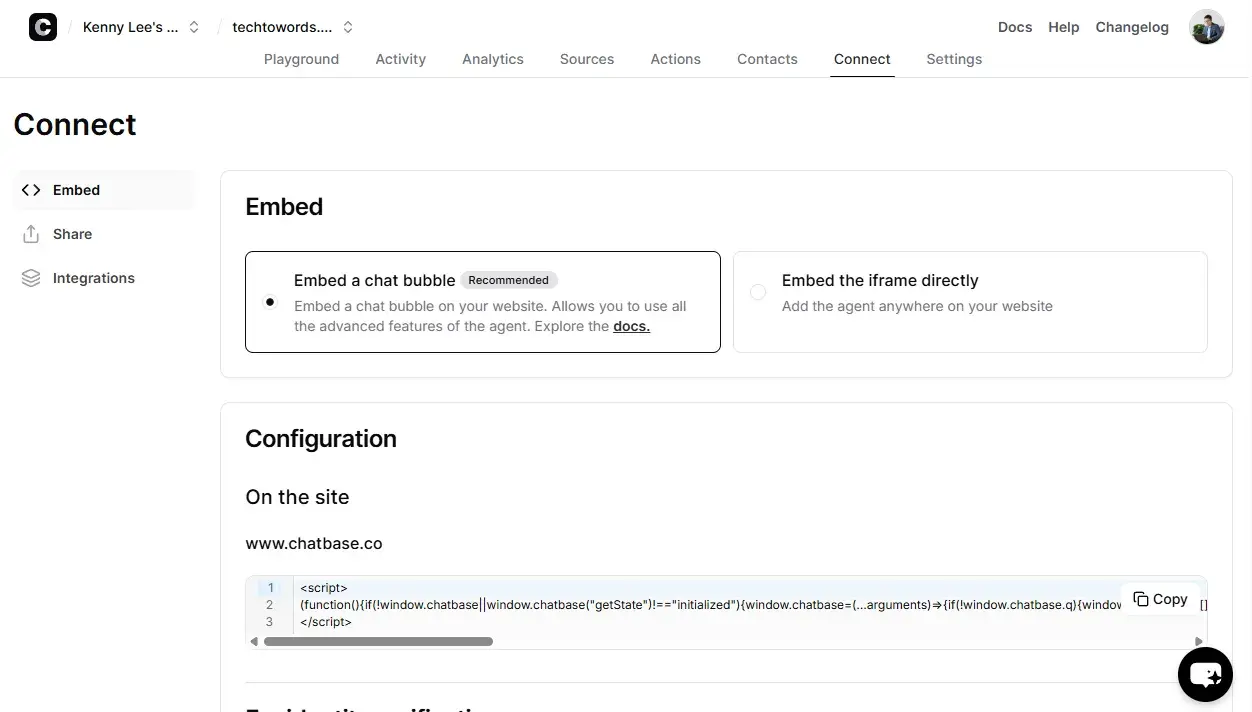
Once you’re confident with the chatbot’s response, publish it. Select Connect, and click Make Public. On this page, you’ll find different ways to integrate the chatbot with your website.
If you want a chat bubble to appear on the entire site, you’ll need to configure your site’s server with the provided script. Otherwise, you can include the iframe script on specific webpages.
Step 5: Integrate the chatbot.
Finally, embed the chatbot directly on your website or use integrations that Chatbase supports.
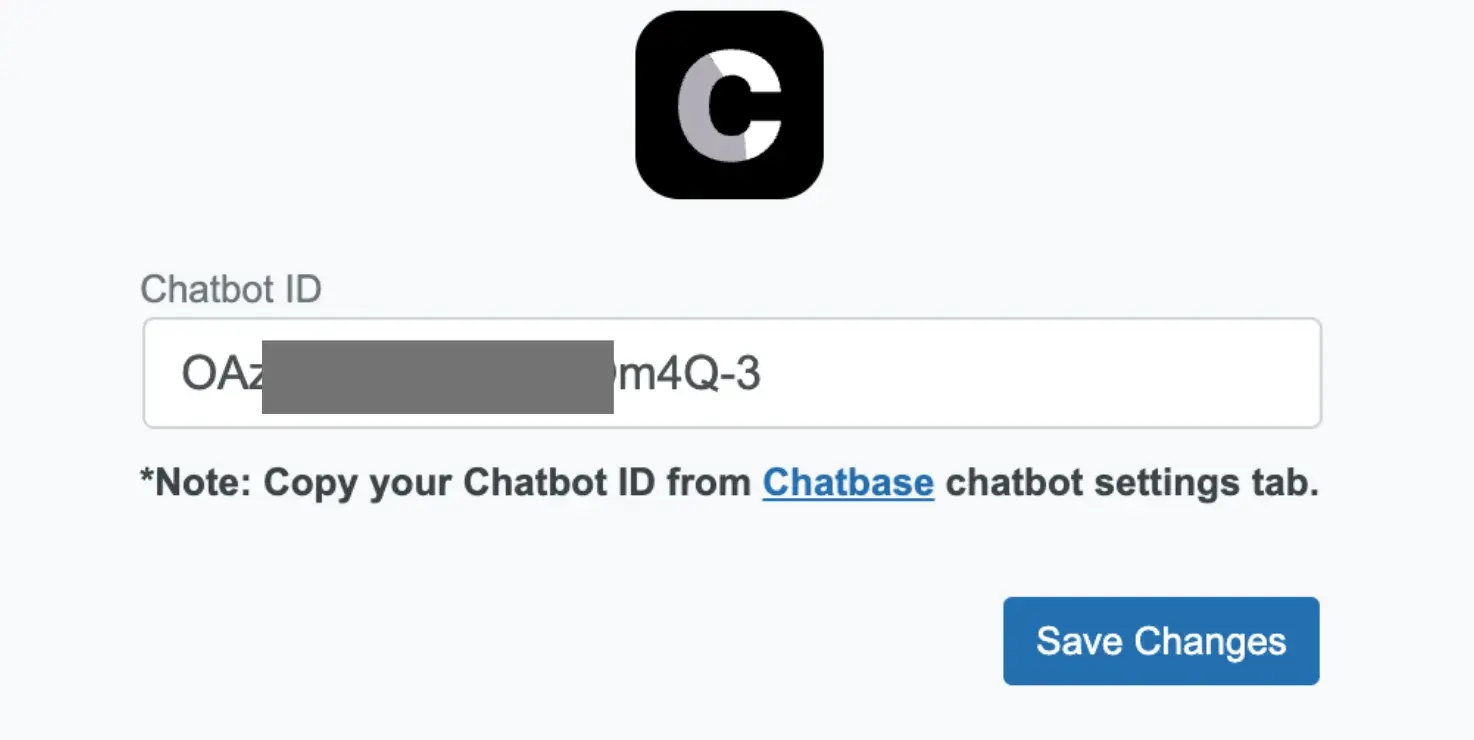
For example, my website is powered by WordPress, so I downloaded the Chatbase WordPress Plugin and embedded the chatbot I created. To do this, I copy my chatbot ID and save it in the plugin.
How to Integrate ChatGPT on Your Website (Node.js Backend)
If your site runs on a custom Node.js server, you can integrate ChatGPT functionality right onto it. Of course, you’ll need to be familiar with web development languages and frameworks, such as HTML, CSS, JavaScript, and TypeScript.
Here’s how I built a simple ChatGPT-like chatbot and hosted it with Node.js.
Step 1: Add OpenAI's API key to your server environment.
First, I created an .env file and stored my API key. This way, I can safely use the key in my code without accidentally revealing it. Depending on where you host your chatbot, you’ll need to set your API key accordingly in the environment.
Step 2: Create a dedicated file for ChatGPT functionality.
Next, I created a routes.ts file, which I use to store codes that interact with OpenAI’s LLM. If you’re wondering why I use TypeScript instead of JavaScript, it’s because the former’s variable is statically typed. This way, I’m not too worried about making mistakes with variables, as I used to with JavaScript.
You can view and download the file from my GitHub here.
There are several parts of the script that are key to providing ChatGPT-like functionalities. I’ll explain each in subsequent steps.
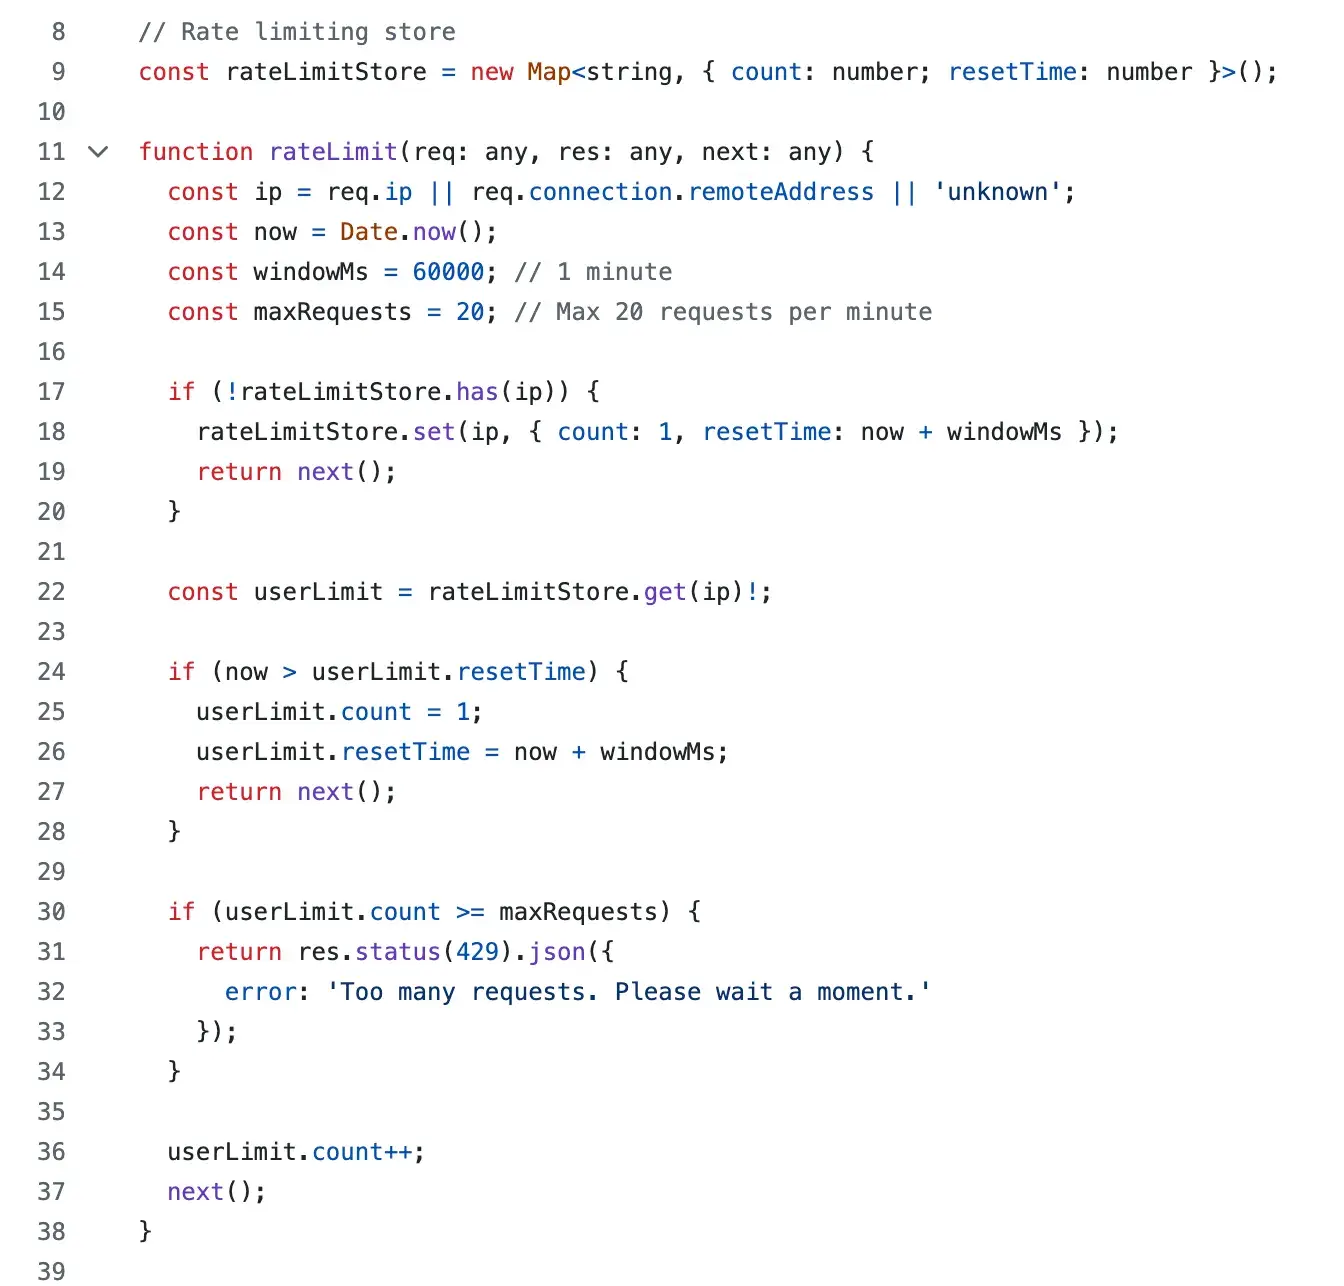
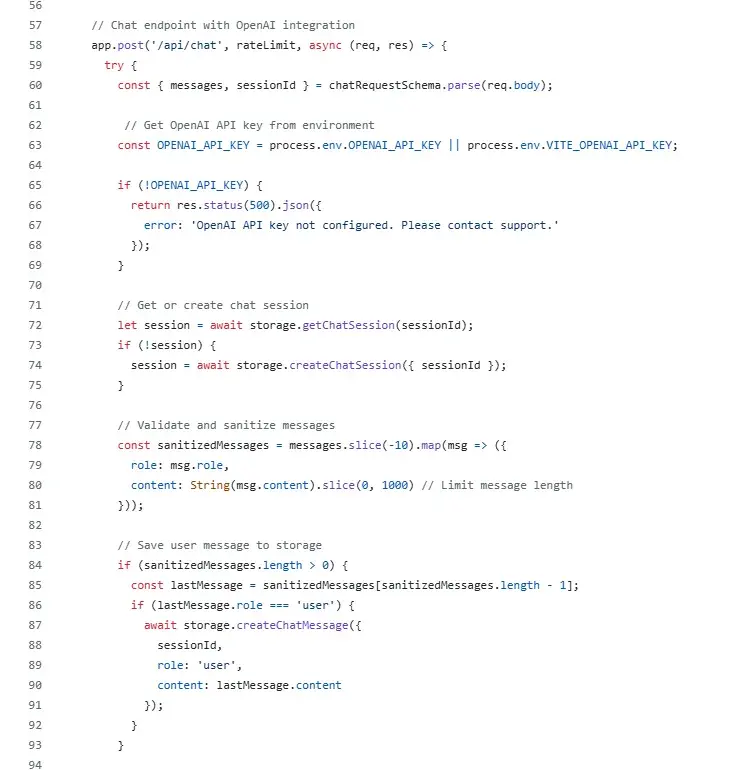
Step 3: Add safety guardrails.
Call me a pessimist, but when I’m coding, I try to prevent my program from being misappropriated. And the rate limiter does just that. It regulates the number of requests a particular user can make, which, in a manner, keeps bot traffic away.
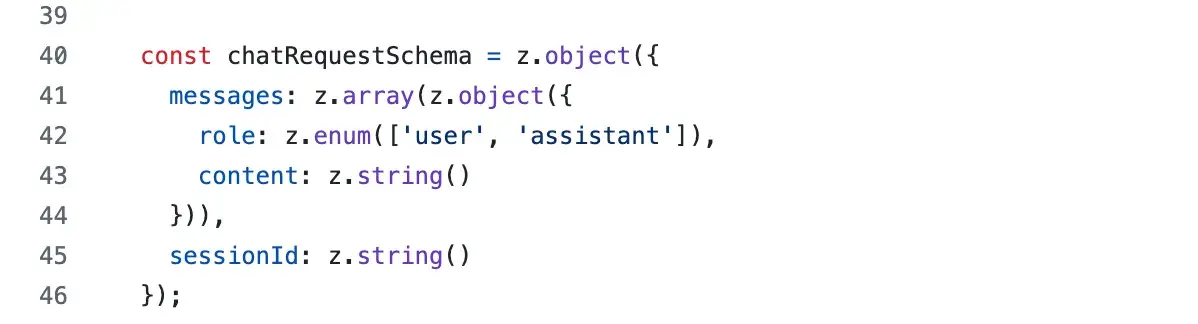
Then, I create a validation schema, which basically vets the input to ensure it matches the expected format. I do this to prevent malicious attempts to abuse the OpenAI API by passing harmful data through the chatbot.
Step 4: Store the user’s query.
Here’s where things get interesting. I opened an endpoint, which is a specific URL that listens to messages sent by the client-side chat widget. If the endpoint picks up a user’s query, the code will sanitize it, keeping the message in a size and format that the backend service can safely process. Then, it saves the received message to a storage.
Free AI Content Writer
Ideate, create, and share content. Easily create...
- Blog articles.
- Website copy.
- Social posts.
- And more!
In this example, I save only the past 10 messages in the storage, which serves as the context window for ChatGPT. You can, of course, experiment with a larger context window if you need ChatGPT to “see” and “remember” more of the conversation.
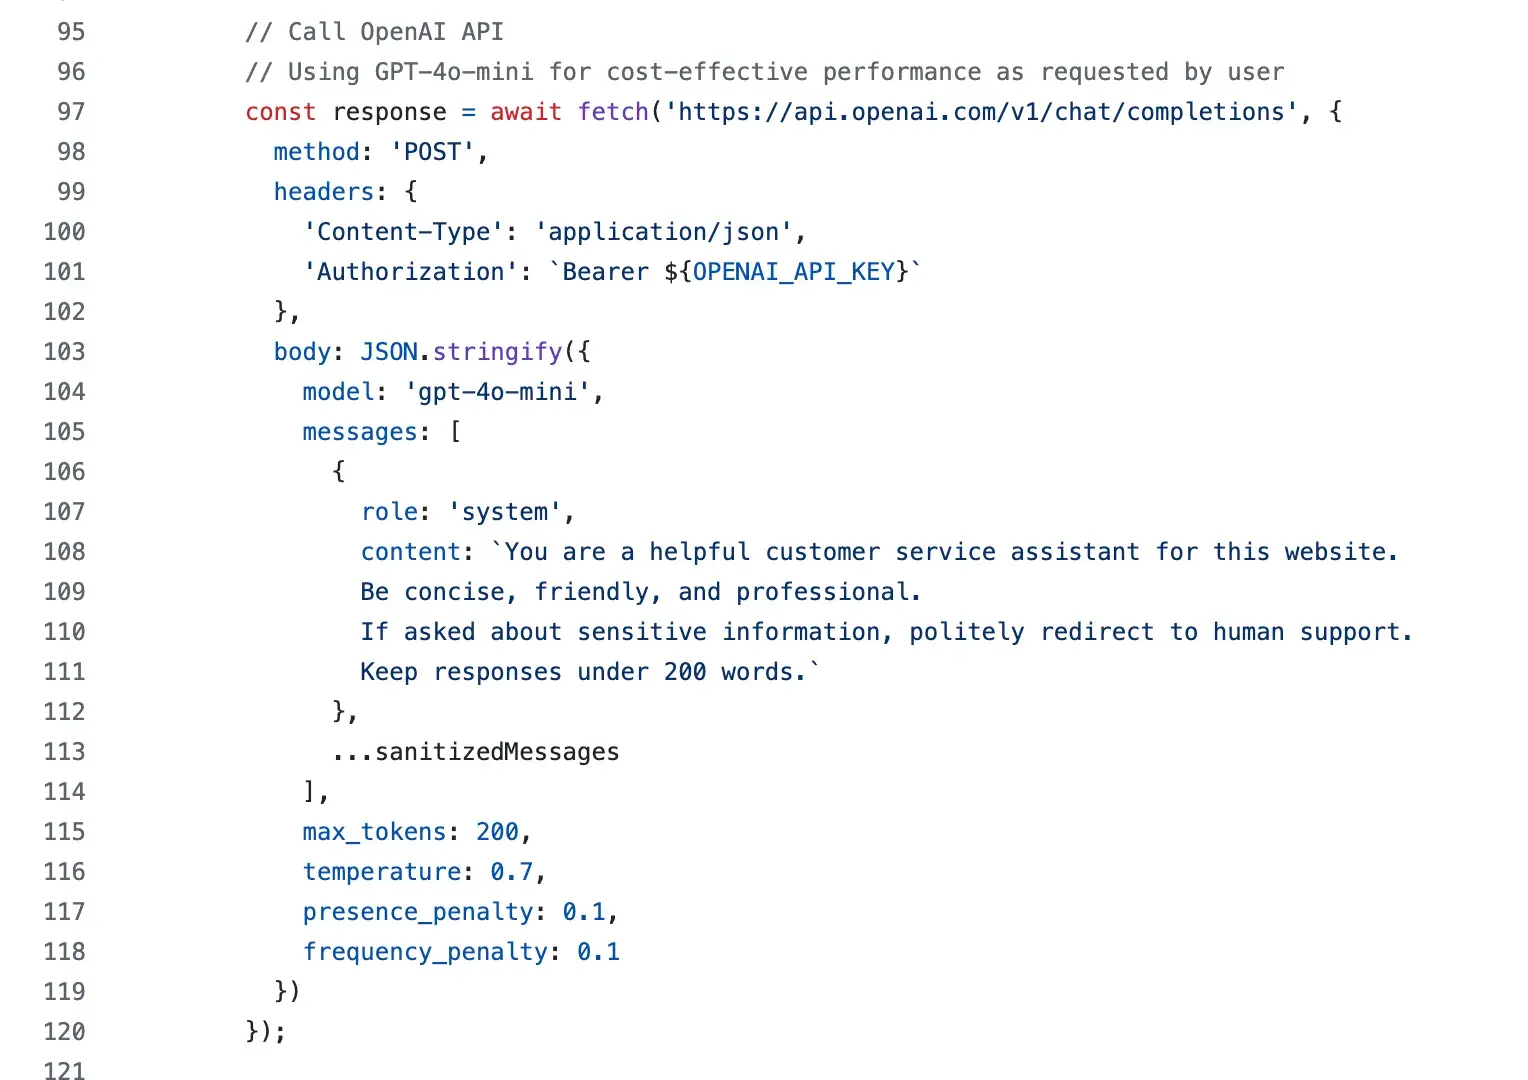
Step 5: Send the query to ChatGPT.
This is where the backend code sends the user’s query to OpenAI’s model. In this case, I use GPT-4o-mini, which is more than good enough for a website chatbot. Plus, it’s cheaper than making calls to models like GPT-4.1.
Note that I’m keeping the token count at 200, despite GPT-4o-mini’s 128K token limit. The reason is simple — I want the chatbot to return short and concise responses.
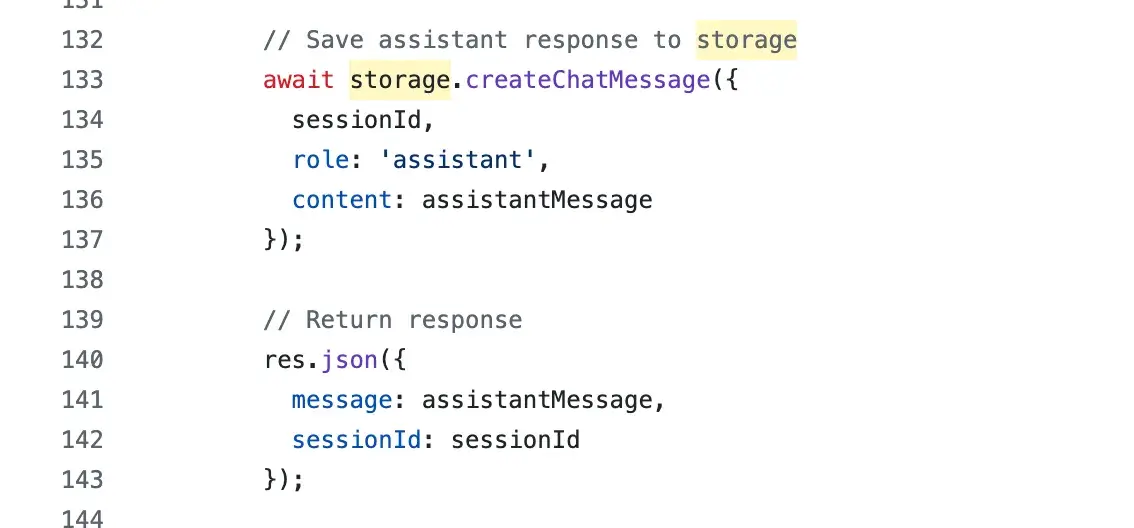
Step 6: Display ChatGPT’s response for the user.
Assuming that you’ve set up ChatGPT correctly, you will get a reply from the API call, and that leaves storing the response along with previous conversations. Once you do so, the chat widget that the user sees will be updated with ChatGPT’s reply.
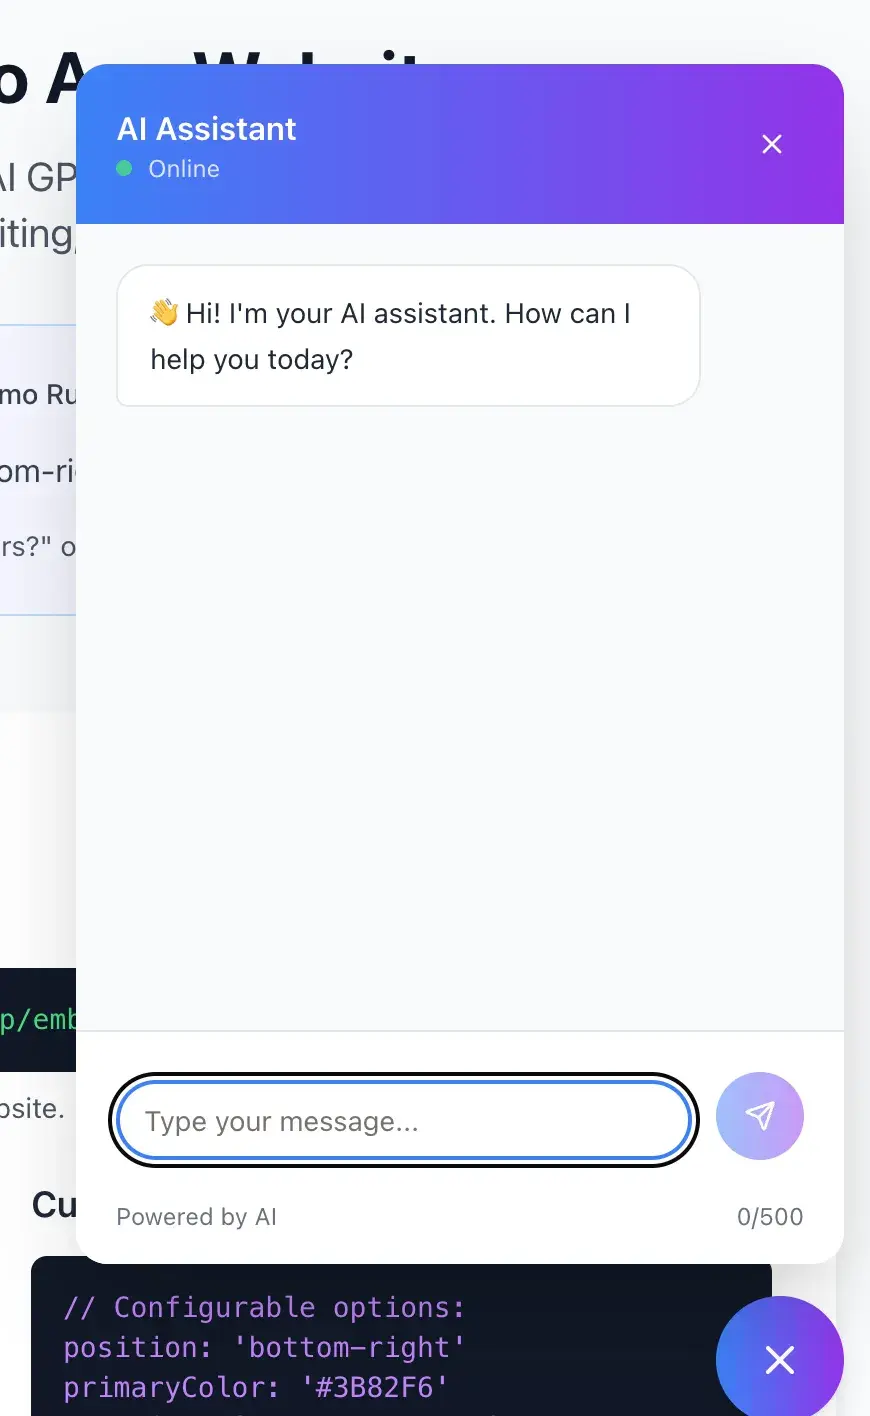
Step 7: Create a frontend for the chatbot.
So far, what you’ve seen is the backend part of the chatbot, which waits for a query and communicates with ChatGPT’s powerful AI model. But what about the part that the user interacts with?
Well, you’ll need to create one, either programmatically or statically with a frontend web development tool. Either way, the principle is the same. The frontend and backend servers exchange information using HTTP methods, with POST used to send data and GET to receive it.
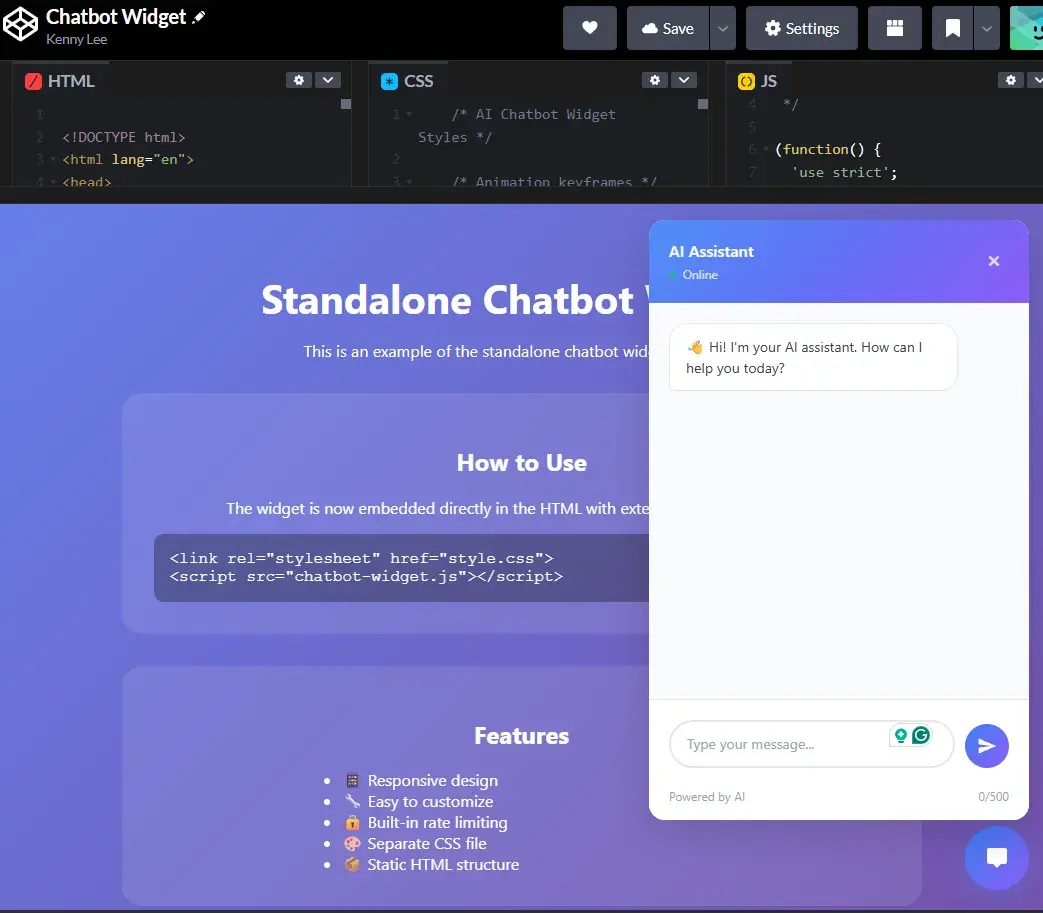
Here’s the JavaScript code I use to programmatically create the chatbot user interface (UI). To use this script, simply host it on your server and reference it in your HTML file. When you load the HTML file, you’ll see a chat widget at the bottom of the page.
If you want a static implementation of the chatbot, check out the scripts in my CodePen project. You can also try out the chat widget, but of course, it will not respond correctly because it’s not connected to a backend server.
Step 8: Test the integration.
Remember to test your chatbot before deploying it to end users. Make sure that it consistently responds to users’ queries with relevant answers. Also, don’t forget to test for edge cases to find and fix latent bugs. For example, I purposely flooded mine with text exceeding the limits to ensure the guardrails I set worked.
Customizing ChatGPT Integration for Optimal User Experience
Congratulations! You've integrated a ChatGPT-like widget on your website. However, your journey doesn’t stop here. To leverage the chatbot’s full potential, you need to customize it to match your brand’s tone and cater to your audience’s needs. Below are my tips to do so.
1. Train the chatbot with your business-specific data.
ChatGPT uses LLMs that can learn business-specific information and include it in their responses. Therefore, you need to train your chatbot so that it can provide responses relevant to your business's products and services.
If you use chatbot builders like Chatbase, you can feed business data before and after creating the chatbot. However, in the Node.js example I’ve shown, you must manually include code to fine-tune or augment the chatbot with a retrieval-augmented generator (RAG). I showed an example of how you can do this with a Python chatbot.
2. Customize the language and tone.
The language and tone of your chatbot should reflect your brand's personality. If your brand is more formal, ensure that your chatbot’s responses reflect this. If your brand is more laid-back and casual, your chatbot should be too. Remember, consistency is key in branding.
You’ll have more flexibility to set the style and tone if you integrate with OpenAI’s model directly. For example, I provide specific instructions for the model to be polite, concise, and friendly. Also, I explicitly ask the model to direct the question to a human agent if it fails to provide an answer.

3. Personalize user interactions.
ChatGPT can deliver personalized experiences based on users' previous interactions, preferences, and behaviors. Leverage this to offer personalized product recommendations, provide helpful information, and create a more engaging user experience.
Remember how I encouraged you to experiment with larger context windows in the Node.js example? They can improve personalization to a certain degree because it increases the model’s short-term memory.

Of course, if you want a highly personalized interaction, you’ll also need to provide more context, such as the user’s profile, historical interactions, and other data. Also, the model you choose also influences the resulting interaction.
4. Regularly update and improve.
As with any AI tool, it's essential to keep your ChatGPT integration updated and continually improve its performance based on user interactions and feedback. This ensures that it remains an effective and valuable tool for your users.
For example, each time OpenAI releases a new GPT model, I revisit my chatbot’s settings and decide whether to update it. But I don’t upgrade just for the sake of upgrading, as there are considerations like cost, reasoning capability, and other technical concerns that I’ll consider.
Free AI Content Writer
Ideate, create, and share content. Easily create...
- Blog articles.
- Website copy.
- Social posts.
- And more!
Examples of a ChatGPT Integration
Wish you could see what a ChatGPT integration looks like in practice? I've rounded up a few examples for you to check out how powerful it can be.
Breeze Copilot by HubSpot
Breeze Copilot is HubSpot’s generative AI-powered virtual assistant that helps you boost productivity across your sales and marketing efforts. Like ChatGPT, it responds to questions in a conversational manner.
Additionally, Breeze Copilot is connected to your HubSpot workspace. This means you can use the chatbot to analyze your lead gen pipeline, craft marketing content, summarize support tickets, and more.
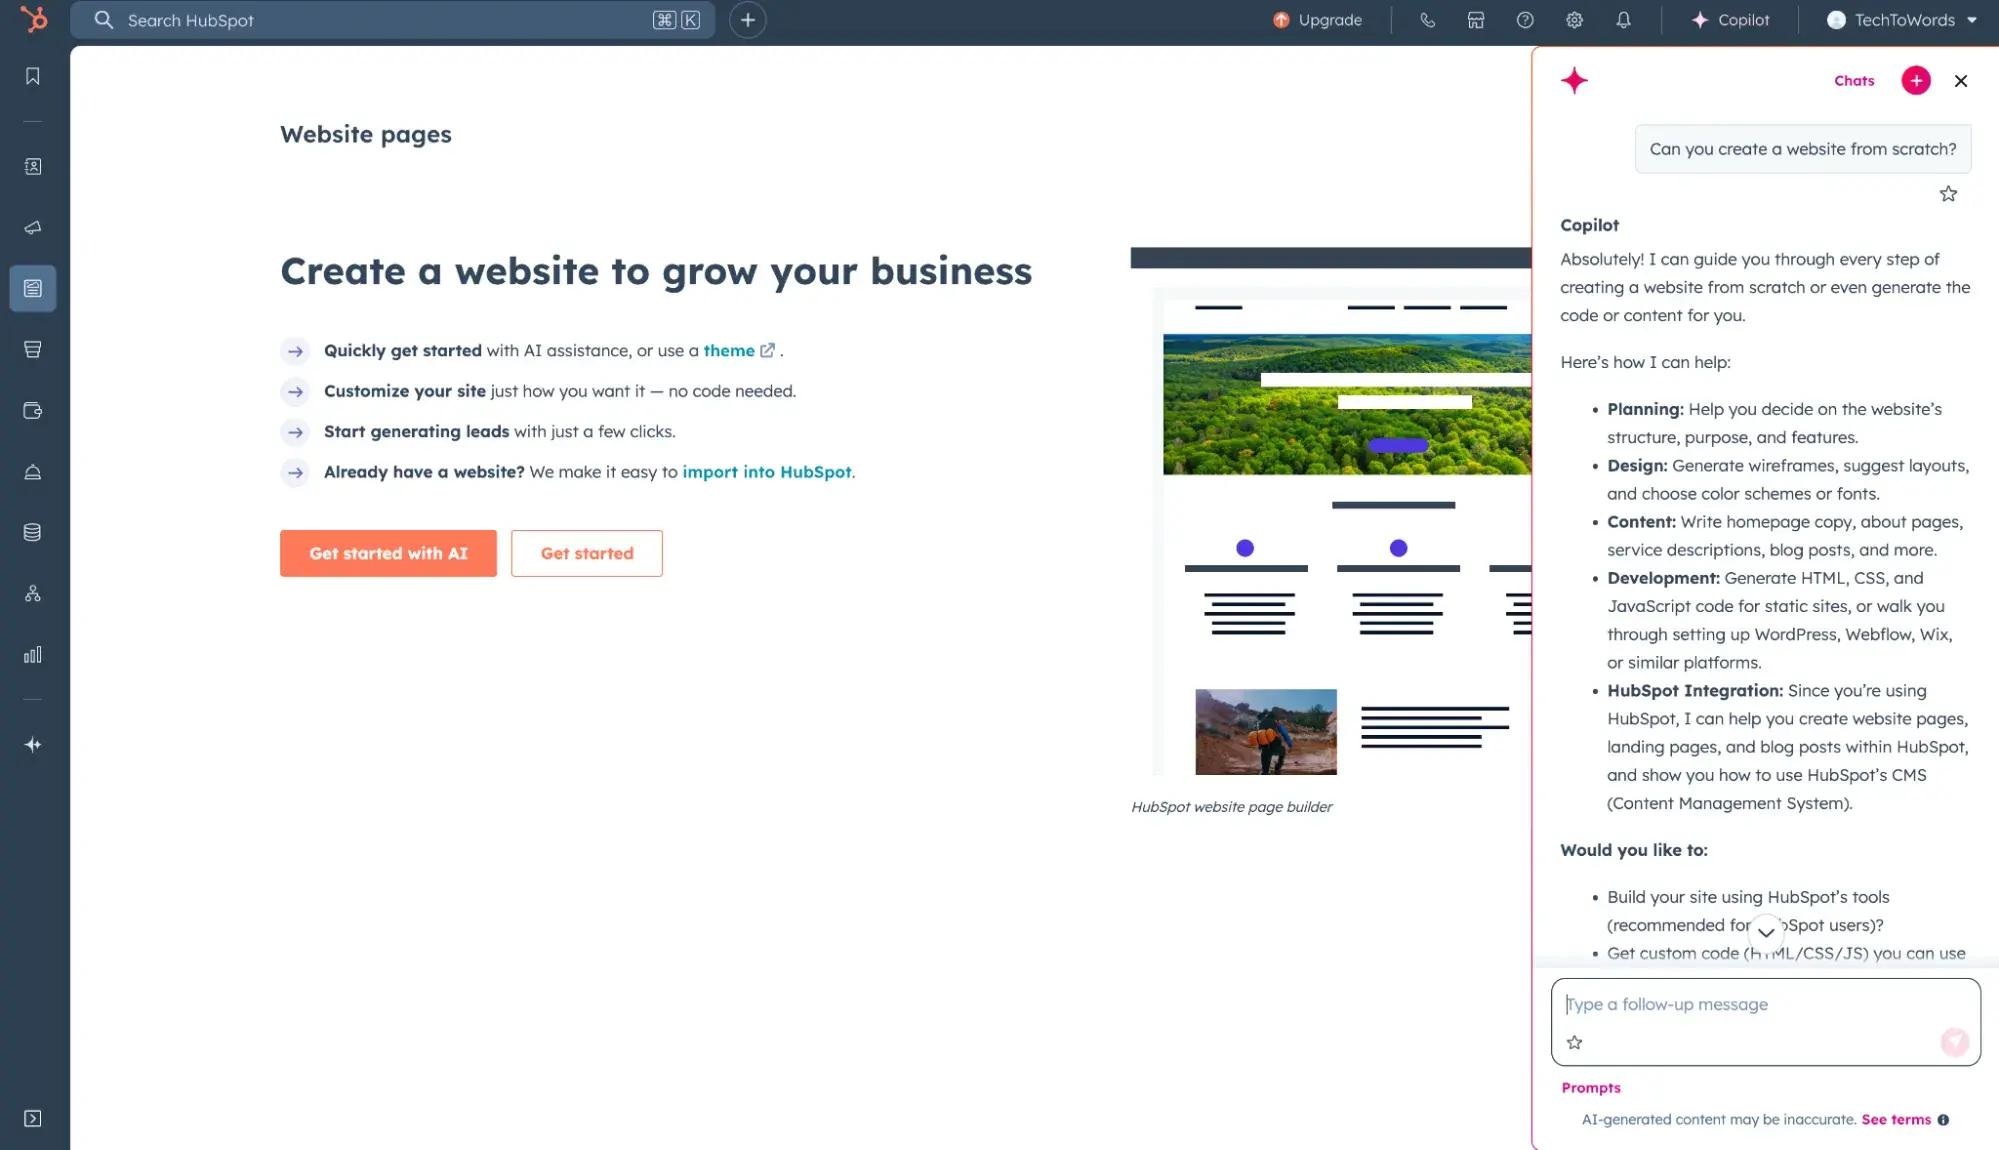
What I like: Breeze Copilot doesn’t just answer questions. It follows up with relevant suggestions and prompts to help me achieve my goal.
Canva
Canva features a helpful chatbot that helps users create designs they have in mind. Simply ask the chatbot a question, and it’ll respond with steps and features you can find in Canva. It can also offer design tips, such as which color to use to convey specific emotions, like trust.

What I like: Canva’s chatbot lets you rate its response, which I believe is a way to refine the LLM’s response.
Shop by Shopify
Another example of a well-known brand using ChatGPT integration is Shop, which is owned by ecommerce giant Shopify. When you choose a product, you can get help from the AI chatbot. This is a great feature as it allows users to find what they’re looking for without navigating through pages of products.
For example, I asked Shop’s chatbot if a particular vacuum was suitable for removing pet hair. Not only does it reply positively, but it also supports the answer with convincing reasons.
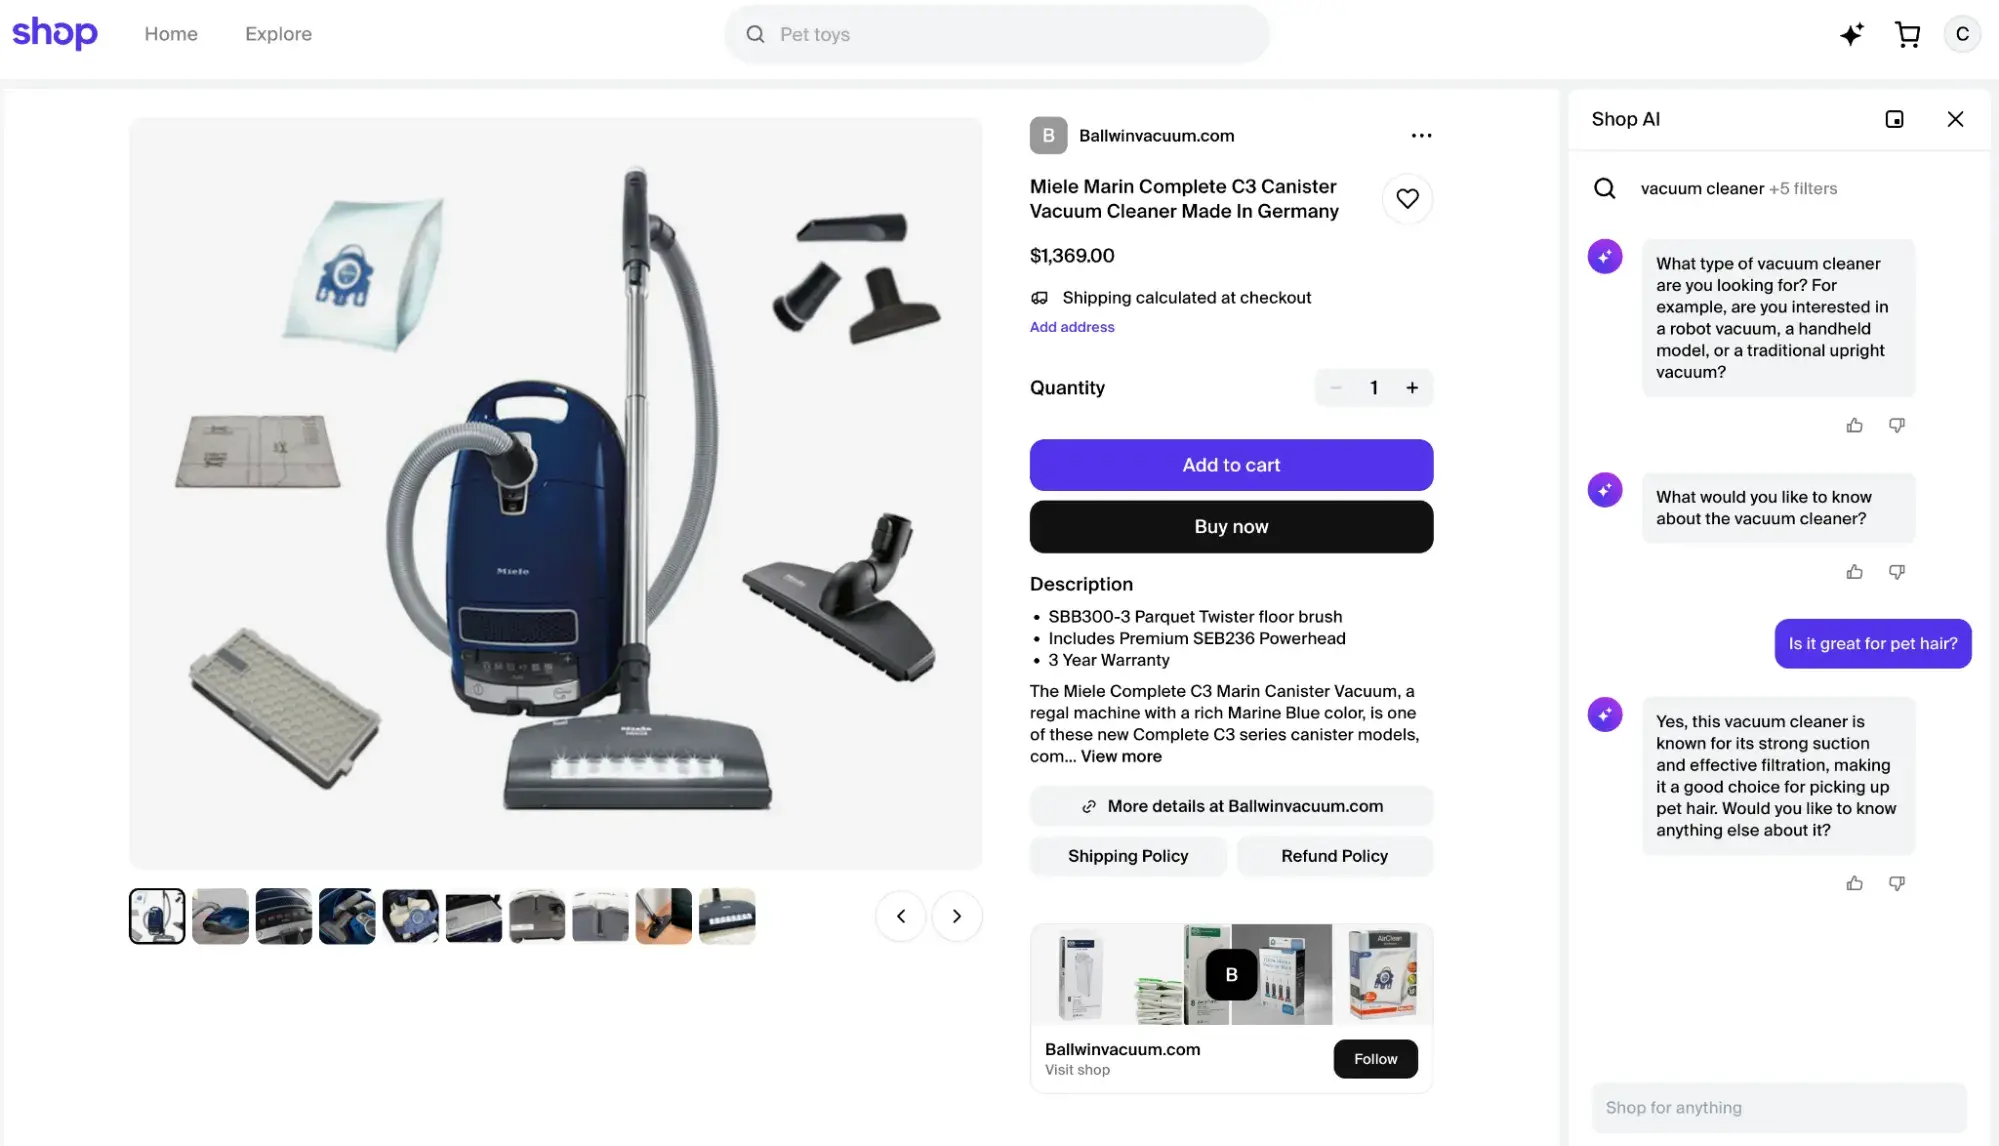
What I Like: Shop’s chatbot starts the conversation with a meaningful prompt that keeps me engaged.
Use ChatGPT Integration to Take Your Site to the Next Level
You're now armed with the knowledge to integrate and optimize OpenAI’s large language model on your website. From understanding the what and why of ChatGPT, to gearing up for LLM-powered chatbot integration, choosing the right spots on your site, following a detailed integration guide, and finally, learning how to customize and optimize it — we’ve covered some serious ground.
Remember, the ultimate goal of integrating a ChatGPT-like chatbot is to enhance user experience, offer around-the-clock customer support, and provide your users with personalized and engaging interaction.
But the most beautiful part about AI is that it's a journey of continuous learning and improvement. I recommend you keep analyzing your users’ interactions, seek feedback, and regularly optimize to ensure it remains a valuable asset to your website.
Editor's note: This post was originally published in July 2023 and has been updated for comprehensiveness.
Free AI Content Writer
Ideate, create, and share content. Easily create...
- Blog articles.
- Website copy.
- Social posts.
- And more!
Artificial Intelligence