If you change your site address, then /wordpress/ will be removed from your URL, but you’re not actually moving your site from the subdirectory to the root directory. As a result, the URLs of media files on your site will still include the subdomain name. To move your WordPress site to the root directory, you can use a plugin. This method will require more time and effort but ensures that no URLs on your site will display /wordpress/.
We’ll take a closer look at each method below.
Removing /wordpress/ from URL of a Blank Site
Say you save your WordPress file in the subdirectory and realize your mistake immediately. Your site is brand new, with no content or configured settings. In that case, you're in luck.
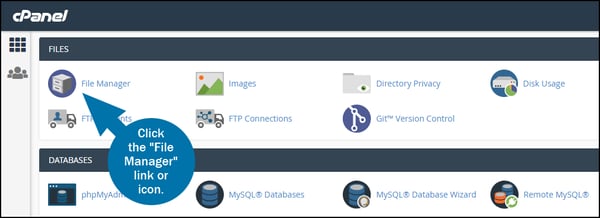
All you need to do is log in to the control panel of your hosting account and open the File Manager. You can find it under the Files section.
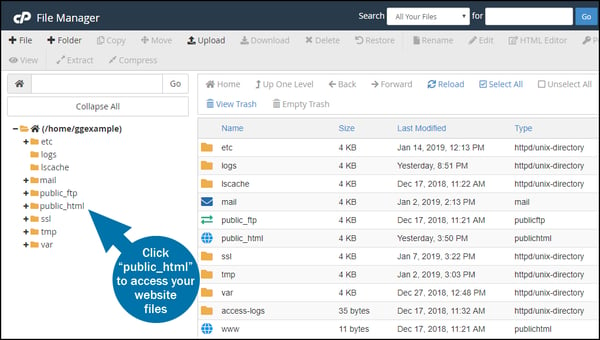
In the navigation menu on the lefthand side of your screen, click on the public_html folder. Please note that, depending on your hosting provider, this folder may also be called www, htdocs, or httpdocs.
Locate and open the “/wordpress” sub folder. Inside, you should see a .zip file that contains the WordPress installation. Right-click to delete it.
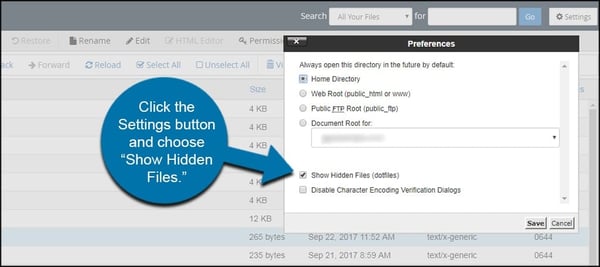
If you don’t see the folder, then go to Settings. A window labeled “Preferences” should appear. Select the box labeled “Show Hidden Files.” You should now be able to see the folder and delete it.
Download WordPress again and save the .zip file to your computer. Navigate back to your public_html folder and upload the WordPress .zip file there.
Nice work! WordPress is now installed in your root directory.
Removing /wordpress/ from URL of a Site with Content
If you’ve already added content to your site or configured its settings, then you won’t want to delete it and start over. In that case, you can either change your site address or move your site to the root directory to remove /wordpress/ from your site’s URL.
Let’s start with the easier method: changing your site address. We’ll then cover how to move your site to the root directory, which is the only way to remove the subdomain name from all URLs on your site, including those of images.
Change Your Site Address
To start, log in to your WordPress admin dashboard and go to Settings. Click General.
Here, you’ll see two URL fields — one labeled WordPress Address and another labeled Site Address — that both include /wordpress/.
Go ahead and delete "/wordpress/" from the Site Address field, but keep it in the WordPress Address field. When you’re done, scroll to the bottom of the page and save your changes.
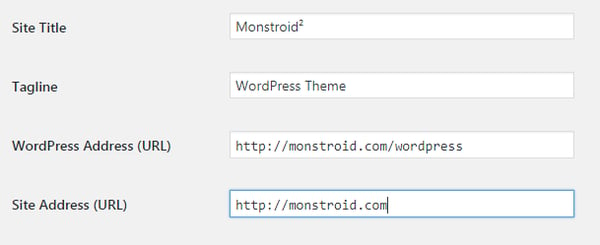
At this point, if you try to type either URL into a browser, you'll be presented with an error message that says your site doesn't exist. Don’t worry — that's supposed to happen.
To ensure this error message is resolved, you'll need to make copies of your index.php and .htaccess files. To do so, log in to your control panel and open the File Manager under the Files section.
In the navigation menu on the lefthand side of your screen, click on the public_html folder. Open the folder labeled “wordpress.”
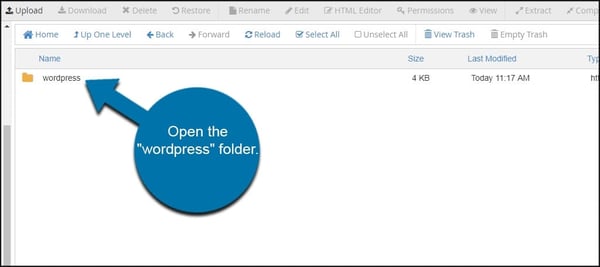
Locate the .htaccess and index.php files inside and download them to your desktop.
To make changes to the index.php file, you’ll need to use a text editor like Notepad.
Open the file in the text editor and look for the line that reads: require(dirname(_FILE_).’/wp-blog-header.php’)
Replace it with the following line of code: require(dirname(_FILE_).’/wordpress/wp-blog-header.php’)
Now when a visitor types in your site’s URL without /wordpress/ into a web browser, this snippet of code will tell the browser that the data it needs to load the page is located in the “/wordpress” sub folder.
Save the index.php file and upload it, along with the copy of the .htaccess file you downloaded to your computer, in the public_html folder.
Note that you didn’t need to make any edits to the .htaccess file, you just needed to copy it into the root directory. Since the .htaccess file controls access to your site, having a copy in your root directory will allow web browsers to retrieve data from the WordPress files in the subdirectory and display them to visitors.
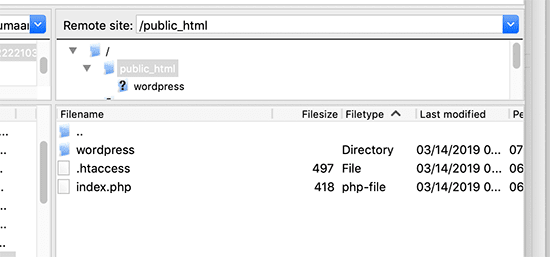
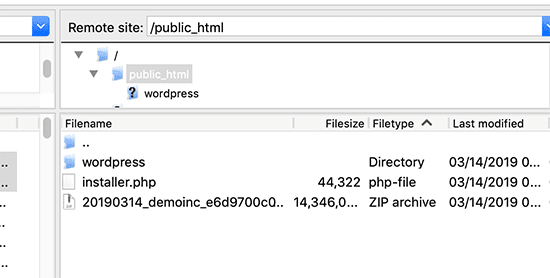
If the contents of your public_html folder now look something like this, then bravo! Visitors will now be able to access your site without seeing /wordpress/ in its URL.
To ensure that all your links are working correctly, you have to take one last step. In your WordPress dashboard, navigate to Settings > Permalinks. Click on any other setting and save your changes, then change it back to your preferred setting. This will reset your site’s permalink structure so that /wordpress/ is removed from links on your site.
Please note, however, that your images and other media files will still use /wordpress/ in their URLs. To avoid this, you can use the method below.
Move Your Site from Subdirectory to Root Directory
Following the steps above will remove /wordpress/ from your URLs, but leave your WordPress files installed in the subdirectory. If you’d like to move them to the root directory in order to ensure /wordpress/ is removed from all links on your site, including images, then you can use a plugin. Let’s walk through the steps below.
Step 1: Create a Duplicator Package
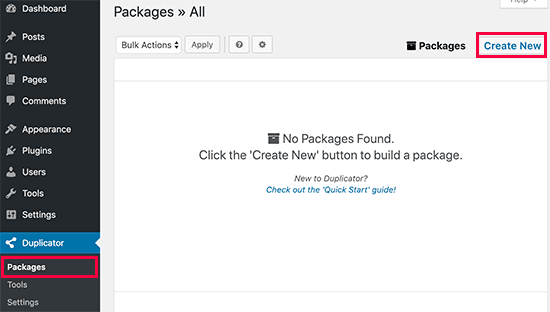
First, you’ll need to install the Duplicator plugin on your WordPress site. On the lefthand side of your screen, click Duplicator > Settings. Now click the Create New button to launch the Duplicator wizard. This wizard will bundle all your site’s plugins, themes, content, and WordPress files into a .zip file called a package.
To start, the plugin will run a few scans to check that your server is healthy and the size of your files and database is possible to bundle. If the scan does uncover any warning signs, as shown below, then you can learn more by clicking on the linked text. For example, you may delete a few large files to reduce the overall size of your package. Or can simply proceed with the build process by clicking the Build button.
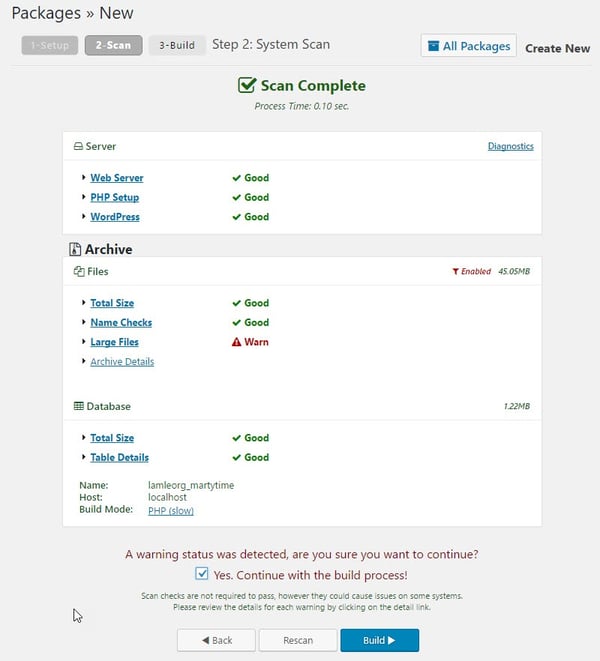
After you click the Build button, you’ll see a message that the package has been completed. Click the One-Click Download link to download both the package and the installer script.
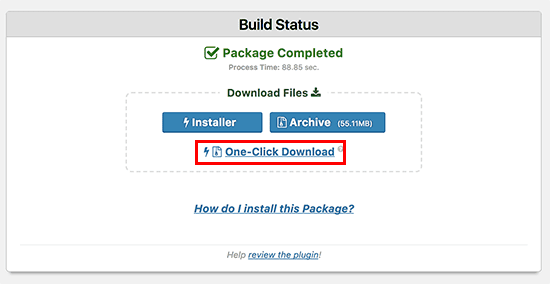
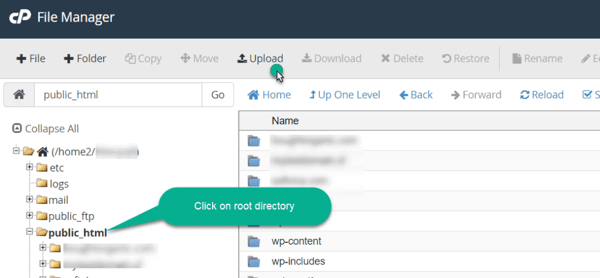
Now you can upload both the package and installer script to the root directory of your website. To do so, log in to the control panel of your hosting account and open the File Manager. In the navigation menu on the lefthand side of your screen, select the public_html folder and click the Upload button.

You’ll then be prompted to select the files you want to upload. You’re looking for the installer.php file and another ending with .zip.
Step 2: Create a New Database
You now have the option of creating a new database. If you’d rather use the existing WordPress database you have, you can skip to the next step. If you’d like to keep the existing database as a backup, then follow the steps below.
Log in to the control panel of your hosting account and click on the MySQL Databases icon. You can find it under the Databases section.
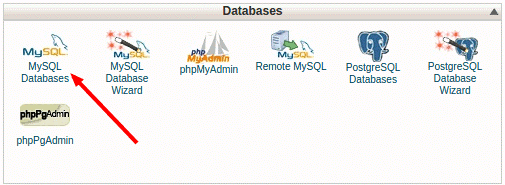
You’ll be prompted to create a name for your new database. You can then click the Create Database button.
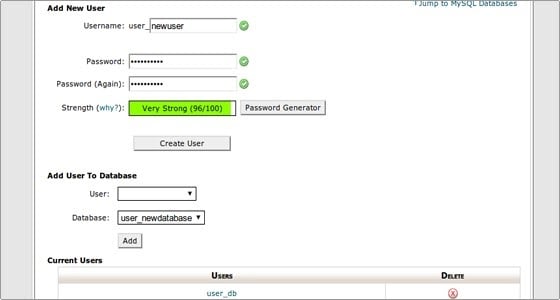
Now scroll down to the MySQL Users section. Under “Add New User,” enter a username and password. Click Create User.
Under “Add User to Database,” select the new user and the new database from the drop-down menus and click Add.
Step 3: Run the Installer Script
Now that your database is ready, you can open the installer script in a web browser. To do so, type your website’s root URL into a browser tab, adding "/installer.php" at the end. It will look something like: https://yoursitename.com/installer.php.
This will open the Duplicator installer wizard.
You’ll need to check the box that says “I have read and accept all terms & notices” and click Next.
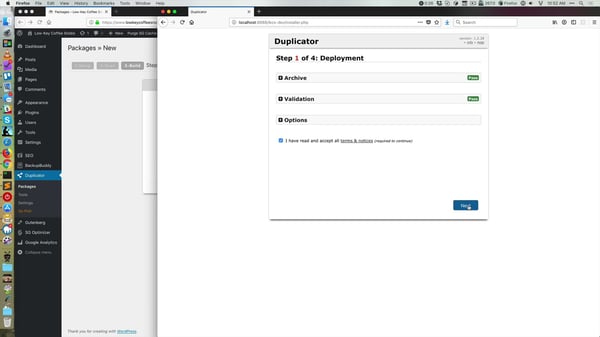
In the next step, you’ll be asked to fill in the information of the database you just created (or your existing database, if you chose to skip the previous step). Click the Next button to continue.
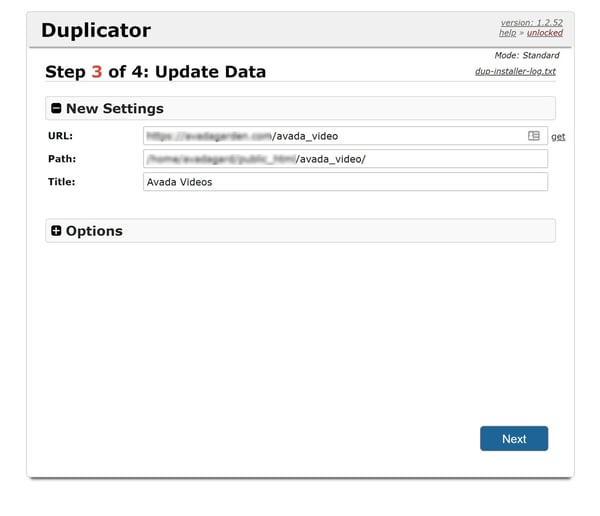
To complete the migration, you will have to update the site URL and path, which in most cases is detected automatically.
On the next screen, it will ask you to update some data, including the site URL and path of your duplicated site. This information will likely be filled in automatically so you’ll just need to verify it.
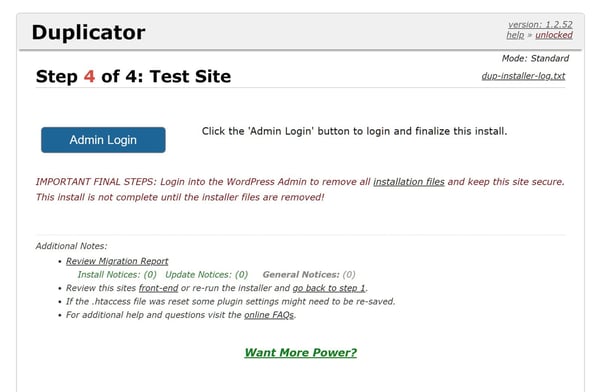
On the next screen, you can finalize the install by clicking the Admin Login button.
Step 4: Set Up Redirects from Subdirectory to Root Directory
You have now successfully moved your site from the subdirectory to the root directory. There’s just one more step to go.
You need to set up redirects so that both users and search engines can find your site in its new location. You can do so by adding some code to the .htaccess file in your subdirectory.
Start by logging in to the control panel of your hosting account. Open the File Manager and click on the public_html folder in the navigation menu on the lefthand side of your screen. Locate and open the “/wordpress” sub folder.
In this sub folder, right-click the .htaccess file to edit it. Delete all its existing content and replace it with the following code:
   RewriteEngine On
RewriteCond %{HTTP_HOST} ^mydomain.com/subdirectory$ [OR]
RewriteCond %{HTTP_HOST} ^www.mydomain.com/subdirectory$
RewriteRule (.*)$ http://www.mydomain.com/$1 [R=301,L]
Make sure to replace mydomain.com with the actual name of your website, and /subdirectory with /wordpress.
Save your changes and congratulate yourself. You have successfully moved your site from the subdirectory to the root directory.
Changing your Site’s URL
No matter how old your site is or how much content it has, you can follow one of the methods above to remove /wordpress/ from your site’s URL. While these methods may be time-intensive, removing the subdirectory name from your URL will avoid confusing your readers or appearing unprofessional. This can help strengthen the very first touchpoint that visitors have with your brand.
WordPress Website


![How to become a WordPress developer [+ tips from WCEU speaker Paul Bearne]](https://53.fs1.hubspotusercontent-na1.net/hubfs/53/59_How%20to%20Become%20a%20WordPress%20Developer.png)


