I have been able to keep websites looking sharp, brand assets consistent, and social media posts polished because I know how to resize pictures without losing quality. It’s a simple skill that goes a long way in web design. When I’m making a landing page, reusing a blog graphic, or getting images ready for Instagram, I need to make sure they look right. They can’t just “fit.”
In this post, I’ll walk you through why images lose quality when resized, the best ways I’ve learned to preserve sharpness, and the tools I use today. By the end, you’ll have a clear process for resizing images the right way without blur, distortion, or pixelation.
Table of Contents
- Why do resized images lose quality?
- Why It’s Important to Resize Images (Without Losing Quality)
- Best Ways to Resize an Image Without Losing Quality
- Upsampling vs. Downsampling Images
- Guidelines for Resizing an Image Without Losing Quality
- How to Resize an Image Without Losing Quality in Adobe Express
- How to Reduce Image Size in Photoshop
- How to Reduce Image Pixel Size in MS Paint
- How to Resize JPG & PNG Files in Canva
- How to Resize an Image to 100KB
- How to Make a PNG Smaller Without Losing Quality
- Image Resizing Tools
HubSpot's Free Website Builder
Create and customize your own business website with an easy drag-and-drop website builder.
- Build a website without any coding skills.
- Pre-built themes and templates.
- Built-in marketing tools and features.
- And more!
Why do resized images lose quality?
When you resize an image, there are two common methods used: resizing by resampling and resizing by scaling.
Resizing by resampling involves adding or removing pixels from the image, resulting in a change in the total pixel count. This process can cause loss of quality because the software has to guess and create new pixels based on the surrounding ones. This can lead to blurriness or pixelation, especially if the image is downsized significantly.
Resizing by scaling, on the other hand, maintains the total pixel count but adjusts the size of the image by changing how many pixels are displayed per inch (PPI). While this method generally preserves the image quality better than resampling, it can still result in some loss of sharpness or detail, especially if the image is scaled up.
Regardless of the method I’m using, I always make sure to consider the original resolution and image quality before resizing. It’s the key to minimizing a noticeable loss in quality.
Why It’s Important to Resize Images (Without Losing Quality)
Resizing images correctly to maintain quality reduces the file size of the image and, therefore, how long it takes for your website content to load. It’s not just a question of quality visuals — poorly sized images can impact your site’s performance and user experience.
Oversized, high-resolution images might look good on the front end, but their file sizes are large. That means browsers will take longer to load them, which will increase your website’s overall load time. For more on how to make a website, check out HubSpot’s free CMS tools.
A recent study found that load speed considerably impacts conversions. For example, the study found that sites that load in one second have three times higher conversion rates than sites that load in five seconds. This means you can’t afford to sacrifice a single second of load time.
That’s not to say that high-quality visuals aren’t important.
Imagine two online stores selling the same pair of shoes, but one has blurry product photos while the other has crystal clear ones. Which store are you more likely to buy from?
Probably the second store. Here’s why.
Aside from showcasing the product properly, having well-formatted images on a page conveys professionalism. On the flip side, messy images imply a lack of competence. The buyer thinks, “If they can’t get the images right, can I trust that they’ll get the products right?”
This is what happens when you resize an image and sacrifice quality. Sure, the image will fit into your banner or post, but at what cost?
Some of these points might sound like common sense, but you’d be surprised how often I have to work with web developers, clients, and partners to make sure we’re using the most optimal image size and quality possible. I often don’t get to choose the source files for a project, and I could be sent poor quality logo files or massive 10MB images to work with for a site. Being able to explain why it’s important that images are properly sized up or down makes it easier to get those files to the size they need to be.
Best Ways to Resize an Image Without Losing Quality
Over the years, I’ve tried almost every way to change the size of an image, from drag-and-drop editors to command-line tools. While some strategies are very effective, others aren’t.
In this section, I will be showing the best ways I have found to resize images while still maintaining the image quality.
1. Start with high-resolution source images.
A high-resolution image is simply one with many pixels. This means the image can show a lot of details and still stay very sharp when resized.
I can’t stress this enough: If your starting image is low-quality, there’s only so much you can do.
Take, for example, resizing a 400px image. This image resolution will only look good as a thumbnail, but when upscaling to fit a full-width website banner, it will never look professional. I always ask for the largest, highest-resolution version of an asset before resizing. Ideally, I mostly use formats like PNG or TIFF. From there, scaling down is much safer than scaling up.
2. Resize incrementally (when upscaling).
If I find myself in a situation where I absolutely must increase the size of an image, I do so with smaller increments rather than making significant size adjustments all at once. I prefer making increases of a modest size in a stepwise fashion (for example, with an increase of 10–20% at a time).
This is handled more effectively by programs like Photoshop, GIMP, or even contemporary editors that use artificial intelligence, and they maintain more detail in the process. The end results are significantly clearer, despite the fact that the process takes a slightly longer time.
Remember, upscaling is more difficult than downscaling, so if you can access the largest high-resolution source image, that would be your best bet.
3. Maintain the original aspect ratio.
I am well aware that stretching an image out of proportion is an assured way to make it appear twisted. Unfortunately, I discovered this the hard way. That’s why I always lock the aspect ratio when resizing.
For example, a square logo (500x500px) should stay square no matter what, never stretched into a rectangle. Most editors, from Photoshop to Canva, have a simple “lock aspect ratio” toggle, and I always keep it on.
4. Use WordPress plugins (for websites).
When I work on WordPress sites, I no longer resize each picture by hand before uploading them. Instead, I use plugins that make images the right size for each viewport instantly. The ones I use right now are:
- Smush (great for compression and resizing).
- ShortPixel (excellent balance between quality and performance).
- EWWW Image Optimizer (handles WebP conversion, too).
This way, WordPress handles responsive sizing for me, and I don’t need to upload five versions of the same image.
5. Employ command-line tools.
Sometimes, I skip GUIs altogether and go straight to the command line. For bulk resizing, ImageMagick is my favorite; it’s lightweight, flexible, and incredibly powerful. For example, if I want to resize all PNGs in a folder to a width of 800px while keeping their aspect ratio, I just run:
mogrify -resize 800x *.png
Lately, I’ve also been experimenting with AI-based tools (like Gigapixel AI) for upscaling. They do a surprisingly good job at reconstructing details when I need to enlarge an image without the blur.
Upsampling vs. Downsampling Images
Upsampling and downsampling are two different processes used to alter the resolution or size of an image.
Upsampling involves increasing the size or resolution of an image. It typically requires adding new pixels to the original image, often through interpolation algorithms. This results in a larger image with potentially more detail, although the added detail is only an estimation based on existing pixels. Upsampling does not actually create new information or improve the quality beyond the original resolution.
One example of when I might use a tactic like this is converting a presentation for use on a super high-quality display, like a large monitor at a trade show. In that instance, medium-quality graphics can be made as sharp and crisp as possible for higher resolution screens.
Downsampling, on the other hand, is the process of reducing the size or resolution of an image. It involves removing pixels from the original image, typically by averaging or sub-sampling adjacent pixels. Downsampling aims to reduce the file size and potentially simplify the image by removing unnecessary details. However, downsampling can also lead to a loss of fine details and smoothness, as some information is discarded.
This tactic is much more common in my day-to-day work. I might use downsampling to create a thumbnail image for a carousel of posts on a main blog page, for example. Or taking a print-ready infographic and downsampling it into a size that’s suitable for social posts.
Both upsampling and downsampling have their applications depending on the specific use case. Upsampling may be used to increase the print size of an image or prepare it for high-resolution displays. Downsampling may be employed to optimize image file sizes for web or email use, reducing loading times.
Guidelines for Resizing an Image Without Losing Quality
When I was first getting started, I believed that resizing was simply a matter of making an image “smaller” or “larger.” However, after some time had passed, I realized that there are some basic principles that must be followed in order to maintain crisp, professional-looking photos.
Here are some of the rules that I follow when I want to resize images for the web.
1. Be mindful of dimensions when reducing image pixel size.
Shrinking images is usually safe, but only to a point. If you scale down too aggressively, text and fine details can get lost. For instance, I usually check to see whether infographics are legible at the dimensions I want before exporting them once I decide to scale them.
Before finalizing the resizing, I use a fast trick: I preview the image at the precise size that it would display on the site (for example, 300 pixels wide). I know that if I’m not able to read the text comfortably, I need to either redesign it or crop the text differently.
2. Compress web images to 100KB.
Back in the day, the rule of thumb was to shrink images under 100KB. Today, that’s not always realistic with high-DPI screens. Instead, I focus on balancing file size and visual quality. My rule:
- Thumbnails: ~30–80KB
- Blog images: ~100–250KB
- Hero banners: up to 500KB if absolutely needed
I use modern compression tools like Squoosh, TinyPNG, or ImageOptim to get the best balance. They give me the ability to observe artifacts such as banding or blurriness in real time before committing to them.
One other trick I use: Always export at the exact size the image will be displayed.
3. Use the right image file type.
File type makes a huge difference in quality and performance. My go-to choices today are:
- WebP – My default for most web images. It’s lightweight and keeps quality high.
- PNG – Best for transparency or sharp graphics like logos.
- JPEG – Still solid for photos, especially when WebP isn’t supported.
- SVG – For icons, logos, and illustrations, I always go vector.
Over the last couple of years, AVIF has also started gaining traction. It offers even better compression than WebP while maintaining excellent quality, though not all CMS platforms or image tools support it yet. When I can, I generate both WebP and AVIF versions with a fallback to JPEG/PNG.
Let’s look at how I resize images with some of the most popular tools out there. I’ll cover:
- How to Resize an Image in Adobe Express
- How to Reduce an Image in Photoshop
- How to Reduce an Image in MS Paint
- How to Resize an Image in Canva
- How to Resize an Image to 100KB in Squoosh
- More Image Resizing Tools
.png)
Free Website Optimization Checklist
This website optimization checklist will help you perfect your website's:
- Performance
- SEO
- Security
- Mobile Performance
Download Free
All fields are required.
Form not available
How to Resize an Image Without Losing Quality in Adobe Express
Adobe Express is a great way to quickly change the size of images without having to open Photoshop or use command-line tools. You can use it for free to do simple things on your computer. It also keeps image quality pretty well when you change its size, which is a pleasant surprise.
Here are the steps I take when resizing with Adobe Express.
Step 1: Create a new project in Adobe Express.
I start by going to the Adobe Express website and creating a new project. I don’t need to install anything; it works directly from the browser, which makes it handy if I’m on a client’s laptop or just want to move fast.
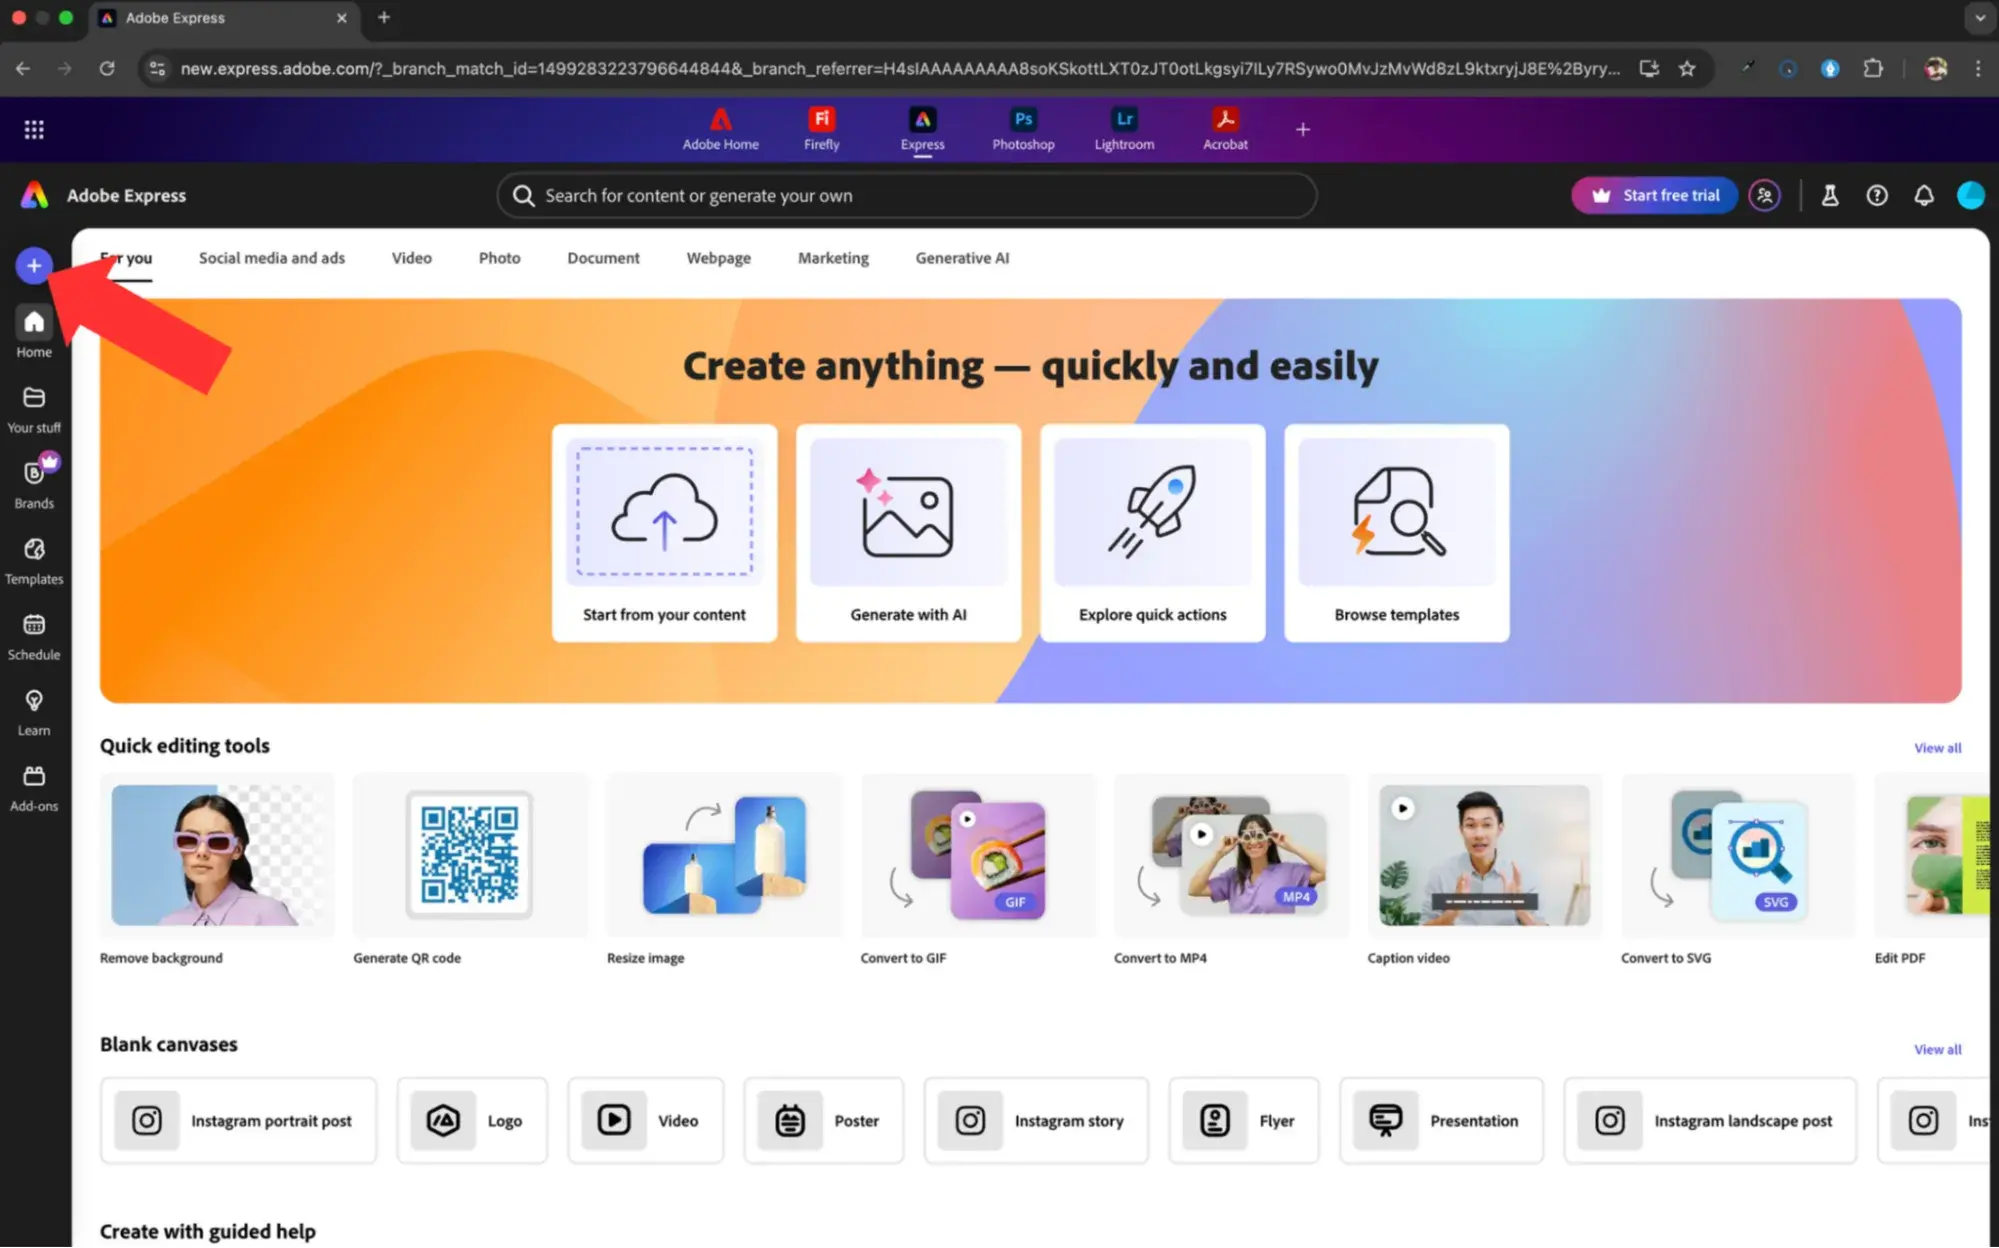
I then choose the Quick actions menu after clicking the + sign on the Adobe Express homepage to get started. I then choose Resize image.
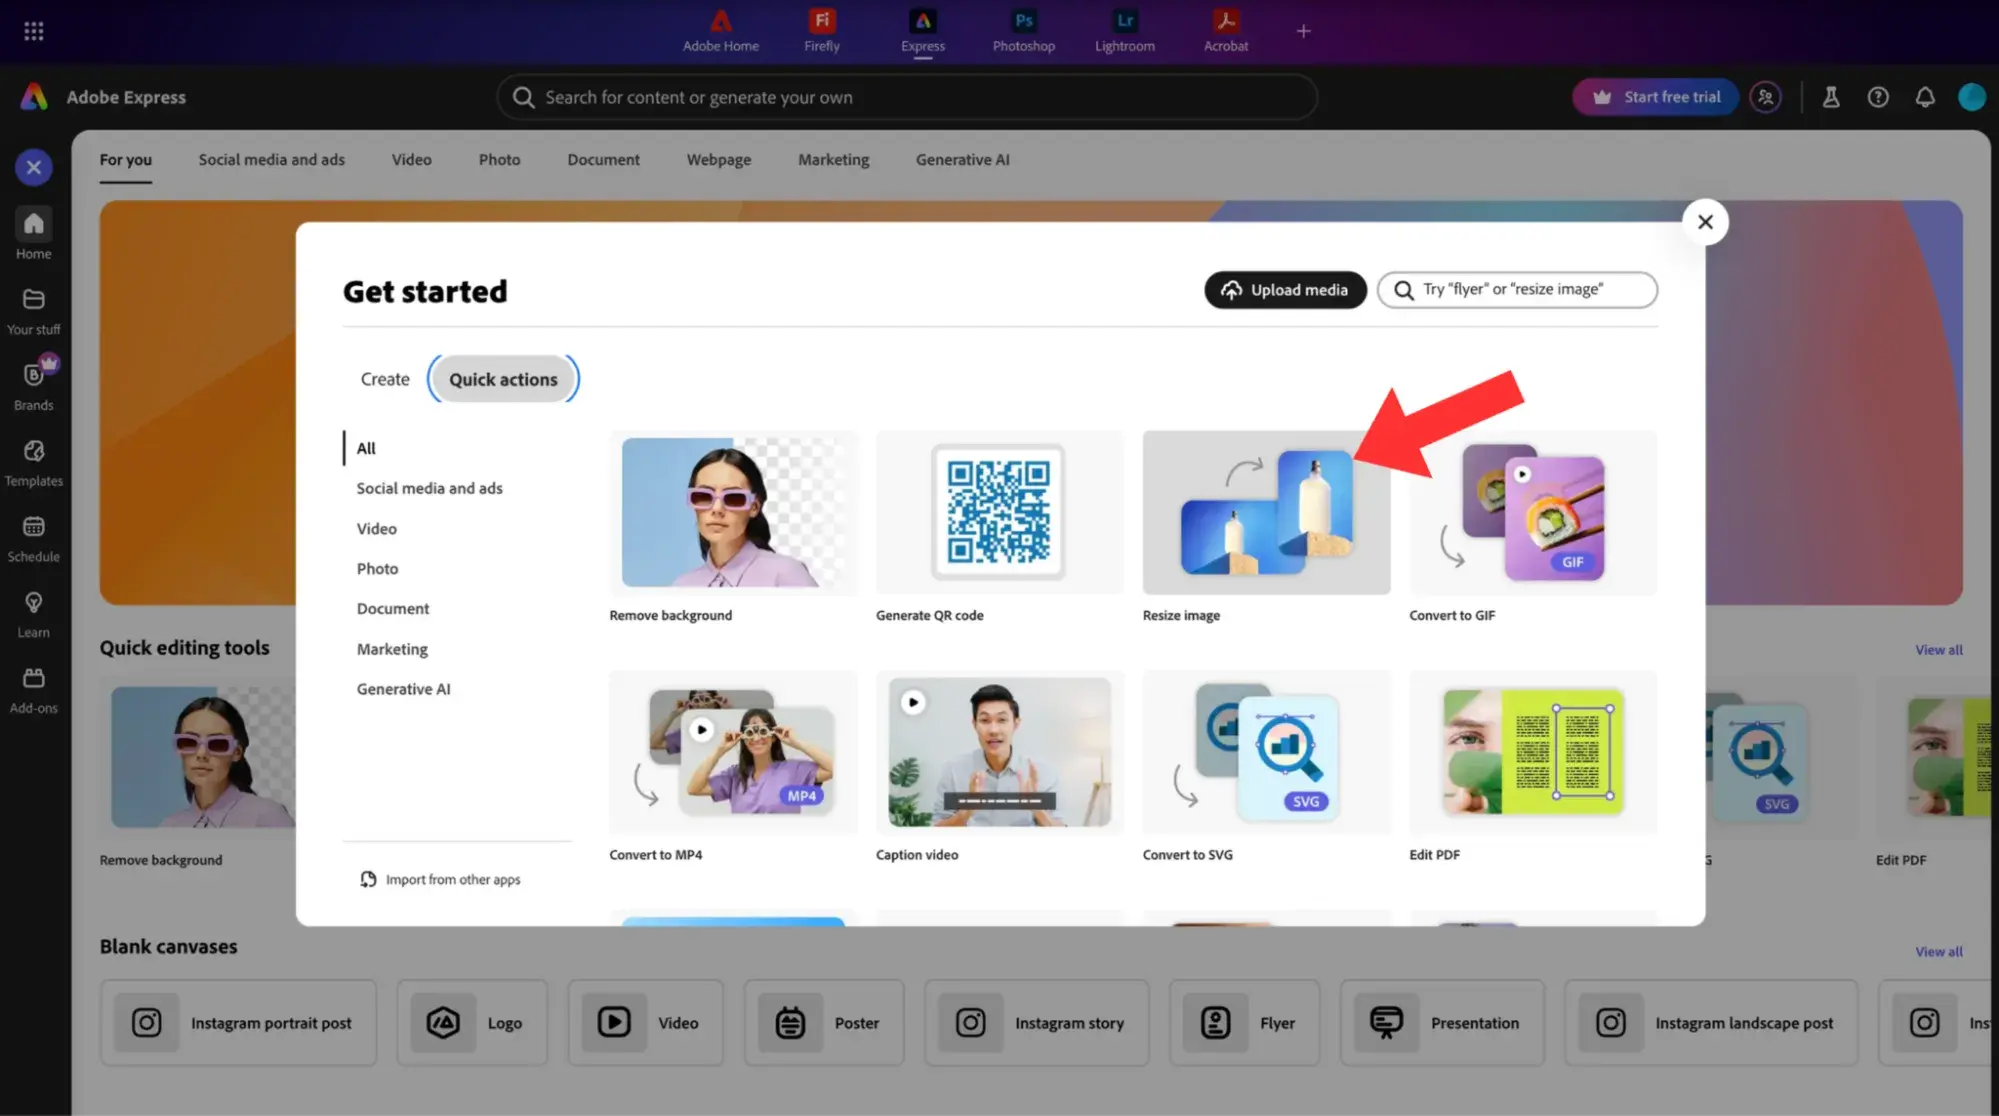
Step 2: Upload your image.
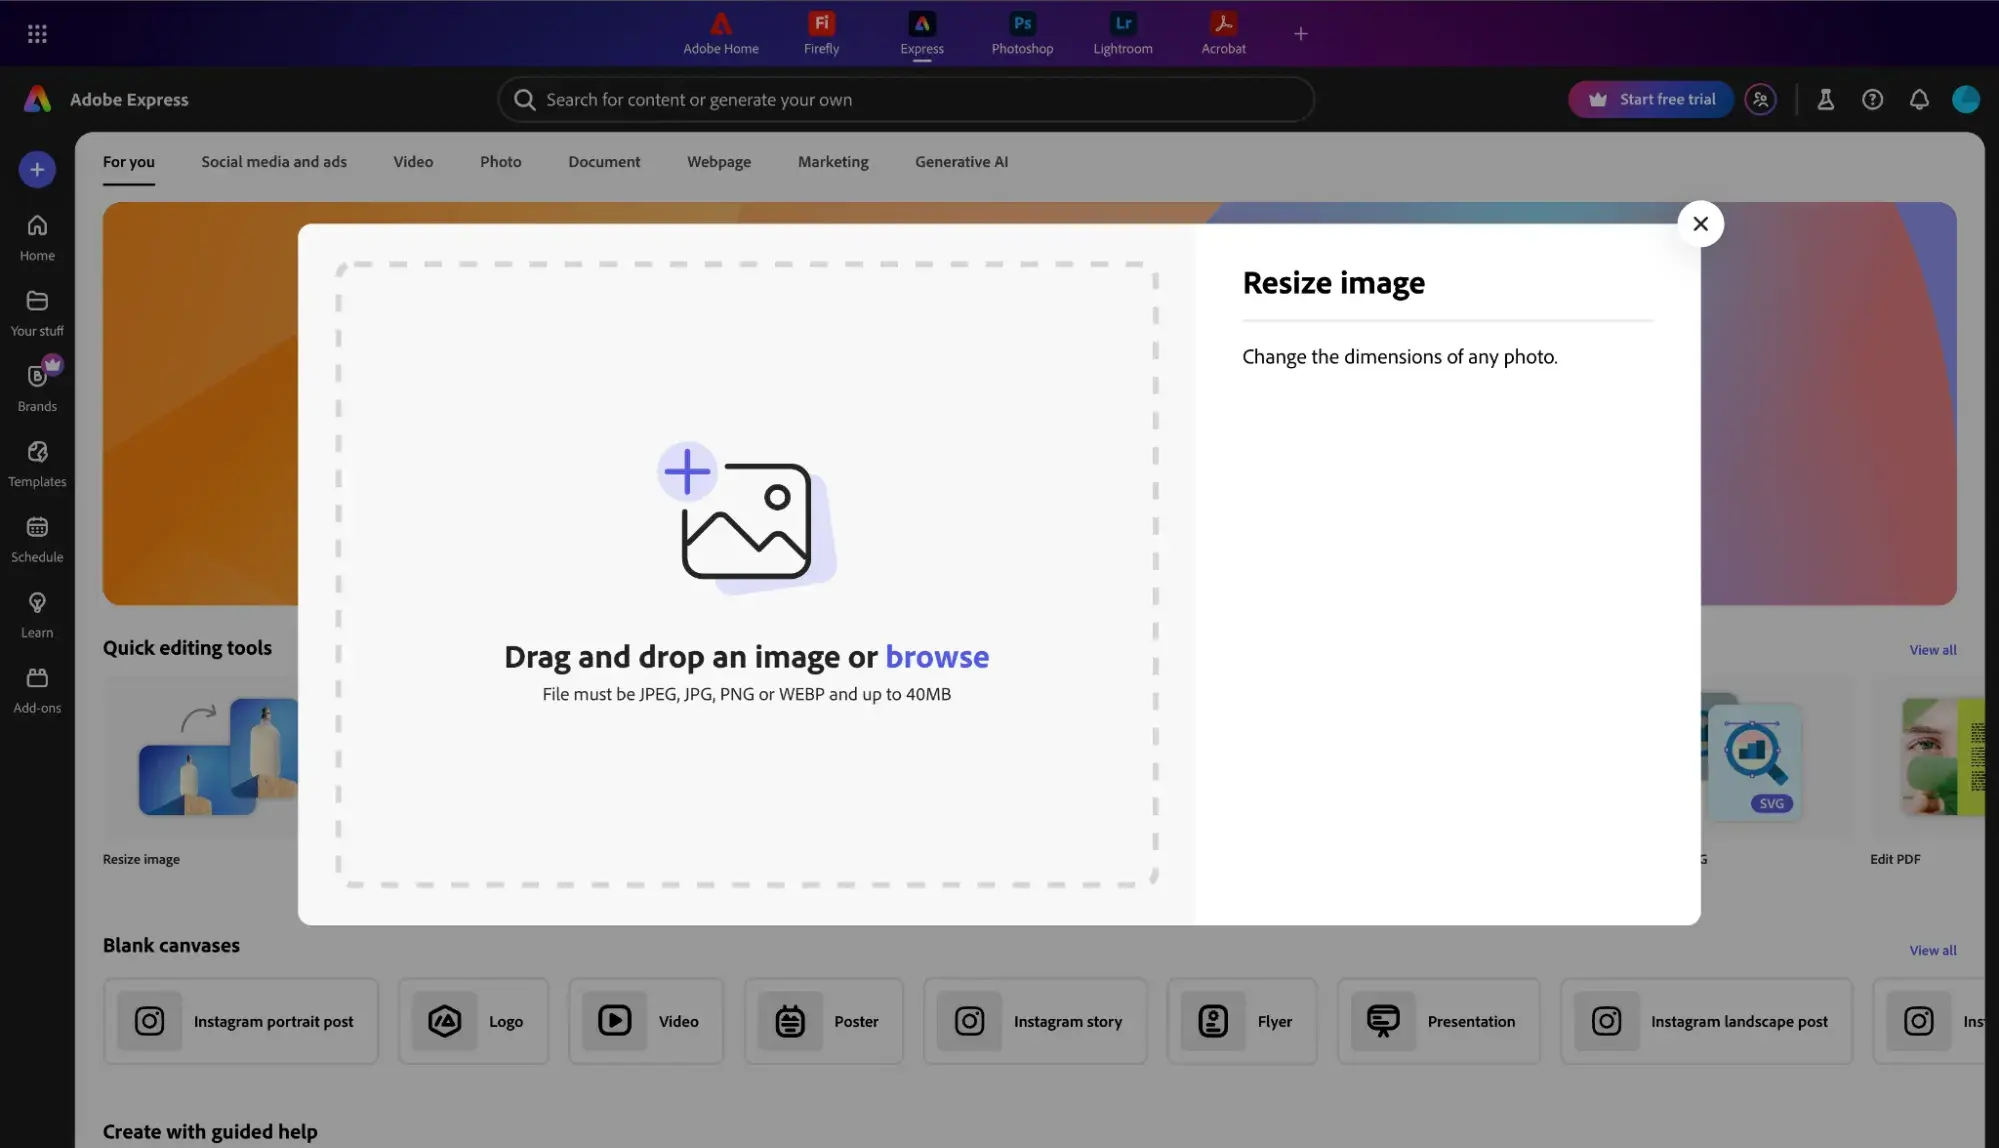
This pop-up then appears. I can upload the image I want to resize by either dragging and dropping it into the square or browsing on my device.
Step 3: Resize your image.
If I’m resizing for social media, such as Instagram, Facebook, or YouTube, I can choose a preset size. Alternatively, if I require a particular pixel size, such as 1200x628 for blog headers, I enter my custom measurements.
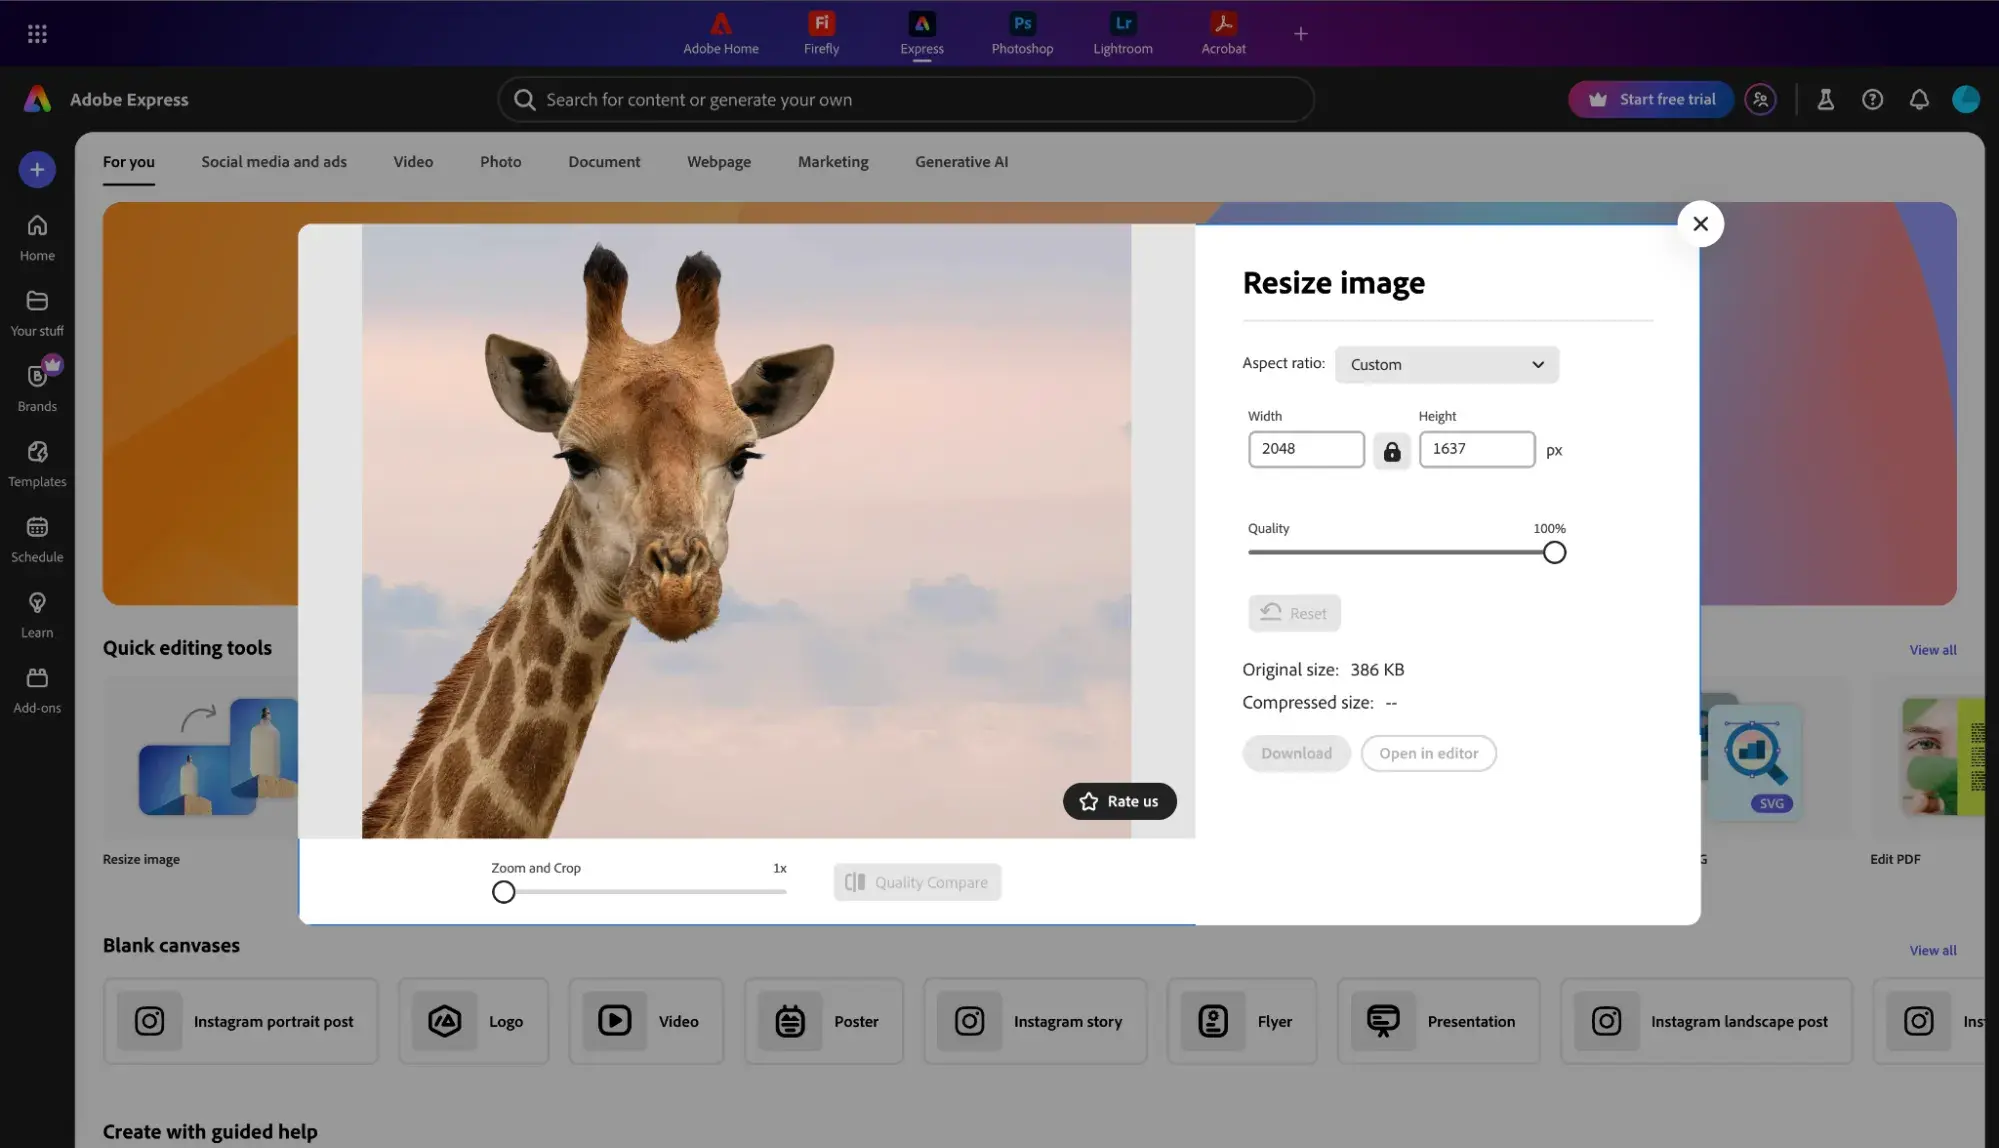
For perfect images every time, I always turn on the “Lock Aspect Ratio” feature by clicking on the padlock icon.
Step 4: Adjust your image.
When you resize, the crop may move, or essential elements of the image may be taken out. It’s easy to move, trim, or zoom in a little with Adobe Express so that the topic stays in the middle and sharp. This is quite helpful when I work with infographics or pictures of my staff.
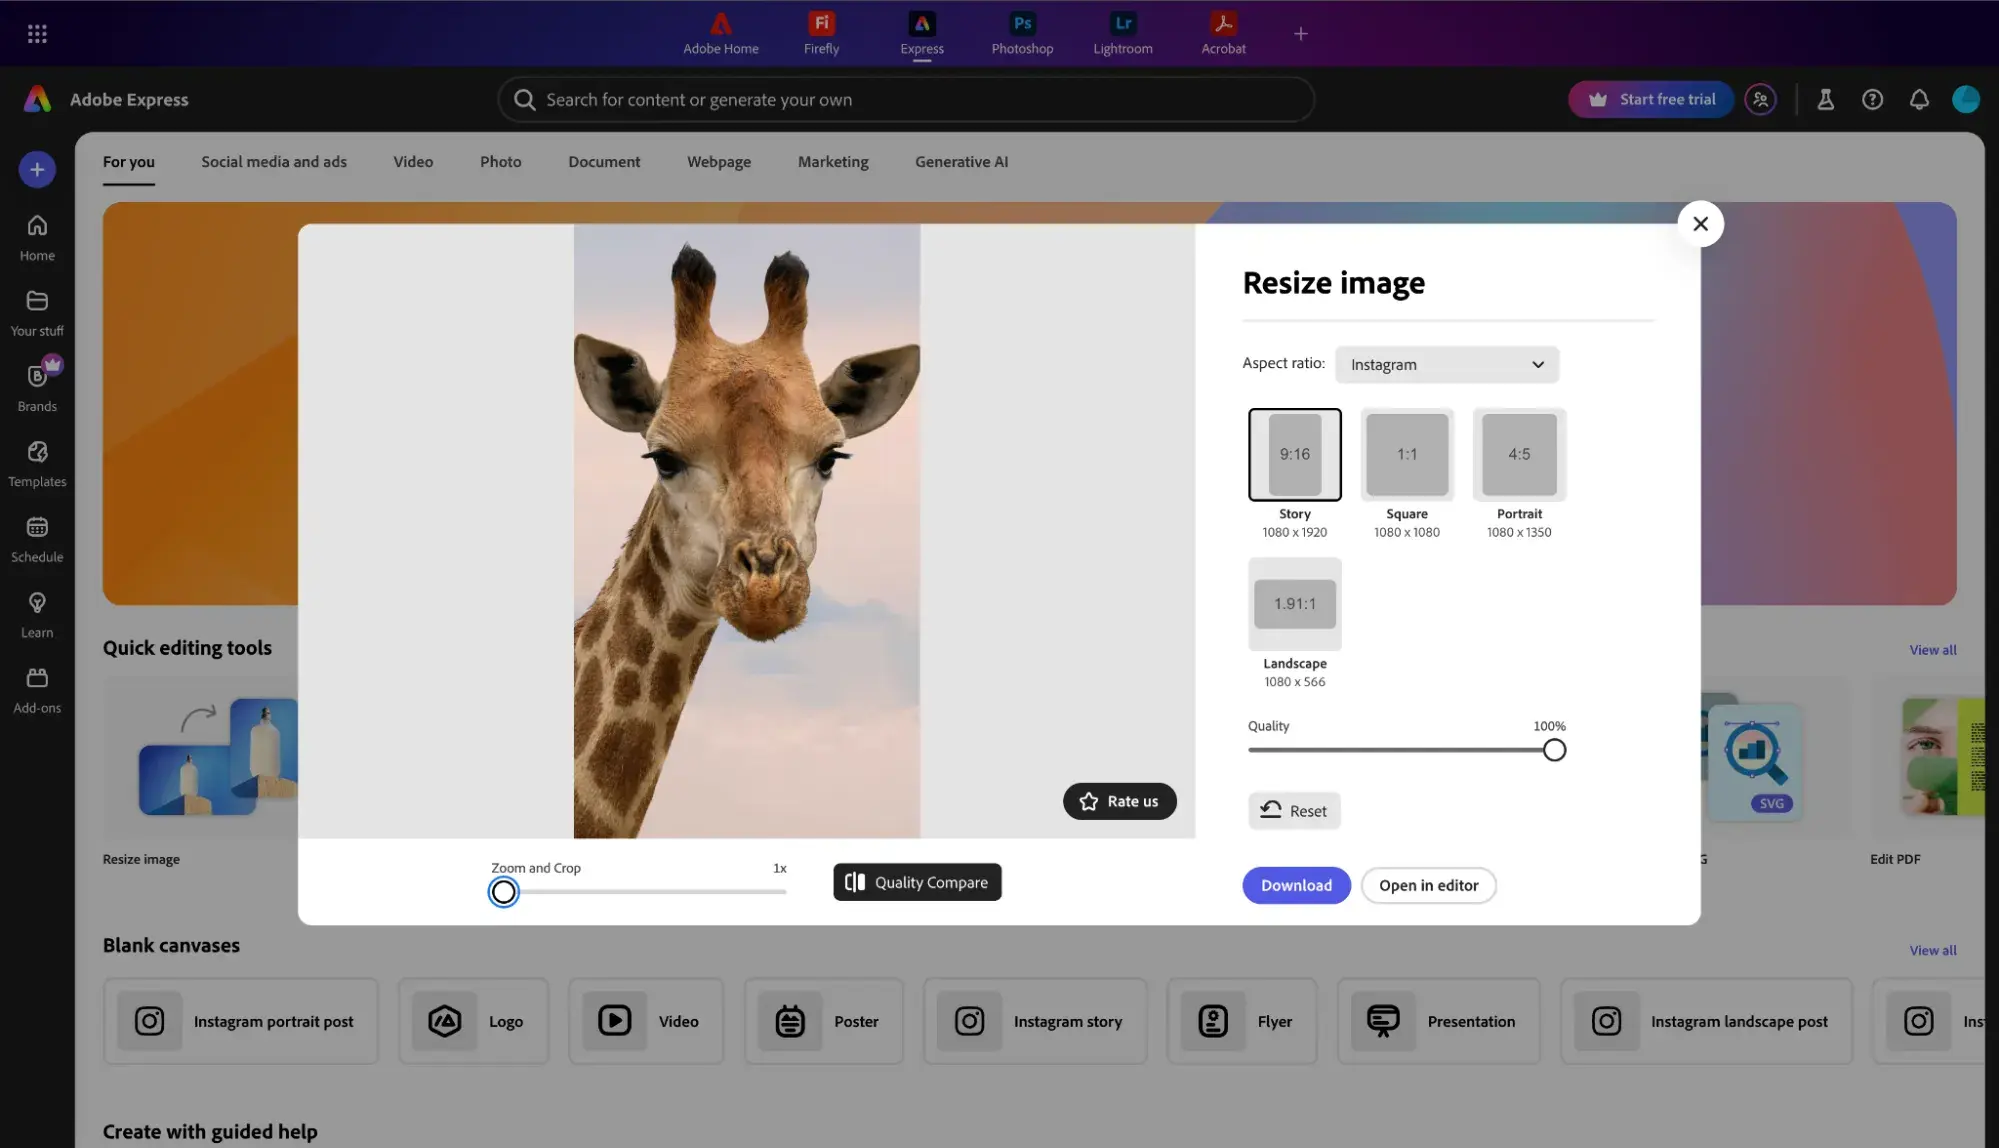
I can also change the image more by panning it (dragging it from left to right) or changing the scale with the slider to zoom and crop it if I’m not happy with how it appears.
Step 5: Download your image.

Once I’m happy with the results, I download the resized version in the right format (usually WebP or PNG, depending on the use case).
How to Reduce Image Size in Photoshop
Step 1: Import your image.
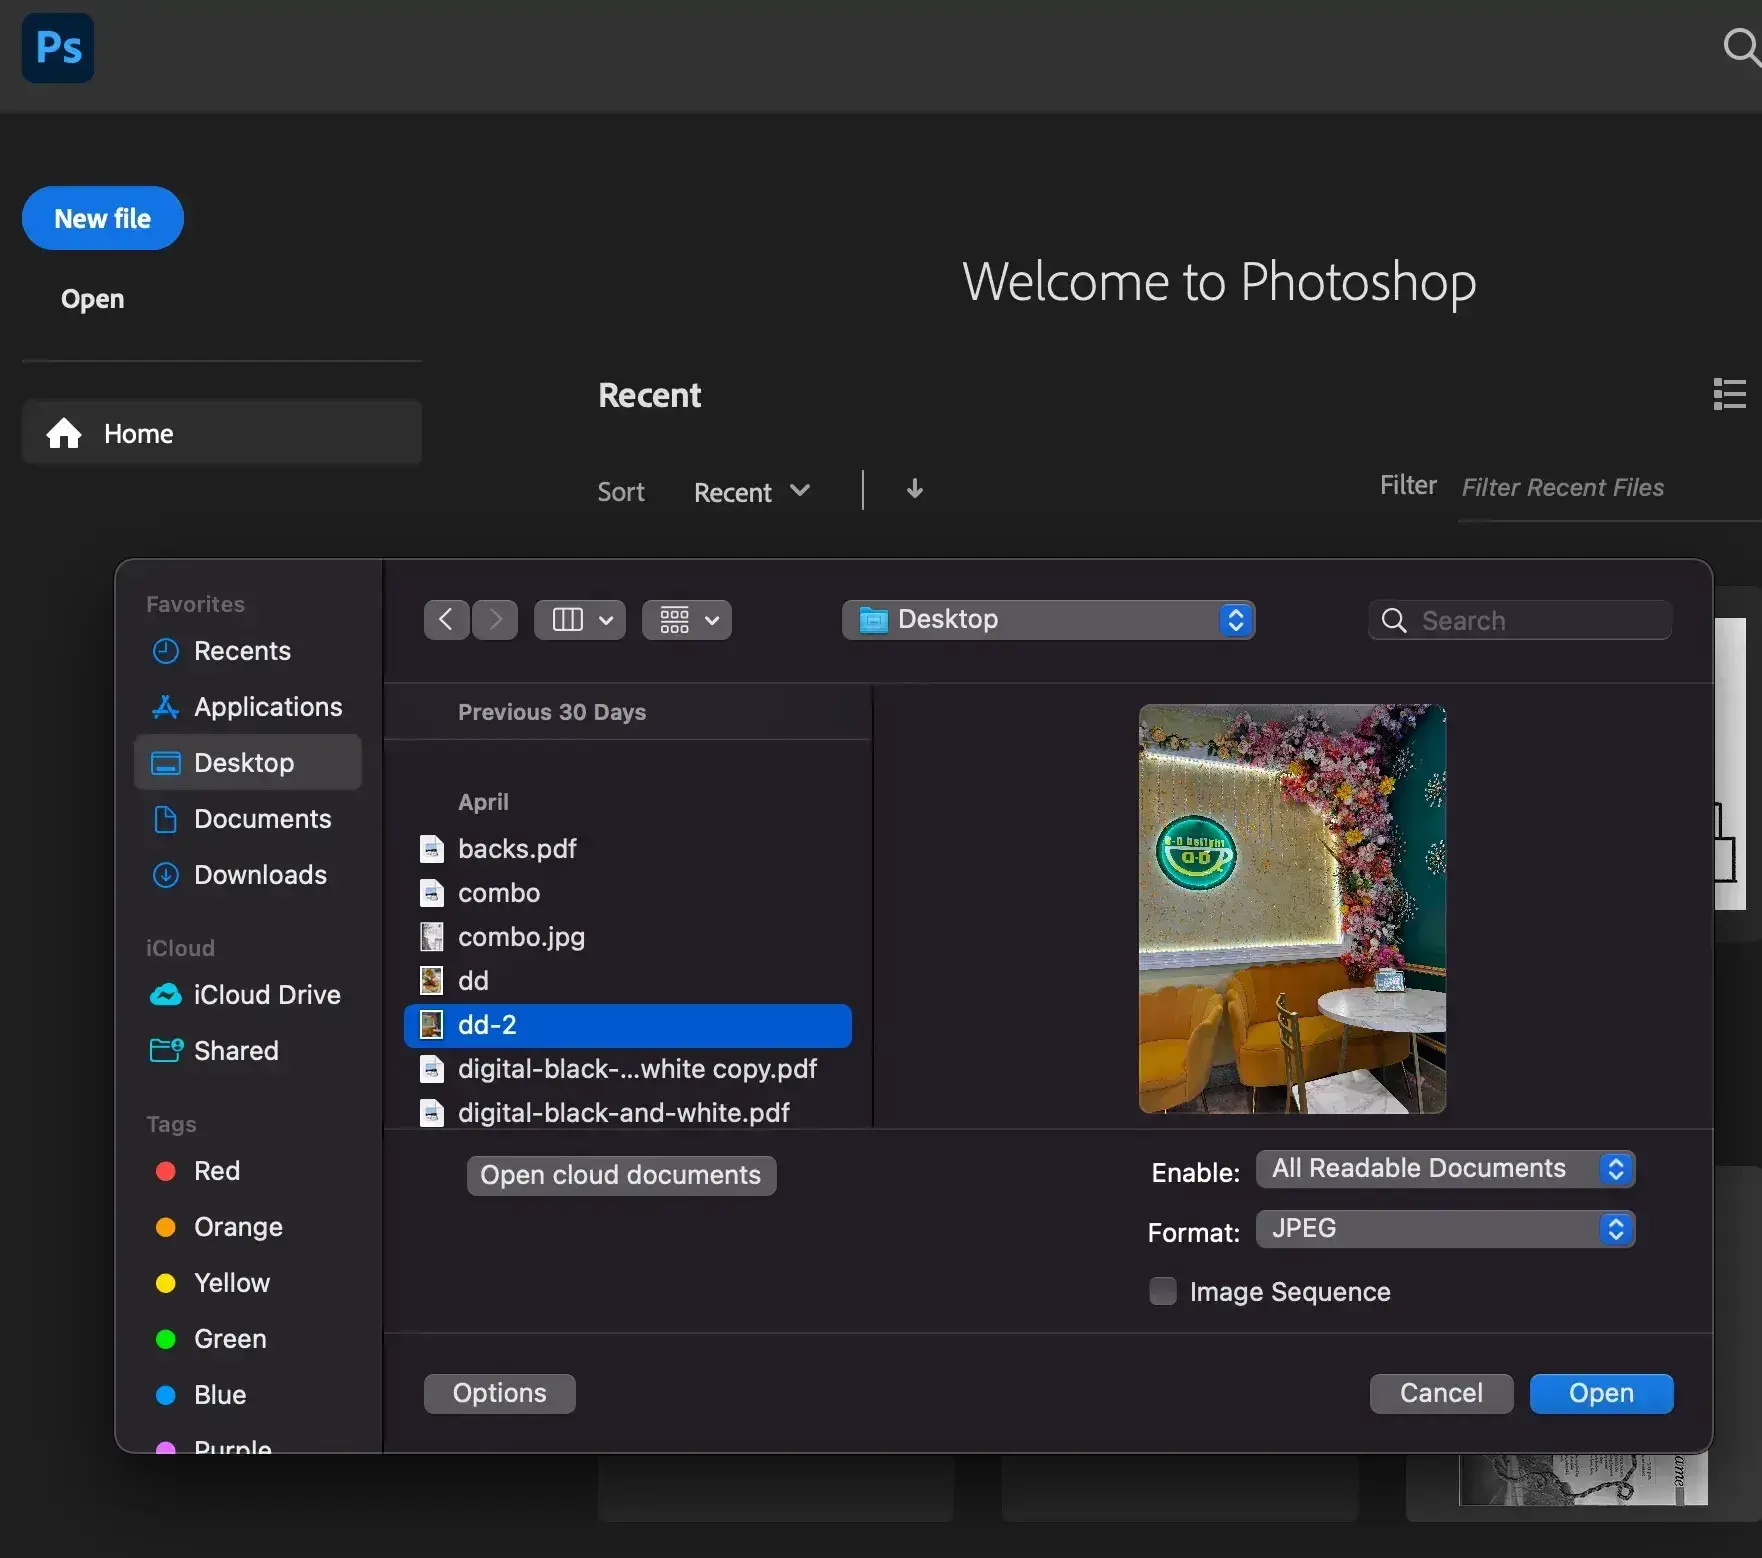
I start by importing the image by clicking File and navigating to Open. I then have to browse my device and select the image I want to resize.
Step 2: Unlock the background layer.

Next, I navigate to the right-hand panel and unlock the background layer. This is a necessary step to be able to edit the image.
Step 3: Change image dimensions.
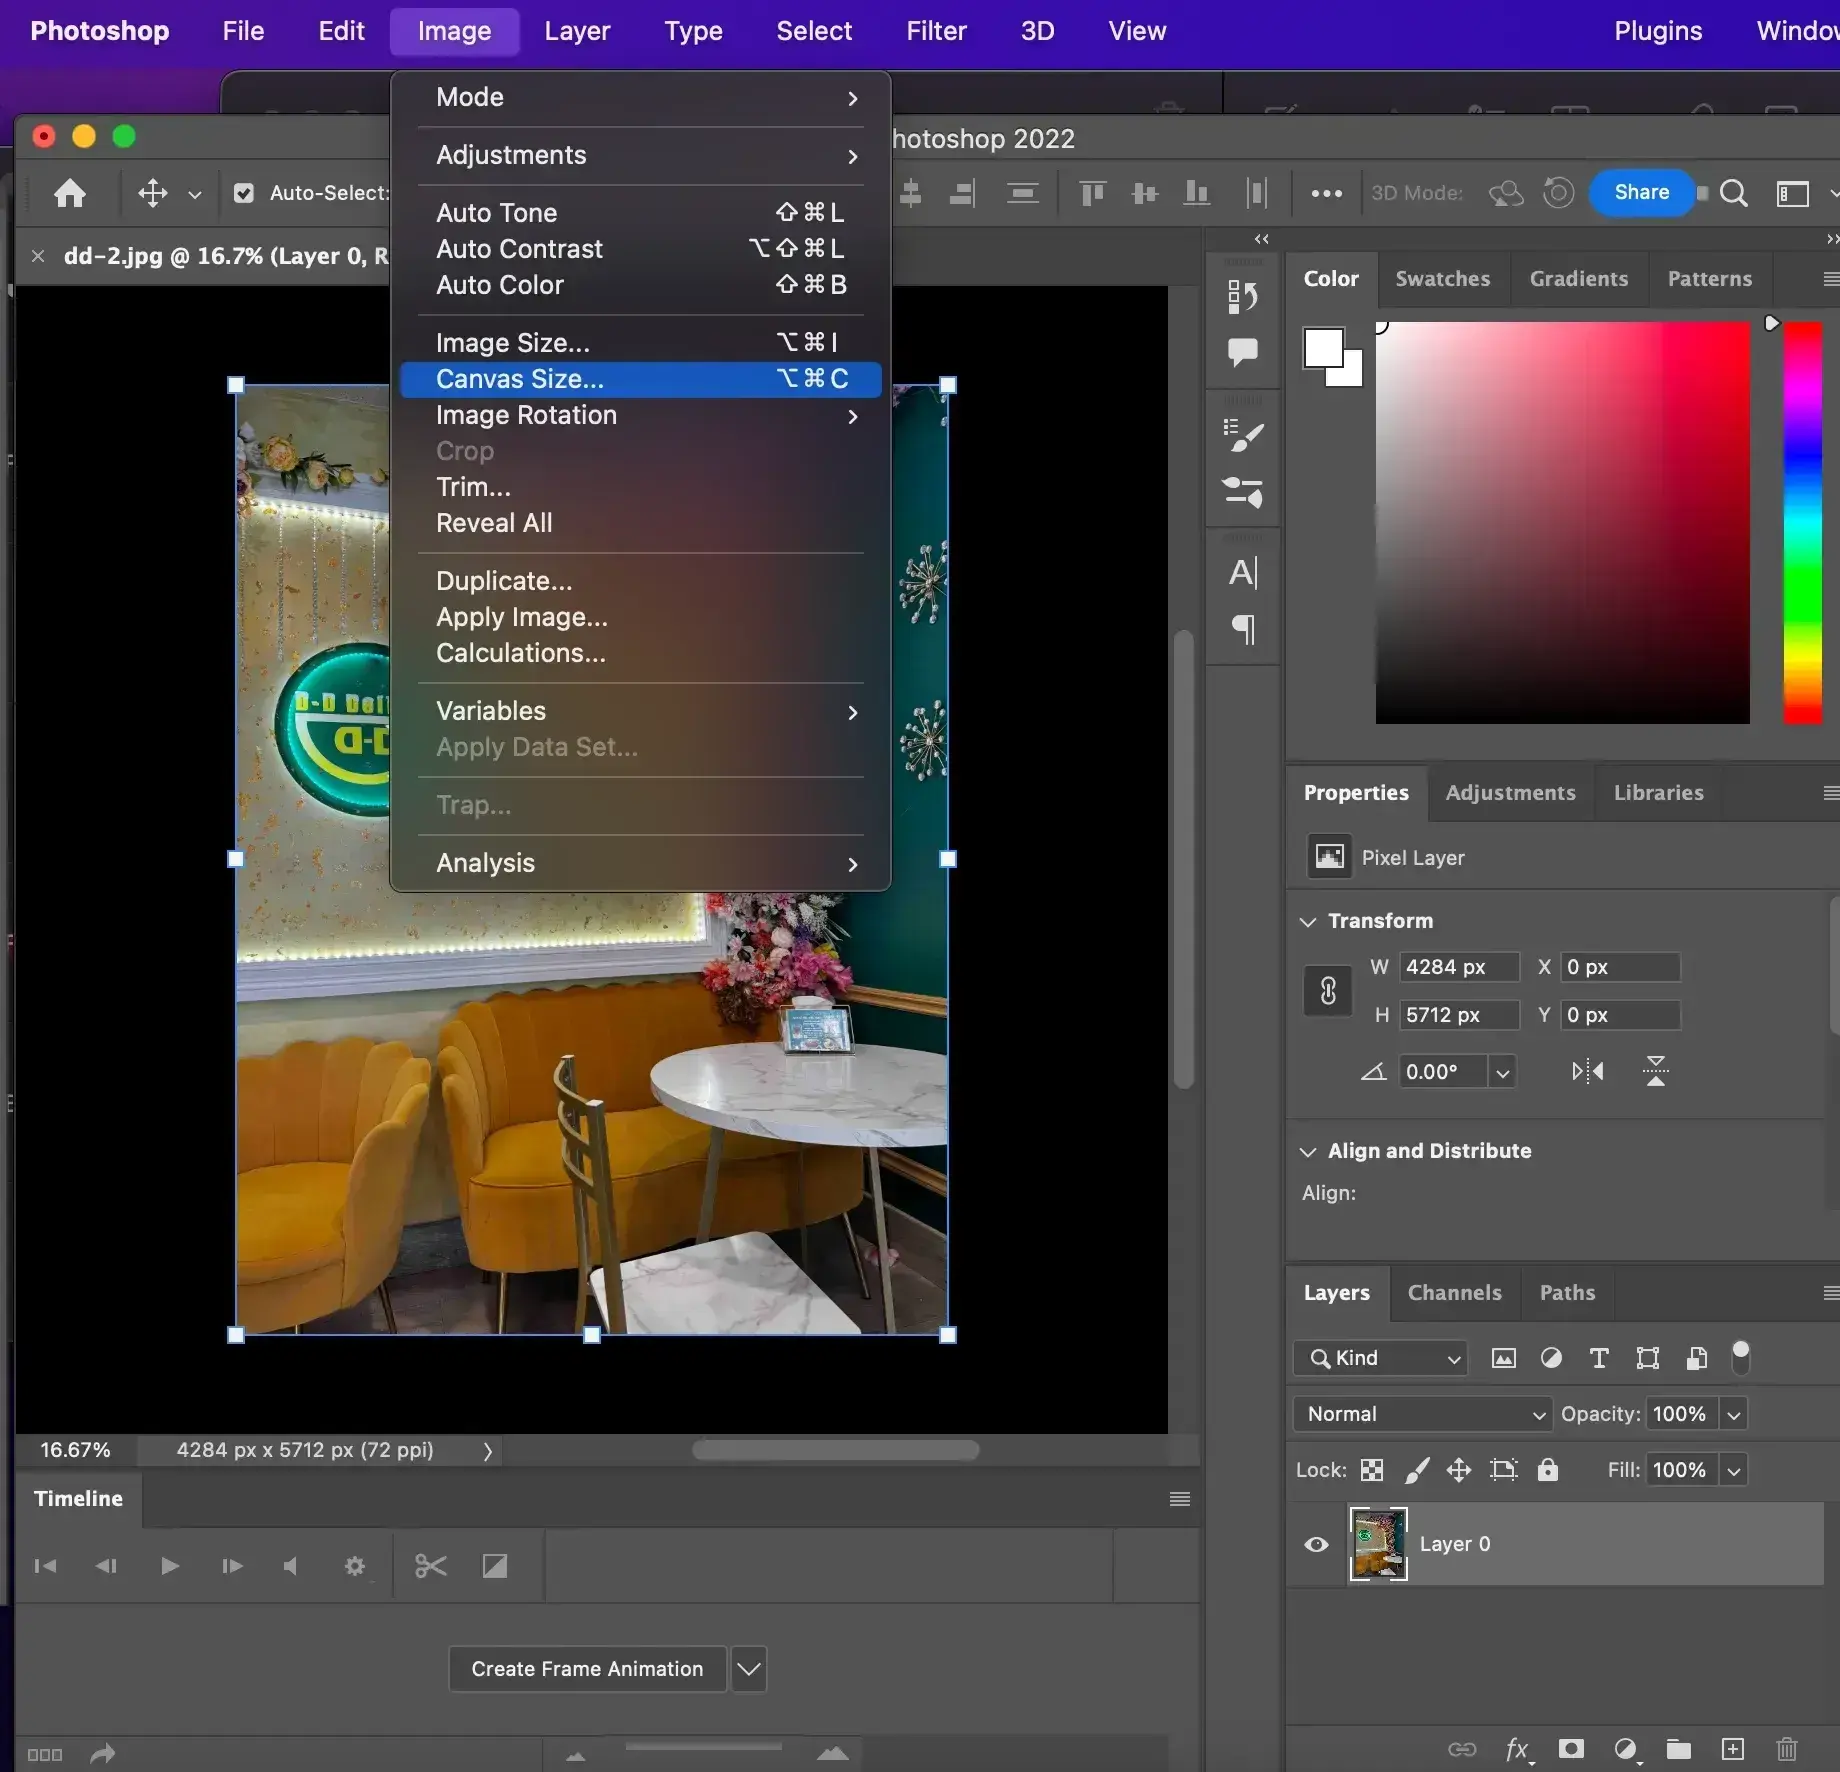
Then I navigate to the menu bar in the header and click on Image. I select Canvas Size from the dropdown menu. I can then change the canvas dimensions in the New Size section of the pop-up box to my desired dimensions. Then I click OK to proceed.
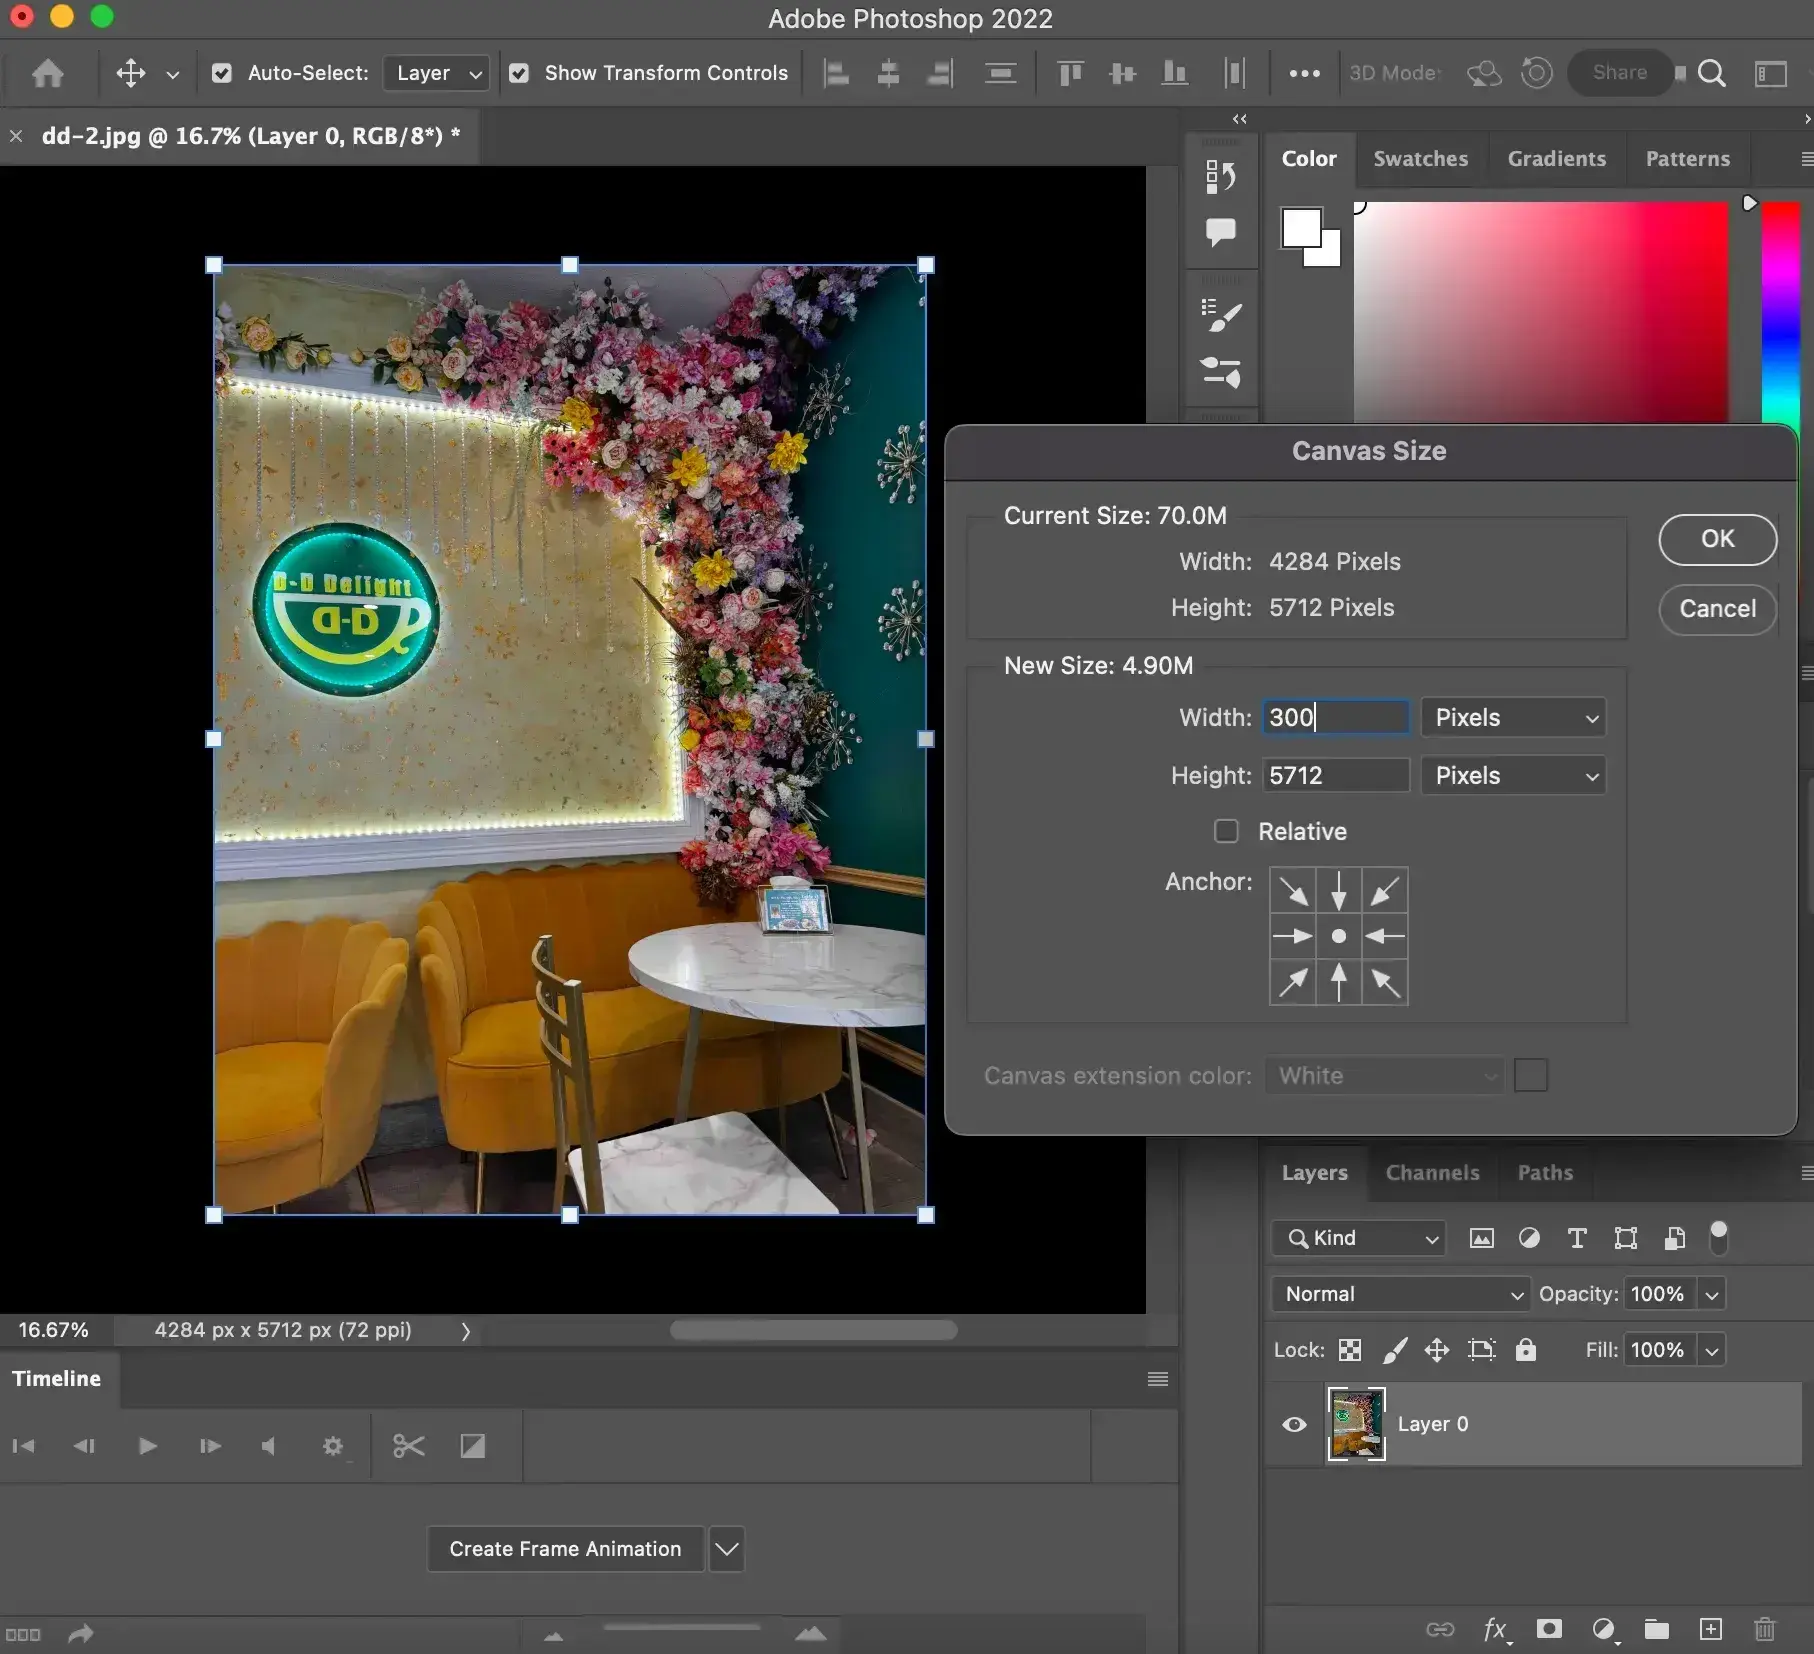
Step 4: Adjust the image within the canvas.
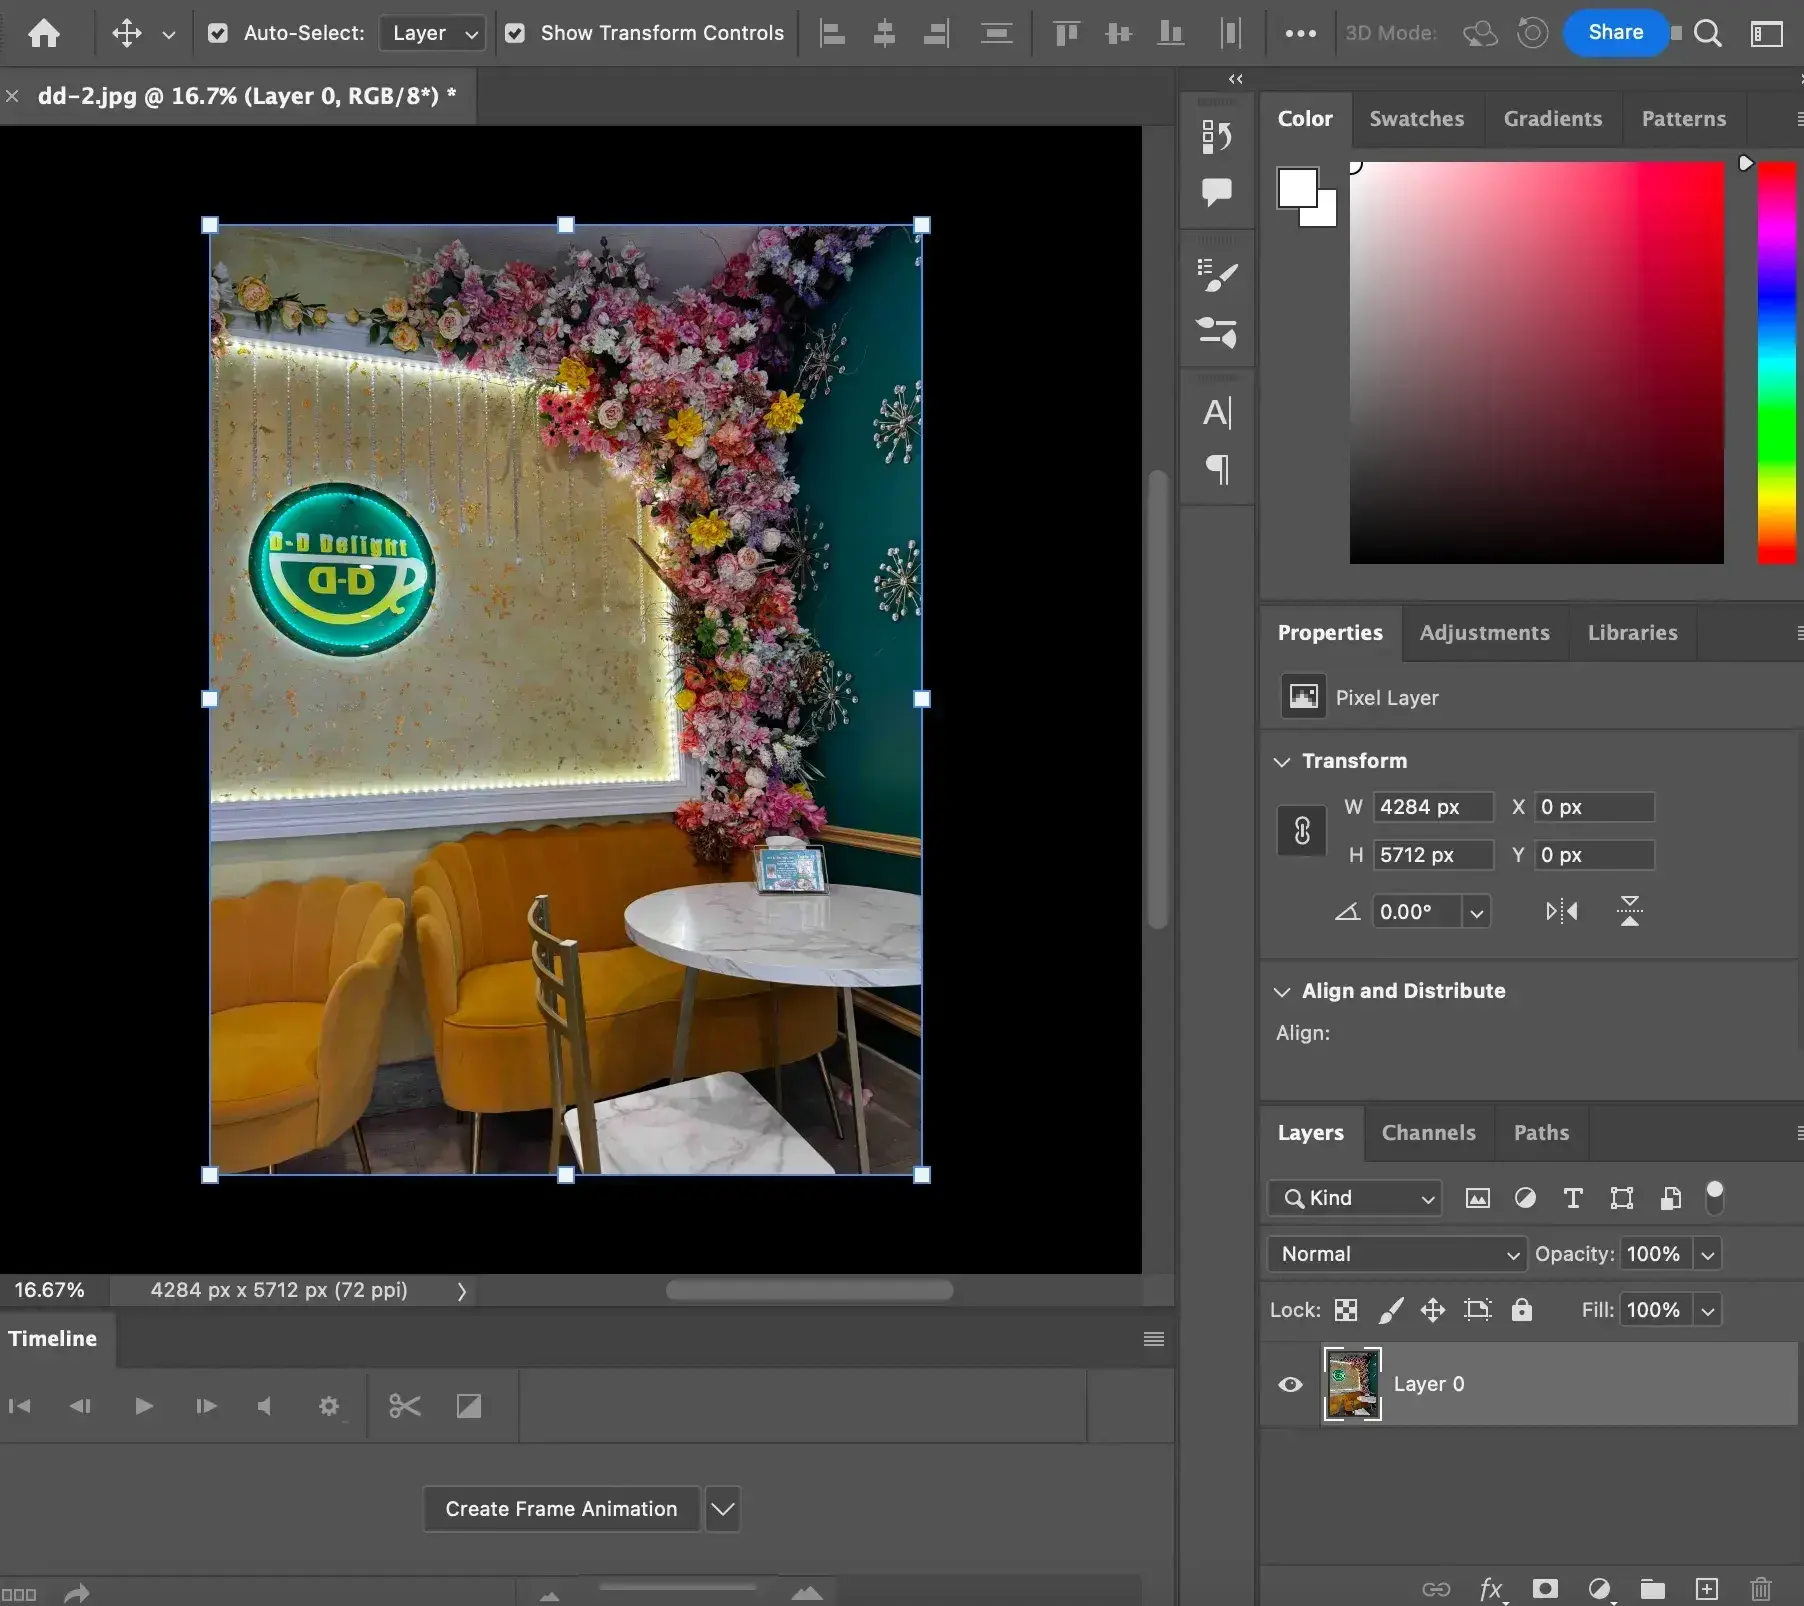
Now, I drag the image around and adjust the edges until it fits into my newly sized canvas. I press the “enter” key on my keyboard once I’m satisfied.
Note: Ensure the Show Transformation Controls box is ticked, as this is what allows you to manipulate the edges of your image.
HubSpot's Free Website Builder
Create and customize your own business website with an easy drag-and-drop website builder.
- Build a website without any coding skills.
- Pre-built themes and templates.
- Built-in marketing tools and features.
- And more!
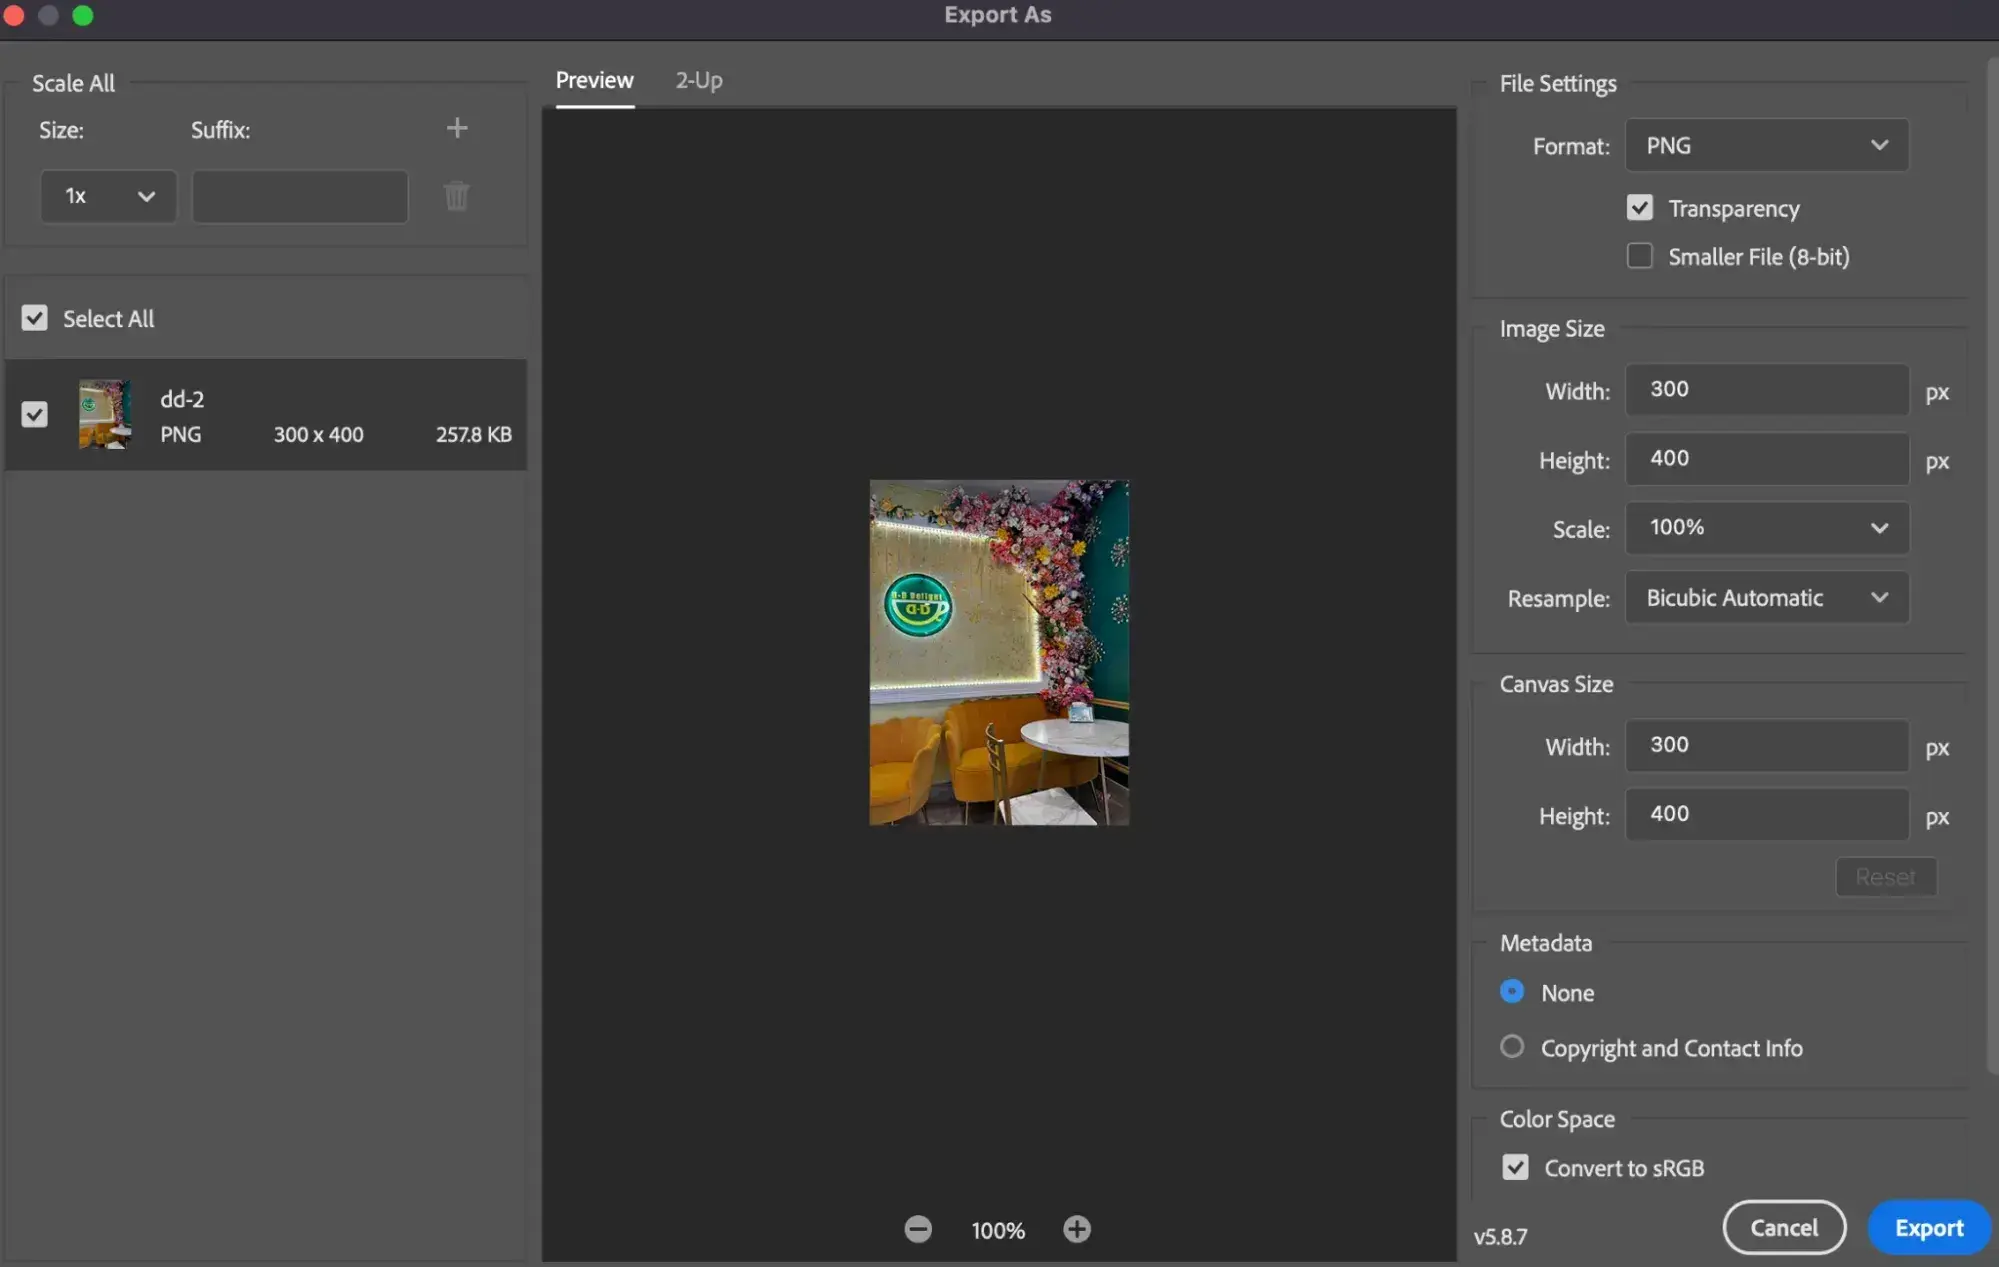
Step 5: Save your resized image.
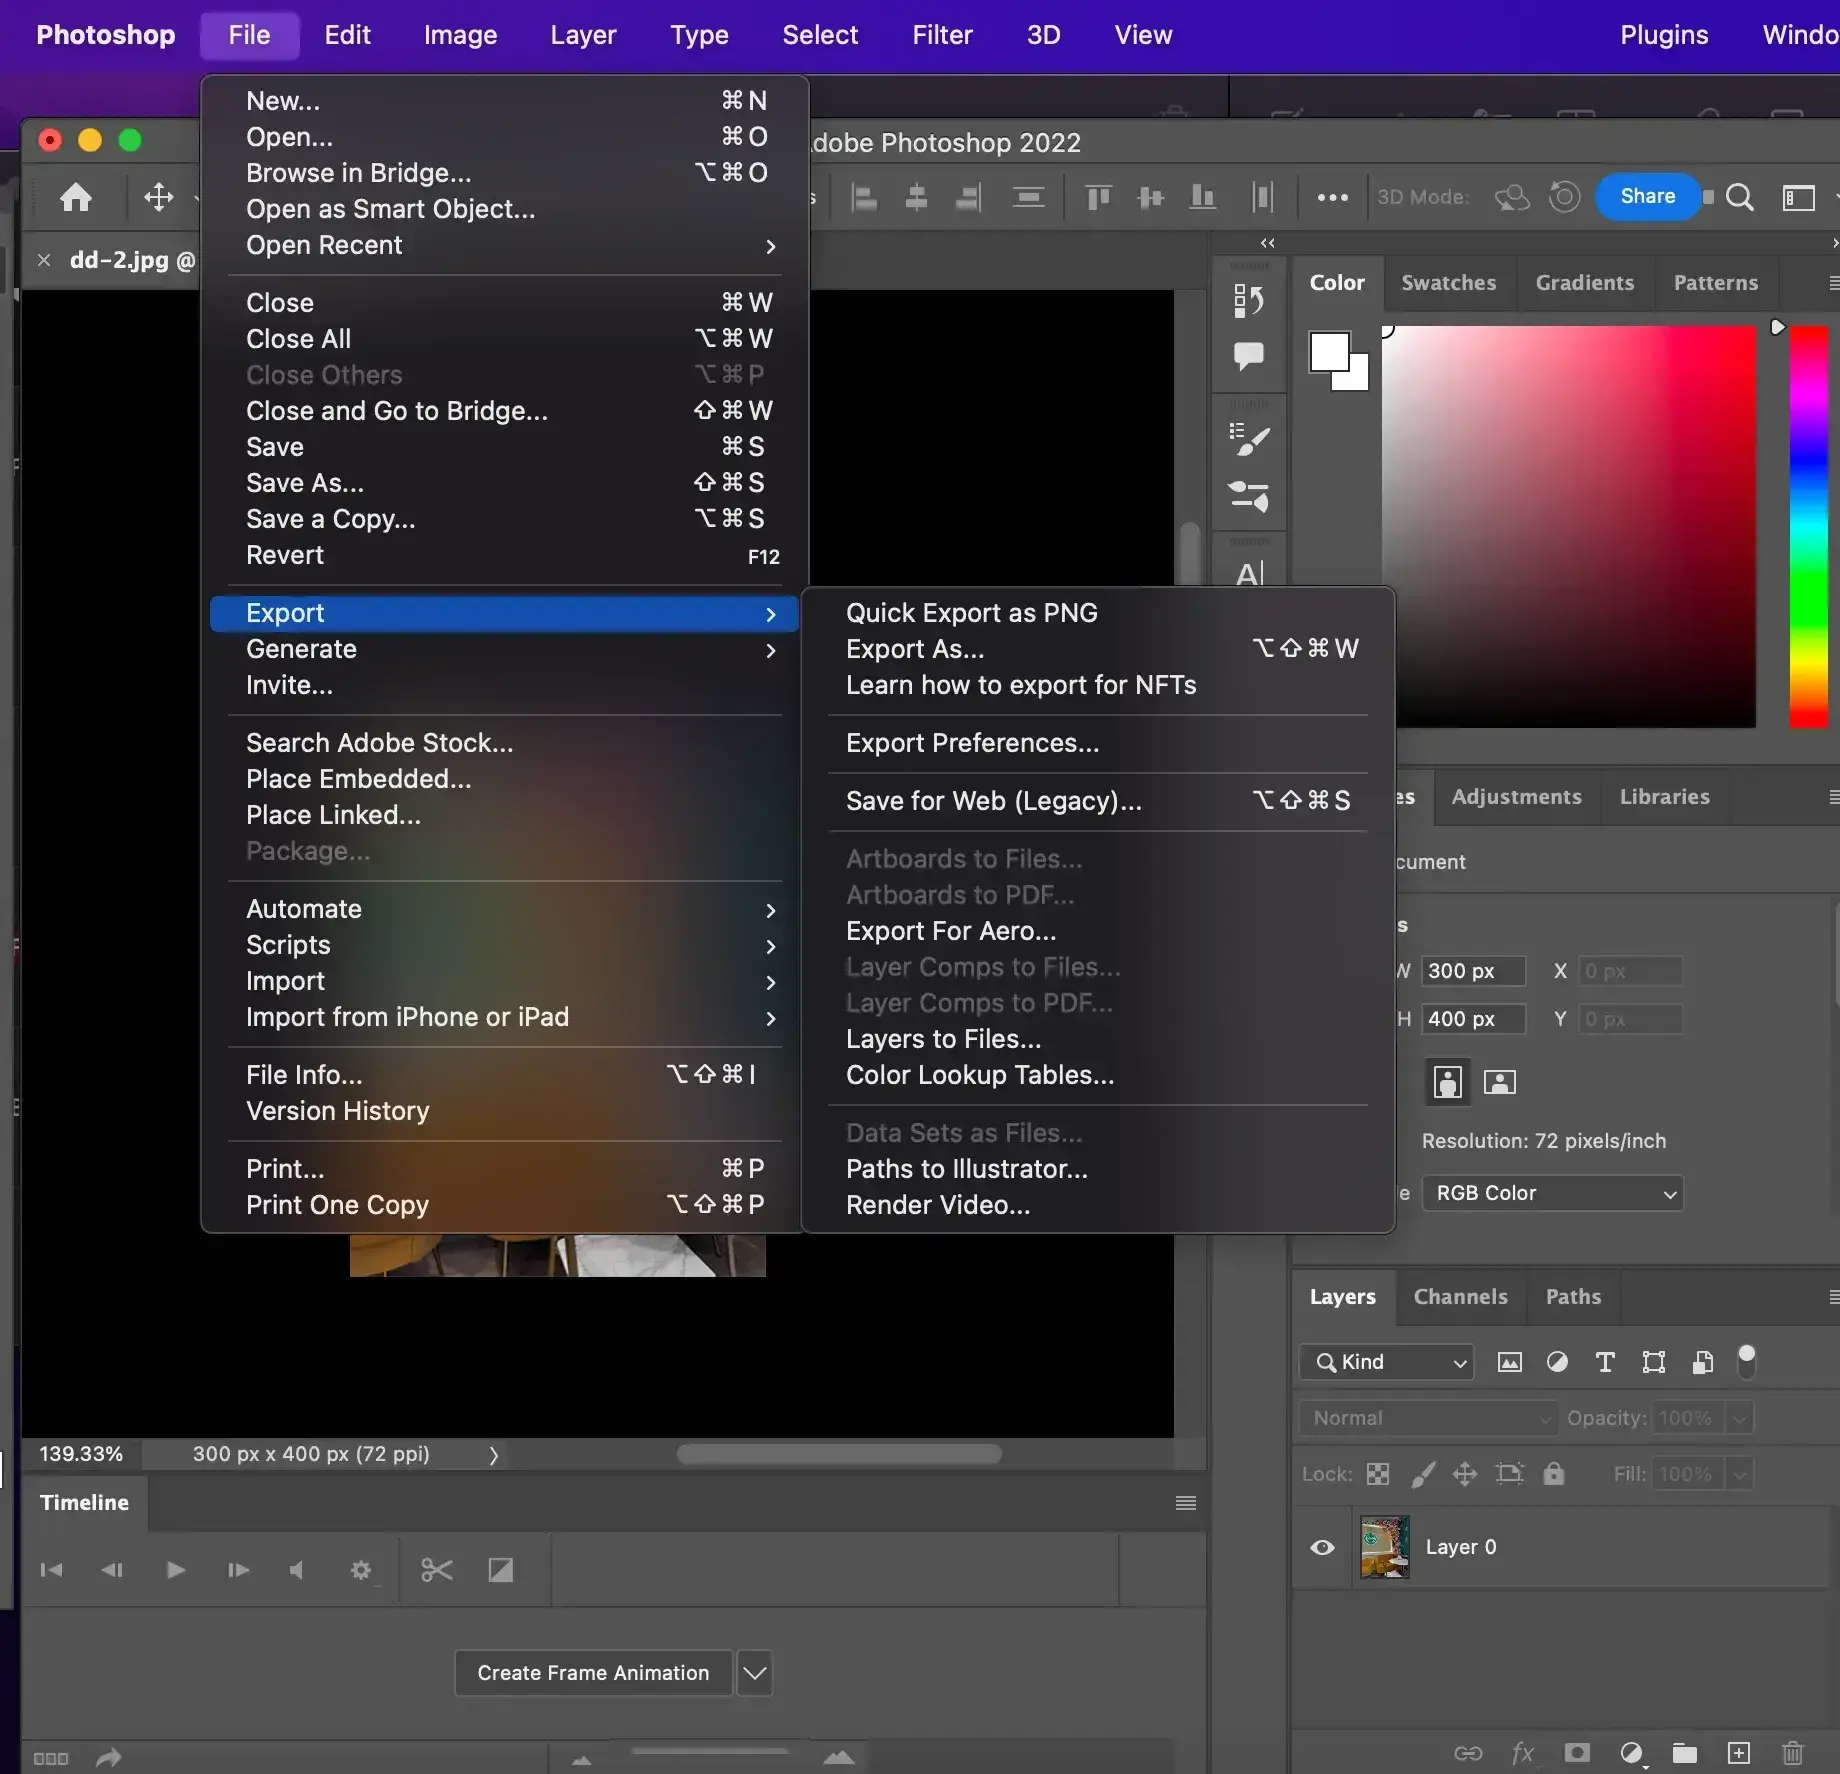
To save my resized image to my device, I select File from the header menu bar. Then, I navigate to Export in the dropdown menu and click Export As. This allows me to choose the format for my image (PNG, JPG, etc.).
Finally, I click Export and save to my desired location.
How to Reduce Image Pixel Size in MS Paint
Step 1: Upload an image.
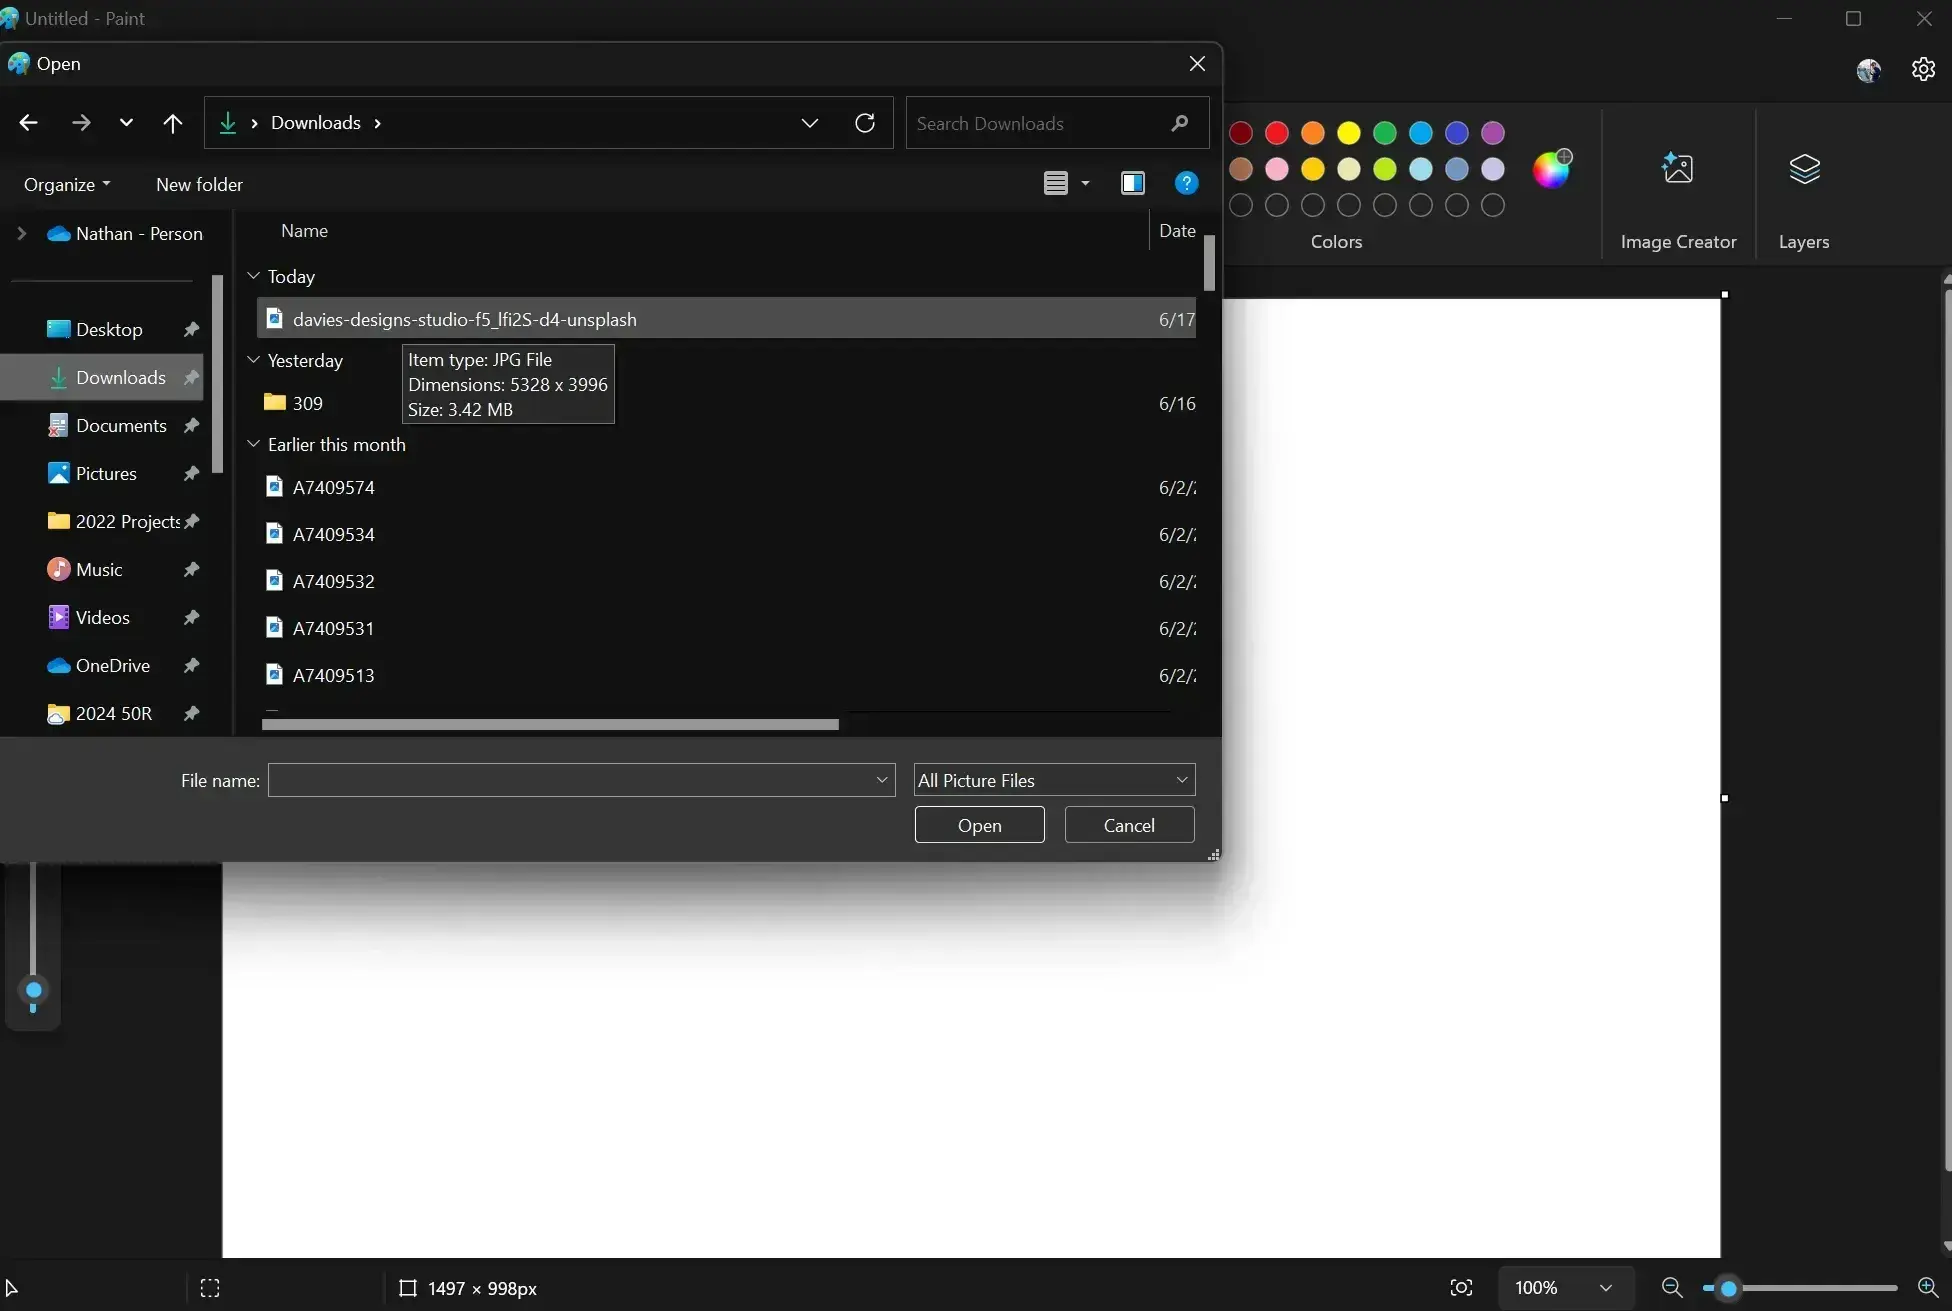
First, I choose the image I want to resize by clicking File on the menu bar and selecting Open from the dropdown menu. I select the image I want to upload from my device.
Step 2: Zoom out.
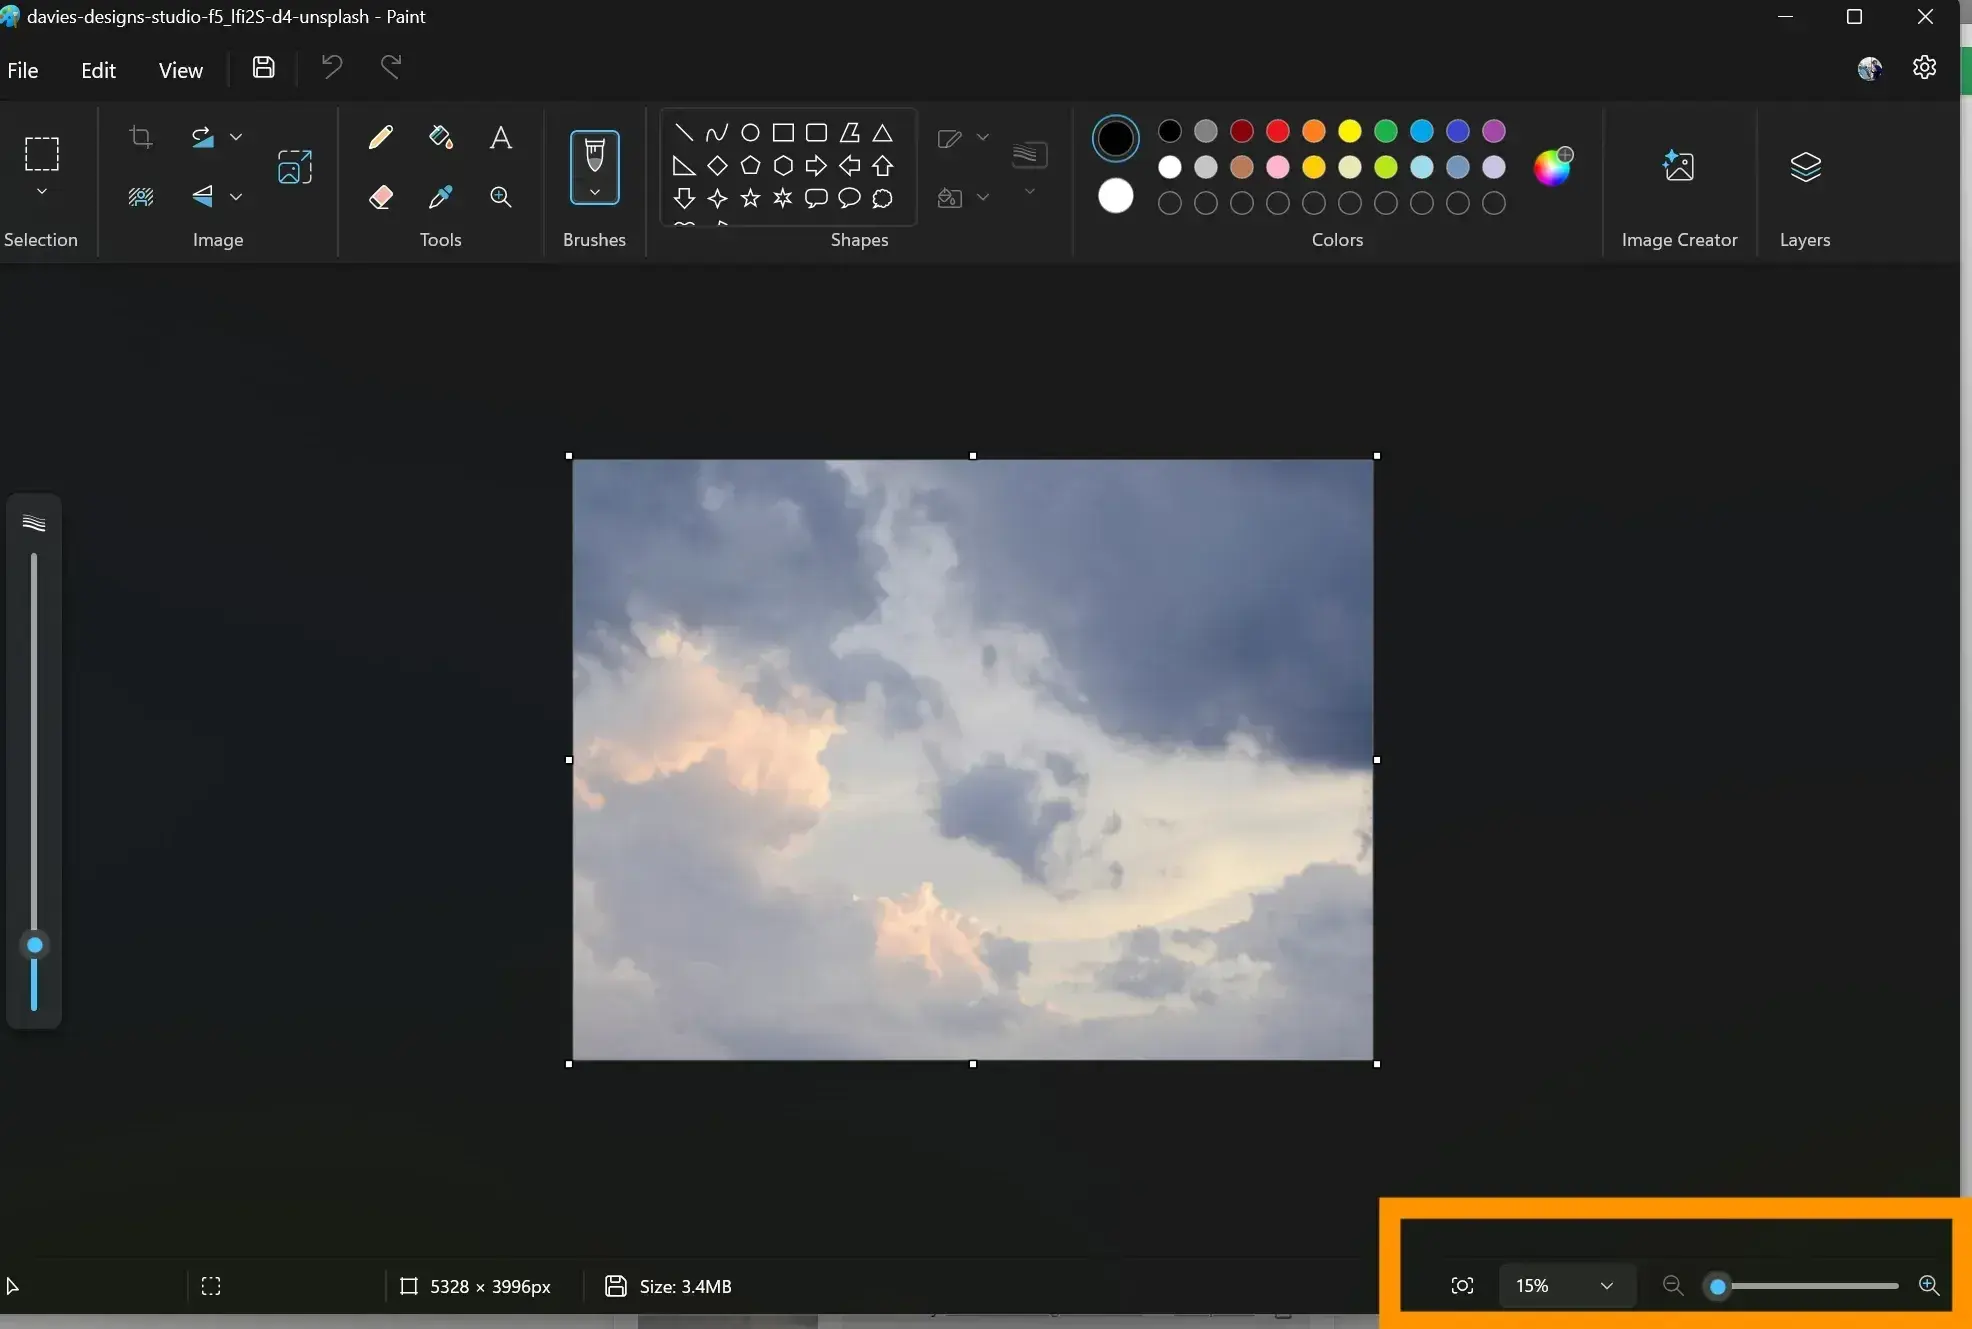
Once the image is open, if necessary, I zoom out using the slider on the status bar at the bottom of the page to bring the image into focus.
Step 3: Crop the image.
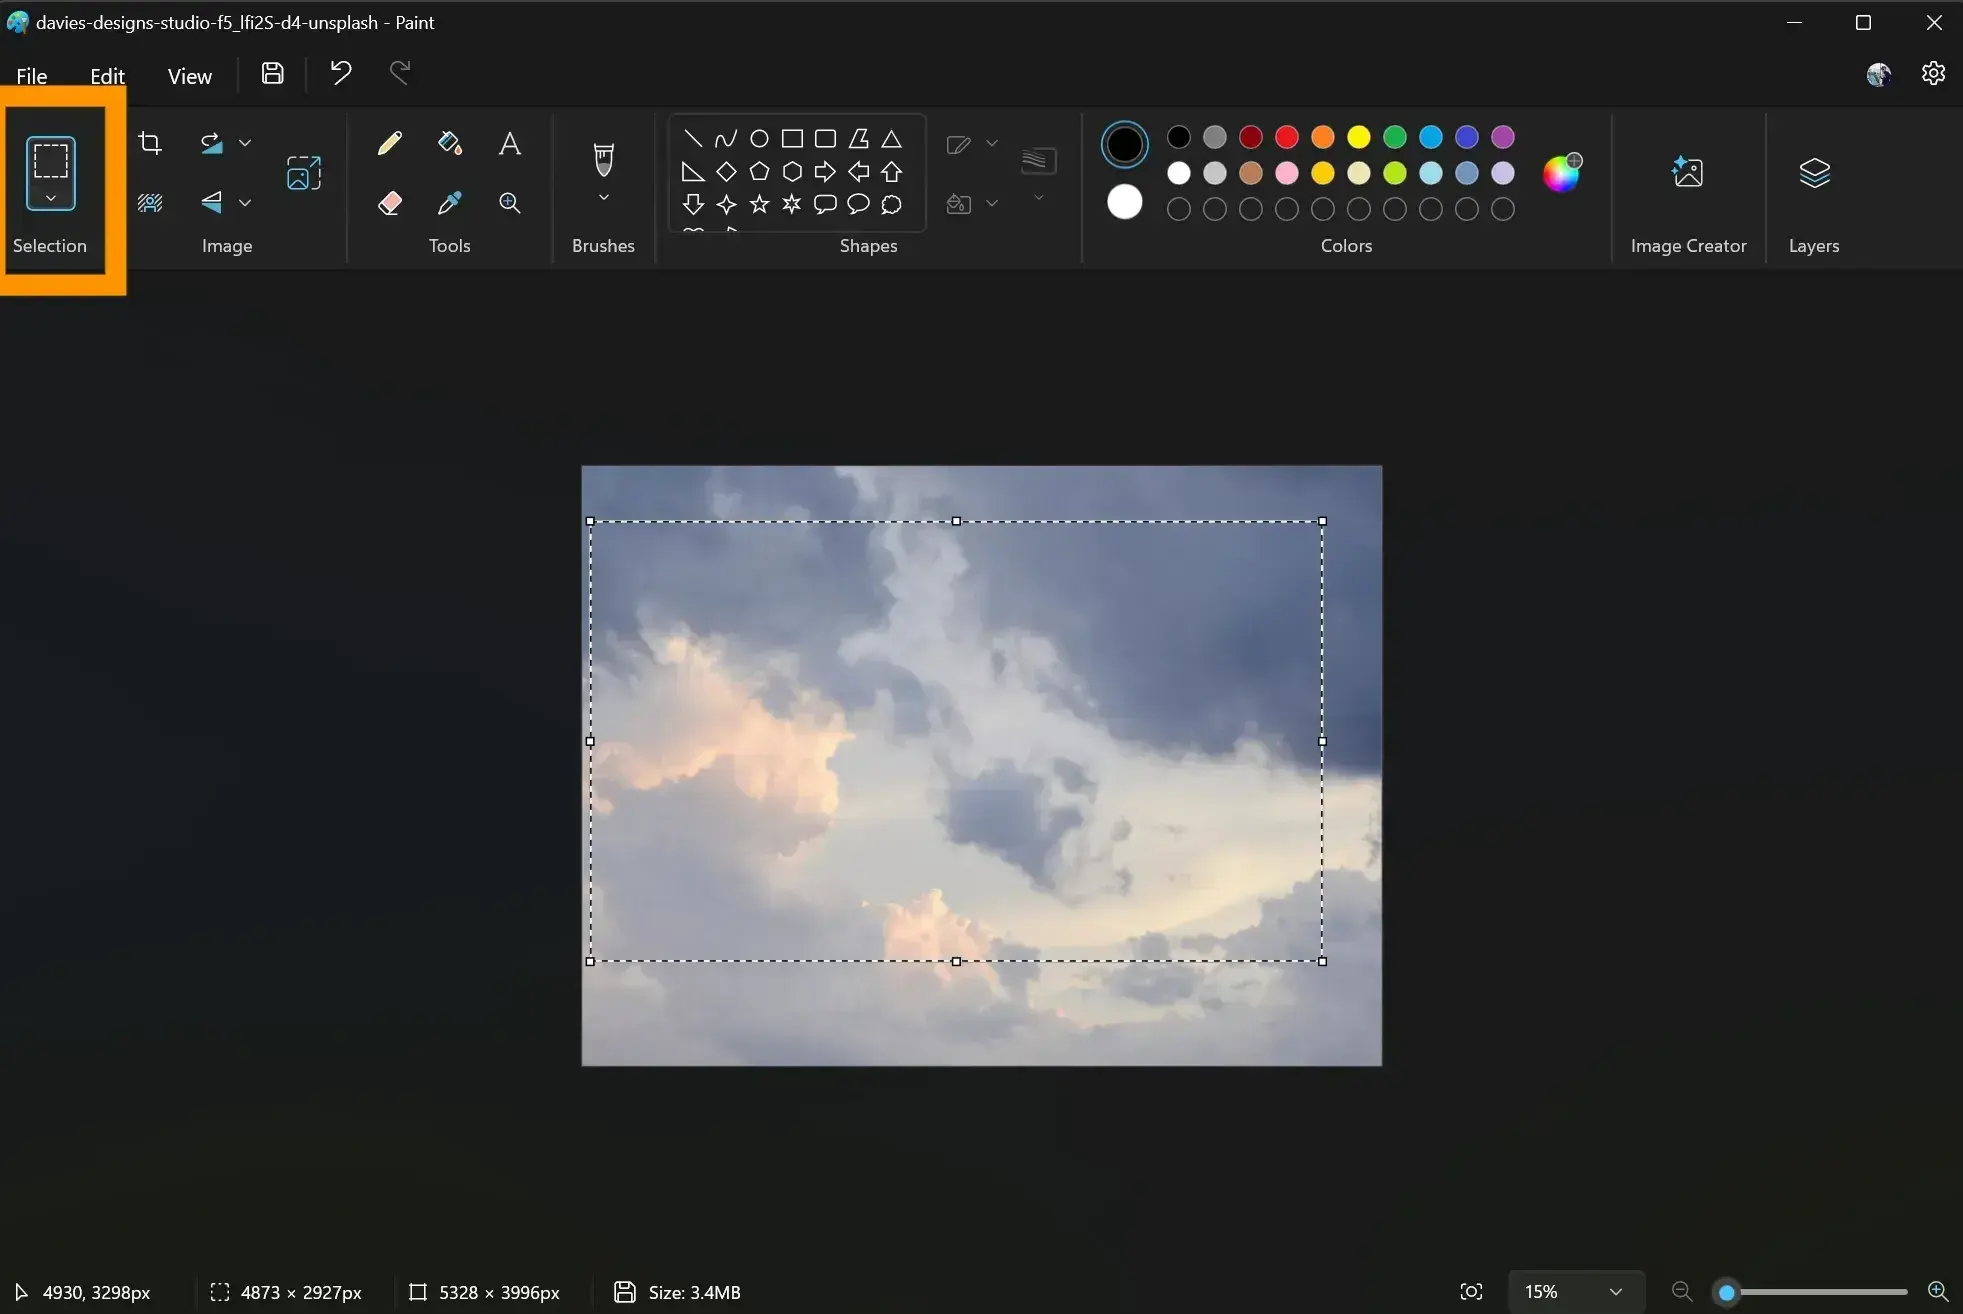
If I want to crop out a portion of the image, I click the square “select” icon and trace the area I would like to keep in the image. Once satisfied, I click the “crop” icon to crop the image.

Step 4: Resize the image.

Next, I click the “resize” icon to resize the image. This will open up a window with options to resize and skew the image. I can resize the image by percentage or pixel, depending on my preference. Then I click OK to save my changes.
Step 5: Save the image.
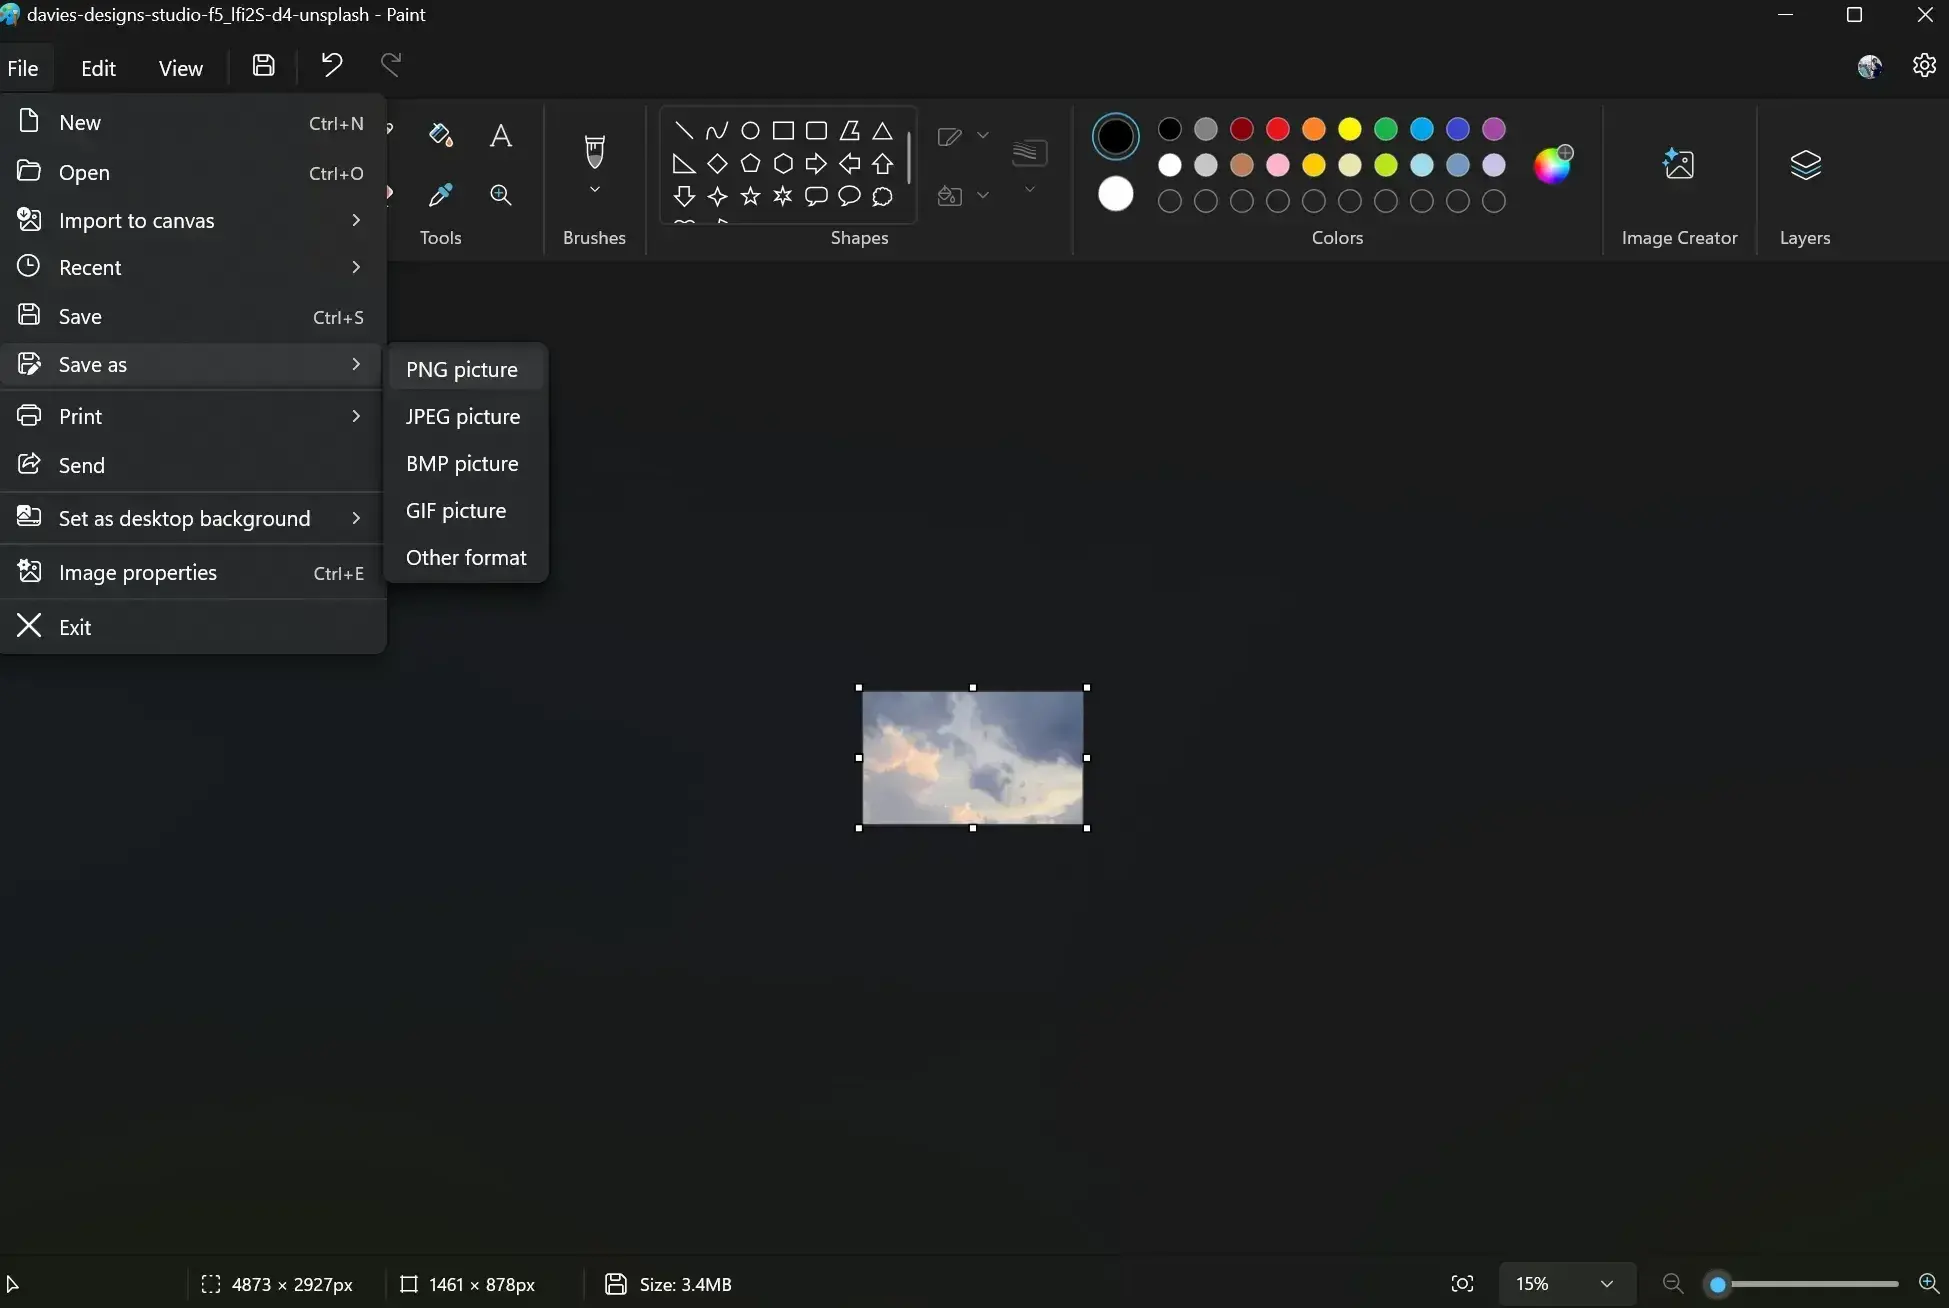
Finally, to save my newly resized image, I click File on the menu bar and navigate to Save As on the dropdown menu. This allows me to choose the format to save my image.
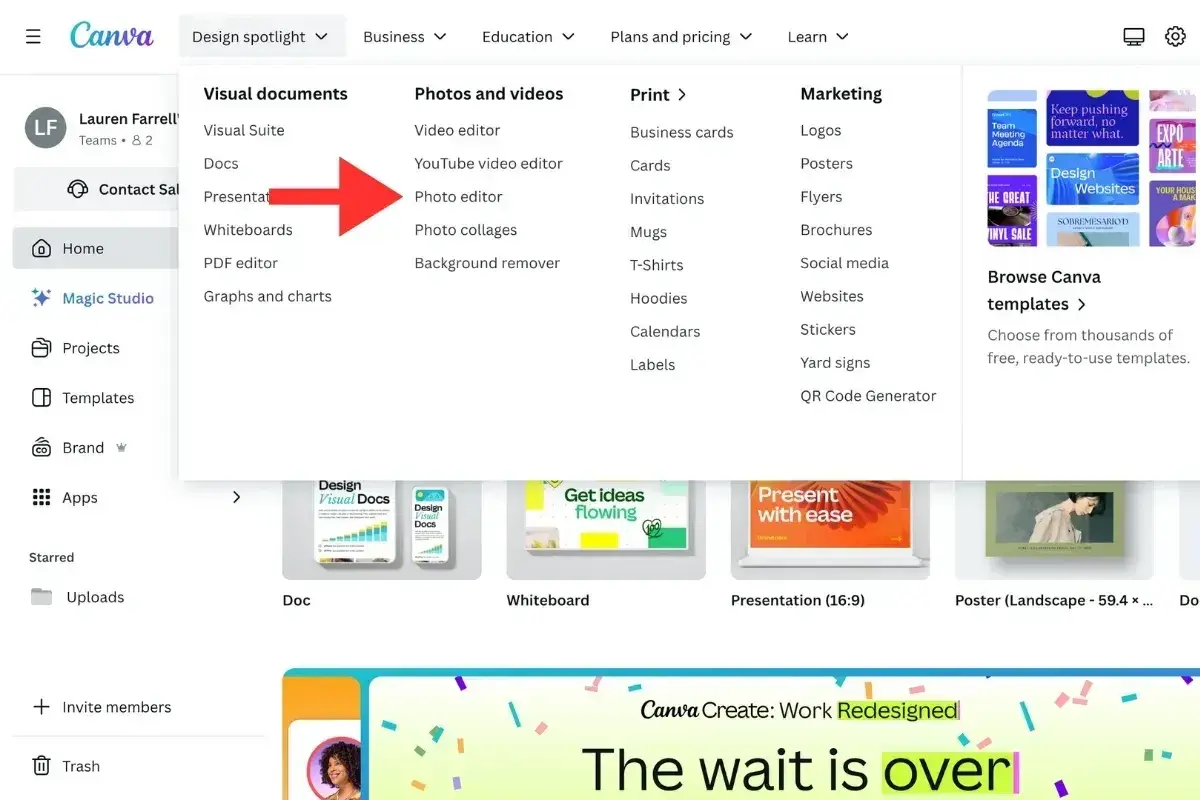
How to Resize JPG & PNG Files in Canva
Step 1: Select image from your device.
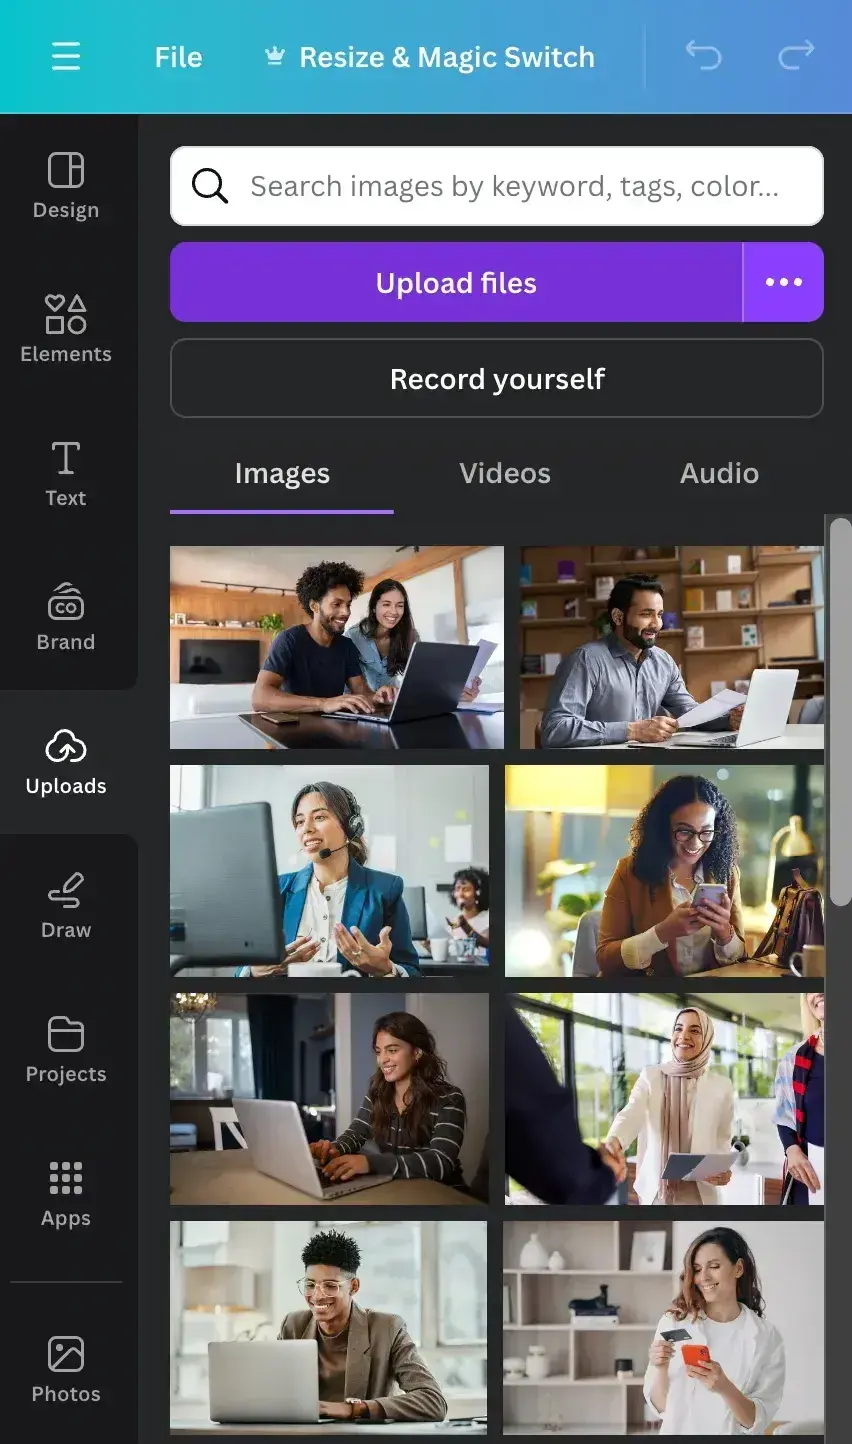
There are a couple of ways to start the process of resizing an image on Canva. With the updated app navigation and photo editor released in 2024, the most straightforward way is to upload my image and go from there.
From the Canva homepage, I click on the Design Spotlight dropdown and select Photo Editor.
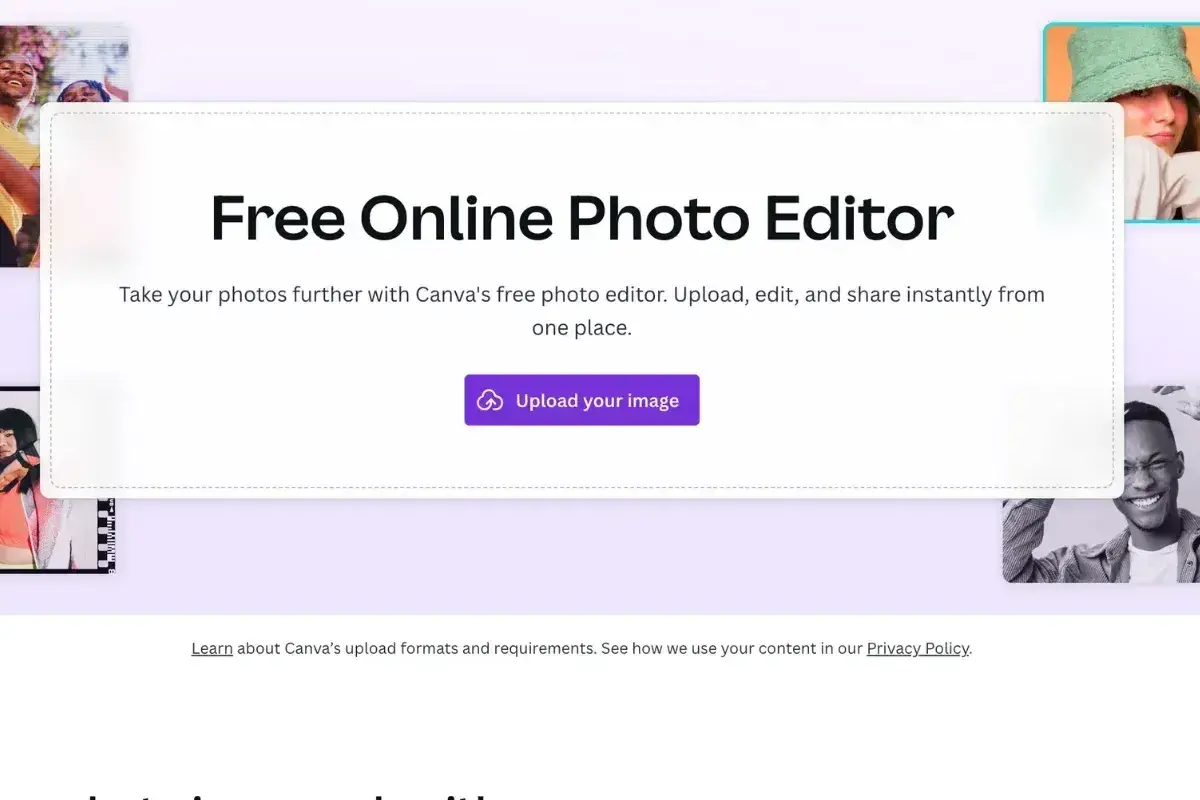
Step 2: Upload your image.
A window opens up where I can click and upload the image I need to resize. I upload the image from my computer by clicking the Upload your image button.
Step 3: Resize the image.
Canva will open my image as a new design, with the original dimensions of the uploaded image. The Photo Editor app will open automatically in the left side panel.

Although I can crop and add new dimensions to the image using Photo Editor, it isn’t particularly useful for overall resizing. Instead, the image will be resized on the original dimensions of the design, leaving me with whitespace when I go to download it.
Instead, I usually click on the Resize and Magic Switch option in the top ribbon. There, I can access a ton of useful out-of-the-box resizing options for the web and social platforms, as well as the ability to create custom dimensions.
Note: The “Resize and Magic Switch” tool is only available with a premium Canva account.
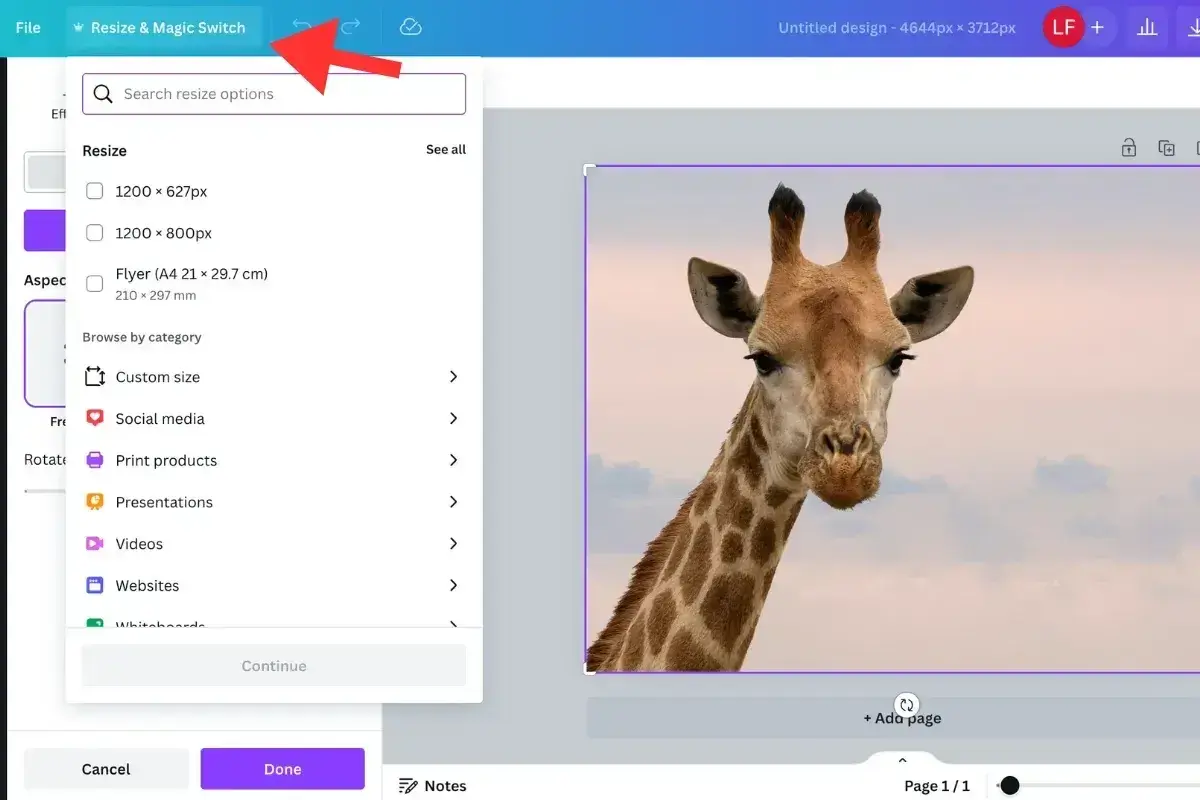
Once I’ve set the new image dimensions, I save my changes by either clicking Copy and Resize — which will create a resized copy of the image — or Resize — which will resize my original image within the same design.
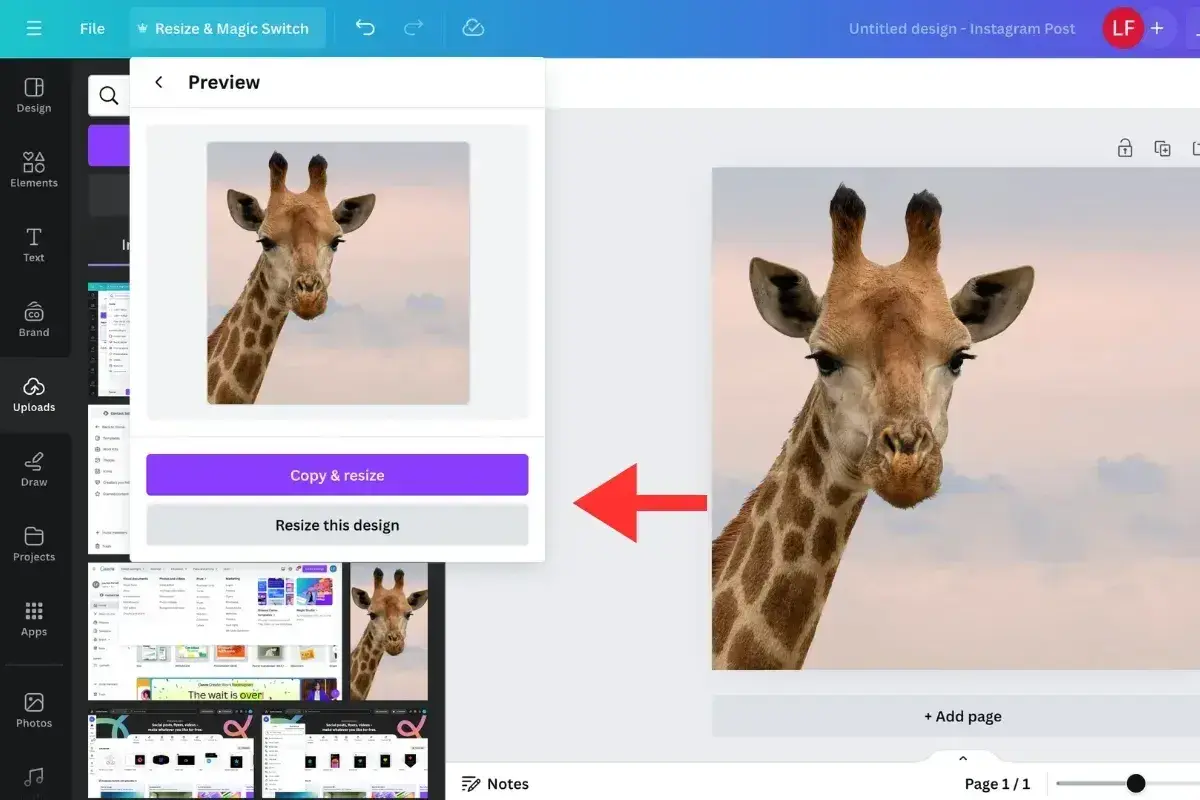
One of my favorite parts of this feature is the ability to select multiple options for resizing at one time to create a whole new set of resized designs. So you can quickly repurpose an image into social graphics across multiple platforms, for example.
Step 4: Save your image.
Finally, to save my resized image, I rename it in the header bar, then click the Download button also located in the header. This triggers a dropdown menu where I have the option to download the image.
For website images, I’ll typically use JPG from the dropdown and leave the quality at 80 since there’s usually no visual quality loss. But you can select multiple different image types from the File Type dropdown and play around with the file size and quality if needed.
Free Website Optimization Checklist
This website optimization checklist will help you perfect your website's:
- Performance
- SEO
- Security
- Mobile Performance
Download Free
All fields are required.
Form not available
How to Resize an Image to 100KB
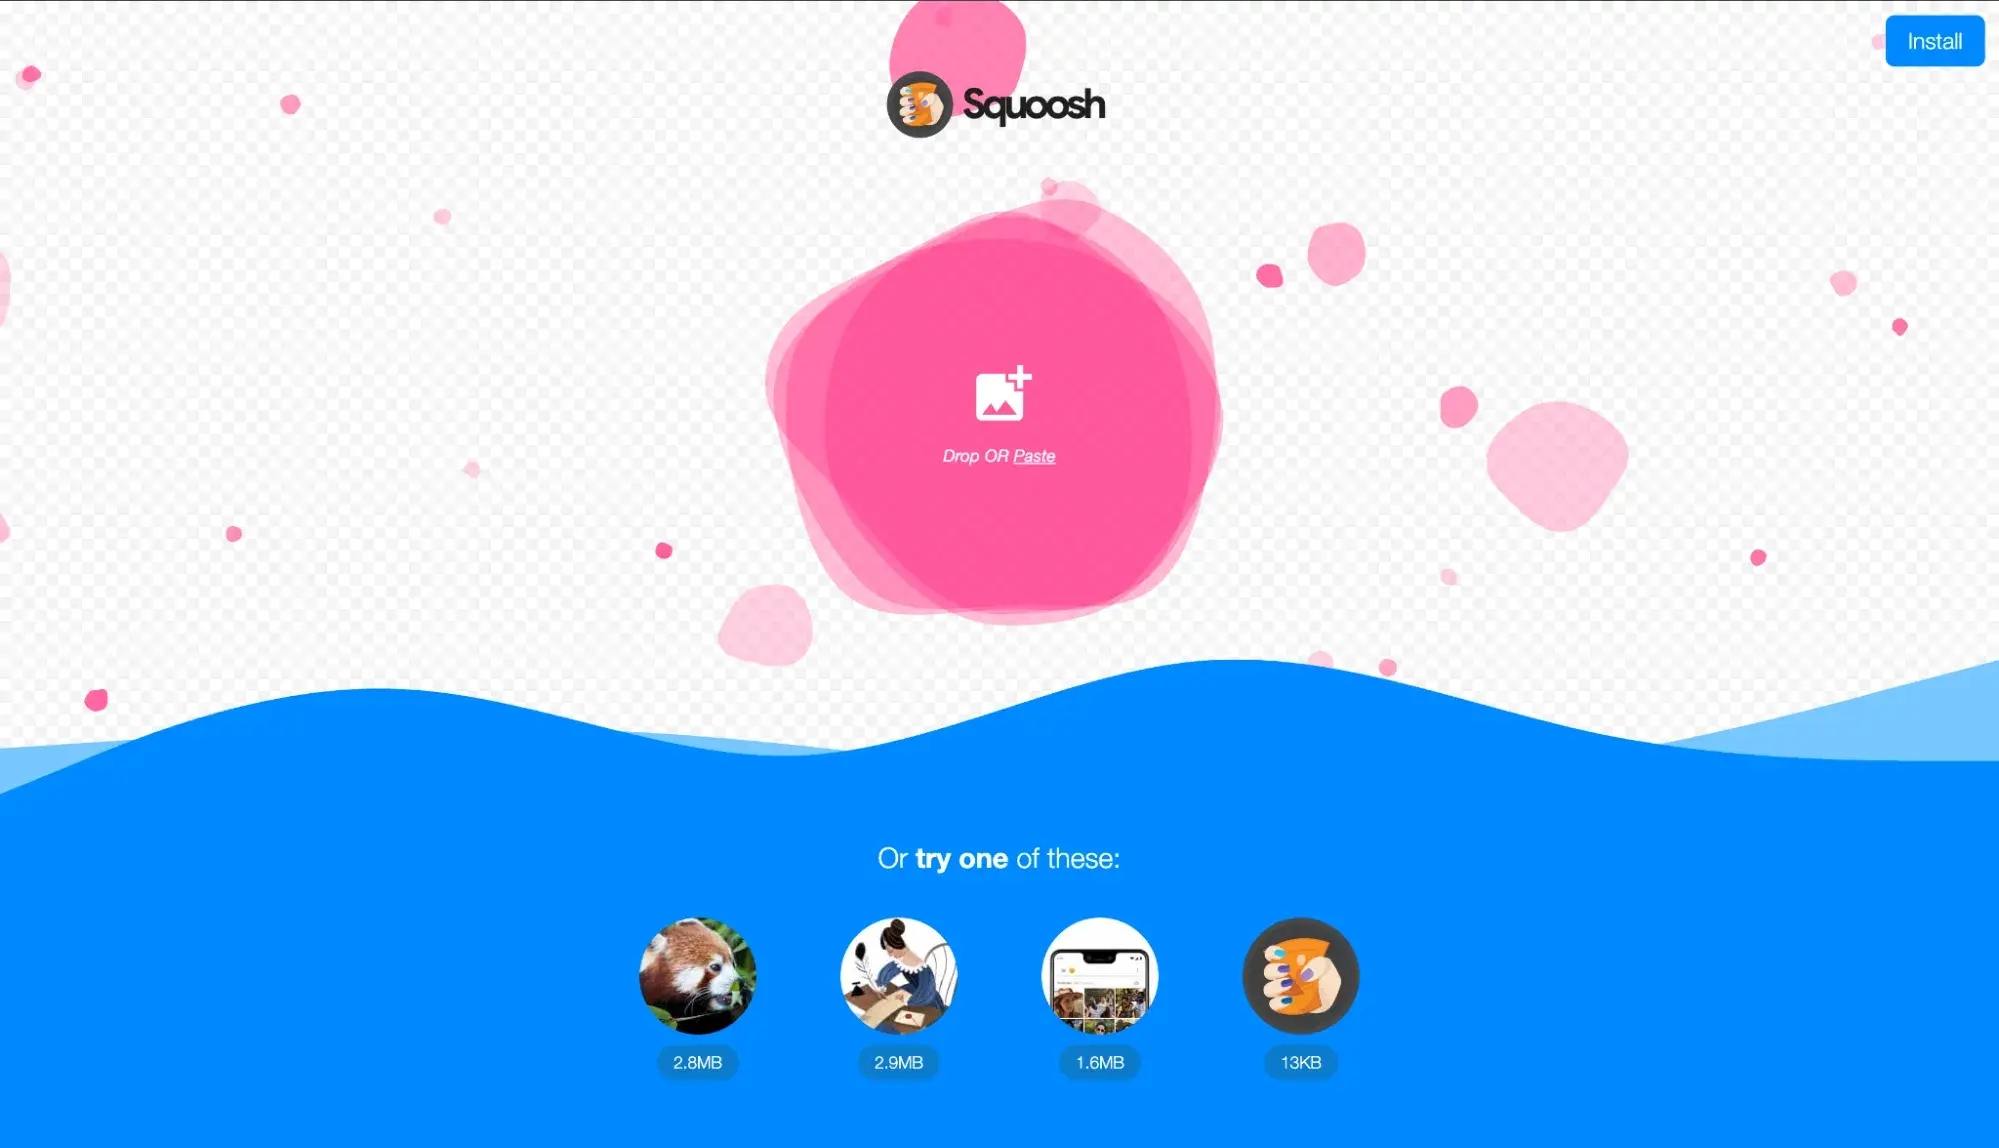
Resizing an image to exactly 100KB (or close to it) isn’t only about changing the pixel size; it’s mainly about compression and optimization. There are a couple of ways it can be done using different tools. But by far my favorite way of resizing an image to 100KB is using Squoosh, an advanced online tool by Google, to control quality and file size.
Here’s a breakdown of how I do it.
Step 1: Go to Squoosh.app.
The interface is clean, and no signup is needed.
Step 2: Upload your image.
I can upload the image I would like to resize by either dragging and dropping it, pasting it from my clipboard, or uploading it from my computer.
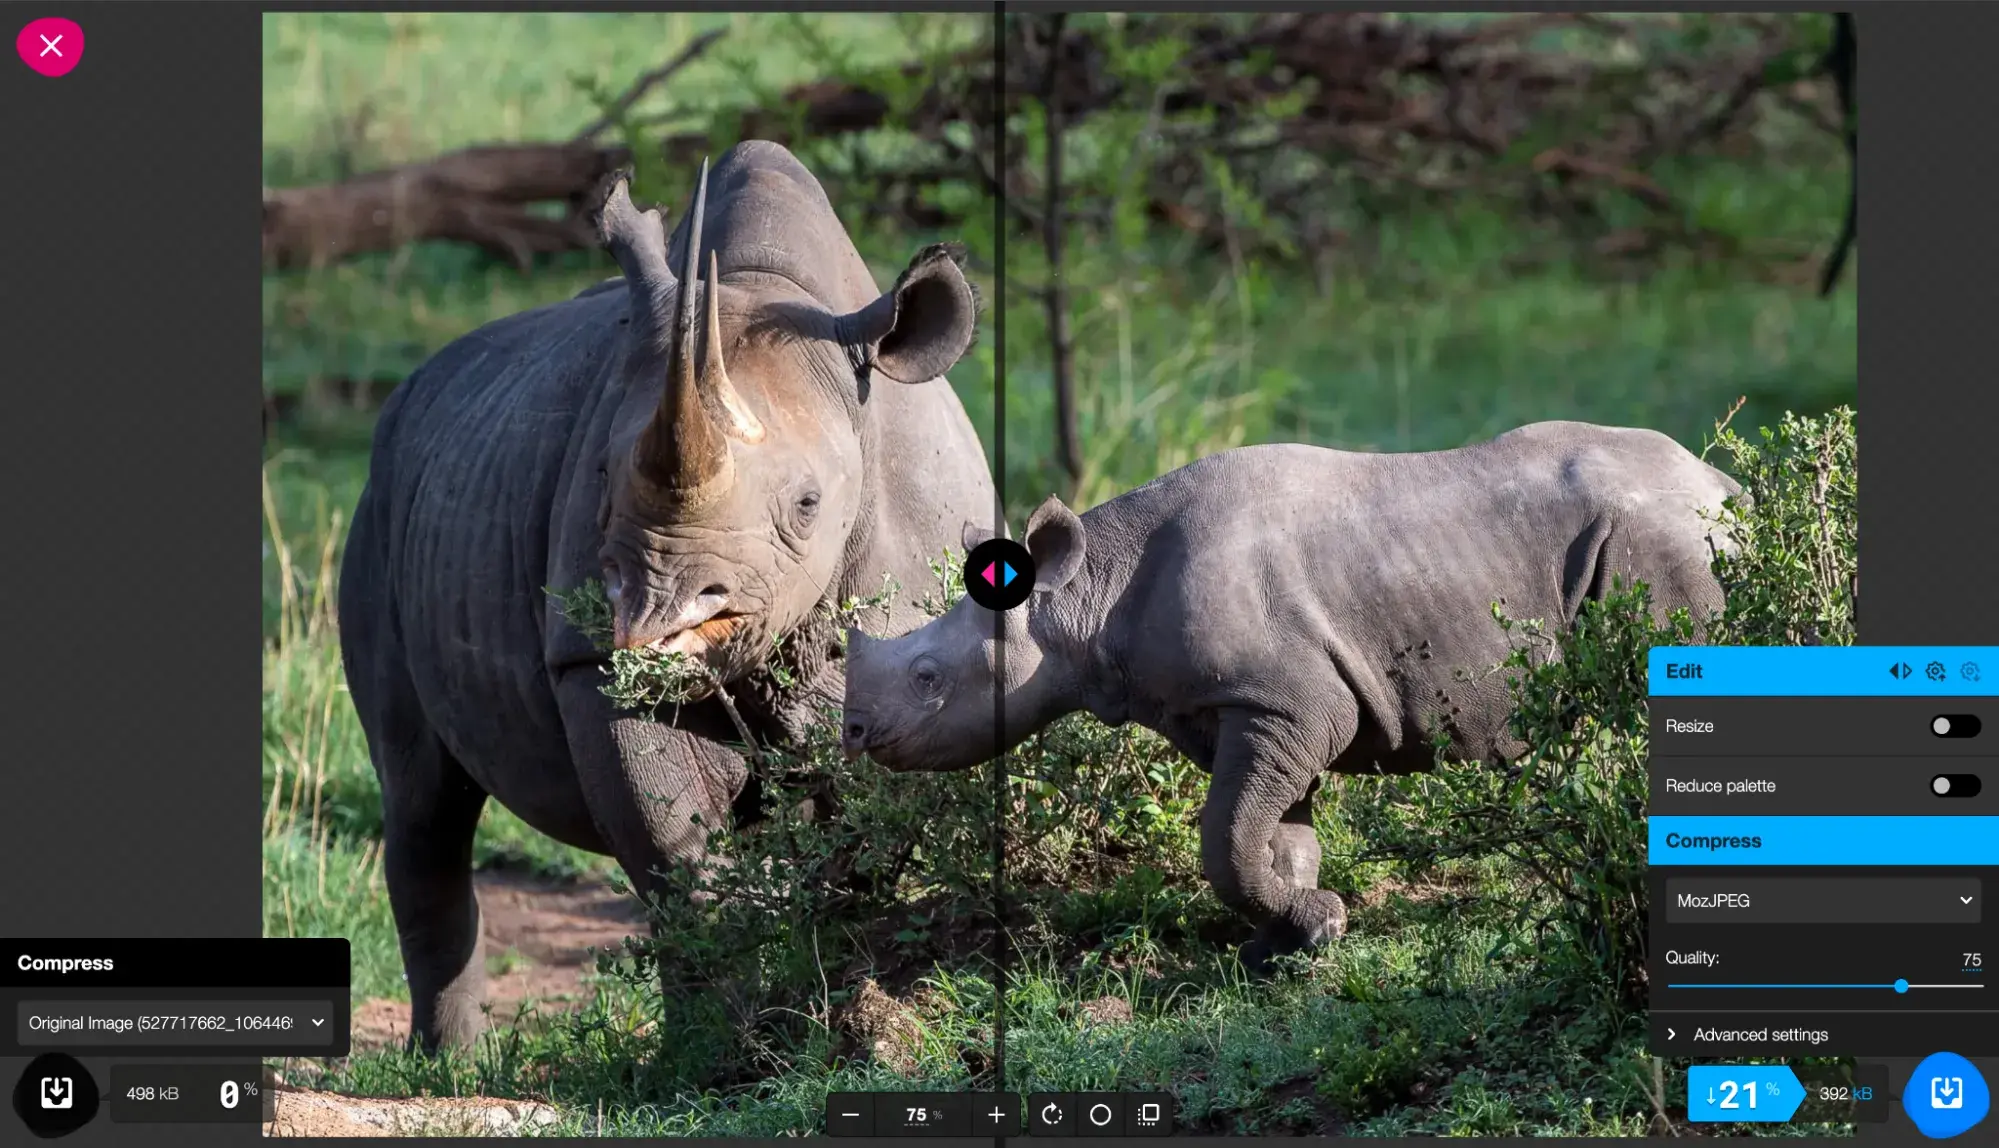
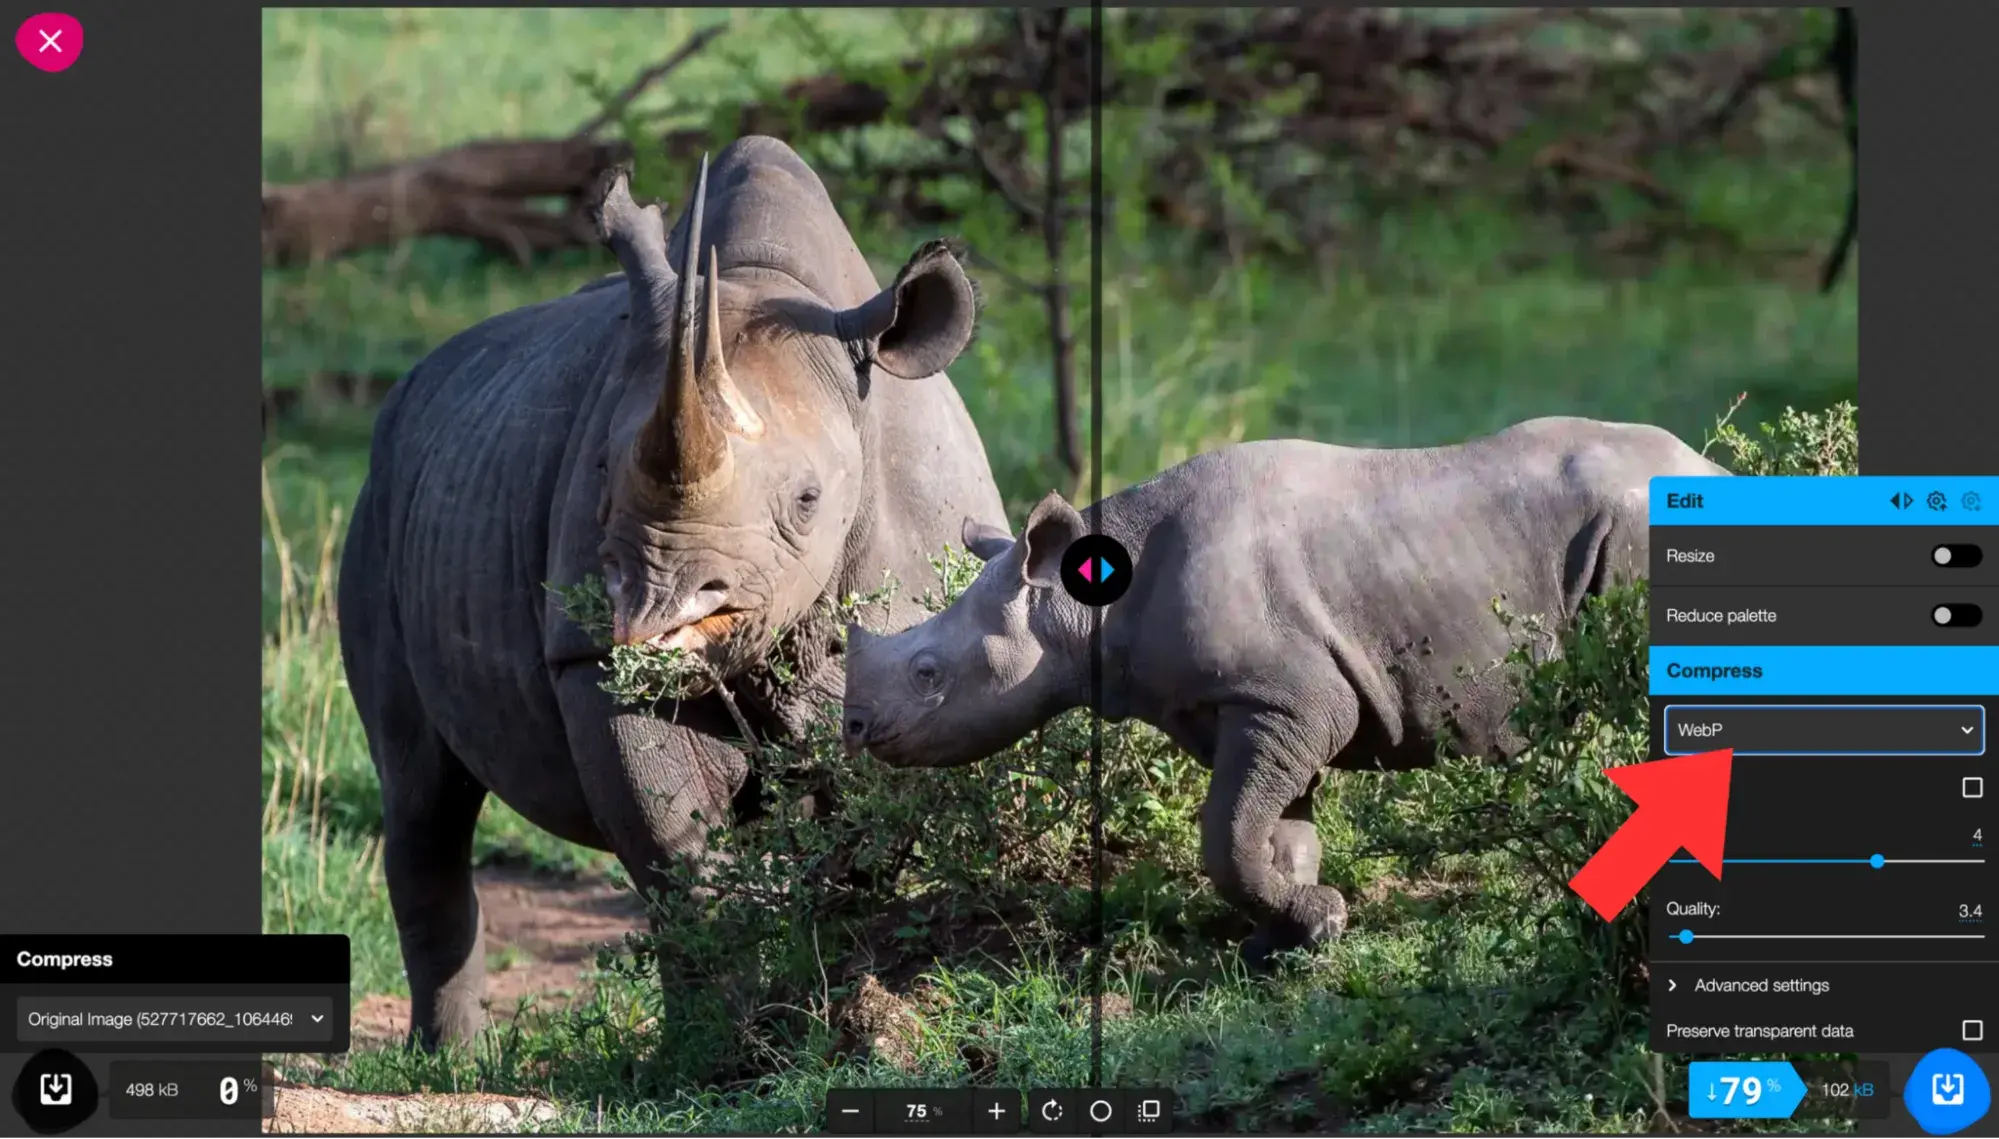
A side-by-side preview will be displayed by Squoosh. On the left side I can see the original image, and on the right side I can see the optimized version.
Step 3: Choose the right format.
I usually switch to MozJPEG or WebP (both much smaller than PNG).
JPEG is best for photos in my opinion, and WebP works well for almost everything.
Step 4: Adjust compression settings.
After selecting my preferred format, I can start compressing my image using the quality slider on the right panel.
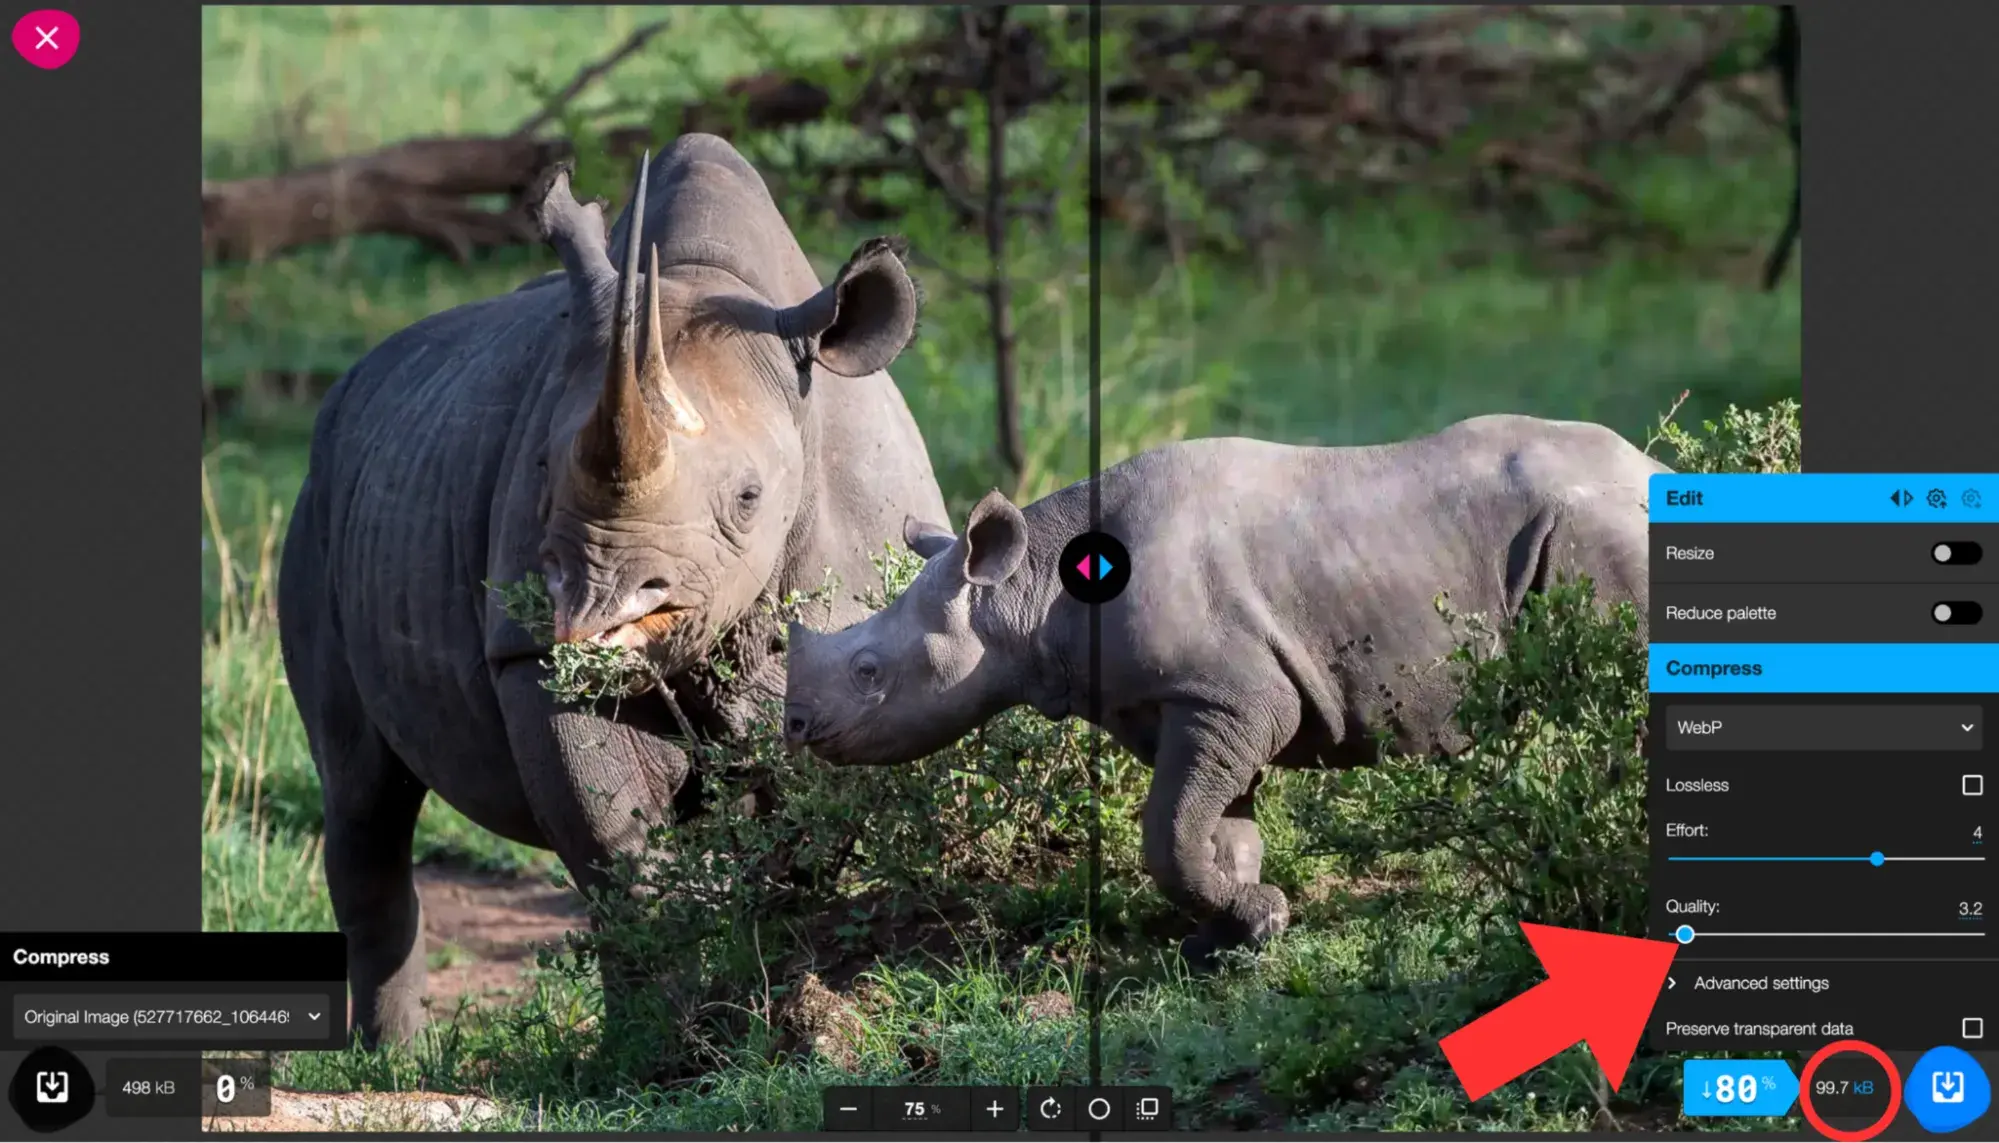
Squoosh displays the file size in real time while I make adjustments, and if you pay close attention, you can already see the change. I simply move the slider till the image is a little smaller than 100KB in order to resize it to that size.
Step 5: Download.
Once the size hits 100KB, I click Download.
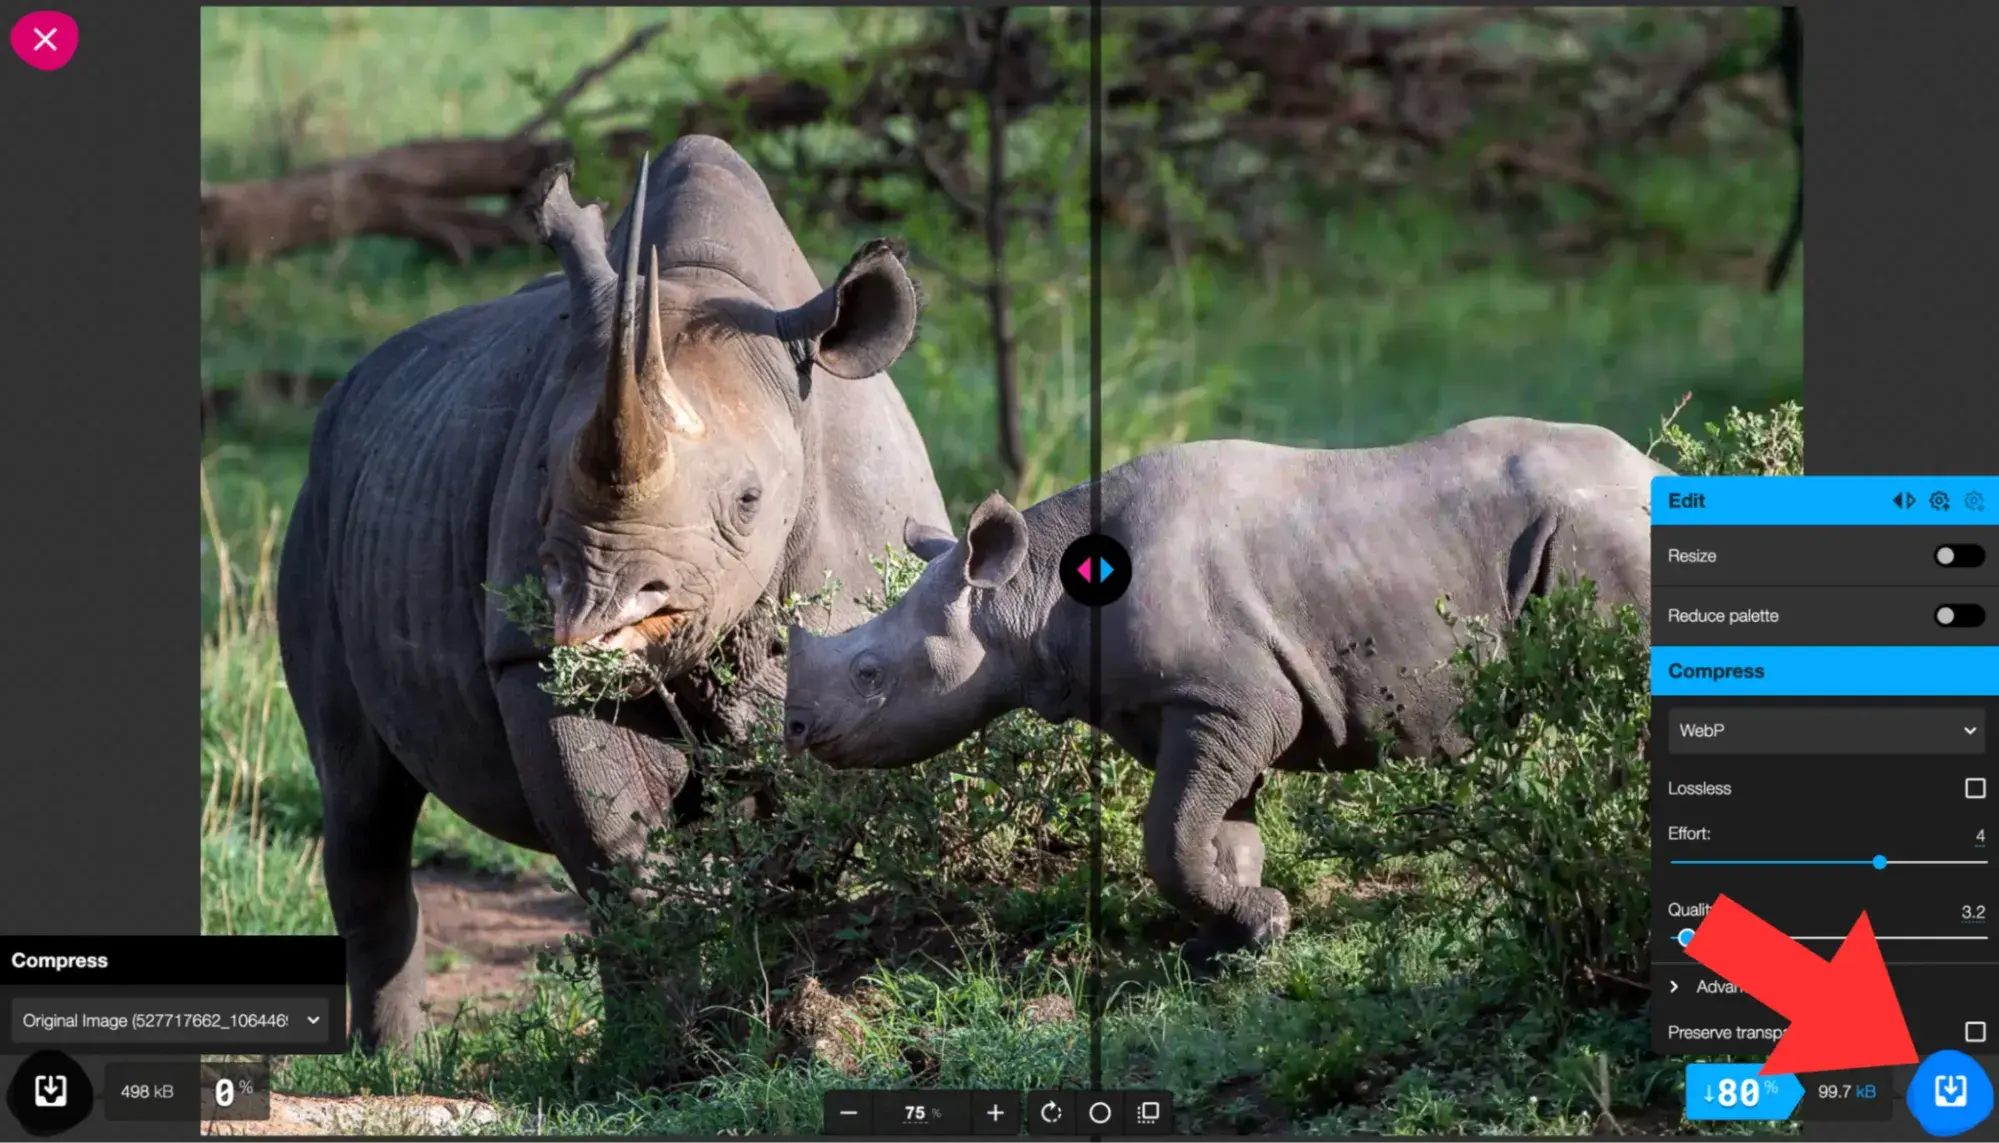
That’s it, I now have a perfectly optimized, web-ready image under 100K.
How to Make a PNG Smaller Without Losing Quality
PNG files are one of my favorites for sharp graphics, transparent backgrounds, and UI elements, but they can also be ridiculously heavy if you’re not careful. In projects, a single oversized PNG logo can slow down a page speed more than all the scripts combined. Therefore, I am always building a workflow to shrink PNGs without sacrificing quality.
I focus on using lossless compression technologies that maintain sharpness and transparency.
Here are some of the tools I use:
Adobe Express
When I need something fast and polished, I’ll throw the PNG into Adobe Express.
It’s great for quick resizing, especially if I need to prep images for social media dimensions. The nice part is it keeps the transparency intact, so logos and UI icons don’t end up with ugly white boxes behind them.
Biteable
If I’m working on simple resizes, let’s say, reducing a PNG from 2000px wide to 800px for a blog post, Biteable is as straightforward as it gets. Upload, set the dimensions, download, done. I use this one when I don’t want extra features, just a clean resize.
Squoosh
This is my go-to when I need more control. In this blog, I used the Squoosh application to resize an image down to 100KB, and I can resize and compress PNGs following the same steps directly in the browser. What I like most is the side-by-side preview that shows me exactly what the compressed version will look like before I save it. For web performance, this is gold; I can usually shave a PNG down to half its size without noticing any difference in quality.
Pro tip: If I have multiple PNGs, let’s say a set of icons, I can batch them through ImageOptim or TinyPNG. Both support bulk processing and make sure everything stays sharp while dramatically cutting file sizes.
Let’s go through a few more of my recommendations for image resizing tools.
Image Resizing Tools
If I had to manually resize each and every image I upload to a website, it would require a huge investment of time and energy. The good news is, even with limited knowledge of graphic design, you can simplify the process with an image resizing tool.
Below is a collection of the best image resizing tools. These are some of my favorites, and they range in functionality and price so you can choose the right one for your needs and budget. Let’s get started.
Resizing.app

Resizing.app is a free Chrome extension that allows users to resize images right in their browsers. It features an incredibly simple interface.
Clicking the extension triggers a pop-up page that instructs the user to click an icon to upload an image. Then, once the image is uploaded, the user can resize the image by width, height, percentage, or using custom dimensions.
Once you resize the image, you can optimize it with the sliding scale and convert it. One drawback of this tool is that it doesn’t show the file size when you’re optimizing it. That can make it difficult to know when to stop sliding the scale to the right.
What I like: Resizing.app is a great option if you want to quickly convert an image from one format to another and maintain the same quality.
Pricing: Free
BeFunky
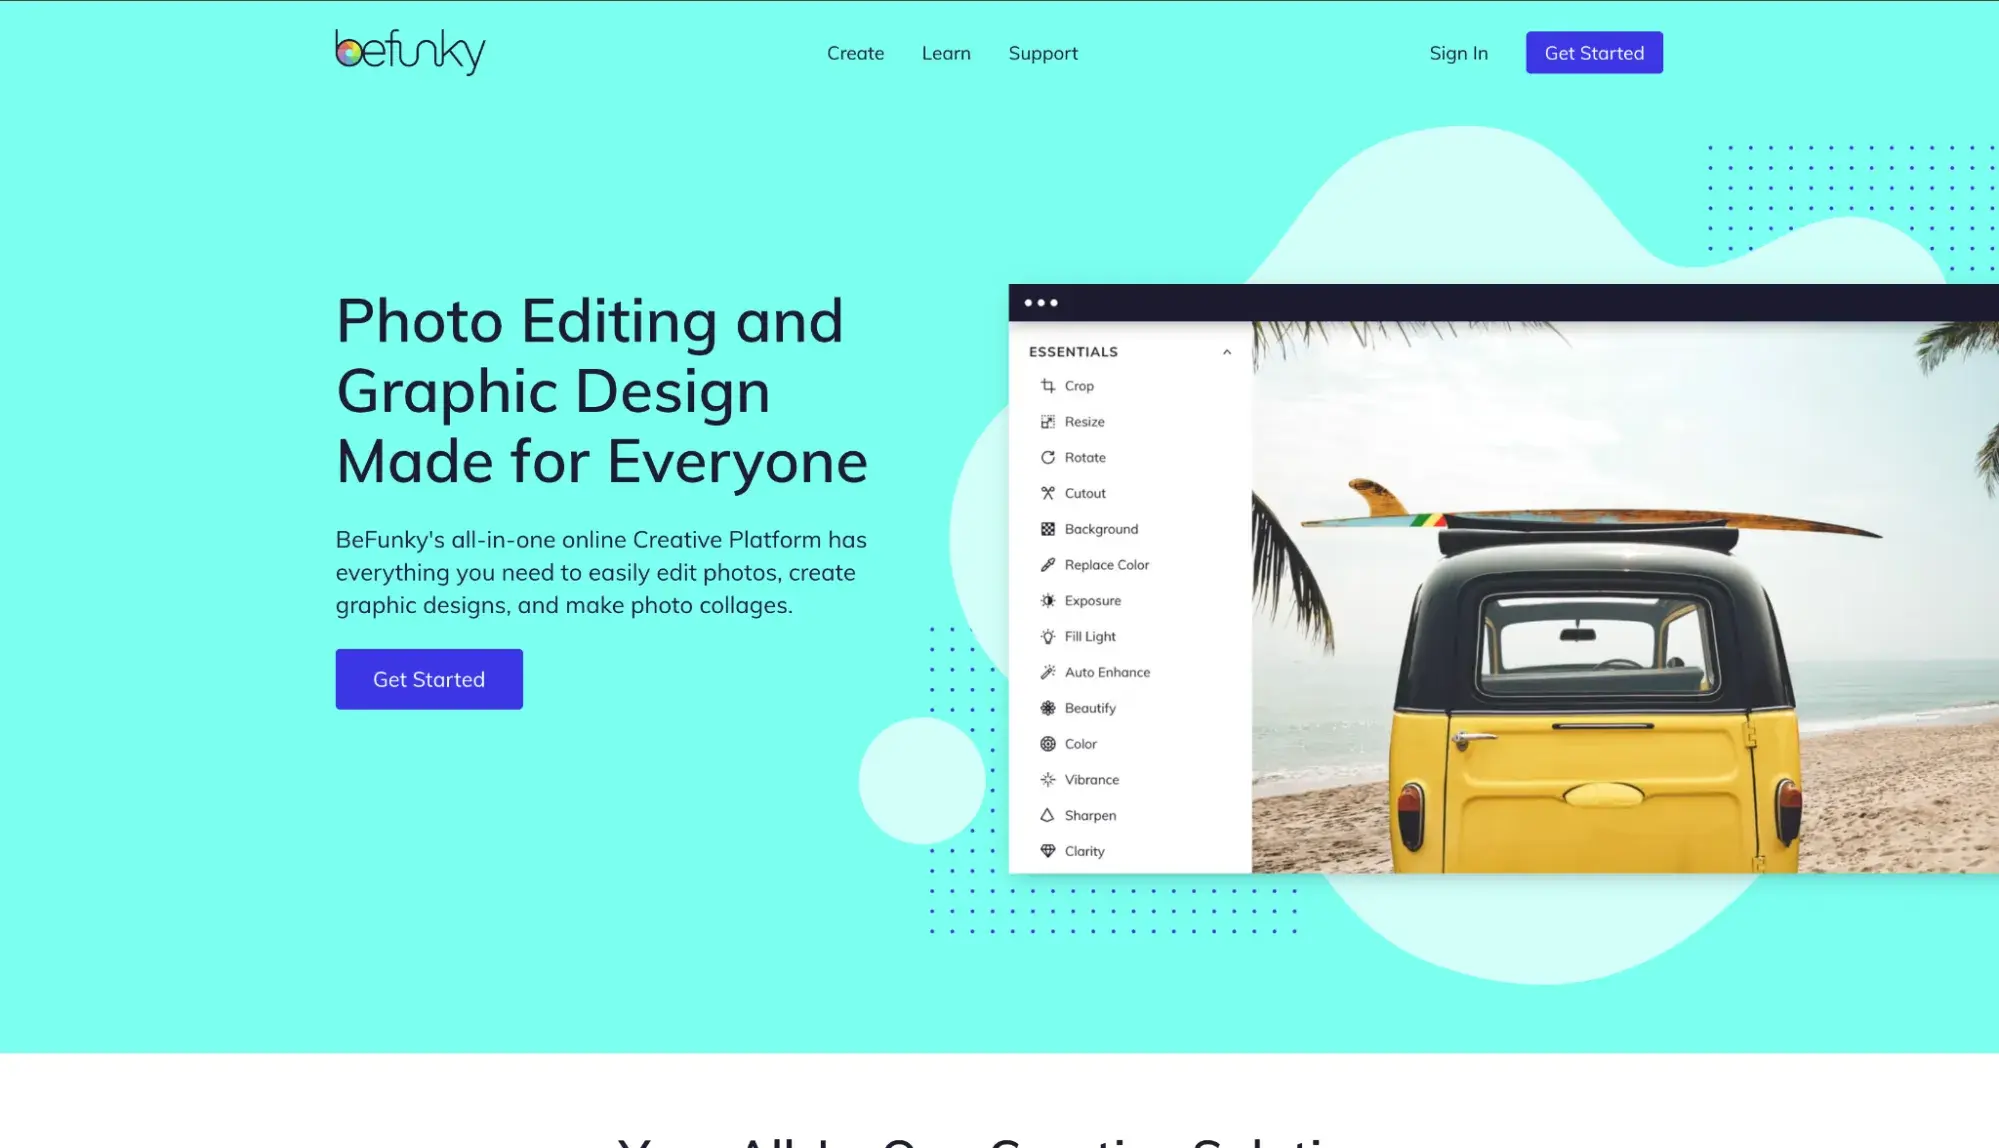
BeFunky is a web-based image editor that allows users to edit photos, create collages, and design digital assets such as banners and flyers. It’s designed to be Photoshop for beginners. It’s rich with features but presented in a user-friendly interface.
With BeFunky’s Batch Image Resizer, you can even resize images in bulk instead of one by one. There’s a free version with 125 digital effects available, and a premium version with hundreds more.
To resize an image with this tool, you can import the image directly from your computer, choose an image from your Google Drive, or simply drag and drop images into the editor.
Once the image is in the editor, the rest is pretty simple — select the Edit menu and navigate to Resize. This will trigger a pop-up window where the image can be resized by width, height, or scale.
What I like: If you’re working with a paid version of BeFunky, the integration with GDrive makes it easy to access your projects as you work.
Pricing: A free version is available. The paid version costs $4.99 a month billed annually or $9.99 a month billed monthly.
PicResize
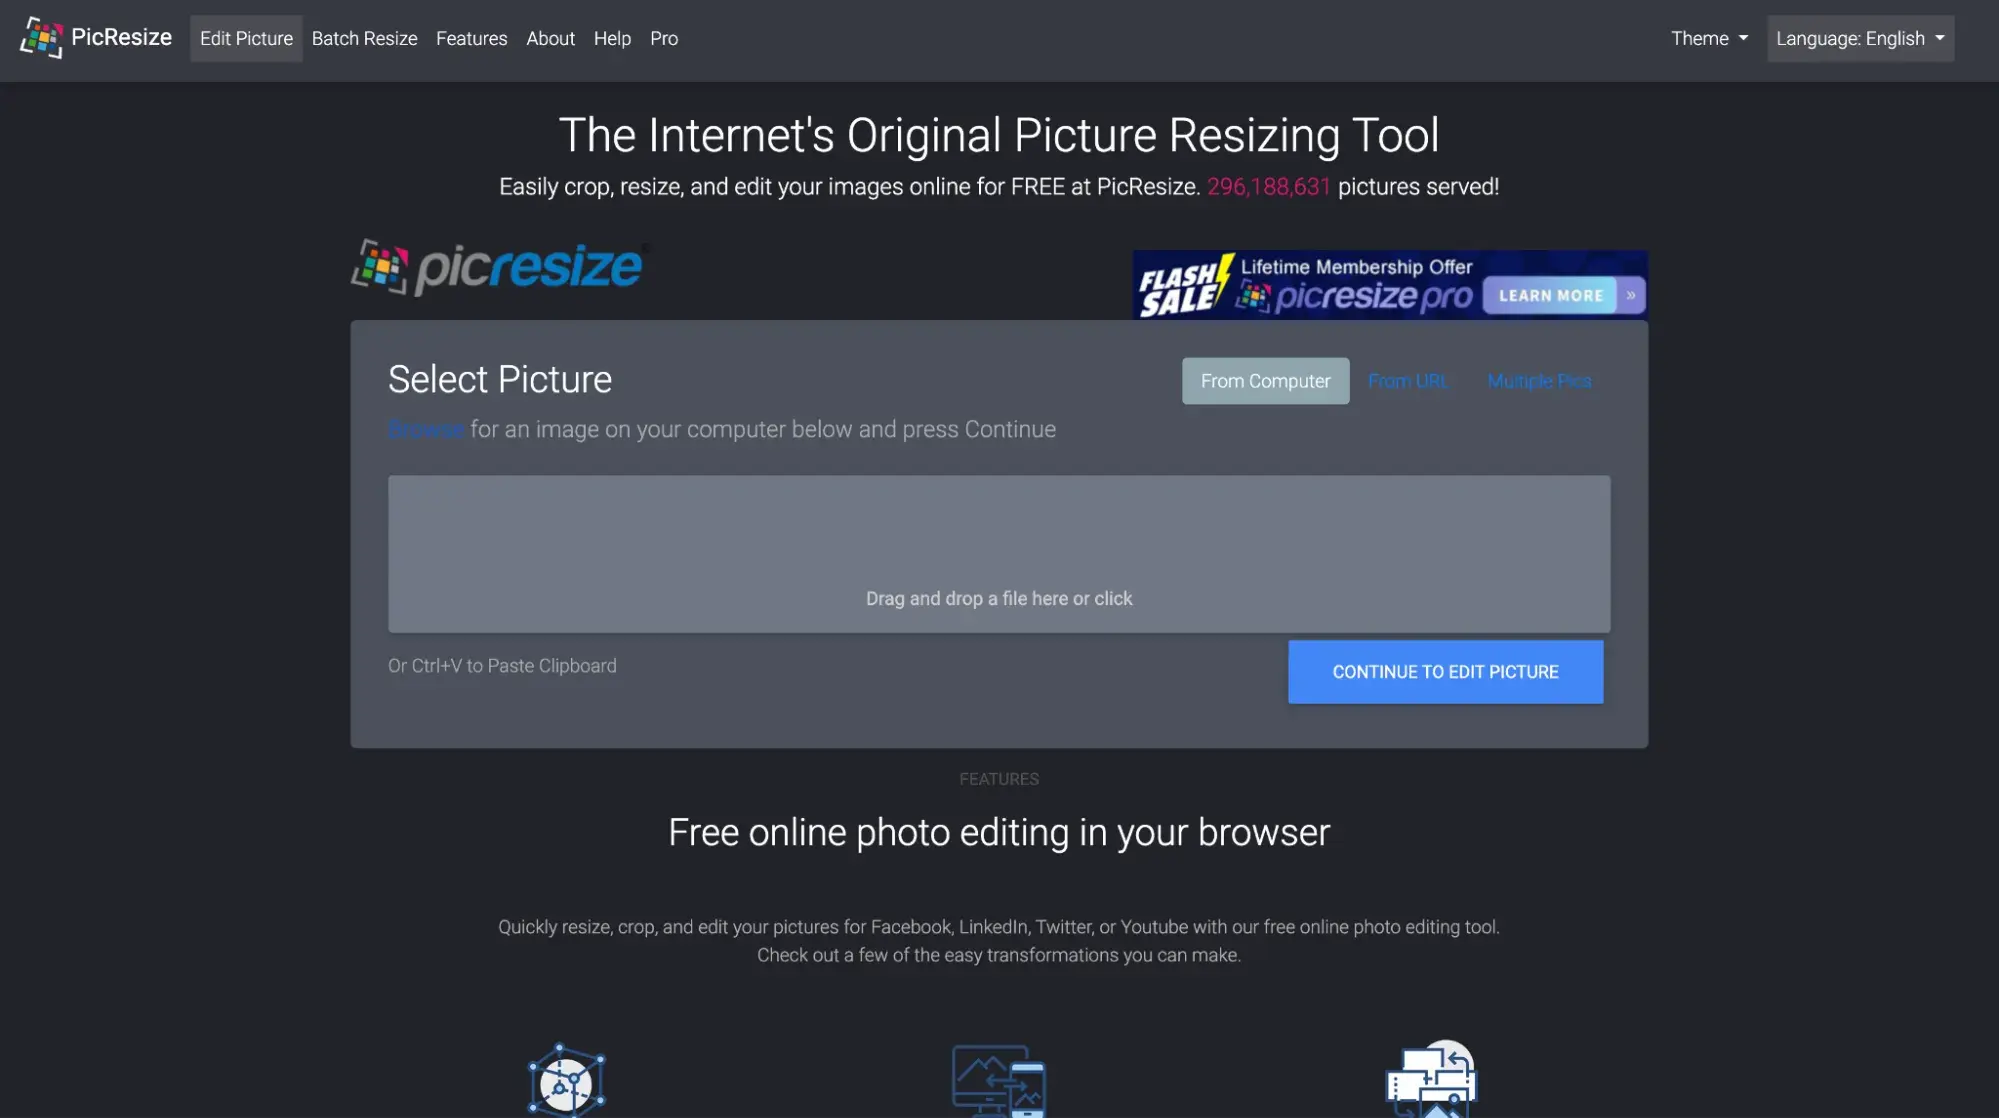
PicResize is a web-based, image-resizing tool that allows users to crop, resize, and convert images. The standout feature of this tool is the ability to resize images in bulk using a feature called “BatchResize.”
This feature allows users to upload up to 100 pictures at once, resize these images using a single parameter such as “make my pictures X% smaller,” and finally save the images in JPG, GIF, or PNG format.
Once complete, users can download the resized images as a Zip folder.
It’s important to note two things:
- The free version of PicResize is only for shrinking photos. You’ll have to purchase PicResize Pro to enlarge them.
- You can only compress JPG file formats. Instead of a slider, there’s a dropdown menu with the options: good, better, best. While you can’t see the image file size, you can set a maximum file size.
What I like: PicResize is a simple, easy-to-use tool for any resizing task. But I particularly like its upscaling feature. It uses AI to quickly double the size of images with minimal quality loss.
Pricing: A free version is available. The paid (ad-free) version costs $75 for lifetime access.
GIMP

GIMP is a free, open-source tool. However, unlike the other tools on this list which are web-based, this tool is a downloadable program.
Although you can use this program for resizing, it is designed as an “image manipulation program.” It has many other powerful features, such as photo enhancement and digital retouching.
To resize an image on GIMP, users can either insert fixed dimensions (similar to other tools on this list) or resize the image completely freehand by dragging the corners of the image.
What I like: If you need to do some editing on the go without Internet access, having a free desktop program to work with is a dream.
Pricing: Free
Resizing Your Images for Optimization
In this blog I have shown several steps on how images can be resized without losing quality. I started off by showing the best way to generally resize images, and then I narrowed it down to how it can be done using different tools and software. I showed how images can be resized using applications like Adobe Express, Photoshop, etc., and then using websites like Squoosh.
If there is one lesson to be learned, it is that images are an integral element of the user experience, not only ornamental. I make sure my designs seem clean, polished, and consistent everywhere they appear by being a little more careful while resizing them.
Editor's note: This post was originally published in December 2020 and has been updated for comprehensiveness.
HubSpot's Free Website Builder
Create and customize your own business website with an easy drag-and-drop website builder.
- Build a website without any coding skills.
- Pre-built themes and templates.
- Built-in marketing tools and features.
- And more!
Website Performance

![All the Image Sizes You Need to Know For Your Website [+Tips and Insights]](https://53.fs1.hubspotusercontent-na1.net/hubfs/53/image-size-for-website-1-20250205-643528.webp)
![7 Site Performance Challenges That Will Hold Businesses Back [Data + Expert Predictions]](https://53.fs1.hubspotusercontent-na1.net/hubfs/53/how-to-improve-lcp-1-20250121-126295.webp)