In this post, I’ll explain what a staging site is, when to use one, and how to set one up with Content Hub and WordPress.
Table of Contents
- What Is a Staging Site?
- How to Create a Staging Site
- What Is Staging in Software Development?
- Why Should I Use a Staging Site?
- When Should I Use a Staging Site?
- How to Create a Staging Site in Content Hub
- How to Create a Staging Site in WordPress
I’m sure none of us want our users to experience glitches, unpolished edits, or insufficient cybersecurity protocols. In order to keep this site isolated from the public, you’ll need a private URL that is different enough from the original URL that your visitors can’t find it.
Having a staging environment not only helps to prevent many site issues, but it also allows us to experiment with the features and design of our website behind the scenes without interrupting the live site’s usability.
I find a staging site an ideal environment to try out innovative apps, test APIs, or troubleshoot potential new features. Using staging sites has become an imperative part of my workflow in designing and maintaining websites, and I highly recommend their use.
Development Sites vs. Staging Sites vs. Production Sites
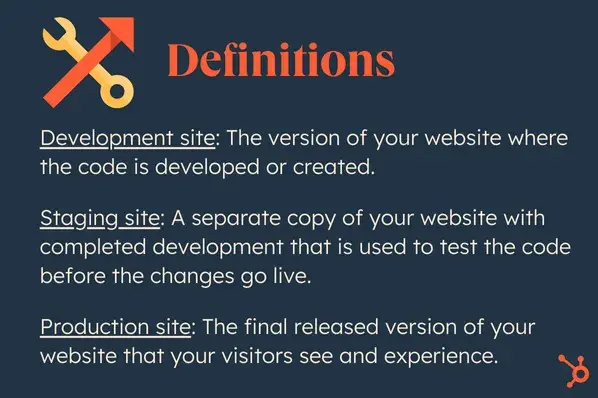
Development Sites
As the name implies, this is the version of the website where the code is developed or created. Whether it’s being built by an individual or a team, this version of the website is kept isolated from users. It is the initial environment where the website’s design and features are built.
Staging Sites
The staging site is a separate copy of your website with completed development that is used to test the code before the changes go live. This site is closer to the final version of the website than the development site and allows for edits to be made privately without disrupting the performance of the live site.
The goal of the staging environment is to test the entire website, including changes and new features. Any errors or issues with the coding should be resolved in the staging site so that everything is working perfectly before being published to the live website.
Production Sites
Production sites are the final released version of the website that your visitors see and experience. Now accessible to end users, with the proper quality control ensured by using development and staging environments, the production site is error-free and user-friendly.
In other words, the production site is the published version of your website with a fully optimized appearance and functionality.
Alternative Names for Staging Sites During Web Development
For this post, I’m focusing on the pre-production website environment known as a staging site.
However, for clarification purposes, I’d like to explain that some web design firms and larger company design teams may use other sites in addition to the three versions defined above, or they may call these same sites by alternative names. Here are some examples of that.
- The development website may be broken down into more versions, including a mockup/wireframing site (the earliest raw/brainstorming design stage), alpha development site (an initial design used to further discussion and collaboration), and beta development site (a more complete development version).
- Staging sites may also be referred to as beta sites, quality assurance (QA) sites, testing sites, sandbox sites, and/or pre-production sites. Even more confusing, beta development websites are different from beta/beta testing websites.
- Beta testing websites are similar to a staging site, and though the phrases are sometimes used interchangeably, beta testing sites use testers to interact with the website in order to identify and report site problems to the developers. Beta website and software testers are typically prompted to approve a specific agreement or contract, while beta software and website users may simply receive a warning that not all coding issues have been ironed out.
What Is Staging in Software Development?
In addition to website design, staging is also an important step in software development. With software development, like web design, staging is the design phase where the software is deployed in an environment that closely mimics the production environment.
Software staging ensures each component and service of the application is performing properly and interacting well with every other aspect of the software. Staging is used to test and validate the application, features, fixes, and updates, before it is released for public use.
Why Should I Use a Staging Site?
Though I’ve already alluded to some of the benefits, I’d like to highlight some additional advantages.
With a staging site, you can:
- Test major and minor elements without negatively impacting the user experience (UX) of your published site.
- Catch bugs and resolve errors before rolling out changes to your published site.
- Check for optimization before any major website redesigns.
- Test significant additions to your website, such as user accounts, membership areas, subdomains, forums, or knowledge bases.
- Try out different APIs without risking a disruption to your live site.
In other words, staging sites give you the utmost freedom to experiment and troubleshoot, empowering you to create better websites that keep users more engaged.
Pros of a Staging Site
Here are some of the benefits I find from using staging sites:
- Ability to catch errors early.
- Allows edits without disturbing the live website.
- Relatively easy to create.
- Facilitates error-free launches.
- Creates better-tested UX.
- Increases client and customer confidence.
- Helps prevent security vulnerabilities.
- Offers the ultimate quality assurance check.
Cons of a Staging Site
Here are some of the possible drawbacks I see to using staging sites:
- Increases the time to get your website up and running.
- Takes time to create, set up, and test.
- Requires additional resources for the staging environment.
- May lead to multiple changes bundled into larger releases.
- Can’t test for issues due to high traffic.
Though creating a staging environment may require extra time, effort, and resources, in my opinion, the benefits far outweigh the cost. I believe that using a staging site for even minor updates has actually saved me countless hours of troubleshooting.
When Should I Use a Staging Site?
As I’ve said previously, I believe using a staging site is important anytime you plan to make changes of any kind to your production site. The extent to which you use it will depend on how much you wish to expand your site, how often your site requires updates, and how comfortable you feel introducing changes to your website. Newer administrators might choose to use their staging site for most changes, while those with more experience might use a test site less frequently and prefer to publish smaller tweaks straight to their main site.
However, at the minimum, I highly advise that you always test major website updates on your staging site before deploying them publicly — especially if many users rely on your website. For example, install major updates to your CMS in your staging area before your main site. Big technical problems can affect your reputation and business, so it’s always better to be safe than sorry.
Many hosting providers and even some CMS systems offer tools for creating and maintaining a staging site. Depending on your platform, this process might look and feel slightly different, but I find that no matter which website-building platform is being used, the process of creating a staging site is fairly similar to the steps I’ve listed above.
I’ll share more specific information to help you build a staging site in Content Hub and WordPress below.
How to Create a Staging Site in Content Hub
The Content Hub allows you to build a brand new site without touching your existing web presence in the content staging tool. This allows you to build safely in a separate staging area and test changes before taking your new design public.
How to Get to the Content Staging Environment in Content Hub
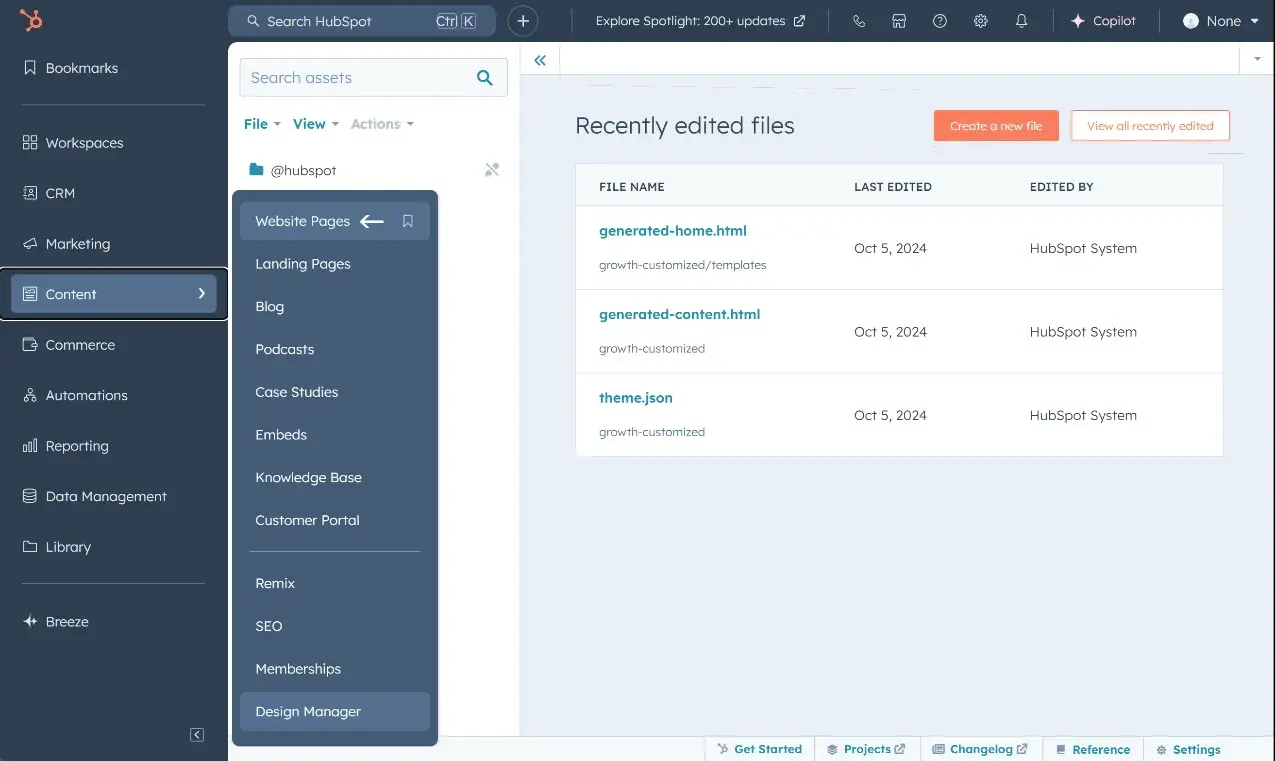
- In your HubSpot account, navigate to Content > Website Pages.
- Click the More Tools dropdown menu in the top-right and select Content Staging.
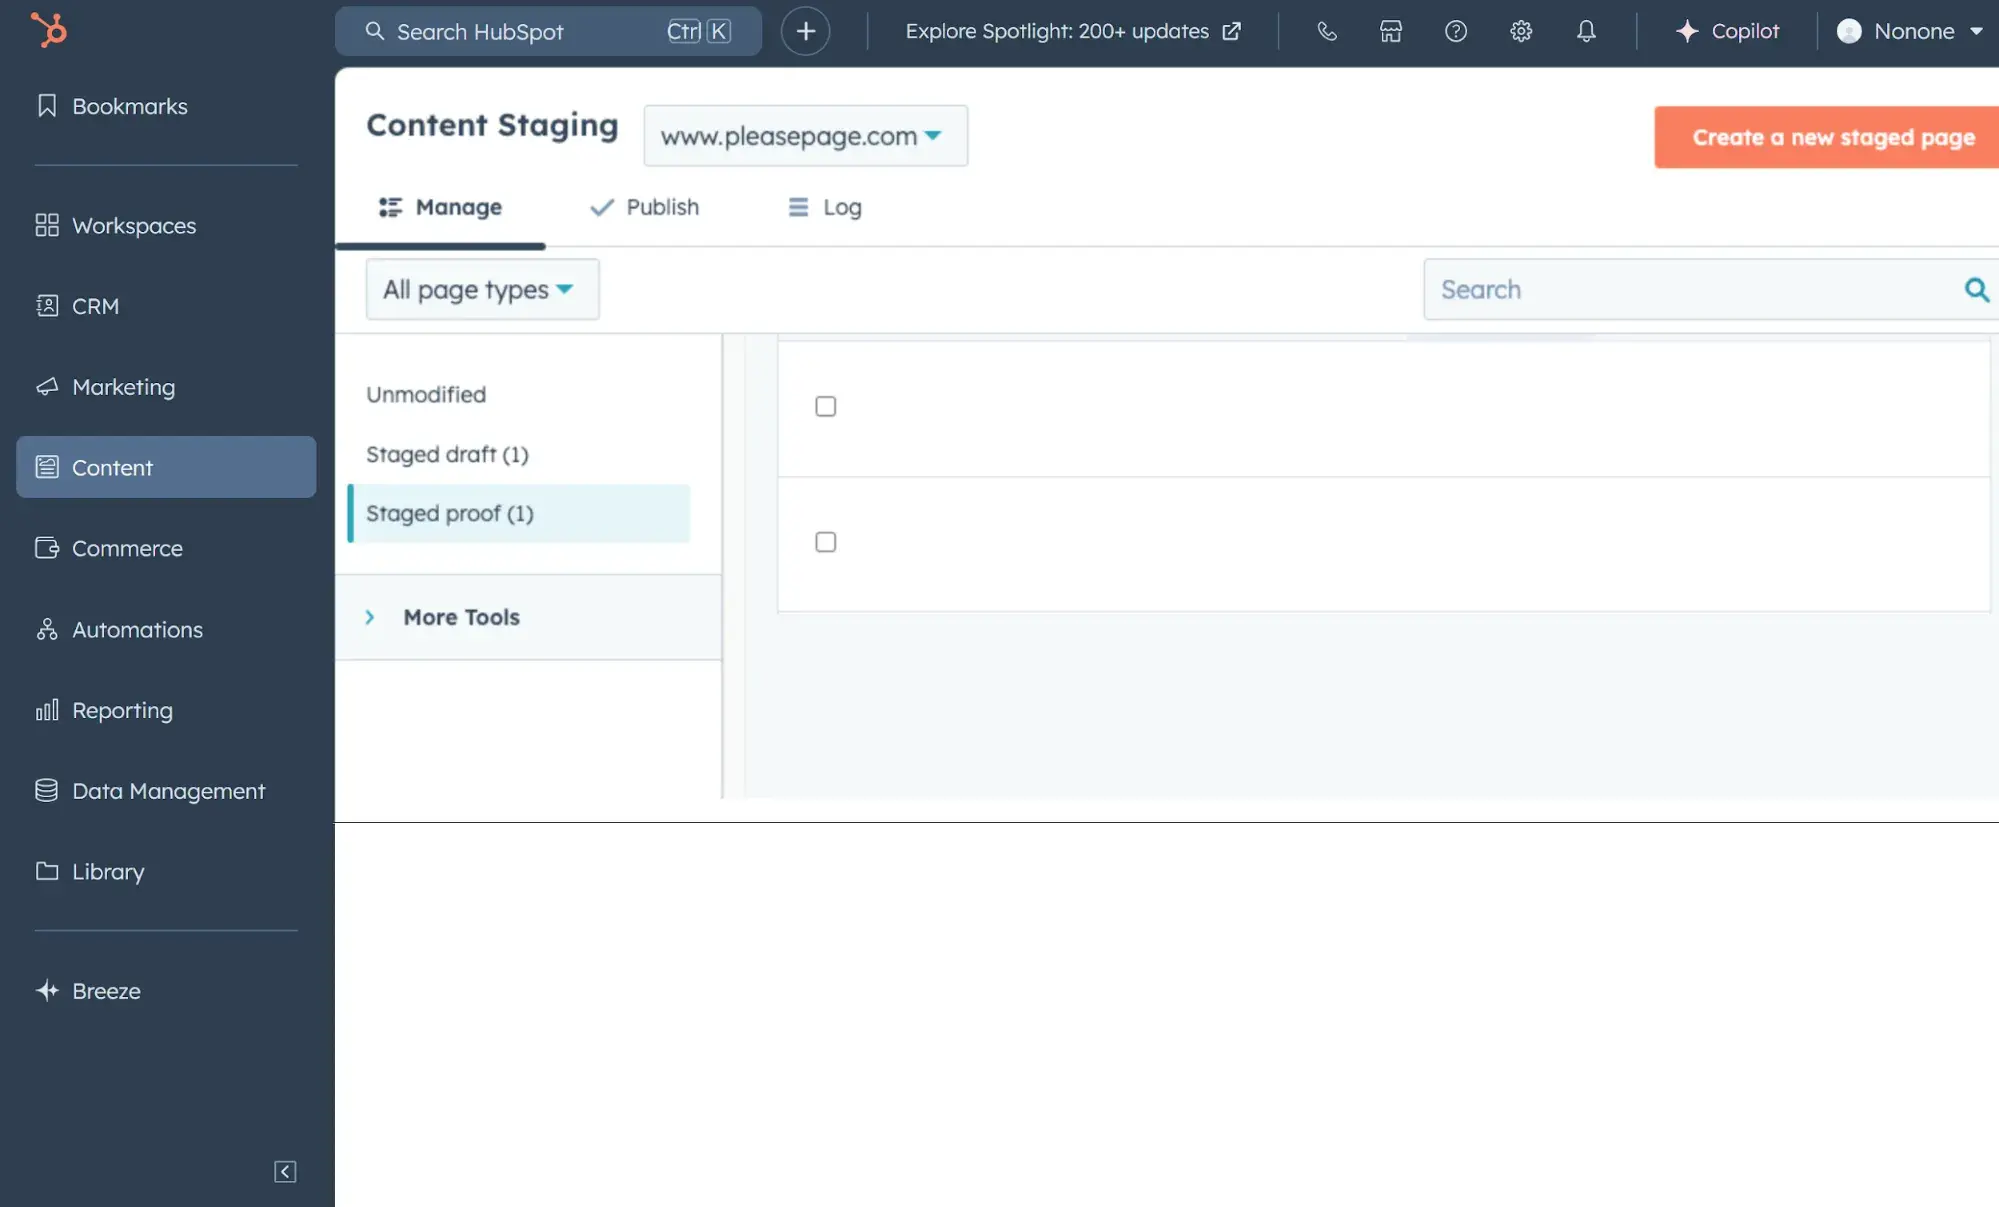
- Review your existing website and staged pages on the Content Staging dashboard.
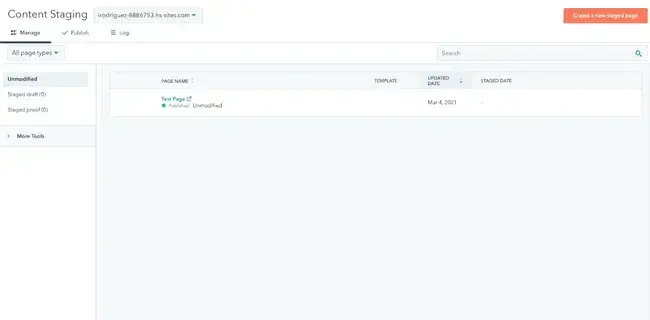
- In the domain dropdown menu, view your existing pages for a domain. The domain selected here is where your redesigned pages will be published.
- In the All Page Types dropdown, filter for landing pages only, website pages only, or all page types.
- The Manage tab contains the existing pages on your site.
- The Publish tab contains redesigned pages published on your sandbox domain.
- The Log tab contains any pages that have been moved over to your live website.
The tabs on the left sidebar menu include the following:
● Unmodified, or existing pages that still need to be modified in the tool.
● Staged draft, or pages you’ve started to stage but still need to publish onto your staging domain.
● Staged proof, or pages you’ve published on your staging domain. You’ll review your pages here before deploying them to your live site.
● More Tools contains additional tools for managing your site.
How to Stage an Existing Page in Content Hub
You can redesign your site in a few ways with content staging in Content Hub. If you want to modify a page but retain some of the existing content on the page, I recommend the following steps.
- Hover over the page you want to stage, then select Stage to the far right.
- In the Stage page dialog box, select Stage cloned page.
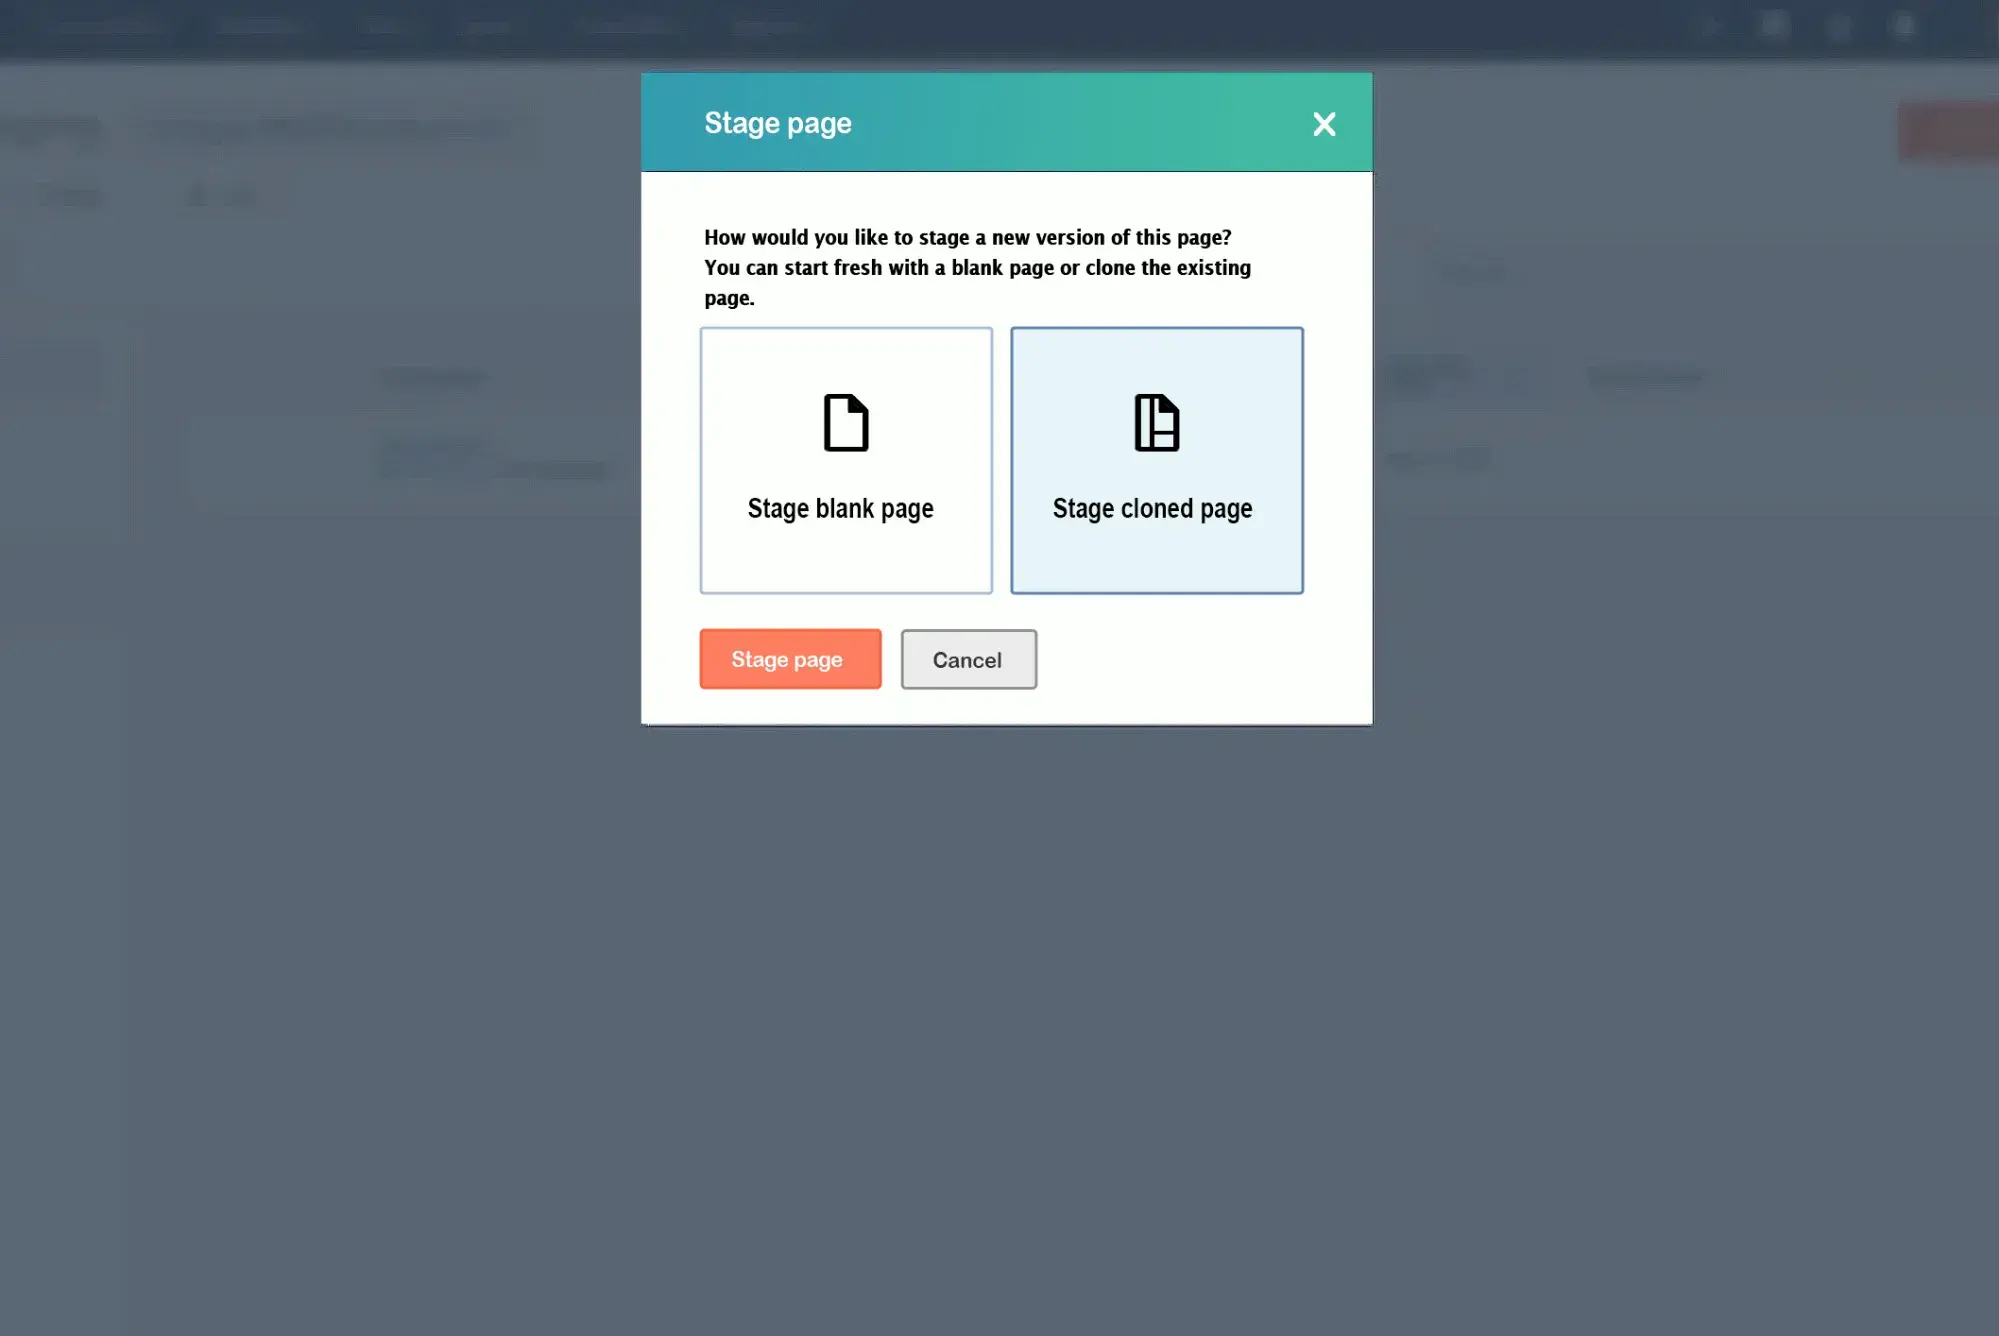
- Click Stage page. This opens a clone of your live page in the content staging editor.
- Edit your content in the page editor. Note that any changes to templates, global content, or stylesheets will impact existing live content.
- After your edits, click Publish to staging.
How to Stage a New Page that Will Be Published to an Existing URL
Here are the steps I suggest you follow to create an entirely new page to replace an existing URL on your site.
- Hover over the page you want to stage, then select Stage to the far right.
- In the Stage page dialog box, select Stage blank page.
- Click Stage page.
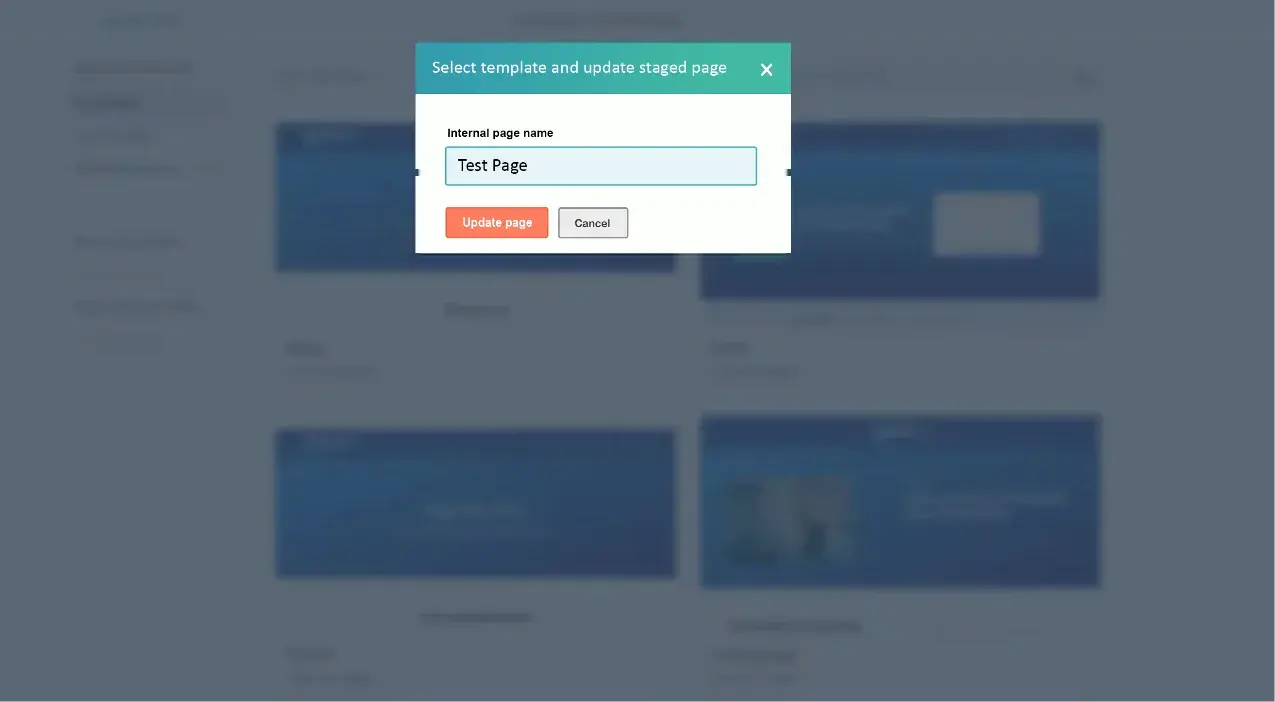
- Select a template for your new staged page. Note that any changes to templates, global content, or stylesheets will impact existing live content.
- In the pop-up, confirm that you want to select a new template by clicking the Update page button.
- Edit your content in the page editor.
- After your edits, click Publish to staging.
How to Stage a New Page That Will Be Published to a New URL
If you want to create a new page that didn’t exist on your website before, I advise following these steps.
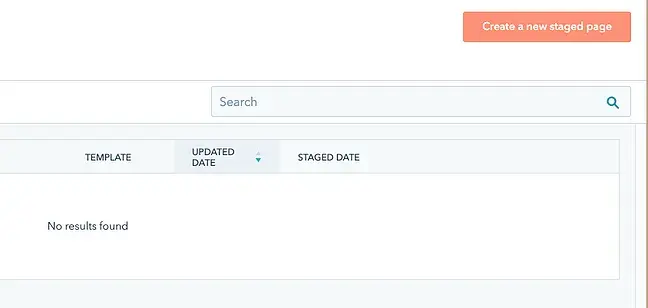
- In the upper right, click Create a new staged page.
- Select whether you want to stage a new Site page or Landing page.
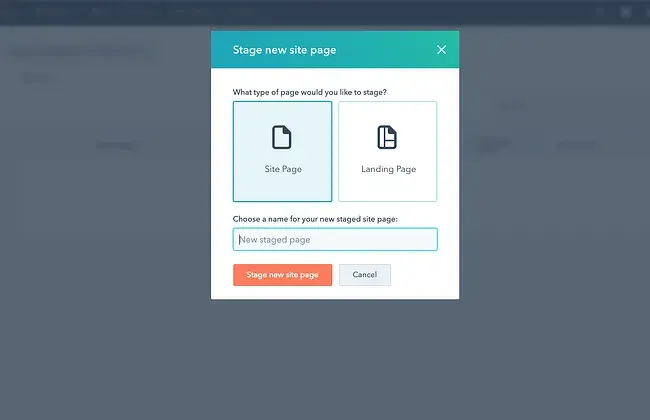
- Click Stage new landing/website page.
- Select a template for your new staged page. Note that any changes to templates, global content, or stylesheets will impact existing live content.
- Edit your content in the page editor.
- After your edits, click Publish to staging.
Note: When adding a new page to your site, I recommend you review your advanced menus and create a new navigation item for the new page.
How to Publish Your Staged Pages
Finally, here’s how to deploy your staged pages.
- In the Content Staging dashboard, click the Publish tab.
- Write a Publish Job Name and Publish Job Description explaining what was changed and why. This will show in the Log tab of the content staging tool.
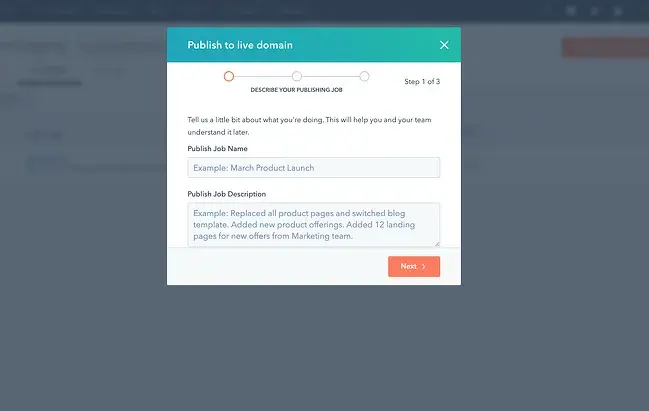
- Click Next.
- Review the details of your publishing job, select the checkbox to confirm, then click Publish.
- To publish a single page, hover over the page name, click the settings dropdown menu, and then select Publish to live domain.
- To publish multiple pages at once, select the checkboxes next to the page name. Then, click Publish # pages to live domain.
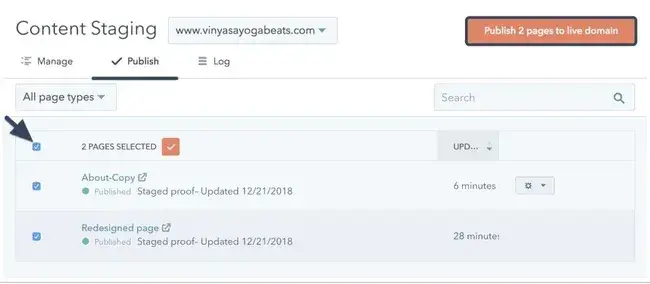
To learn more about content staging in Content Hub, see our knowledge base page.
How to Create a Staging Site in WordPress
With straightforward and virtually endless customization options, WordPress lends itself to tinkering and optimization. However, since third parties make most WordPress add-ons, one tool might cause another to break.
So, it’s definitely a good idea to test any update to your WordPress website before publishing. I recommend setting up a staging site through your WordPress hosting provider. This is because it’s best to test in the same environment as your actual website — otherwise, it is possible to miss errors caused by your host.
Bluehost Staging Site
Bluehost WordPress hosting plans offer site staging out-of-the-box on its subscription packages. To create a staging site on Bluehost, please use the following steps:
- Navigate to the Bluehost staging site setup page.
- Next, from your WordPress dashboard, select Bluehost > Staging, then click Clone to Staging.
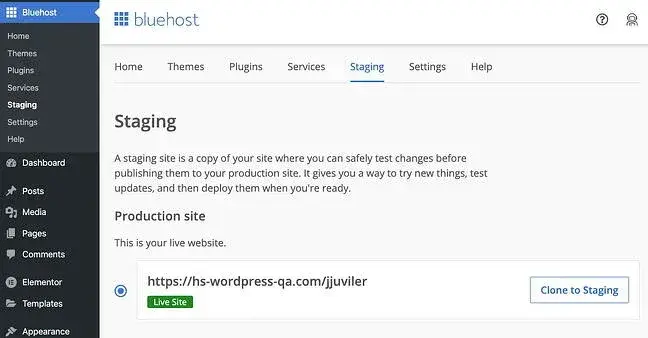
- You are now in your staging environment and can make changes without affecting your actual website. You should see a Staging Environment message in the top banner. You can return to your live site by selecting Bluehost > Staging, then clicking the white circle next to your live site’s URL.
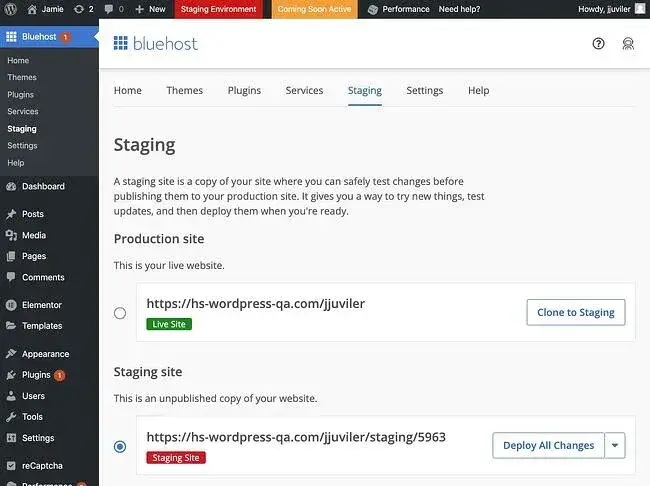
- When you’re ready to deploy the changes on your staging site to your live site, go to Bluehost > Staging, then click Deploy All Changes next to the URL of your staging site.
Alternatively, you can click the downward arrow and choose Deploy Files Only or Deploy Database. Be very careful if you choose to copy the database, as this will overwrite the existing information on your live site.
- Select your deploying option. A message will pop up. Click Deploy.
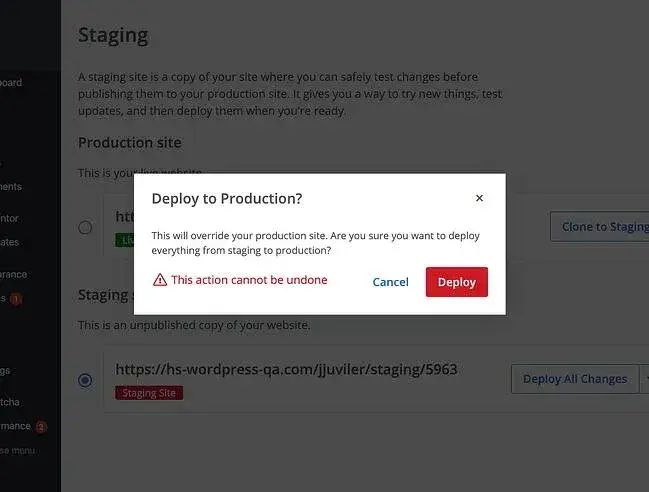
- Once the deployment is complete, a confirmation pop-up will appear. Next, return to your live site by selecting Bluehost > Staging, then clicking the white circle next to your live site’s URL.
SiteGround Staging Site
SiteGround is another popular WordPress hosting provider with a staging tool. I suggest the following steps to create a test site with SiteGround.
- Navigate to your SiteGround cPanel dashboard and select Staging under WordPress.
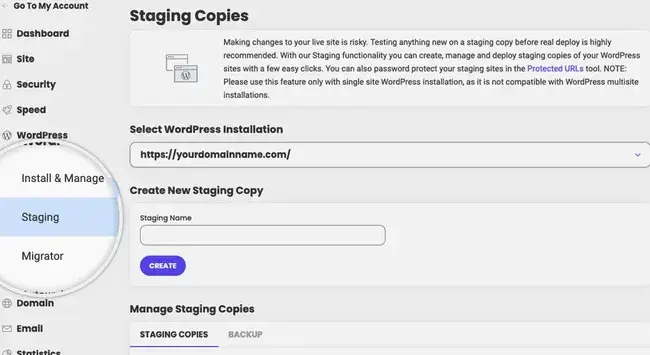
- Choose the website you want to stage and click Create.
- You’ll be able to protect your staging site with a username and password. We recommend protecting your staging site since it will block search engines from crawling your staging site and damaging your SEO. Choose the Password protect option, enter a username and strong password, then click Continue.
- After your staging site is ready, you can edit it.
- After your edits, navigate to your cPanel dashboard and select My Account > Original Website.
- Click Push To Live.
WP Engine Staging Site
Staging sites are also included in managed hosting plans through WP Engine. To create one, follow these steps.
- In your WP Engine User Portal, select Sites and click on the site you want to stage.
- Find the drop-down with your site’s environment and click Add Staging.
- Fill in the Environment options. You can create a new one, create one from a template, copy one from an existing environment, or move one from another site to yours.
- Click Create environment.
- After your staging site is created, you can access it under Sites.
- After editing your staging site, you’ll need to copy it to your live site. Under Sites, select your staging site.
- In the top-right corner, select Copy environment.

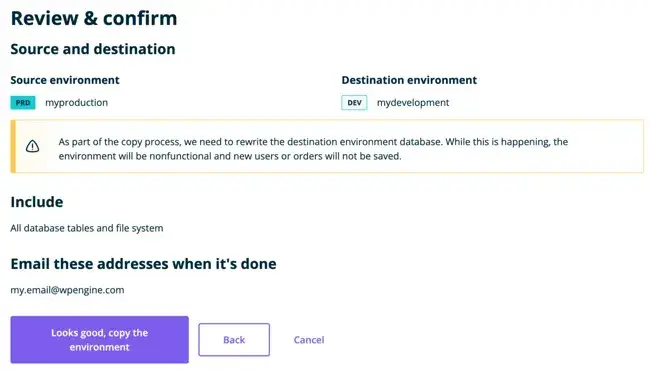
The following options will appear. These indicate where you want to copy data or content from and where you wish to copy the content to.

- Select a backup point to save your changes to your live site before updating. Next, choose whether or not to include your database in the deployment. Be very careful if you choose to copy the database, as this will overwrite the existing information on your live site.
You can choose between the following options:
- All database tables and file system
- Specific database tables and file system
- Click Review and confirm.
- Double-check the information, then click Copy Environment.
Staging With a WordPress Plugin
If your hosting plan does not include staging, I would advise you to consider using the free WordPress plugin WP Staging to stage your content. This plugin duplicates your entire site and stores it in a subfolder of your main WordPress installation.
To create a staging site with a WordPress plugin, follow this guide.
- Install and activate the WP Staging plugin under Plugins > Add New.
- You’ll see a new WP Staging tab in the left-side panel. Select WP Staging > Sites / Start.
- Click Create New Staging Site.

- Name your staging site, then click Start Cloning. It will likely take a few minutes to clone your entire site.
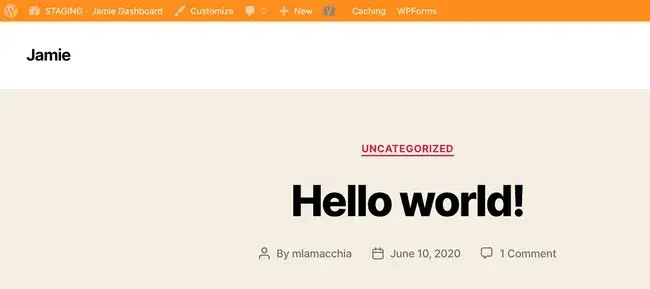
- When the staging site is ready, click Open Staging Site and log in with your WordPress credentials. You’ll be taken to the staging site, where you can make changes. The orange bar across the top will tell you when you’re working in your staging environment.
Use Staging Sites to Level Up
It might take a bit more time and even cost a little extra, but it’s almost always a good idea to maintain a staging site in addition to your actual website. A basic testing environment will prevent the instant regret of pushing a buggy update into the world, so keep the business upfront and tweaks at the back.
Editor's note: This post was originally published in November 2021 and has been updated for comprehensiveness.
Content Management System





![How to make a subscription website [+ 7 best membership website builders]](https://53.fs1.hubspotusercontent-na1.net/hubfs/53/how-to-make-a-subscription-website-1-20251230-3683850.webp)

