
What is a Wireframe Map?
A wireframe map combines refined wireframe templates for the various pages you're planning to include on a website with the sitemap of the website. It's important to note that the nature of the wireframes included in your wireframe map are serving as refined templates for your web pages — you're likely implementing a wireframe map after some design work has already been done.
Most design processes start with several wireframes, or a layout that shows how all elements will fit on a single page. These wireframes serve as templates for your landing pages, home page, and blog posts, for example.
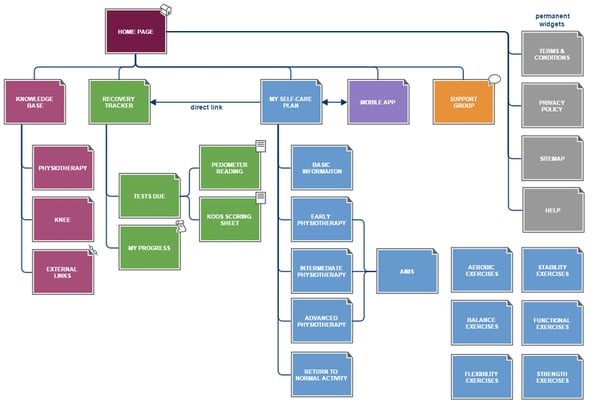
The wireframe map demonstrates how all of those wireframes will fit together to create a cohesive site and positive user experience.
The benefit of creating a wireframe map a little later in the design process is that you can use it to check for inconsistencies between pages. For example, using a wireframe map can help you to determine if elements of the footer design have unintentionally changed between pages.
You can also use a wireframe map to help lay out how the user will navigate between pages. In fact, your wireframe map should be laid out to display functionality as various pages relate to each other. For example, you might design your wireframe map with your home page taking a central focal point, surrounded by all the additional pages that can be accessed from the home page.
Benefits of Using a Wireframe Map
Effective communication is an integral part of the design process. A wireframe map clearly conveys a product design idea from the beginning, so there is less confusion between team members as you move through the development process. If everyone is on the same page, you are less likely to have expensive revisions later.
Wireframe maps are also incredibly useful in terms of team management. They will help you lay out the full scope of the project — so you know exactly how big the workload will be. They will also provide you with a place to assign tasks to individuals.
How to Create a Wireframe Map
- Understand your user persona.
- Create a list of content needed.
- Create a sitemap to understand user flow.
- Create the wireframes.
- Create the wireframe map.
Now that you know the advantages that come with creating a wireframe map, here's how you can create one.
1. Understand your user persona.
It may seem obvious, but you can't do anything until you know what your target persona needs. Before you sketch out anything, it's best to take a step back to define and understand your user persona.
Ideally, this would involve having conversations with actual users (or potential users). But if that's not something you can justify right now, thinking through and answering prompts offered by a tool like HubSpot's MakeMyPersona can help create the basis for your persona.
2. Create a list of content needed.
Use what you know about your persona and start to make a list of all the various pages or screens that need to appear on the sitemap. It's necessary to imagine the user's journey as you identify the right elements to include.
Start with the commonly used and most important website page types (homepage, contact, about), then add in additional pages as needed. The pages or screens you choose to incorporate will depend on the needs of your target persona.
For instance, any sort of ecommerce site will need product pages and a checkout page, while a non-profit will need a donation page and perhaps a blog detailing their ongoing activities.
Other possible pages include:
- Testimonials or reviews
- Gallery or portfolio
- Frequently Asked Questions (FAQ)
- Calendar or events
- Press
- Jobs or careers
Considering the user flow is key in creating a sitemap. Once you have this list, organize it according to the pages and sub-pages, indicate which element will be on each page, and send it off to the rest of your team for approval.
You can add more elements as you go along, but you want to have the most comprehensive list possible before you create the visual sitemap.
3. Create a sitemap to understand user flow.
Before you attempt to create any wireframes (or edit your initial sketches), it's important to get a handle on how your target persona will navigate the various pages of your website.
In order to help conceptualize this process, you'll want to develop your sitemap before putting any further effort into creating wireframes.
Use the content list you created in the previous stage to lay out pages and their relation to each other. While you're working through this, you may uncover additional needs for pages to help your target persona achieve their goals.
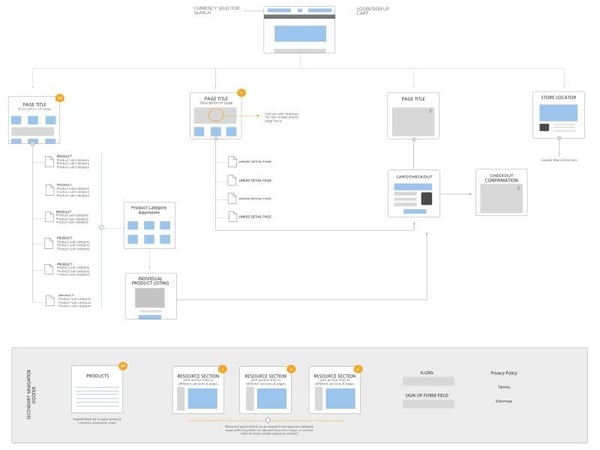
Using page labels in addition to simple color-coding or numbering (for more complex sites) will keep things organized as you flesh out the nature of various pages to include in your sitemap. From there, use arrows to establish links between various pages. To specify certain desired functionality (like live chat or contact forms), consider using representative icons.
There are plenty of different ways to create your sitemap. You can choose to keep things analog: use good old-fashioned pen and paper, or use index cards and move them around on your workstation. There are also multiple services designed specifically for building visual sitemaps, including GlooMaps, FlowMapp, and Dynomapper.
Some of these tools will also allow you to collaboratively design your sitemap with team members and ultimately convert it into a useful project management workflow.
4. Create the wireframes.
At this point, you should have addressed everything you need to create the sitemap as well as the wireframes: the sorted list of elements to be included, details regarding their relationships to each other, and the pages they should appear on.
Before you start creating wireframes, use the sitemap to determine the wireframe templates you'll need. Pages with the same functionality can use the same template. Unique pages with special functionality will require individual wireframes.
When building a wireframe map, it is best to create low- to medium-fidelity wireframes. You want something that is detailed enough to help visualize what the page or screen will look like, but also simple enough to create quickly.
Save time by disregarding minor variations, and ensure you create wireframes that have the flexibility to exist without or without additions (for instance, having a slider in the header, or not).
A few best practices and tips to consider when creating wireframes include:
- Starting with a basic sketch and adding polish as you progress through various stages of design.
- Asking for and incorporating feedback as you move from low- to medium-fidelity wireframes.
- Using online wireframe tools like InVision or Sketch to share wireframe designs and work collaboratively with your team.
Wireframe Examples
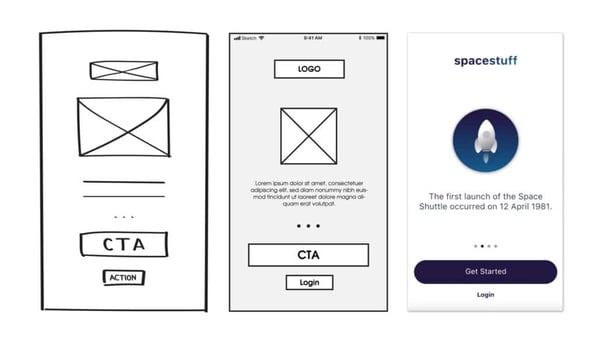
This image shows the difference between low-fidelity to high-fidelity wireframes. As you can see, it looks like the low-fidelity wireframe on the left was hand-drawn. Pen and paper is a fine place to start, but it's a good idea to give your wireframe a bit more polish before you present it to an important stakeholder for review — but not too much! You don't want to put too many hours into the draft, just to have someone tell you it's all wrong.
As with sitemaps, there are digital tools that can help you create wireframes quickly and easily. Miro offers both the ability to build sitemaps, as well as wireframes. Beyond that, it's designed with collaboration in mind, so you can assign wireframes to different members of your team, making the process even faster.
5. Create the wireframe map.
Now that you have your sitemap and your wireframes, the next step is to put them together. Arrange the wireframes of each page according to the sitemap you laid out.
And there you have it! Schedule a meeting with your team to review it, listen to their feedback, and you're ready to move on to the next step in the development process.
Start Creating!
Like the great explorers of the past, you've created a map to serve as a visual guide. However, instead of leading lost travelers, your meticulously assembled wireframe map will lead your developers — and eventually the user — on a journey through your digital design vision.

Website Design Process
![How to create a website to sell products: 7 steps I used [+ expert tips]](https://53.fs1.hubspotusercontent-na1.net/hubfs/53/how-to-create-a-website-to-sell-products-1-20240909-6141294.webp)
![Website design proposal: A streamlined approach to pitching [+ templates]](https://53.fs1.hubspotusercontent-na1.net/hubfs/53/%5BUse%20(1)-Oct-23-2025-03-34-31-8363-PM.webp)


.png)
-2.png)