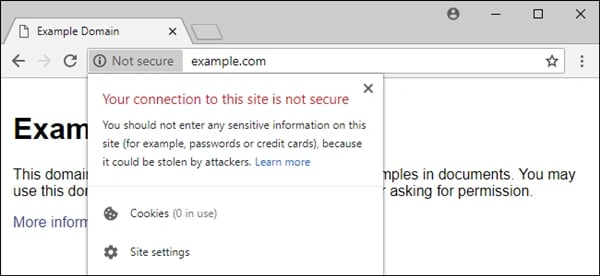
When browsing the web on Google Chrome, you’ll see some web pages marked “Not secure.”


That means these domains do not have a SSL certificate installed and therefore do not encrypt information shared between a visitor’s browser and the site. In addition to Google Chrome’s warning, you can identify these sites by the http:// at the beginning of their URLs.
Chrome began marking these HTTP sites as non-secure in January 2017 with the goal of helping users browse the web safely. Because it helps keep sensitive information like passwords and payment information safe, visitors feel safer on sites that are encrypted with SSL.
![Download Now: How to Launch a WordPress Website [Free Guide + Checklist]](https://no-cache.hubspot.com/cta/default/53/b5ae83fa-3a09-487e-a43a-4833bf87ab87.png) As search engines and consumers alike show preference to HTTPS sites, more of the internet has become encrypted. In fact, there are over 155 million sites with an SSL certificate on the internet today. This time last year, there was only about 138 million.
As search engines and consumers alike show preference to HTTPS sites, more of the internet has become encrypted. In fact, there are over 155 million sites with an SSL certificate on the internet today. This time last year, there was only about 138 million.
To join the growing number of encrypted sites on the internet, you can install an SSL certificate and force HTTPS on your WordPress website. Let’s look at two methods for doing so below.
How to Force HTTPS on WordPress
Forcing HTTPS on WordPress is relatively easy. To start, install or enable an SSL certificate on your site. Most WordPress hosting providers include an SSL certificate in their plans so you simply have to reach out to your host to ask them to install it. If your hosting plan doesn’t include an SSL certificate, you can get one for free from a certificate authority like Let’s Encrypt.
For an in-depth comparison of free or low-cost certificate authorities, check out How to Get an SSL Certificate [+10 Best Free SSLs].
Once your SSL certificate has been installed, you need to configure your site so that it uses the secure URL with HTTPS instead of HTTP. Let’s look at the two methods you can try below.
Option 1: WordPress Plugin Force HTTPS
If you’re a beginner with no coding experience, you can use a WordPress plugin to force your site to load securely over HTTPS. There are several plugins designed for this purpose.
One of the most highly rated and downloaded is Really Simple SSL. Let’s walk through the process of forcing HTTPS on WordPress with this plugin below.
- Log into your WordPress dashboard and go to Plugins > Add New.
- Search for the Really Simple SSL plugin.

- Click the Install Now and Activate buttons.
- Click the button labelled Go ahead, activate SSL!

SSL will now be activated on your site, but you will be “assigned” some tasks. These are not necessarily required so you can dismiss them or open and complete them another time.

While this plugin method is simple and fast, it’s considered a temporary solution because it doesn’t update the URLs with HTTP in your WordPress database. To permanently force HTTPS on your WordPress site, try the method below.
Option 2: Force HTTPS Using htaccess on WordPress
Another way to force HTTPS on your WordPress site requires you to edit your .htaccess file. While this method will be more difficult for beginners or users with little technical experience, it’s a more effective and permanent solution than using a plugin. Let’s walk through the process below.
Step 1: Update your general settings.
- Log into your WordPress dashboard ang go to Settings > General.
- Scroll down to the WordPress and Site URL Address field and replace the HTTP with HTTPS.

- Click the Save Changes button at the bottom of the page.
You’ll be automatically logged out of your dashboard and have to log back in.
Step 2: Set up 301 redirects in your .htaccess file.
Next up, you need to set up 301 redirects from the HTTP version of your web pages to the HTTPS version. This will ensure that any visitor — even one who types in an HTTP URL into their browser’s address bar — will be redirected to HTTPS. This will also avoid the WordPress HTTP “not working” error. Here are the steps:
- Log in to your hosting account’s control panel.
- Open the File Manager.

- In the navigation menu on the lefthand side of your screen, click on the public_html folder. Open the folder labeled “wordpress.”

- Find the .htaccess file and right-click to edit it.
- Add the following code before the line that reads # BEGIN WordPress.
RewriteEngine On
RewriteCond %{HTTPS} !=on
RewriteRule ^(.*)$ https://%{HTTP_HOST}%{REQUEST_URI} [L,R=301,NE]
Header always set Content-Security-Policy "upgrade-insecure-requests;"
Step 3: Resolve the “Mixed Content” error message.
By completing the two steps above, your website will be set up to use HTTPS — but you have to complete a few additional steps to prevent the “mixed content” error from appearing on your site. Here’s an example of how the error message appears in Chrome.
This error is prompted by files — like images, scripts, and your theme’s stylesheet — that are still loading over HTTP. To prevent or resolve this error, follow the steps below.
- Install and activate the Better Search Replace plugin.
- Click Tools > Better Search Replace.
- In the field labelled “Search,” type in your domain name with HTTP.
- In the field labelled “Replace,” type in your domain name with HTTPS.

- Select all your database tables below so the plugin searches and replaces every HTTP URL in your database.

- Uncheck the box next to Run as dry run?
- Click the Run Search/Replace button.
The plugin will now search your WordPress database for URLs starting with HTTP and will replace them with URLs starting with HTTPS. How long this takes will depend on your WordPress database size.
If you complete the steps above and are still seeing the mixed content error on your site, then the problem might be your WordPress theme or plugins. In that case, use your browser’s Inspect Tool to identify the mixed content items. If a stylesheet is mentioned, then you might need to find and replace any URLS with HTTP in your WordPress theme files manually.
If the problem is a plugin, you shouldn’t edit the plugin file. Instead, you’ll need to reach out to the plugin author to ask them to fix it. Otherwise you’ll need to find an alternative plugin.
Add Your HTTPS Website to Google Search Console
To complete the process of forcing HTTPS on your WordPress site, you’ll have to add your domain name with HTTPS as a new property in Google Search Console. This — in addition to the 301 redirects set up in the plugin or htaccess method above — will ensure Google transfers your search rankings to the HTTPS version of your site. Below are the steps to follow.
Log into your Google Search Console account.
Click into the search box and click Add a Property button at the bottom of the menu.

A popup box will appear. Select Website from the dropdown menu and type in your domain name with HTTPS.
You’ll now be asked to verify your site. There are several ways to do so, including using your domain name provider or Google Analytics account. Simply select the verification method you’re most comfortable with and follow the instructions provided by Google.
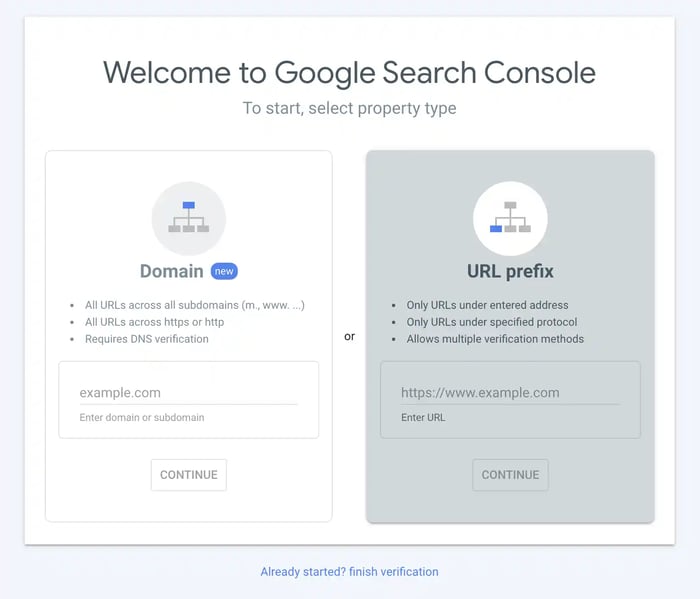
Once your site is verified, you’ll be able to view reports for both the HTTP and HTTPS versions of your site in your Google Search Console account.
Creating a Safer Browsing Experience
As search engines and online consumers show an increasing preference for HTTPS sites, it’s important that you install an SSL certificate on your WordPress site if you haven’t already. Once you do, you can use either of the methods above to redirect any visitors from the HTTP to the HTTPS version of your site. This will not only help make your website safer to browse — it will also help make the Internet safer more broadly.