 Are you immediately overwhelmed when you hear the words “workflow” or “marketing automation?” Do you feel like this is something that you should to be doing, but really don’t know where to start or how it applies to you? If so, keep reading.

Workflows are HubSpot’s number one way to automate your processes, nurture your leads, and engage your customers. By following a few simple steps, you too can become a Workflow-building aficionado in no time at all. So let’s get started.
1. Workflows Based on Existing Content and Motivators
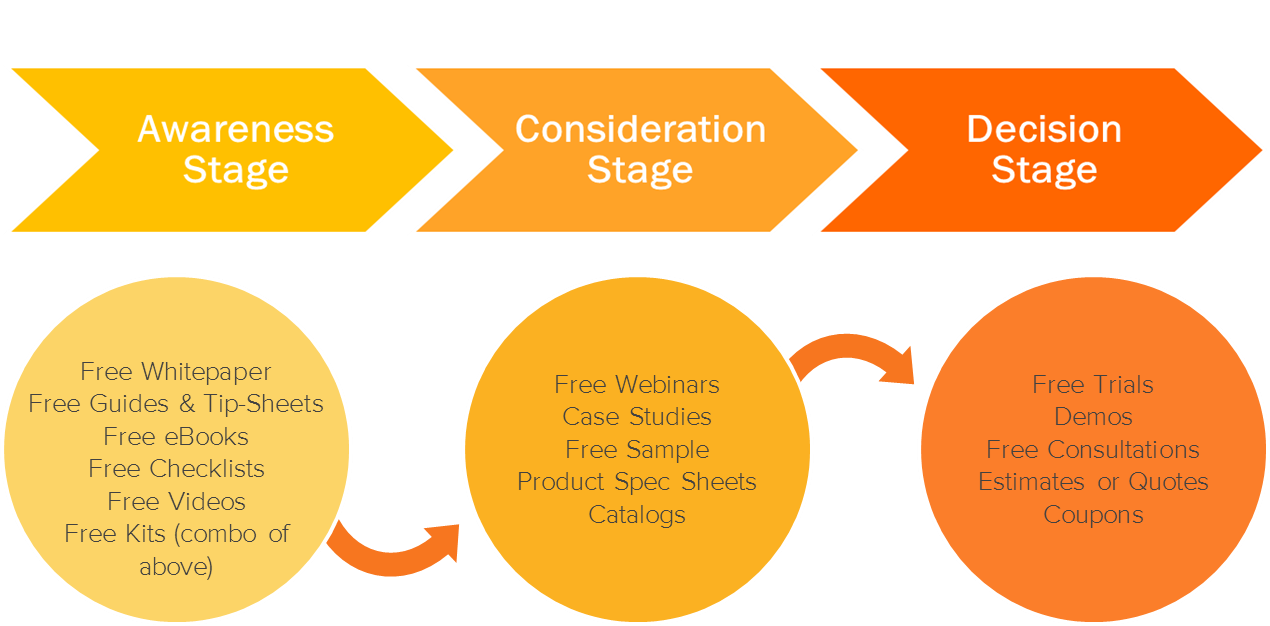
When you are first getting started with Workflows, it can be tough to set up a successful follow-up step when you don’t have that much content to follow up with. I hear ya. But if you’re getting enough leads to warrant the need for an automated follow-up sequence, then you must have at least some content to provide to keep people interested. Seriously, give yourself a little credit!
What you’ll need for this Workflow:
- A smart list that holds all of the people who filled out the form for your first offer for someone in the “awareness” stage (this will be the starting condition of the Workflow)
- An awareness stage or consideration stage offer that relates to your first offer (behind a landing page, of course)
- A blog that is on a topic related to the first offer that they downloaded
- A landing page with your blog subscription form on it
- A case study or decision stage offer (optional, depending on what you have available)
With your buyer persona(s) in mind, think about what reasons would motivate them to download the next offer that you are going to send them.
Here are some examples:
- The value of shiny, new and free - Check out our newest free resource on [Insert topic], just released this week! Be the one of the first to download [Insert title]. In this complimentary resource you will learn: [Insert list of benefits].
- CEO/Owner recommended - Based on your previous interest in [Insert topic], I recommend exploring this additional resource [Insert title]. In this resource you will take your research to the next level and learn: [Insert list of benefits] - Sign off with the CEO/Owner name and have the email sent from them, instead of the marketing team.
- Expert advice - As a fellow expert in the [Insert industry] field, I wanted to share this resource, [Insert title], with you so that you can continue to expand your expertise on [Insert topic]. This resource will help you to: [Insert list of benefits]. I am more than happy to connect to speak more deeply on this topic. Please let me know if you have any questions. - Sign off as the expert and have the email sent from them.
- Social influence - It looks like you may have missed out on accessing [Insert title]. Over 500 [Insert persona descriptor or job title] have already downloaded this PDF to begin [Insert benefit(s)]. Don’t lose your [Insert topic] edge!
- Negative consequence - In order to avoid [Insert negative consequence], be sure that you take advantage of educating yourself on [Insert topic]. The information in this resource [Insert title] can prevent: [Insert additional consequences of not knowing the information].
- Urgency - As a loyal [subscriber/customer/evangelist] of [Insert your company], we wanted to give you the opportunity to get a preview of our newest [Insert topic] resource, [Insert title], before it is released to the public next month. In this resource you will learn: [Insert list of benefits]. P.S. If you are interested in taking advantage of this pre-release, please download this resource in the next two weeks, by [Insert date]. After that time, you can gain access via our blog [Insert hyperlink].
You will want to select 2-3 different motivators that you think might spark the best response from your audience. Jot down your ideas and set them aside.
Preparing for your Workflow:
- Write an email that presents the value of your awareness stage or consideration stage offer in the tone of the first motivator that you want to use. As a reminder, your automated emails should be concise and have a goal of getting the recipient to take action. Once ready, save this for automation.
- Write an email that presents the value of your awareness stage or consideration stage offer in the tone of the second motivator that you want to use. Save this for automation.
- Write an email that encourages the recipient to read the blog article that is related to the first offer that they downloaded. Save for automation.
- Write an email that explains the value of subscribing to the blog and encourages the recipient to visit the blog subscription landing page. Save for automation.
- If you think that it is appropriate to include a case study or the opportunity for your lead(s) to take advantage of your decision stage offer, like a trial, demo or consultation, write an email that explains the value of requesting that offer. Remember to keep your copy focused on how this offer fits within the context of the first offer that they downloaded. Save for automation.
- Before we head into the Workflows tool, make sure that you have your list of everyone you want to add to your Workflow ready to go.
Pro tip: Whenever you are building a Workflow, you’ll want to have a goal in mind of where you want them to be after having gone through the steps. It’s the whole reason for putting them into a Workflow, right? Whatever your goal is, you want to have that set as the goal list. That way, if they meet the goal before the end, they will be removed and no longer nurtured to reach that point. Plus, you get to keep track of how many people have met the goal, and therefore, how effective your Workflow is at getting them there.
Building your Workflow:
Once all of your emails are created, you are ready to head into the Workflows tool.
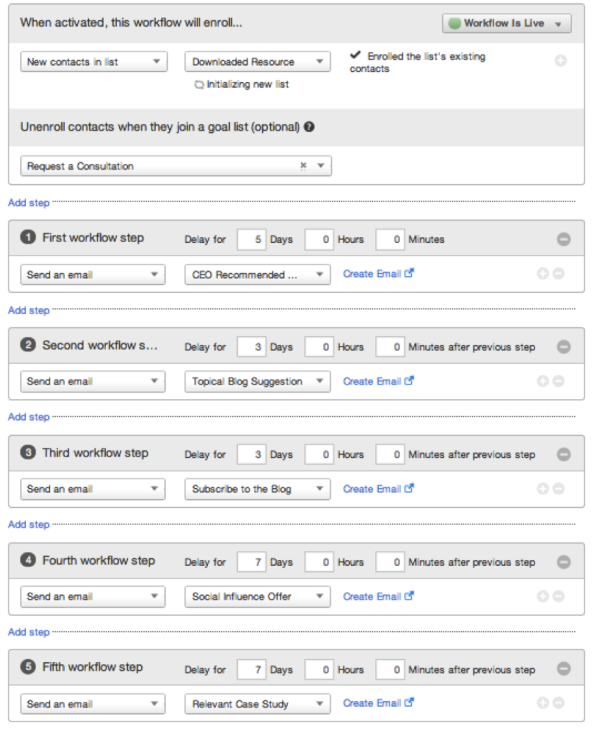
Pro tip: For timing between steps, consider how much time your recipient needs to digest the information that you are sending them. Keep in mind that even if you have the Workflow set to execute on business days only, weekend days still count in the day delay. Typically, steps will be delayed anywhere from 3-7 days but, it all comes down to how long your sales cycle is.
Before your Workflow goes live, you’ll have the chance to enroll contacts that are already on your list. This will include all members of the list, regardless of when they filled out your first form, so it’s important to consider what makes the most sense. Once your Workflow is turned live, you will not have this option available to you.
Ready? Go ahead, activate your Workflow!
2. Workflows Based on a Webinar or Event
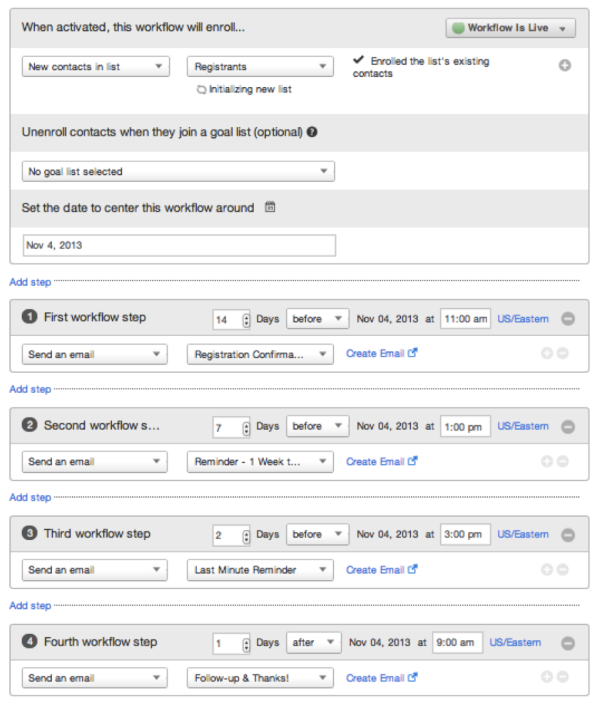
For this next workflow, we’ll be setting up automation leading up to and following an upcoming webinar or event. Once people have registered, you can keep them excited and engaged, and help them prepare to get the most out of their experience.

What you need for this workflow:
- A registration form connected to HubSpot, or a list of everyone who has registered for you webinar or event
- The date of your event
- Any resources or information you need to provide to your contacts in advance of the event
- Any materials that you want to share with your contacts after the event
Pro tip: If you will be hosting a webinar on GoToWebinar, check out the HubSpot - GoToWebinar integration through Zapier in the HubSpot App Marketplace.
Preparing for your workflow:
- Create a list of everyone who has registered for your webinar or event
- Write an email confirming the registrants information and the details of the webinar or event. Save for automation.
- Write an email reminding them a week before with information or resources that can help them prepare to get the most out of it. Save for automation.
- Write a last-minute reminder email with helpful information and event/webinar details. Save for automation.
- Write an email to follow up with everyone who registered. Include any materials that were covered in the webinar and any helpful resources that would help registrants take the next steps. Save for automation.
Building your workflow:
Once you have all of these elements ready, you can head over to the Workflows tool.
3. Workflows Based on a Contact’s Date Property
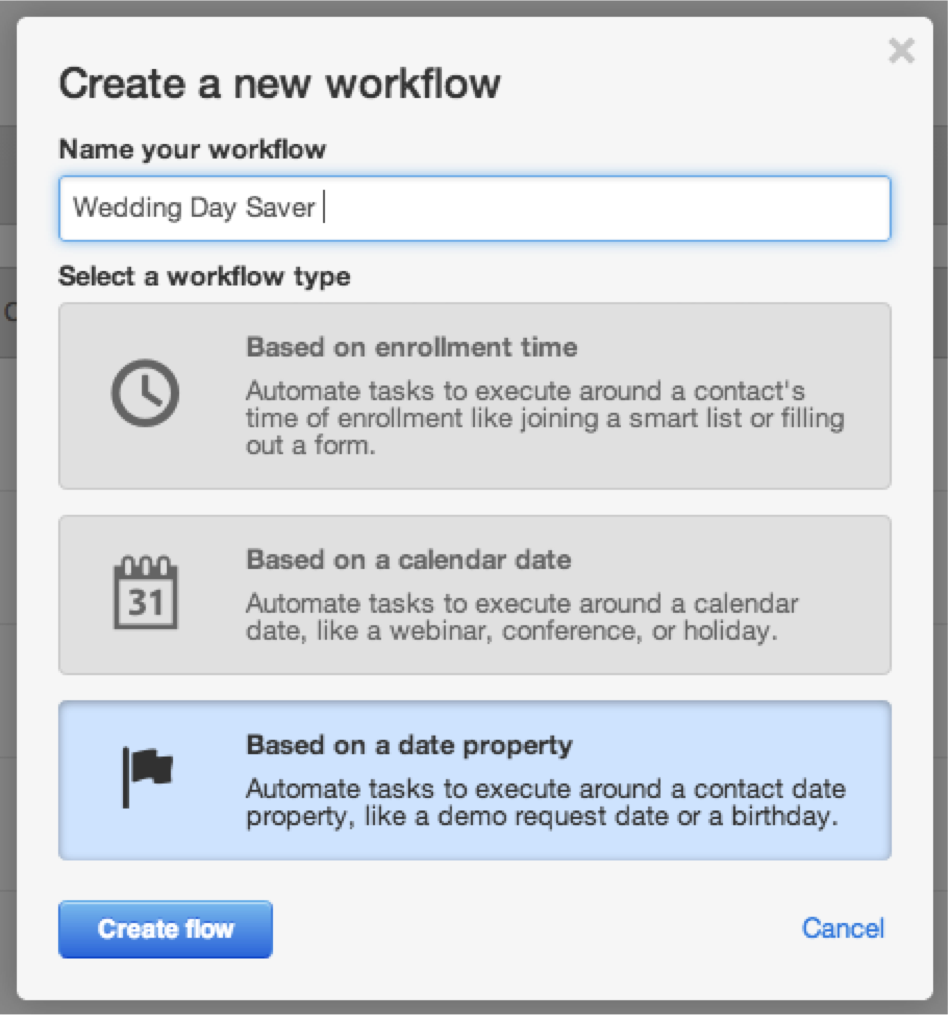
Finally, for our third example, we will be basing the workflow steps around a date property. A date property is something that is specific to each individual contact included in the workflow, like a wedding date, membership renewal date, or lease expiration date. The difference between this type of workflow and a workflow like the one mentioned above is that the steps in the workflow will not be based on when the contact is enrolled in the workflow, but around the contact’s unique date property, which is likely to vary from contact to contact.
What you need for this workflow:
- A date property in mind that you will base your emails around (this type of property needs to have the field type “Date Picker” in your Content Settings).
- A smart list of people who you want to add to your workflow.
- A goal in mind for what you want to have happen when someone completes the workflow.
Preparing for your Workflow:
- Create your smart list to pull in people who meet the criteria for your workflow
(The above is a list of all people who expressed interest in saving money when it comes to their wedding day but have not had their wedding yet. After their wedding there are things that they can sell through our website to get money back.)
Remember:
- Think about what messages someone needs to hear in order to help them meet the goal of your workflow.
- Write out the different emails that you need to send to your contacts -- in this case, before and after the date. Save these emails for automation.
Building your workflow:
As before, once everything is ready, let’s head into the Workflows tool.
Looking to get early access to date-based workflows? Request to be ungated!
What are some other Workflows that you would like to setup around date properties or to save you time?
![Lead Nurturing With HubSpot: How to Craft a Killer B2B Campaign Using Workflows [Part 2]](https://53.fs1.hubspotusercontent-na1.net/hubfs/53/User%20Blog/tammy-featured-1.jpg)
