Data source: IBM
The click-through rate for transactional emails also has a significant edge on other marketing emails at 10.4%, while the average CTR for non-transactional emails is 3.2%.
.jpg?width=669&height=329&name=click-through%20rate%20(1).jpg)
Data source: IBM
So before you write off these messages as boring, think again. In fact, you can harness transactional emails to amplify your marketing efforts. Their potential is way beyond just welcoming a new subscriber or sending ecommerce-related updates.
What is a Transactional Email?
There’s a general perception that transactional emails are only sent after a customer has bought something from your website -- an order confirmation email, order shipment email, order delivered email, etc.
In reality, transactional emails have a broader defintion. A transactional email is a message sent to a subscriber because of a certain action they took on your website, such as visiting a particular page, signing up for blog updates, or abandoning a cart.
Personalization in Transactional Emails
We all love to receive emails that are tailor made for us. And that is the reason why personalized campaigns help improve click-through rates by around 14% and conversions by 10%. We all know this is true for promotional emails, but few marketers have begun to further optimize their transactional emails with advanced personalization.
As a general rule of thumb, your transactional emails should be 80% informational and 20% promotional. Transactional emails are intended to deliver important information, so you can't compromise this with too much promotional content. The key is to give users the information they need and expect, and offer them a personalized next step to continue their journey with your company.
To help you start harnessing the power of your transactional emails, we'll take a look at three impressive examples of optimized and personalized transactional emails sent by real companies. Each example represents a different type of transactional interaction, enabling you to create messages that are extremely relevant to recipients and profitable for your business.
The Welcome Email
The welcome email is the first email you send to a person who has opted in to receive your emails, or someone who has made their first purchase on your website. As your first direct interaction with a user, the welcome email is an important chance to start things off on the right foot.
To help you gather data for a positive personalized experience, It’s important to ask for a few key pieces of information about your new subscriber at the time of sign up. The information can be used to tailor your welcome email to resonate with the subscribers.
If you have asked for their name, you can go ahead and open with a personalized greeting . Isn’t it natural to like someone saying "Hey Joe" rather than just a "Hey there"? If you have collected their zip code, providing local store information is also a good idea.
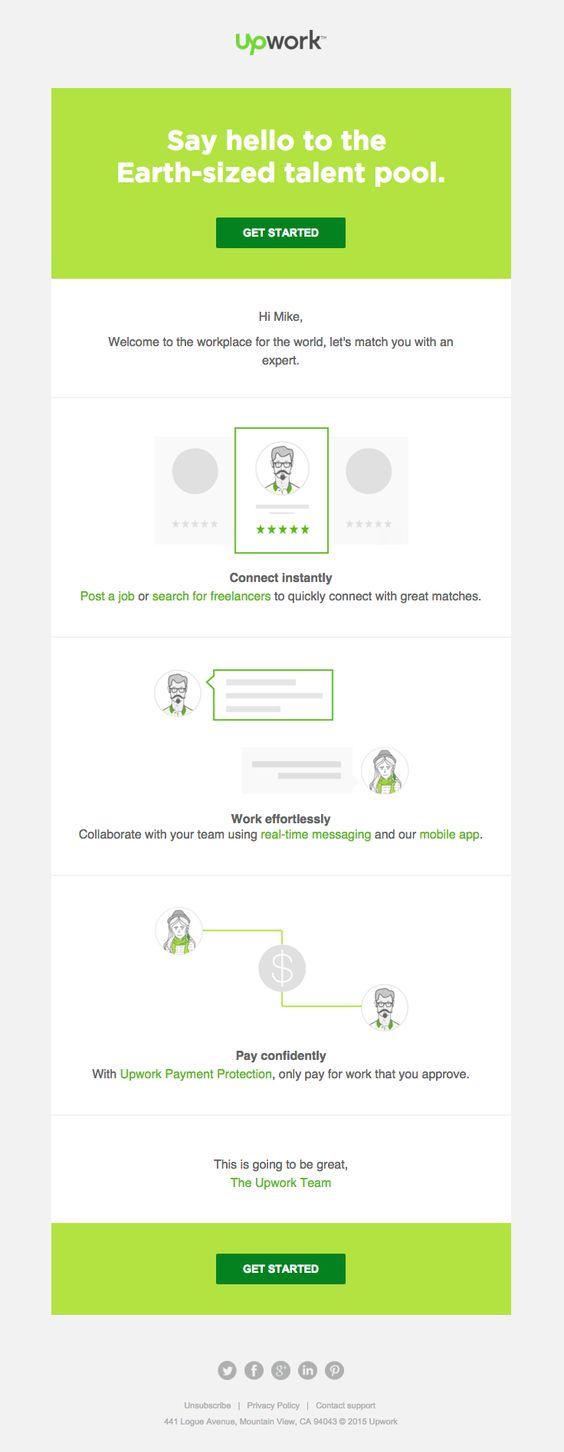
Here’s a simple yet awesome welcome email from Upwork. They have made good use of the of the subscriber information they collected at sign-up. The global freelancing platform makes the person feel special with just a few simple, personalized lines.
They welcome Mike and provide all the information he needs to know to get acquainted with the platform. Prominent CTAs can be used to guide the user back to the website for more relevant info.
The Purchase Email
After a customer makes a purchase, there are 3 types of emails that are usually triggered: order confirmation email, order shipment email and order delivered email.
We know none of these sound exciting, but they’re important to the customers who are waiting to know the status of their order and should thus be very important to marketers as well.
To interact with your customers at their most engaged, you should customize these emails with relevant content. Apart from the basic dynamic information of the order, you can make best use of upsell and cross-sell techniques, which direct users to content or products relevant to their purchase.
When someone purchases something from your website, you get an idea as to what kind of apparel they like or what kind of holiday destination they prefer. Dynamic content for these type of emails can be fetched on the basis of the customer’s current purchase, past purchase history or any other real-time interaction.
It might seem a little dicey when it comes to recommending products, but if used carefully, recommendations have the potential to make a strong impact. After all, it costs 5 times more to attract a new customer than to retain an existing one. Also, convincing your existing customers to buy from you is easier than convincing a new subscriber, isn’t it?
Make sure you do not bombard the customer with a big list of recommendations or they might soon lose interest in you or feel overwhelmed. Restraint on the number of suggested products serves to keep the customer engaged.
We love this purchase confirmation email from Teespring. It provides all the essential information about the order -- which the subscriber needs to know. But they've also taken full advantage of relevant cross-sell opportunities, presenting the user with customized information about other products.

Cart Abandonment Email
It’s a nightmare for a business to see abandoned carts. But they exist in big numbers. According to a SalesCycle report, around 74.52% carts were abandoned in 2016.
But it is possible to recover some lost carts through email marketing. And personalization of cart abandonment emails makes things easier. Generally, when a subscriber receives relevant suggestions, they are more likely to take the desired action.
Lux-Fix.com, a fashion retail brand, implemented an email personalization program to get 85.7% rise in email conversion rates and a 136.2% rise in recovered sales from cart abandonment emails.
By personalizing the email with products the customer or prospective customer was looking for, you can create context and remind them about their interaction with your brand. Also, you need to make sure that when they click on a product image or description you send in your email, you take them to the exact product page on your website.
Moreover, you can also cross-sell in this type of email. By giving color options of products they put into the cart or recommending similar products that they may like, you are actually broadening the horizon of your brand in more ways than one.
You can also segregate the cart abandoners on the basis of what caused them to do so. By implementing your knowledge regarding shopping habits, stage of a particular subscriber’s journey, etc. we have a few ideas you can make use of:
- First time visitor/ price-sensitive visitor: a discount works the best
- Those deterred by shipping cost: offer free shipping
- If someone puts a product in the cart and it is out-of-stock: send an email when the product is back in stock
This email by MCM is an excellent example of cart abandonment emails. The top menu is in place and there's a major focus on reminding the subscriber about what they left in the cart. Apart from all this, they have cross-sold well by adding some similar products that the subscriber may like.

Don't Forget Your Transactional Emails
Personalization plays an important role in increasing the probability of your email campaign’s success. While personalization often gets limited to just promotional emails, it's important to consider personalization options in your transactional emails as well to improve open and click-through rates.
Customized transactional emails can perform even better with this targeted approach.

Personalization


![Behavioral Marketing: What Is It & How Is It Beneficial? [+ Examples]](https://53.fs1.hubspotusercontent-na1.net/hubfs/53/behavioral%20marketing.jpg)