As you become more adept at generating traffic to your site and leads in your database, the necessity for an effective lead nurturing strategy becomes more and more apparent. That's because in most cases, only a relatively small percentage of your leads will be ready to make an immediate purchase, leaving upwards of 90% on the table. That's where the magic of lead nurturing comes into play.

Welcome to Part 1 of Lead Nurturing With HubSpot. Over the course of this four-part series, I’ll be showing you ways to grow your revenue, convert your leads, and delight your customers with lead nurturing powered by HubSpot.
Let's jump right into part 1, which is dedicated to my B2C and eCommerce HubSpotters.
If you operate an eCommerce company, you may have hit a wall in the past, where visitors will show up on your website, viewing and adding products to their online shopping cart, only to abandon before clicking that final button to submit their order. Or perhaps, your B2C company offers a product or service that has a replacement date (such as coffee, ink cartridges, or pest control), but past customers never return to make a second purchase. Or, you want to engage and delight your customers with a higher value product that would benefit them.
If this resonates with you, then it’s time to implement a lead nurturing email series.
With a B2C lead nurturing campaign, which you can easily create in HubSpot, you can remind customers about the product they missed out on, the product they forgot they needed more of, or the product they never even knew they needed.
That's right! We're talking about:
- Abandoned-cart campaign
- Replenishment campaign
- Up-sell/Cross-sell campaign
How to Identify Which B2C Lead Nurturing Email Campaigns Are Best for You
To identify which B2C lead nurturing email campaigns are best for you (maybe all of them!), you need to analyze your customers’, or potential customers', behaviors. Here are the reasons to employ each different nurturing email campaign:
- Abandoned-cart: Visitors are finding your online store and adding products to their shopping cart but aren’t completing their purchase.
- Replenishment: Customers are making an initial purchase of a product or service with a finite lifespan, but they aren't returning to you to make a repurchase.
- Up-sell/Cross-sell: Customers are making an initial purchase or repurchase, but their average order value is stagnant.
What Are the Benefits of These 3 Lead Nurturing Email Campaigns?
Let's quickly run through each email campaign example and show what their benefits are, starting with abandoned-cart campaigns.
Benefits of an abandoned-cart email campaign
By engaging with a website visitor that didn't complete their online purchase, abandoned-cart workflows aim to re-engage with them and convert them into customers. Do this by nudging them with email reminders about their forgotten purchase. Automate this process to convert more website visitors and not lose out on as many potential customers.
Benefits of a replenishment email campaign
It costs significantly more to acquire a new customer than it does to keep a current one. Not to mention that your most qualified audience are those who already purchased from your store— i.e., those who've qualified themselves and are on your email list. Thus, replenishment campaigns target those that are most likely to buy from you again. This is the best way to increase the lifetime value of your customers while cutting your customer acquisition costs.
Benefits of an upsell/cross-sell email campaign
Up-selling and cross-selling campaigns again re-engage with your previous customers. The greatest benefit to your business is an increase in the average order value of customers. Plus, if you use this campaign as a way to delight your current customers by recommending products that are related to their past purchases, you heighten the chance for word-of-mouth marketing to attract even more customers. This all means more revenue and higher marketing ROI.
Lastly, for all these campaigns, it's simpler and easier to re-engage with website visitors and past customers than betting on acquiring new ones.
How to Create an Abandoned-Cart Campaign Using HubSpot Workflows
Let's walk through the steps you'll take in your HubSpot account to create an abandoned-cart campaign using HubSpot workflows.
Step 1: Create your campaign
To create the abandoned-cart B2C lead nurturing campaign in HubSpot, navigate to Marketing > Planning and Strategy > Campaigns. In the upper-right corner, click Create campaign and give it a relevant name.
Step 2: Write and create your emails
Now that you've created your campaign, create the actual abandoned-cart emails to associate it with. To create an email in HubSpot, navigate to Marketing > Email. In the upper-right corner, click Create email. As you create each email, be sure to associate it with your campaign. There are three types of emails to include as part of this series:
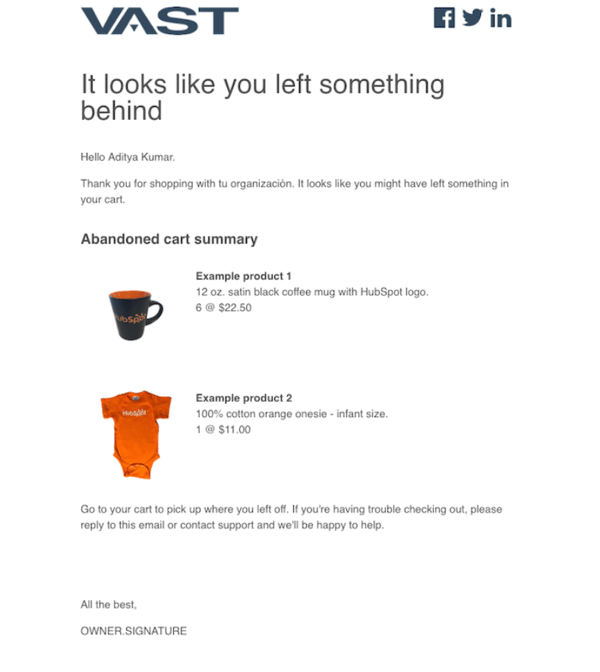
The reminder emails
Here are a few elements you should include in each reminder email:
- The abandoned item displayed as part of the message and subject line
- Product image
- A backlink directed to the abandoned-cart checkout URL
If an email recipient fails to act on the first few abandoned-cart emails, including a discount or free shipping in latter emails can entice them to follow through with the purchase.
The farewell email
The second email to create will be similar to the reminder email. However, its purpose is to be used as a send-off to your customer in the case that they choose not to repurchase your product. So, how does this email differ? You can include a specific “farewell to the customer” message, still showing them that they’re still a valued customer, but nonetheless, they’ll be missed.
The thank you email
For the last email type, you'll want to say a “Thank You” when a contact purchases the product. For this email, you'll include:
- A subject line and message showing gratitude towards the customer and their purchase.
- Personalized copy using their contact information.
- A way for them to provide feedback, such as adding a link to a survey they can complete.
Step 3: Set up your abandoned-cart workflow
Okay, are you ready to set up an abandoned cart workflow of your own in HubSpot?
Navigate to Automation > Workflows. In the upper-right corner, click Create workflow. On the left, choose Contact-based.
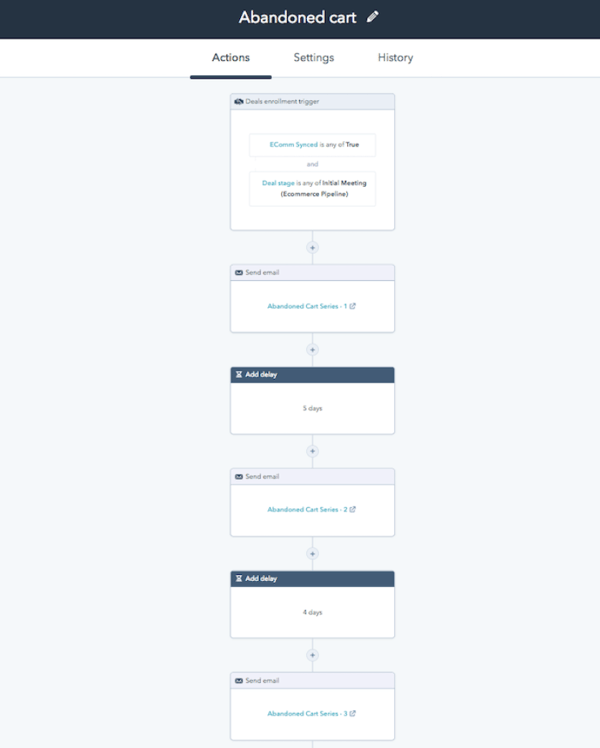
Either create a workflow from scratch or use the Marketplace tab for a workflow template. In our case, Shopify's integration with HubSpot includes an existing abandoned-cart workflow template, using a sequence of three emails and three action delays. But, you can always add more triggers and actions to the workflow to customize it.
The criteria for this workflow's enrollment trigger should be set to contacts in an abandoned-cart active list. If a contact adds a product to their online shopping cart but does not proceed to purchase, they’ll be added to this active list. Additionally, if they purchase the product, they'll be removed from the abandoned-cart active list.
Following the enrollment of a contact, set the first action delay of 12 – 24 hours.
After that time, the first action will send an abandoned-cart email.
This is where we'll differ from the template and set up an if/then sequence.
- If the contact purchases, add an action to send them a “thank you” email with only a brief few minutes delay. .
- If a contact doesn't purchase, add an action to send them an abandoned-cart email with a 12 – 24 hour delay.
Pro tip: Repeat the “if not” sequence once more or however many more times you choose to, unless a purchase is made. But be sure to avoid sending these emails too frequently. They could be mistaken as spam.
Personally, I recommend successively creating larger action delays between each abandoned-cart email send, giving the contact more time to consider the purchase.
To complete the abandoned-cart workflow, if the contact doesn't purchase the product, use the “farewell” abandoned-cart email as the last email action.
Under the Settings tab, be sure to associate your workflow with you campaign.
Congrats, you've set up an abandoned-cart nurturing campaign in HubSpot! Here’s an example of what this workflow would look like:
How to Create a Replenishment Campaign Using HubSpot Workflows
Now that you know how to create an abandoned-cart workflow, let’s jump into creating a replenishment campaign using HubSpot workflows.Step 1: Create your campaign
To create the foundation for the replenishment email nurturing campaign, once again navigate to Marketing > Planning and Strategy > Campaigns. In the upper-right corner, click Create campaign and give it a relevant name.
Step 2: Write and create your emails
Below are the emails you'll include for this campaign.
Replenishment reminder email
Below are the most effective pieces of content to include in your replenishment reminder email:
- Clear purpose stated in subject line and message of email, such as: “We see that your [Product] is almost out! Would you like to reorder?”
- Product name
- Product image
- Your website's product URL
- A personalized and targeted message, such as: “Hello [Contact.First.Name]! As a valued customer of ours, we would love to remind you about your past purchase of [Product]. We figured you're about to run out. Is that right? If so, we more than welcome you to visit our online store to repurchase [Product].
Thank you email
Again, the second type of email you'll create is a “thank you” email. This one will contain the same elements that were part of the abandoned-cart “thank you” email as well as a reminder to purchase the product again later on.
Farewell email
The third type of email takes a similar approach as seen by the abandoned-cart “farewell” email; however, customize it to fit the needs of a replenishment email rather than an abandoned-cart email.
Step 3: Set up your replenishment workflow
Before you create your workflow, create an active list of contacts that you’ll use to enroll and re-enroll in the workflow in case they purchase a replenishable product or service.
You can do that by navigating to Contacts > Lists. In the upper-right corner, click Create list. In the upper-left corner, click the pencil icon and enter a name for your list. Select Active list from the dropdown menu. Include all criteria needed to enroll contacts who purchase the replenish-able product as part of that list.
Now, follow similar steps as you did for creating an abandoned-cart workflow. But this time, use the Marketplace tab and choose the workflow type called Re-engage with old customers.
Enrollment triggers for contacts to be enrolled in this workflow is whether they've purchased your replenish-able product. Also, click the Enrollment triggers box and check the box beside the option to allow contacts to re-enroll in the workflow who meet the enrollment triggers.
When a contact enters the workflow for purchasing a replenishable product, an immediate replenishment “thank you” email is sent. Next, they’re put in a delay, which should be half the duration of the product's lifespan.
After the delay, an email action sends a replenishment email.
- If the contact purchases, they’ll be re-enrolled in the workflow and sent the prior replenishment “thank you” email in response.
- If they don't purchase the product, set a delay for another replenishment email to send out when the product's lifespan is reached.
Again, another if/then sequence takes place here.
- If they become a returning customer, the same re-enrollment action happens.
- If not, send them one last email a day later, the “farewell” replenishment email.
The “farewell” email again offers the opportunity to repurchase the product, but if they don't, they’re fully unenrolled from the workflow.
There you have it! That's the gist of a replenishment campaign. Just make sure that you take the final steps to associate the workflow and emails you created with the campaign itself.
How to Create an Up-Sell/Cross-Sell Email Campaign With HubSpot Workflows
Two down, one more to go! Let's walk through the steps to create an up-sell/cross-sell email campaign using HubSpot workflows.
Step 1: Create your campaign
For an up-sell/cross-sell email nurturing campaign, you'll follow all the same steps you took for the replenishment campaign up until you begin building emails and the workflow.
Step 2: Write and create your up-sell/cross-sell emails
There will be several emails that you'll need to draft for this campaign. I recommend at least three types:
- A “thank you” email
- A “recommendation” email
- A “farewell” email
The “thank you” and “farewell” emails will follow a similar format as seen in the replenishment campaign; however, instead of promoting the same product the customer bought, they’ll promote related recommended products.
A “recommendation” email should include the following information:
- Clear subject line and message
- The original product, including its name and image
- Recommended product names
- Recommended product prices
- Recommended images
- CTAs linking back to each recommended product's page
To set up recommended products, navigate in your Shopify account and install an app or perform a theme code customization. You can then integrate recommended products as part of your emails.
Step 3: Set up your up-sell/cross-sell workflow
Next, set up an active list to enroll contacts who purchase up-sell/cross-sell worthy products. Use this list as an enrollment trigger for your workflow.
Now, to build an up-sell/cross-sell nurturing workflow, choose the Re-engage with old customers template from the Marketplace tab. Again, this is a contacts-based workflow.
The enrollment trigger for this workflow is when a customer purchases a product. Again, click the Enrollment trigger box and check the box beside the option that allows contacts to re-enroll in your workflow once they meet the criteria.
Once enrolled, they'll receive an immediate “thank you” email.
Include an if/then sequence at this point:
- If the customer chooses to purchase one of the recommended products seen in the “thank you” email, re-enroll them in the workflow.
- If the customer doesn't purchase a recommended product, set a 24-hour action delay, and then send the “recommendation” email.
You can repeat this process however many times you prefer, attaching if/then sequences to when a customer chooses not to purchase a recommended product.
Wherever you choose to end your workflow, create one last if/then sequence.
- If a customer purchases a recommended product, re-enroll them.
- If a customer doesn't purchase a recommended product, send them a “farewell” email after an action delay.
The “farewell” email again offers the opportunity to purchase a recommended product, but if they don't, they’ll come to the end and complete the workflow.
Though it's quite a lot to take in, you've reached the end. You've successfully built an up-sell/cross-sell email nurturing campaign.
What Results Can I Expect?
E-commerce brand, Vitacup, was struggling to turn email into a viable marketing channel. They had a large list of leads generated from paid ads and wanted to increase revenue and purchases from this list.
Over 12 months, their new abandon cart and replenishment campaign workflows produced a 300% increase in email revenue. Their average email click rate increased from 0.89% to 1.85% and average email open rate from 11.75% to 20.12%. These campaigns, improved conversion rates, and a well-planned promotional email schedule led to a 559% increase in email revenue (for them, it was well over 7 figures) over this same period.
These lead nurturing email campaigns do indeed work!
Well that wraps up part 1 of the Lead Nurturing With HubSpot series. Here's what’s coming next:
- Part 2: How to Craft a Killer B2B Campaign Using Workflows
- Part 3: How to Begin Lead Scoring to Fuel Your Nurturing Strategy
- Part 4: How to Test and Optimize Your Lead Nurturing Campaign
Stay tuned for more lead nurturing!
Want to connect with others on HubSpot tips, tricks, and updates? Head over to the HubSpot Community to join a conversation or start one of your own.