As your sales team grows, the needs of individual team members become more diverse. You’ll have new reps who need to be coached on the basics of sales. You’ll have experienced reps who need to be reminded to stick to your well-defined sales process. And you’ll have all kinds of on-the-fly questions about how your offering compares to your competitors’. Making all of this information readily accessible for all of your salespeople is really hard. And that’s where playbooks come in.

Using Playbooks in HubSpot
In a broad sense, a playbook is collection of tactics or methods that a person or team relies on to do their job. HubSpot’s playbooks tool gives you a place to store these methods and tactics so that they can be accessed from your CRM records right when they’re needed. Let’s walk through how playbooks work inside HubSpot and then take a look at three examples.
Please note:
- To create, edit, and delete playbooks, you must have an assigned Sales Hub or Service Hub Enterprise seat and Publish and/or Write playbooks permissions.
- Sales Hub Enterprise users without playbooks permissions can still view and use playbooks in the playbooks tool, and in contact, company, and deal records. But they will not have access to playbooks in ticket records.
- Service Hub Enterprise users without playbooks permissions can still view and use playbooks in the playbooks tool and on contact, company, and ticket records, as mentioned above. However, they will not have access to playbooks in deal records.
How Do Playbooks Help Salespeople?
Playbooks can be accessed from any CRM record in HubSpot. They’re listed in the Playbooks section of the right-hand sidebar:
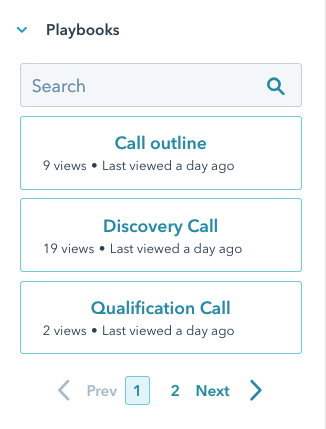
Find the playbook you want, and then click on its name to open it. The playbook pops open, like this:
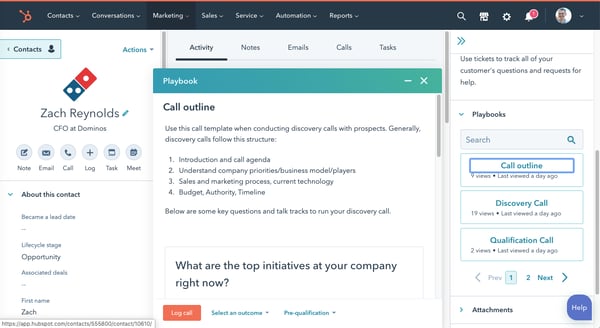
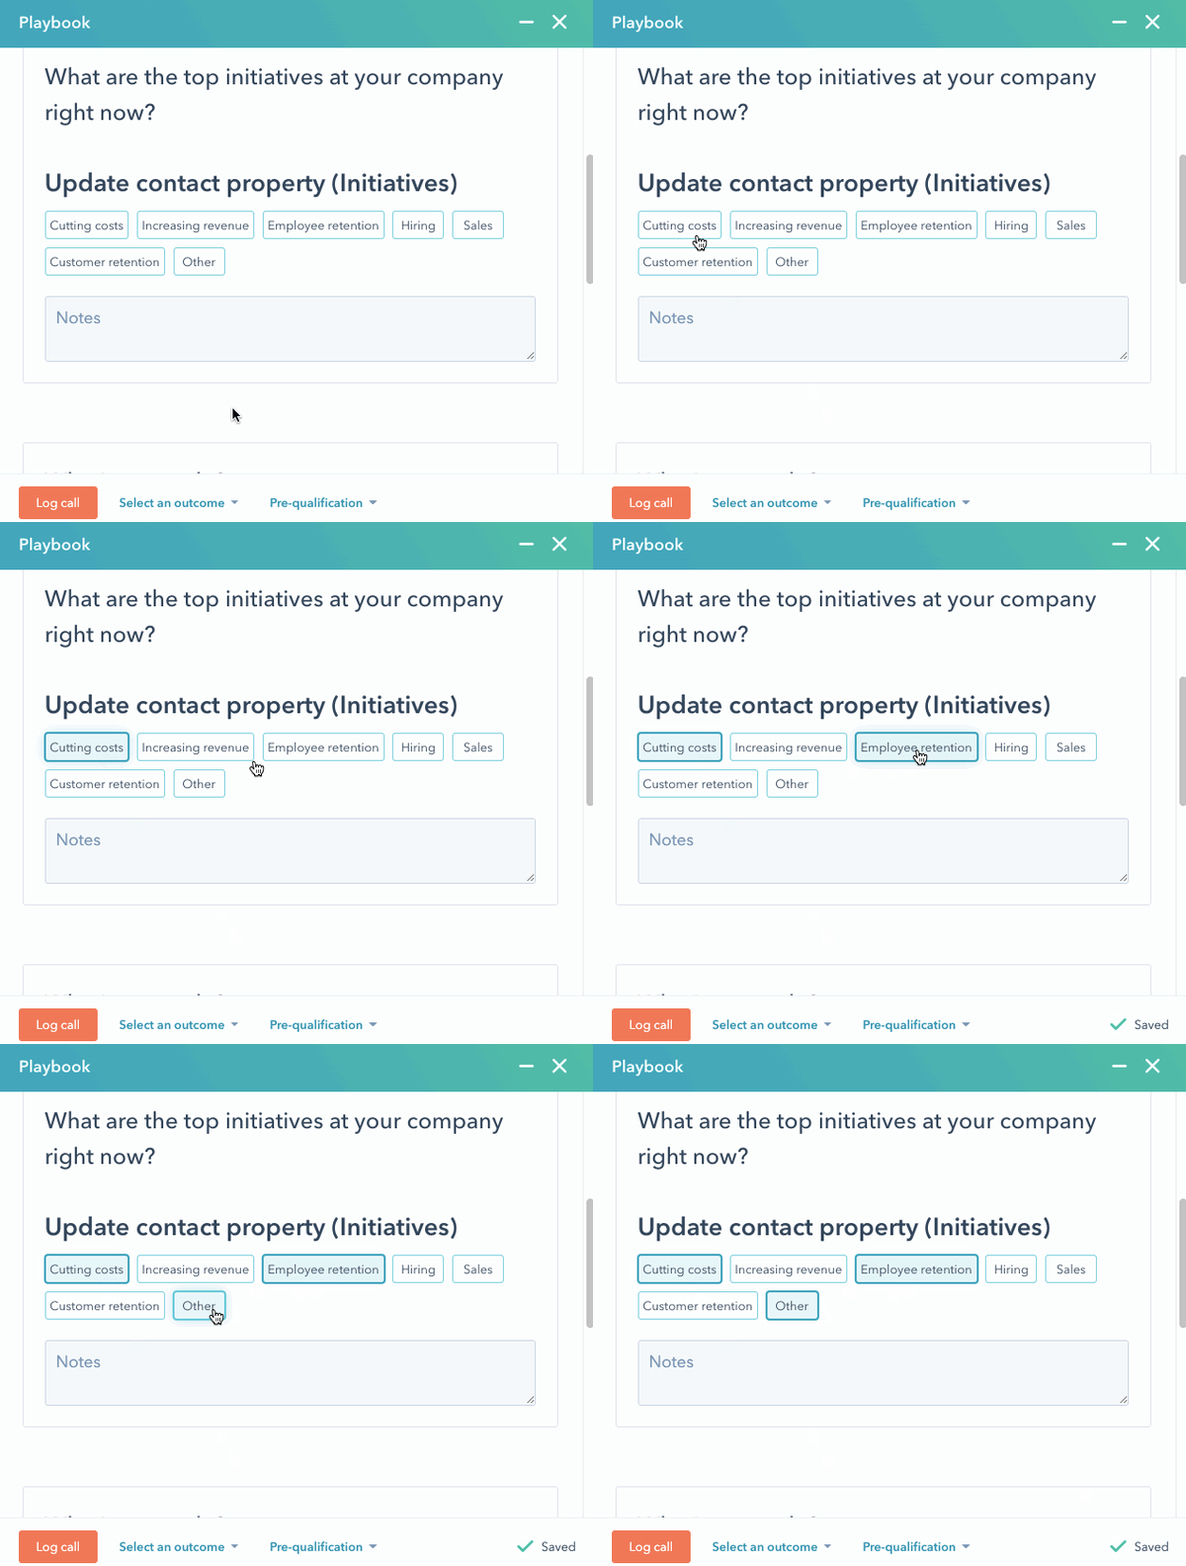
As you can see, a playbook can hold all kinds of things — text, links, images, videos — but the most unique part of playbooks are the question-and-answer boxes. These are interactive elements where the sales rep is given a question to ask and clickable options for recording the persons response. This not only helps the rep remember to ask the question, but also makes it simple for them to capture the person’s response:
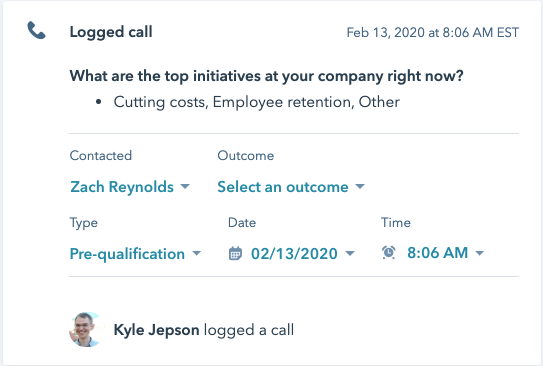
At the end of the conversation, the rep saves the playbooks, and it shows up on the timeline:
Behind the scenes, there are a lot of options for how the information in a playbook gets saved. So let’s pull back the curtain and take a look.
Creating Playbooks in HubSpot
When you create a playbook in HubSpot, you’ll see a toolbar of options for formatting your text and inserting other elements. If you’ve ever written a blog post in HubSpot, the options here will look familiar to you. If you need help navigating this part of the creation process, here’s a helpful knowledge doc. For now, let’s focus on the question-and-answer boxes, since those are unique to playbooks.
When you create a question-and-answer box, you’ll see a sidebar that looks like this:
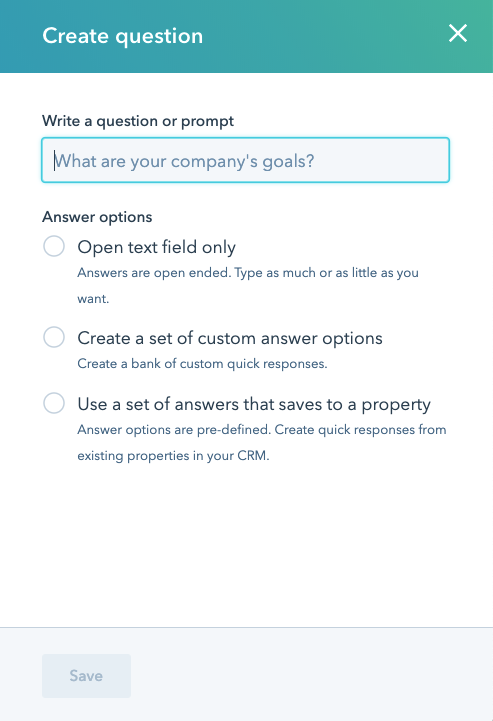
The first thing to do is write the question or prompt. This will be the header for the box, and it should be the thing you want your rep to say to their contact when they’re using this playbook.
Once you’ve written out the question, you have three options for how your rep will collect the person’s response. The first is “Open text field only.” This will give your rep a text box where they can take notes on what the person says. A text box will always be included in every question-and-answer box regardless of what option you choose here, but “Open text field only” means the only way for your reps to capture answers to this question will be good old-fashioned note taking.
The second option is “Create a set of custom answer options.” With this option, your rep will still have a text box for taking notes in, but you can also provide a list of common answers for this question. For example, if you want your rep to ask their prospect about their current goals or challenges, and there are a few common responses that are especially relevant to your offering, you could add those as clickable boxes inside the question-and-answer box, like we saw in the example GIF above. To add these options to your question-and-answer box, select the “Quick replies” box and type out each option. Anytime you type a comma, semi-colon, or enter/return, the system will add the option to the list and you can start typing another one.
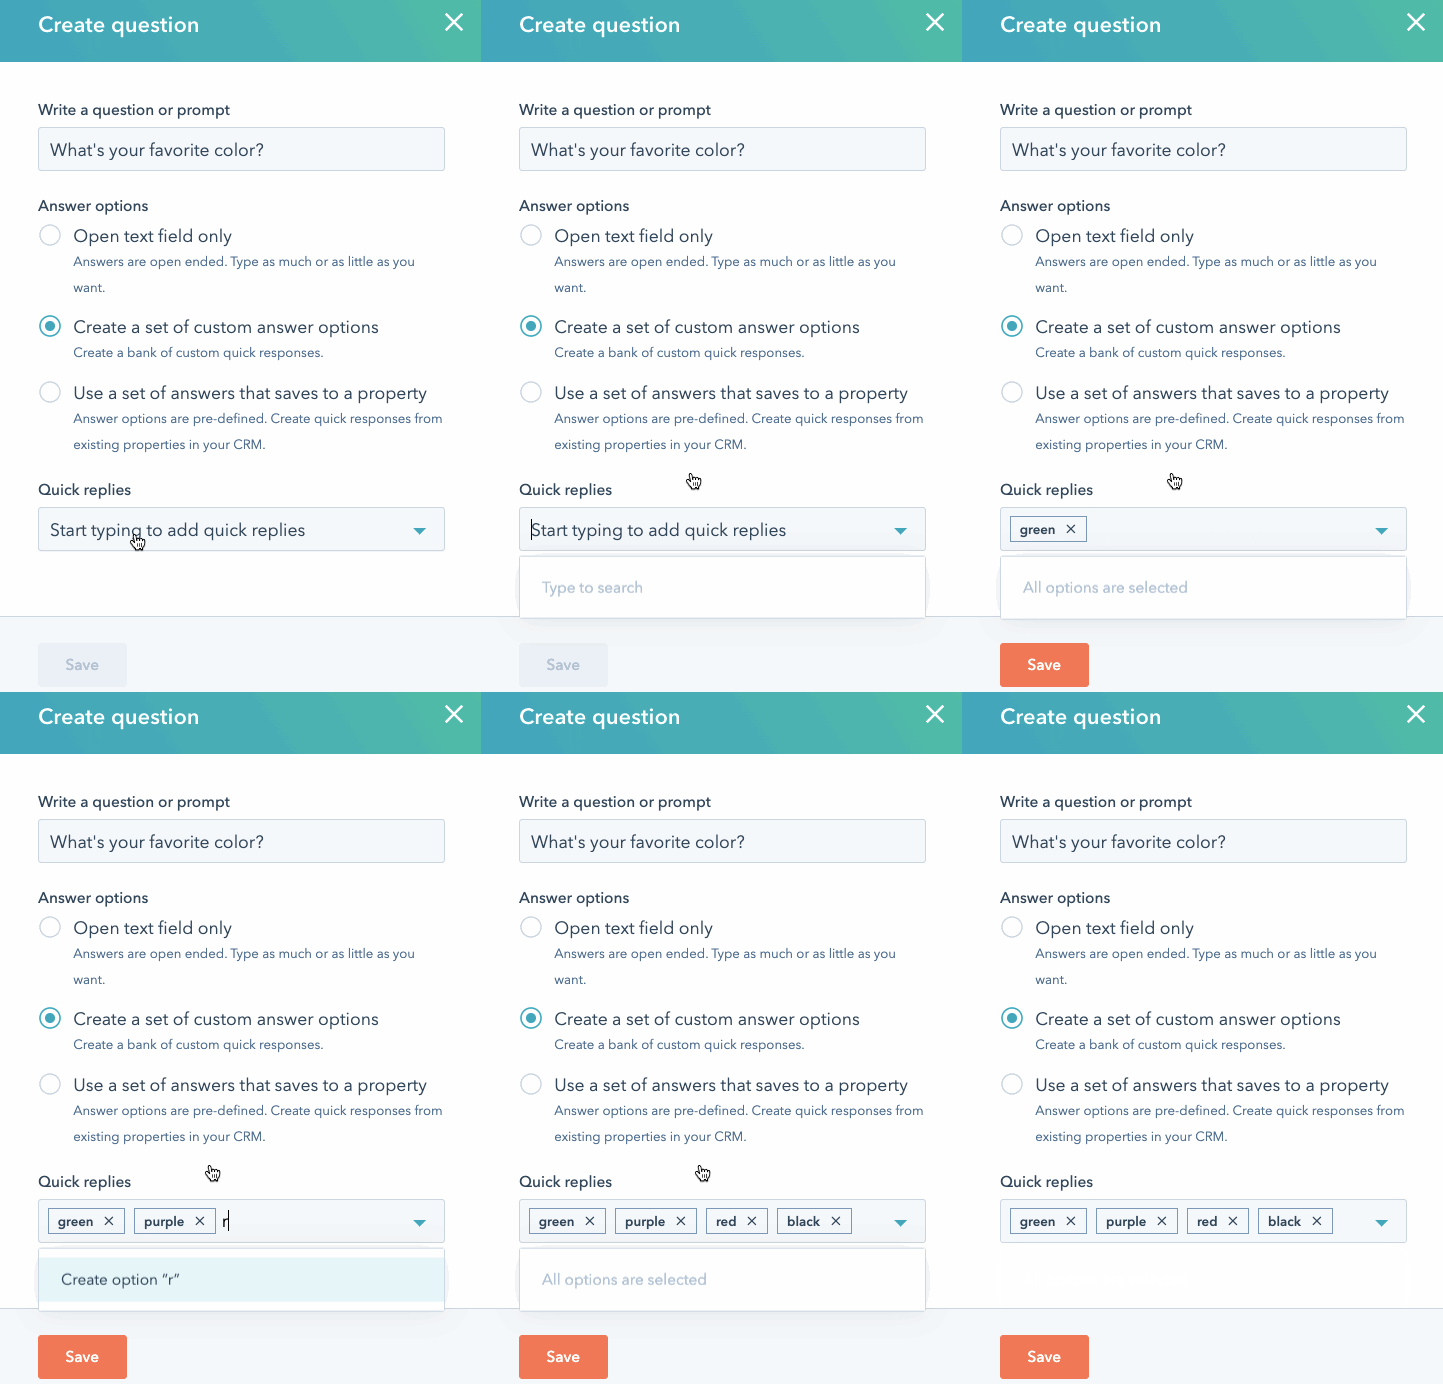
In both of these first two options, the information your rep collects inside a playbook will only be stored on the timeline. But what if the information they’re collecting should be used to update properties on some of your records? That’s where the third option comes in: “Use a set of answers that saves to a property.” If you select that option, you can then choose a CRM property in which to save the responses. Like this:
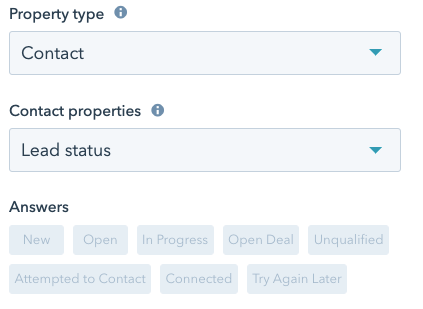
Depending on the property you select, the question-and-answer box will behave slightly differently. In the above example, I selected the contact property “Lead Status,” which includes a set list of options. Notice that the playbook automatically pulled in those options as the quick replies for this box. That’s what happens when you select a property with predefined options. If you select a text property, like "name" or "phone number," your reps can type in an answer just like they would with an “Open text field only” box, but instead of being saved on the timeline, their answer will be stored in a text property.
(NOTE: For now, those are the only types of properties you can update with a question-and-answer box. Other property types, like date picker properties or number properties, aren’t yet compatible with playbooks.)
Now that you know a bit about how to create a playbook, let’s look at some examples.
Use Playbooks to Prepare for a Call
You can embed videos into a playbook, either by uploading them or by using a link from YouTube, Vimeo, or Instagram. This is great if there are techniques you want your reps to brush up on before a call.
Use Playbooks as a Call Outline
Using a combination of bullet points and question-and-answer boxes, you can guide your reps through entire sales conversations, making sure they hit all the most important points.
Use Playbooks as Competitive Battlecards
Create a playbook for each of your major competitors. Use images and text to contrast the strengths and weaknesses of your product and your competitors' and list out areas where you win and areas where success is unlikely. Your reps can open these whenever a particular competitor is brought up.
Keep in mind that your reps can only have one playbook open at a time, but one great thing about playbooks is that they remember the information your reps enter into them even before they’re saved. So if your rep needs to leave a call outline to open a battlecard, when they go back to the outline, all the information they put into it will still be there waiting for them.
Bringing Your Playbooks Together
These are just three examples of how you might use playbooks. Got other ideas? We’d love to hear them! Share with us on your favorite social channel.