Finding a CRM that fits well with your business operation can be a long journey. Once you find a good fit, you create an even bigger task for yourself: getting the team to adopt the new CRM.

Sales reps want to focus on selling rather than learning a new system. As a sales manager, you want to empower your sales reps to sell as best they can, and you understand their hesitation. Still, this CRM is the one your business leaders decided upon, and it's up to you to drive adoption of this new system.
So what can you do?
You can save time for your teams by setting up pieces of the system for them. This way, there's minimum set-up required of your reps, and they can start selling in the system faster. If you have admin access in your HubSpot CRM, below are 5 items you can set up for your sales team before they log in for the first time.
1. Require Fields for Creating New Records.
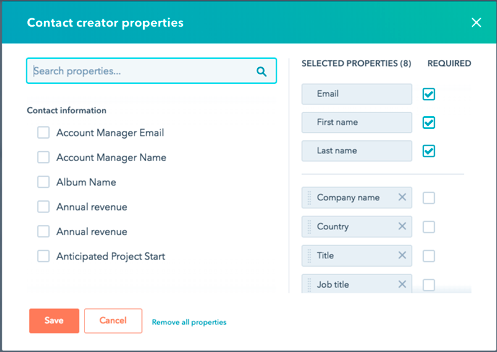
A contacts database with missing information is a point of frustration for sales reps and managers alike. One easy way to maintain a clean database with a new platform is to ensure that quality data is inputted in the system from the start. Admins can require a certain set of information to be provided before creating a contact or company in the tool.- In the upper-right hand corner of your main navigation menu in HubSpot, click the settings icon.
- In the left sidebar menu, select Contacts & Companies.
- Next to Set the properties your team sees when creating contacts/companies, click Manage.
- Choose the fields you would like to appear upon the creation of the record and mark which are required for your rep to populate.
2. Create One View for All Your Reps to See Their Leads.
When a sales rep logs in to the CRM, they want to see data that matters to them. One of the views they will prioritize is the Contacts or Companies home page, the space where they can see leads. You can create one view that will show each sales rep their own leads/companies in HubSpot. - In the left sidebar menu, click Add filter.
- Search for Contact property of Contact Owner.
- Check the box for Me.
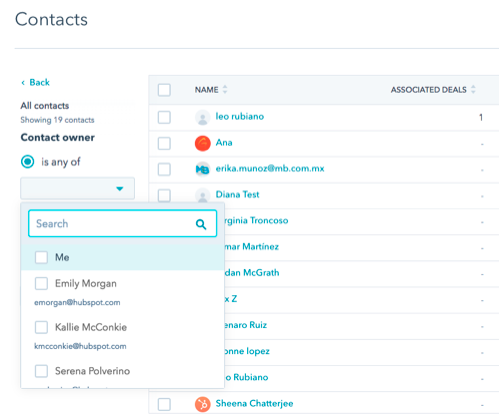
The value of Me changes depending on what user in HubSpot is looking at the view. If Sales Rep #1 looks at this view logged in on their own account, they will see different leads/companies than when Sales Rep #2 looks at the same view on their account. One view will accommodate all your sales reps using HubSpot filters.
- Click Apply filter and save the view.
- Along with naming the view, select Everyone as the audience. This will allow all sales reps to access this view in their own account.

Your sales reps can access this view by following these steps:
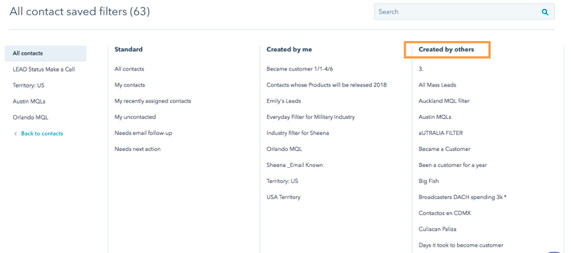
- In the left sidebar menu, click All saved filters.
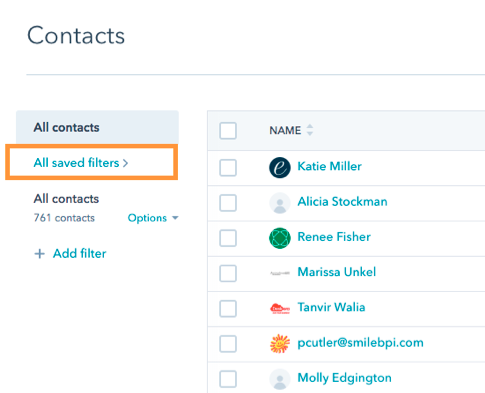
- Navigate to the Created by others column and select the saved filter they need.
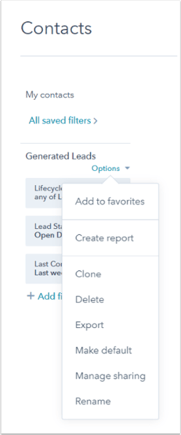
Depending on the importance of this view, they may consider favoriting the view to have it live in the top-left of your contacts/companies view:
3. Display the Most Crucial Info on Records.
On each HubSpot contact/company record, there's the About box. This box is meant to provide a quick look into the most important details you collect on your contacts.
Admins can set a default view of this About box for all your sales reps. As a manager, you want a standard foundation for all your reps that help them tailor their pitch to each lead. Thus, you have the opportunity to set a standard About box in your HubSpot account that each sales rep can look at when interacting with each lead.
- In the upper-right hand corner of your main navigation menu in HubSpot, click the settings icon.
- In the left sidebar menu, select Contacts & Companies.
- Next to Set the properties your team sees when creating contacts/companies, click Manage.
- Select the key information all your sales reps should take note of when nurturing a specific lead.
- Click Save when you're finished.

Try adding basic information to the view like Name, State, or Country. Consider adding some analytic information such as Last Email Opened Date, Recent Conversion, or Last Page Seen. For more options of what you can add, take a look at the different properties in your HubSpot account by default.
Upon completion, all the chosen properties will be the default in the About box for all your sales reps. For any reps already using HubSpot, your selection will be added to their existing view.
4. Build Out Email Templates for Common Scenarios.
While each rep should be customizing their communication with each lead for the particular situation, its understandable that there will be overlap in experience for each lead. There will be common messages sent to each lead such as introduction emails, set up a time to connect emails, and sending over the contract, to name a few.
Set up templates, pre-made emails, for your sales reps to hold these standard messages they consistently send to all prospects. These templates can be used when sending emails in the HubSpot CRM or your sales rep can access them directly from their connected inbox.
- In HubSpot, navigate to Conversations > Templates.
- Click New Template.
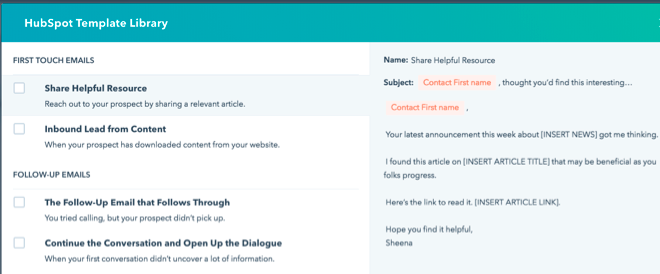
You will see two choices in the dropdown menu: From Scratch and From template library. In the template library, you’ll find pre-determined messages that you may select and tailor for your specific situation/team.
Your sales team can access these templates whenever they send a 1:1 email to prospects on the contact record in HubSpot or in their connected inbox.

5. Create Shortcuts to Insert Common Phrases in Notes and Emails.
Every minute counts on the sales floor, so why waste time writing long product names or describing the same service multiple times a day? As an admin, you can create snippets as a shortcut. With snippets, your reps can insert a block of text or common phrase when building out an email message or writing notes.
- In HubSpot, navigate to Conversations > Snippets.
- Click Create snippet.

- Enter a name for the snippet. This will be used for internal organization purposes.
- Enter the body of your snippet in the Text snippet section.
This is where you can add answers to FAQs, create a template for meeting notes to populate, long product/service names, etc.
- Enter a name for the snippet shortcut in the Shortcut section. In the example below, when a rep types in “#de,” they get the recommended snippet of “Demo.” Once selected, the text gets replaced with the text of the snippet.

- When you've finished creating your snippet, click Save snippet.
Want to learn more about the HubSpot CRM and how your team can use all the tools? Consider coming to Classroom Training! We'll cover all the parts of the HubSpot CRM, how your team can sell within the system, and how you can report on your efforts. Click the CTA below to learn more.