Have you ever looked at a feature in your HubSpot account and said to yourself, “What the heck is this for?”

You're not alone.
During my time working at HubSpot, I've spoken with dozens of users with questions like, “Why is this in my portal?” or “Can I delete this? I’m not sure what it’s for.” You don't have to live in doubt when it comes to keeping your account organized.
Here are six pro tips to help you keep your HubSpot account neat and tidy.
1. Campaigns.
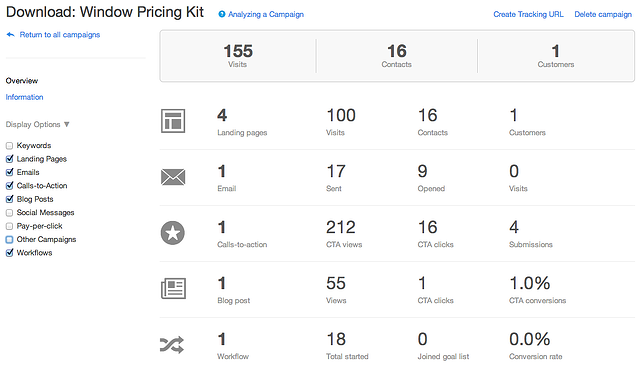
An inbound campaign is a specific marketing effort that aligns your content across all channels toward one specific goal. The campaigns tool allows you to associate the assets you create for this specific goal to an individual campaign.
This can help with organization because all the assets created particularly for that campaign can be viewed from one page. Furthermore, you can measure how these assets helped you convert new contacts and close customers.

Pro tip: The name you give to your campaigns should dictate how all associated assets should be named. This can help you make sure only the proper assets are associated with the appropriate campaign.
2. Folders.
Folder systems can help you and the rest of your team inventory the existing assets in your HubSpot account and make note of the assets you still need to create. By using the folders feature, you can start to group the assets based on the organizational needs of your team.
One way you can set up your folders systems is by creating a folder for each of your campaigns. The folders feature can be found in many of the tools that are nested under the content tab in the HubSpot Marketing software — you can see it in the file manager, landing pages, website pages, blog posts, and emails. You can also create folders for tools under the contacts tab like workflows and lists.

Pro tip: If you're afraid the idea of moving image files into new folders will impact the URL of the images, resulting in a broken image, have no fear. The HubSpot tool automatically takes care of the redirect for any URL changes to ensure your images or documents will render properly.
3. Descriptions.
There are designated spaces in HubSpot to help you add context around why an asset was created. There are description boxes in the campaigns tool, workflows, and individual contact properties.
Use this space to add information about the asset, such as why it was created or the goal, who created it, how the asset will be updated in the future, and the date it will be deleted (if applicable).
.png?width=650&name=Webp.net-resizeimage%20(1).png)
Pro tip: When conceptualizing workflows, use tools like Gliffy. This is an extension that allows you to build diagrams that help you visualize your workflow before you enter it into the tool, and you can save the finished diagram as a .jpg, which you can upload into your account’s file manager. This .jpg will be given a URL you can add into the description section of your workflows so you can recall your plan for the workflow in question.
4. Contact property groups.
It's easy to create custom contact properties with HubSpot. Many users will create custom contact properties for specific occasions, such as running campaigns, putting on events, or new product lines. This is a useful way to collect information on your contacts, but some should only be used in a certain instances or only for a limited amount of time.
To ensure everyone in your organization is using the contact properties effectively, you can gather similar contact properties by using contact property groups. This will allow you and your team to easily define which contact properties are being used regularly, which contact properties have rules attached to when to use them, and which properties were created for one-time use. The properties that are no longer of use to your team can then be deleted to make room for more pertinent information.

Pro tip: Create a contact property group specifically for properties that need to be deleted. This will help your team compile contact properties that are no longer useful nor should be used in any future assets.
5. Customizing your view of the contact record.
When viewing an individual contact record, it can feel like you're sifting through a ton of information for one or two contact properties. To save time, customize the view you see in the About box found on all contact records. You can do this by selecting “View all contact properties” at the bottom of the About card, scrolling to contact property you wish to add, and selecting “Add to About.”

Pro tip: Custom views within the About card are user-specific, meaning the changes you make within your user view of HubSpot will not affect how others' About cards are arranged.
6. The HubSpot calendar.
Use the HubSpot calendar to plan your content publishing. You can plan the publishing of social messages, emails, landing pages, and blog posts. This feature allows you to also assign the creation of these assets to other HubSpot users. By using a calendar, you can adhere to a constant publishing schedule rather than periods of silence on certain channels.

Pro tip: If you're looking to schedule posts through the HubSpot calendar and have these deadlines show up on your Google calendar, you can set up this integration through Zapier. HubSpot has a native integration with Zapier, which you learn about and sign up for a free account here.


