.png?width=112&height=112&name=Image%20Hackathon%20%E2%80%93%20Horizontal%20(67).png)

It’s a blend of SEO tools, AI assistance, firsthand experience, and a deep customer understanding.
In this guide, I’ll show you the exact steps, the tools I rely on, and the choices I make at each stage. The process is flexible enough for both solo writers and big content teams.
Table of Contents
- A Blog Post Outline vs. Content Brief
- How to Write a Blog Post Outline: A Step-by-Step Formula
- Optimizing Your Blog Post Outline for AI Overviews and LLMs
- Blog Post Outline Example
- Outlining Tips From HubSpot Bloggers, Buffer, and Todoist
.png)
6 Free Blog Post Templates
Save time creating blog posts with these free templates.
- "How-to" Post
- "What is" Post
- Listicle Post
- And More!
Download Free
All fields are required.
Form not available
A Blog Post Outline vs. Content Brief
Content marketers and writers often confuse a content brief with a blog post outline. They’re related, but not the same, and mixing them up can derail your process.
A content brief comes first, usually designed by a content lead or SEO strategist. It answers the “what and why”:
- Target keywords and related terms.
- Search intent and audience persona.
- Goals (rankings, conversions, backlinks).
- Tone of voice and brand guidelines.
- Must-have elements (internal links, CTAs, examples).
It’s the blueprint for the writer, editor, or content manager from which they design an outline.
So, the blog post outline comes second. This is where I step in and turn the brief into the “how”:
- H1, H2, and H3 structure.
- Logical flow of arguments.
- Bullet points, examples, stats, or anecdotes.
- Notes for visuals, quotes, or internal links.
- Product embeds recommendations.
- EEAT guidance.
Brief = strategy. Outline = execution.
How to Write a Blog Post Outline: A Step-by-Step Formula
A strong outline is half the battle in writing a great article. It keeps your post aligned with SEO goals and ensures the final piece actually answers what readers came for.
1. Start with topic and keyword research.
If you’re working with a large content team, this step might already be done for you by an SEO strategist since keywords and intent live inside the content brief.
With lean content teams, you don’t have this luxury, so you’ll need to run this step yourself. I work with different teams, so my process also includes keyword research from time to time.
Let’s use “content outline template” as our example keyword.
Step 1: Check search volume and difficulty (Ahrefs).
In Ahrefs’ Keywords Explorer, type content outline template. You’ll see global search volume, keyword difficulty (KD), and CPC. For instance, content outline template has consistent monthly searches, low difficulty, and clear ranking potential. Worth pursuing?

Step 2: Explore variations and related terms (SurferSEO / Ahrefs).
In Ahrefs, look at “Matching terms” or “Also rank for.” You’ll find variants like seo content outline template, blog post outline, or outline generator. At this point, I took a step back and broadened KW to content outline because content outline template clearly doesn’t suffice for a standalone post, but will make for a good H2.

In SurferSEO’s Keyword Research and Topic Research, you’ll get keyword clusters and semantic terms Google expects to see. That means you’ll know which supporting terms to include in your outline.
For my initial KW, there wasn’t much, either, so I ran a search for content outline and chose to stick with this KW.

2. Define search intent.
If a keyword tells me what people type, intent tells me why they type it. How do I figure it out?
Step 1: Review the SERP (Google).
I start validating intent by simply typing content outline. The top results are how-to guides like “How to Write a Content Outline,” “Content Outline Examples,” and templates. That tells us the intent is informational + instructional.
Primary intent: tutorial.
Step 2: Identify sub-intents.
Here, I skim a few top-ranking posts. Most of them focus on the step-by-step process, while others provide ready-to-use templates. That means my outline should cover both angles: the how and the what.
Step 3: Confirm with SEO tools (Ahrefs / SurferSEO).
In Ahrefs, I look at “Traffic potential” and SERP features. If you see “People Also Ask,” note the exact questions Google is surfacing (e.g., What is a content outline?, What is a content outline example?, How do you write one?). The SERP also includes images and an AI Overview.
In SurferSEO, check the Outline Builder. It highlights common headings from competitors. This confirms the core user expectations.

Having decided on the KW and the intent, we’re ready to start content outlining.
3. Analyze competing posts.
Before you lock your outline, look at the articles already winning the SERP. Review them for structure, subtopics, and content gaps you can fill.
You can do it manually, like in the previous step, or with the help of SurferSEO — which I prefer.
In the Content Editor, I use the AI assistant called Surfy to compare competitors’ outlines and pull out the H2/H3 patterns competitors use, along with unique angles. Then, I ask Surfy to create a simple outline based on those.

I note down how many and what types of images competitors use, product embeds, bullet lists, their tone of voice, and video embeds.
Lastly, I benchmark the length of the post. Actually, I just follow Surfer’s guidelines:
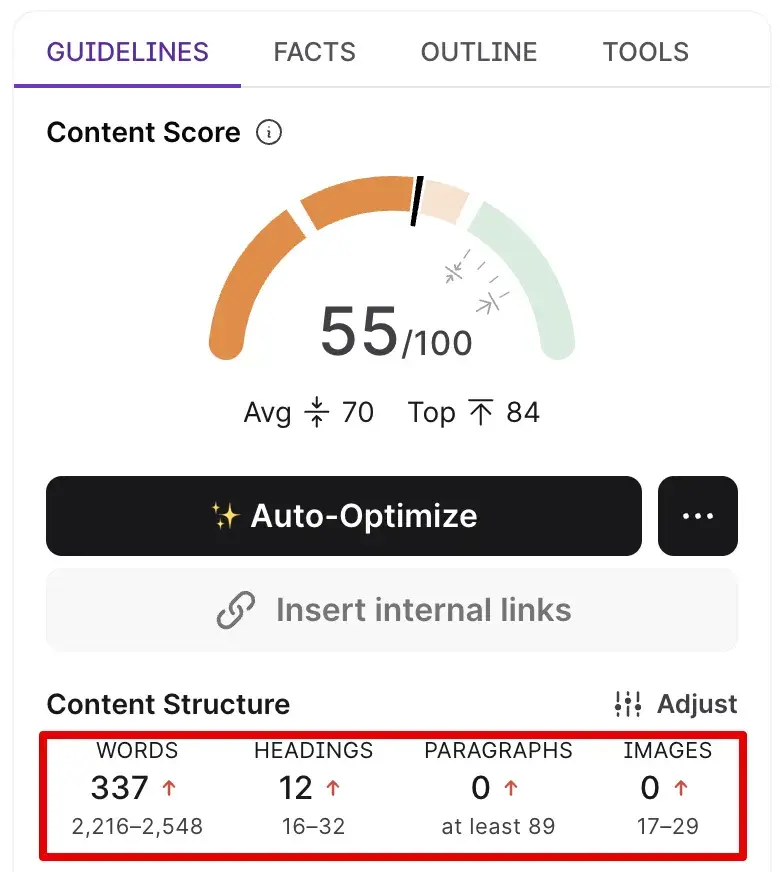
But when I assign a brief to a content writer, I never limit them with this word count. If they have to say more, be it — but not less.
4. Decide on your unique angle.
For me, this is the most challenging part when developing blog post outlines.
Take our example: The top results for content outline all look the same. Each starts with a definition, covers why outlines matter, and ends with a step-by-step process and template.
What fresh perspective can I bring to the table while considering that I have to meet the baseline SEO expectations so Google sees my post as relevant?
Here’s the trick.
I prompt ChatGPT to do the job and ground its recommendations on fresh industry trends (2024–2025 data), subreddits, LinkedIn posts, case studies, podcasts, etc. This way, I know the LLM will pull up proper research.

The ChatGPT’s suggestions are blowing my mind:
- Add a mini‑section on AI‑optimized outlines like Google’s AI Overviews and GEO/AEO strategies — that’s it!
- Operationalize AI-first content workflows.
- Highlight how the content outline strategy now needs to think beyond blogs — repurposing content into TikToks, LinkedIn posts, YouTube shorts, bingo!
- Add micro-interviews.
Basically, I’ll differentiate my blog post outline with new data, personal POV, GEO/AEO tips, and better examples.
Warning: Don’t let AI decide on the entire angle! Jot down what competitors’ articles were missing for you (i.e., I wanted to see more AI tools and more external workflows). Also, incorporate your lived experience. Stitch everything together.
6 Free Blog Post Templates
Save time creating blog posts with these free templates.
- "How-to" Post
- "What is" Post
- Listicle Post
- And More!
Download Free
All fields are required.
Form not available
5. Draft a working title and H1.
Get your ChatGPT or Claude to do the work. Your input decides the quality of the output. Here’s what I ask ChatGPT to consider when developing blog titles:
- Plug [PRIMARY KEYWORD] into the title.
- Look at how competitors phrase theirs and spot a pattern.
- Add a differentiator based on [INSERT UNIQUE ANGLE].
Here’s my prompt:
Draft a working title and H1 for the [KW]. Offer several options with different intents based on the outline and unique angle. Look at how competitors phrase theirs and spot a pattern. Add a differentiator.
Analyze the answer and modify suggested titles as needed.
6. Map out H2s and H3s.
Create a logical structure with a clear hierarchy based on your unique angle, competitor analysis, and keyword research. Explore subreddits on a given topic and the People Also Ask boxes to identify common concerns and address them.
I use ChatGPT to simplify the process and save hours. Save my prompt to develop a content outline:
You are an SEO content strategist. I need a blog post outline that is:
- Based on the keyword: [INSERT PRIMARY KEYWORD].
- Optimized with these secondary/semantic keywords: [INSERT LIST].
- Aligned with this positioning/unique angle: [INSERT YOUR ANGLE STATEMENT].
- Structured for SEO and readability (clear H2/H3 hierarchy).
- Informed by competitor baselines (common sections they include: [LIST COMPETITOR H2s/H3s]).
- But differentiated by covering missing pieces competitors skip (e.g., [LIST UNIQUE ANGLES: brief vs outline, AI Overviews, team workflows, etc.]).
Deliverables:
- A complete outline with H2s, H3s, and H4s (if relevant).
- Keep it scannable and writer-ready.
For the secondary keywords, I turn to SurferSEO and simply copy them all.
Your initial blog post outline with all headings and subheadings might look like this:

7. Add bullets, notes, examples, product embeds, and CTAs.
Actually, you can skip this step and let your writer expand on every heading in the outline based on their lived experience, research, customer interviews, and expert tips.
Adding explicit guidance or not largely depends on the internal content production process. I prefer adding a few bullets, examples, and notes for the writer to include. First, I ask ChatGPT to do that, and then edit the output.
My prompt for AI writing assistants to expand on the outline:
Under each heading, bullet notes of what content should go there (key points, examples, data, CTAs).
Then, I copy and paste it to Google Docs and give concrete pointers, along with product plugs and CTAs.

At this stage, your outline comes with 90% of the writing done. Drafting the whole article will feel like filling in gaps, not building from scratch.
As a bonus, you’ll receive content that matches or even exceeds your expectations.
For the final step, copy and paste your outline back to SurferSEO and share it with an assigned writer. This speeds up keyword optimization, as the writer can clearly see which terms are mentioned and which are not.

Optimizing Your Blog Post Outline for AI Overviews and LLMs
As both Google’s AI Overviews and LLMs like ChatGPT and Perplexity reshape how people discover answers, your outline must be tailored to new SEO realities. Recent Semrush research shows that ChatGPT usage doesn’t cannibalize Google traffic; it actually expands how people search.
That means you’re optimizing for both search engines and AI-powered responses.
To increase your odds of content being cited by LLMs or surfaced in AIO, instruct your writers with:
- Lead with short definitions. Kick off key sections with 1–2 crisp sentences that answer the query directly.
- Use numbered lists, bullets, and subheadings to make it easier for Google and LLMs to parse.
- Cover sub-intents. If people want both how-to and examples, include both. The AI summary is more likely to cite you.
- Use clear section headers. LLMs rely heavily on H2/H3 structure when pulling answers.
- Answer conversational queries. Anticipate queries like What is a content outline? or Why use one? and address them explicitly.
- Add fresh stats from external publications.
- Optimize alt text. Make it descriptive and include primary or secondary KWs.
- Weave in lived experience. Make up examples, show workflows, or quote experts. LLMs often pull up original content.
Blog Post Outline Example
Now, let’s see how all the lessons are stitched together in one outline.
Title (working): How to Create a Content Outline for AI‑First Search [Step‑by‑Step Guide + Expert Tips]
Intro.
Primary KW: content outline
H2: Why Content Outlines Matter More Than Ever
- H3: What changed in 2024–2025 (AI Overviews, LLMs & zero‑click)
- [Definition lead] In the AI‑first era, your content outline is a structural signal that helps search engines and LLMs extract answers quickly.
- Explain AI Overviews, zero‑click trends, and why structured frameworks win visibility. Add corresponding stats.
- Q&A box: “Do outlines still matter if AI summarizes everything?” → Yes; they increase the odds of inclusion/citations.
- AIO/LLM instruction: Use a crisp definition first; then bullets on impacts.
- H3: Business Impact
- Faster writing process, fewer rewrites, clearer logical flow.
- Better chance to win snippets, PAA, links → more traffic.
H2: What Is a Content Outline?
- H3: Definition & purpose
- [Definition lead] A content outline is the hierarchical plan of headings, key points, and evidence that guides the draft and signals structure to search engines.
H2: Content Outline Examples
- Add a few images to show how different companies approach outlines.
H2: Step 1 – Perform Keyword Research That Powers the Outline
- H3: Expand from seed keyword to clusters
- H3: Evaluate SERP viability
H2: Step 2 – …
- H3: …
- bullets
- bullets
- H3: …
- bullets
- bullets
6 Free Blog Post Templates
Save time creating blog posts with these free templates.
- "How-to" Post
- "What is" Post
- Listicle Post
- And More!
Download Free
All fields are required.
Form not available
Outlining Tips From HubSpot Bloggers, Buffer, and Todoist
Ever wonder how top brands create dozens of outlines for their writers? Me too. I sat down with content teams from HubSpot, Buffer, and Todoist and inquired about the nitty-gritty details of their content creation processes.
It’s eye-opening.
1. Sloppy outlines won’t make it; give specific instructions to writers.
HubSpot assigns between 40 and 120 posts a month to freelance writers and receives great content back. Here’s how Kaitlin Milliken, senior program manager at HubSpot, makes this real:
“When working with external writers, I try to give specific enough instructions that people know what we’re looking for at the start. That includes the specific headers we want them to include in the post, the number of stats to feature, images, KW instructions, and data sources.”
Hailley Griffis, head of communications and content at Buffer, also highlights the importance of detailed outlines to ensure outstanding content quality.
She says, “For much of our blog content, we make fairly detailed outlines. We list all the headings, all the talking points, all the links, and all the potential visuals that we might use. All of the keywords are also highlighted throughout the outline.”
So, why do top brands invest so much time in outlines?
Griffis gladly explained, “We essentially like to make the outlines something where you can really get a sense of the piece before moving on to spending more time drafting.
“The goal is that when someone looks at our outline, they should have a clear picture of exactly what the final article will look like and cover. That way, if we need to make any adjustments to what we want the final blog post to look like, we can course-correct at the outline stage.”
2. Guide your writers to add product plugs.
Imagine being a freelance writer for HubSpot or Buffer. Do we have to know the product inside out to write practical tutorials? Or to have hands-on experience with all the features?
Yes and no.
At Buffer, Griffis gives freelance writers specific guidance on product plugs in the outline, while the in-house team makes decisions on their own.
She says,“Since our in-house team knows our product and brand so well, they have the context to make those decisions as they’re writing. But for freelance writers, we want to be more prescriptive about exactly which features to highlight and where, so that gets built right into the outline.”
And for HubSpot?
The team handles it in three ways:
- Writers are given just links to the products/features that have to be mentioned.
- Milliken explicitly points out features to be included under specific headings.
- Some articles are assigned only to writers with hands-on experience, so they are flexible with product embeds.
I work with all three types of blog outlines and delve beyond them, exploring the knowledge base, CRM, and video tutorials. So, as living proof, I can say that Milliken’s approach works great.
3. Write blog post titles that tap into pain points and deeply connect with your readers.
I’ve always wondered how and why Todoist’s blog titles and articles don’t sound as SEO-optimized, while the content ranks high and acquires leads.
I wanted an answer, so I reached out to Todoist’s content lead, Naomi Liddell, and found out how Liddell’s team approaches blog outline creation for both in-house and freelance writers.
“First and foremost, our titles are designed to engage with the intended reader. Keyword research is one input, but it’s never the whole story. We start with what our users actually struggle with: the ‘overwhelmed professional’ who wants clarity in both work and life.”
Liddell continues, “Sometimes that comes from data (search volume, customer questions in support tickets), other times it comes from listening to our community in comments, social, or user interviews. Once we know the core pain point, we balance clarity (so readers immediately know what they’ll get) with personality (so it feels human and a little delightful). The best titles sit at that intersection: they solve a problem, but they also make you want to click.”
She highlights: “The throughline is always a deep empathy with the reader.”
4. Have your freelance writers create outlines from briefs to ensure an ideal brand voice.
I couldn’t resist and asked Liddell for more outlining tips. I inquired about the details of her blog post outlining process to ensure that freelance and in-house writers turn in great articles with minimal revisions.
“We have an article brief template that gives our freelance writers all the information they need to craft the perfect outline:
- The audience pain points.
- The key benefits to highlight.
- The SEO opportunities.
- The narrative arc that ties it together.
Then we hand over the actual outline drafting to the person who is researching the topic in depth, the writer.”
Liddell also shared that quality feedback at the outline stage means the finished post requires minimal edits.
To sum up, great articles come from alignment: If a writer understands Todoist’s voice (human, trustworthy, affirming) and their content philosophy (depth over breadth, expertise paired with relatability), then the writers deliver something that feels like Todoist.
Liddell also doesn’t expect new contributors to magically “get it” on the first draft: “The outlining process is where we transfer that knowledge and set them up for success.”
As you see, there’s no silver bullet for all content teams. It all depends on the product complexity, the amount of content, and the writers. If detailed outlines work better for your niche, go for it.
Or you can take Naomi’s approach and let your writers handle this part — and still receive outstanding content!
5. Use AI to speed up outline creation.
Yes, top content teams use LLMs to create more content.
Hailley Griffis from Buffer says that since AI adoption, AI definitely helps with structure and formatting, and accelerates the process from idea to detailed outline.
Yet, she highlighted the following: “But we like to add a lot of personal experience to our content, and AI can’t do that part. So we use AI to get the foundation in place more quickly, and then we focus our human effort on the parts that really matter — adding our unique perspective, personal stories, and the voice associated with the Buffer brand.”
Kaitlin Milliken from HubSpot also recognizes the power of AI and has already implemented it into her outlining process.
“For SEO and AEO content, we now get outlines from AirOps, an AI tool. I start with a detailed prompt. I want to include not only the primary and secondary keywords, but also information about the persona and what type of article I want to create.
“If I want to make a step-by-step guide, listicle, or comparison piece, I make sure to add that to my prompt. I then specify how detailed I want the outline to be. I may want broad H2s or a full breakdown with bullet points.”
But as we know, AI hallucinates big time. So Milliken never lets it pass to writers without her looking closely at the output.
“I always make sure to review the outline. If anything seems particularly confusing, I’ll add specific instructions that make the section clearer. For example, we may want a list of best practices. If I want to make sure quotes are included in that section, I would write that out specifically.”
6. Unlock your creativity with powerful AI prompts to develop headings no blogs have covered.
If you’re struggling to think of sections for your blog posts, HubSpot’s Senior Marketing Manager, Basha Coleman, suggests getting really good at writing descriptive prompts for generative AI tools like Claude or ChatGPT.
“Your prompt should explain your level of experience, your end goal for the piece, and the audience you’re targeting. I also like to ask it to cite competitor posts that don’t have any of the sections it’ll recommend. This ensures you’re not rewriting the same talking points as everyone else, and instead are finding competitive content gaps you can cover.”
Outline strategically for stronger writing.
My biggest takeaway as both a writer and content manager is that the better the outline, the better the writing will be.
I like to think of my outline as directions in Maps. It tells the writer exactly what to do to get to the destination, but the writer is the one who actually has to travel the course. The clearer the directions, the stronger the execution will be. When I’m writing and start going down a rabbit hole or feel stumped, I always turn back to the outline to re-focus and realign myself.
Next time you sit down to write a blog post outline (either for yourself or another writer), remember that a good outline always includes keywords, logically ordered headings, a defined audience, and an angle that aligns with intent. With these basics alone, your blogs will be stronger — but don’t forget how AI can help you with the process, too.
Editor's note: This post was originally published in May 2014 and has been updated for comprehensiveness.
6 Free Blog Post Templates
Save time creating blog posts with these free templates.
- "How-to" Post
- "What is" Post
- Listicle Post
- And More!
Download Free
All fields are required.
Form not available
Blogging

![HubSpot's 2025 State of Blogging Report [Data from 500+ Marketers]](https://53.fs1.hubspotusercontent-na1.net/hubfs/53/untitled-design-4-67880d8b2a3db.webp)


![19 Types of Blogs that Make Money in 2025 [+Examples]](https://53.fs1.hubspotusercontent-na1.net/hubfs/53/blogs-Jan-05-2024-05-12-25-3281-PM.png)
![The Top 3 Reasons Consumers Read Blogs & How to Attract Them [New Data]](https://53.fs1.hubspotusercontent-na1.net/hubfs/53/202_Reasons-Consumers-Read-Blogs.png)