.png?width=112&height=112&name=Image%20Hackathon%20%E2%80%93%20Horizontal%20(24).png)

If you want to learn how to build a survey, the most important thing to know is that an excellent survey respects your time. It should be succinct, ask the right questions, and provide valuable insights. As a respondent, I’m quick to bail if a survey is too long, confusing, and repetitive.
If you want people to complete your survey and give you meaningful feedback, it needs to be purpose built, easy to understand, and quick to finish.

In this post, I’ll walk you through how to create a survey in a few easy steps, plus I’ll show you how to create surveys using popular platforms like Google, Facebook, SurveyMonkey, and more.
Table of Contents
- How to Create a Survey in 15 Steps
- How to Make a Survey in Microsoft Forms
- How to Make a Survey in Microsoft Word
- How to Make a Google Survey
- How to Create a Survey on Facebook
- How to Make a Poll on Facebook
- How to Create a Survey on SurveyMonkey
- Create a Survey People Will Want to Take
.webp)
5 Free Customer Satisfaction Survey Templates
Easily measure customer satisfaction and begin to improve your customer experience.
- Net Promoter Score
- CSAT Score
- Customer Effort Score
- And more!
Download Free
All fields are required.
Form not available
How to Create a Survey in 15 Steps
- Define your survey objectives.
- Research your target audience.
- Determine the best distribution method.
- Plan your survey timeline.
- Choose the right platform.
- Keep it short.
- Avoid 'yes' or 'no' questions.
- Use survey logic to create personalized paths.
- Randomize your answer options.
- Offer an incentive for completing the survey.
- Keep your tone neutral.
- Use matrix questions judiciously.
- Try out a template.
- Include a “red herring” question to weed out inattentive respondents.
- Test your survey before launching.
In a few straightforward steps, you can create a survey that provides your team with the information it needs while keeping your respondents engaged throughout the entire survey.
1. Define your survey objectives.
What do you want to learn from your survey?
Surveys can serve a range of goals, including gauging customer satisfaction, gathering feedback on a new product or feature, discovering customer pain points, and much more. Be specific when crafting the objective of your survey so you can create the most relevant questions.
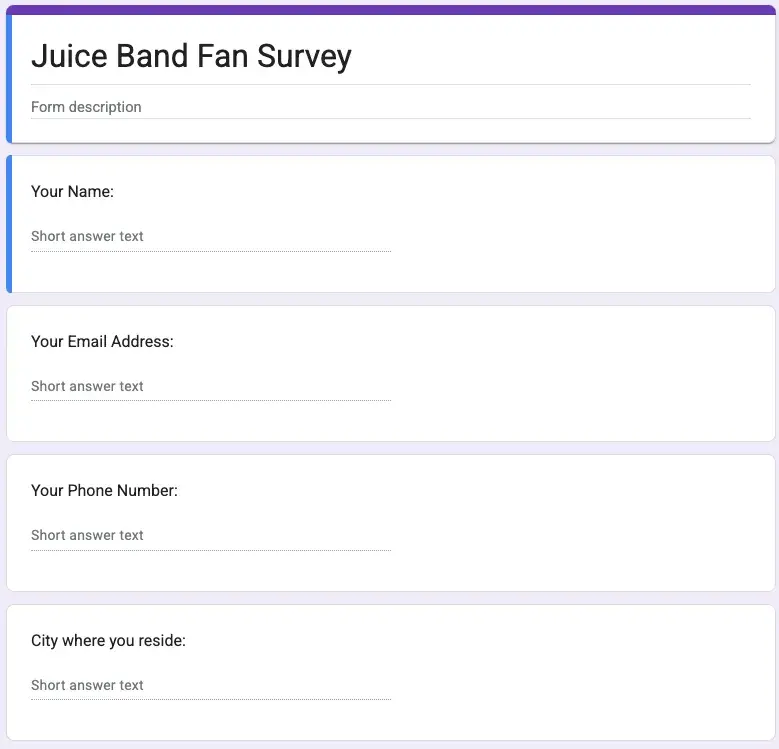
Example:
I play bass in a touring band, and I want to survey our fans (customers) to learn what songs they want to hear live, what kind of merch they are into, and what cities we should hit on our next tour.
My objectives are to:
- Pinpoint fan-favorite songs for our live set.
- Gather feedback on merch ideas before ordering inventory.
- Prioritize tour stops based on demand.
2. Research your target audience.
Knowing your survey audience helps you ask better questions and get more helpful answers.
Before you write your first question, learn more about your audience — including demographics like age, gender, education level, and geographic location. The most important traits for your survey will depend on your brand and goals, but knowing them helps you connect with your audience and get better answers.
Example:
Based on Spotify data, our fans are pretty evenly split between males and females, with 53% of listeners falling between the ages 25-34, followed by 24% between 18-24. The overwhelming majority of listeners are based in the US, with our top cities being New York, Chicago, and Los Angeles.
With this information in mind, I’ll write the survey using a casual, Millennial/Gen-Z friendly tone, keeping the questions short and ensuring everything is mobile optimized. Since most of our fans live in major cities, I’ll prioritize these locations in questions about tour stops while providing an open response field for fans to suggest smaller markets.
3. Determine the best distribution method.
Now that you know your audience, you’ve got to figure out how to reach them.
Where do they spend time? Do they frequent social media, or are they more likely to respond to a survey via email? Luckily, your demographic information will inform many of these questions. The proper distribution method can make or break your survey, so meeting your audience where they are is critical.
Example:
My first instinct is to distribute my survey through social media. Most of our fans are Millennials and Gen Z, so it’s a safe bet to assume they are social natives. Instagram is our most active channel, so starting there is natural.
We also maintain an email list of fans who have bought merch and signed up for updates, so I’ll send the survey straight to their inboxes. To reach people at shows, I’ll display a physical QR at our merch table that links directly to the survey.
Since 60% of surveys today are submitted on mobile devices, I'll make sure mine is easy to read, scroll, and submit on a phone.
4. Plan your survey timeline.
A good survey isn’t one you just cook up out of nowhere. It should be planned and launched with intention. Planning a clear timeline with a start and end date helps you stay organized and gives your respondents a sense of urgency, which is especially relevant if you offer a juicy incentive.
Survey responses tend to peak mid-week, so a Wednesday or Thursday launch date is a solid move.
Example:
I plan to launch my band’s survey midweek ahead of our upcoming tour. On launch day, I’ll send an email and post to social media, and I'll keep survey responses open for the duration of our tour (usually about one month). That gives fans plenty of time to give feedback online or at a show.
5. Choose the right platform.
Before you craft the first question, you’ve got to figure out where your survey will live. These days, there are plenty of survey platforms to choose from, and the right choice depends on your goals.
If you need detailed customer feedback data with powerful reporting and analysis, something like HubSpot’s Customer Feedback Software is a sound choice. However, you can create lighter-weight surveys using Microsoft Forms or Google Forms.
Pro tip: Google Forms and Microsoft Forms can export results to CSV if you’d like to analyze survey data in Excel. You can also let Google’s Gemini AI create a form based on a quick prompt.
Example:
I don’t need to analyze customer feedback or do any serious reporting on my fan survey results, so I’ll plan to use Google Forms to build a quick survey from scratch and share the link via email and social media.
6. Keep it short.
Keep your survey short and sweet. The risk of survey drop-off increases as you add more questions, so think about what information you actually need to make decisions and hit your survey goals.
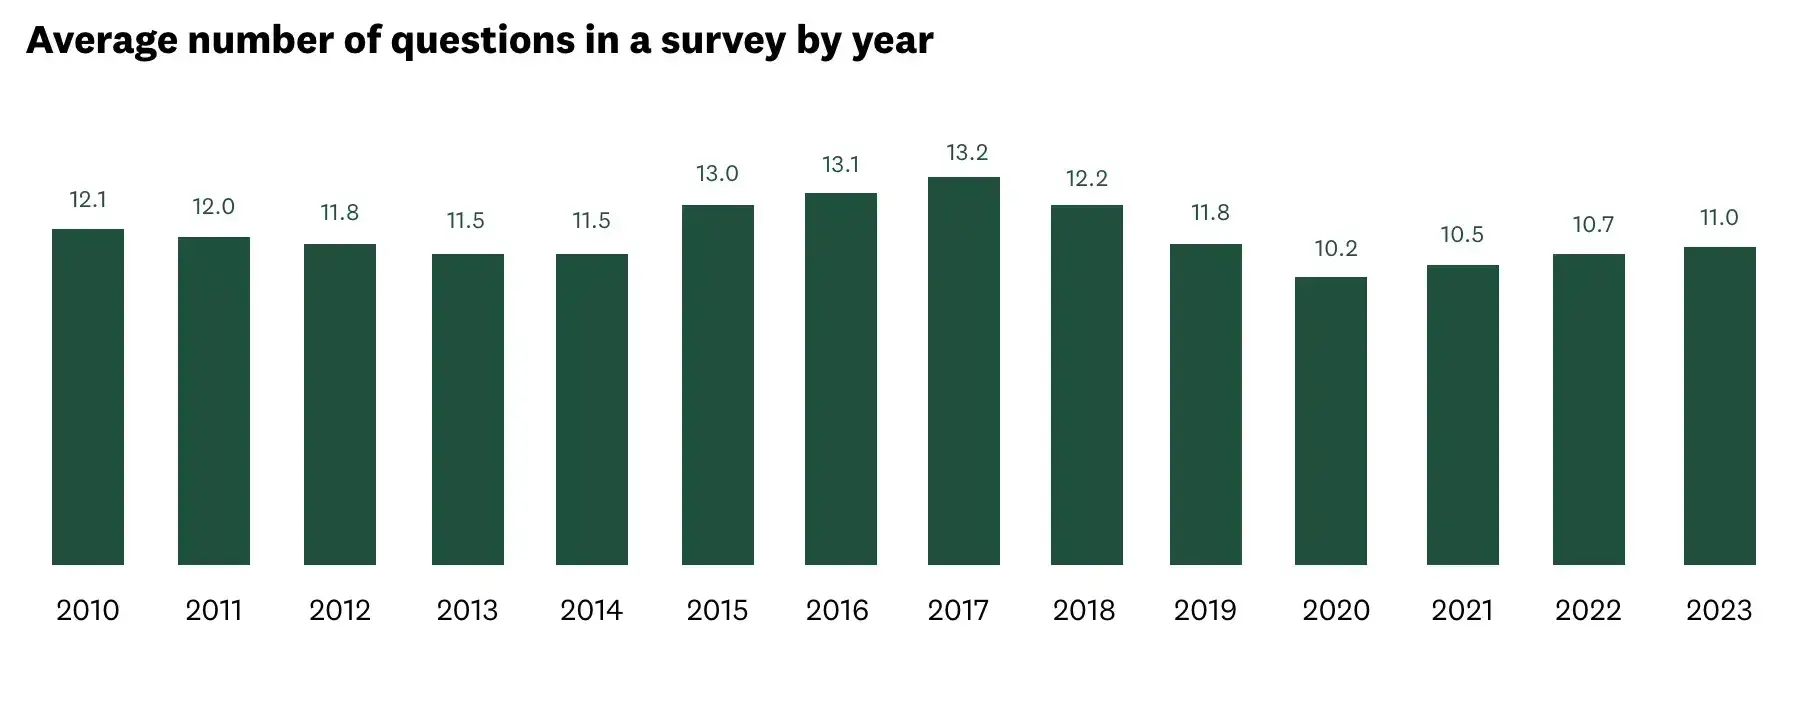
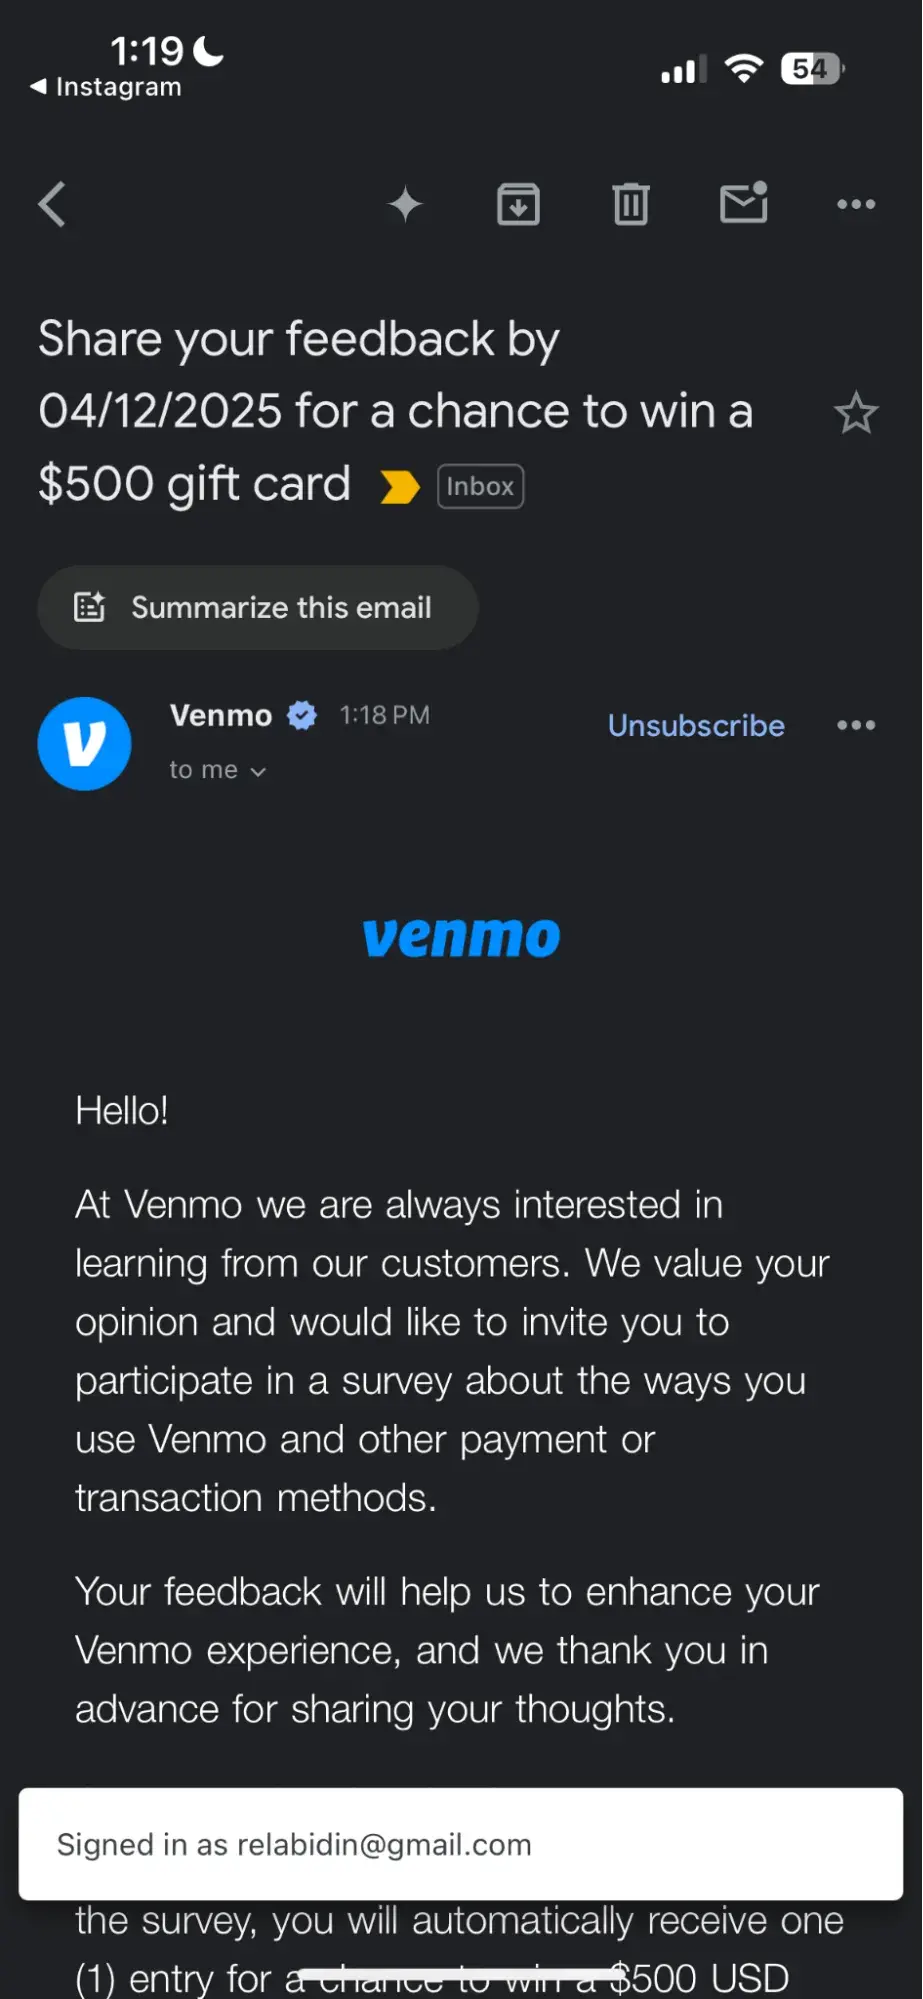
Pro tip: Aim for no more than 10-12 questions. These days, 11 questions is the sweet spot. If your survey is longer, be upfront about it. Here’s a familiar example:
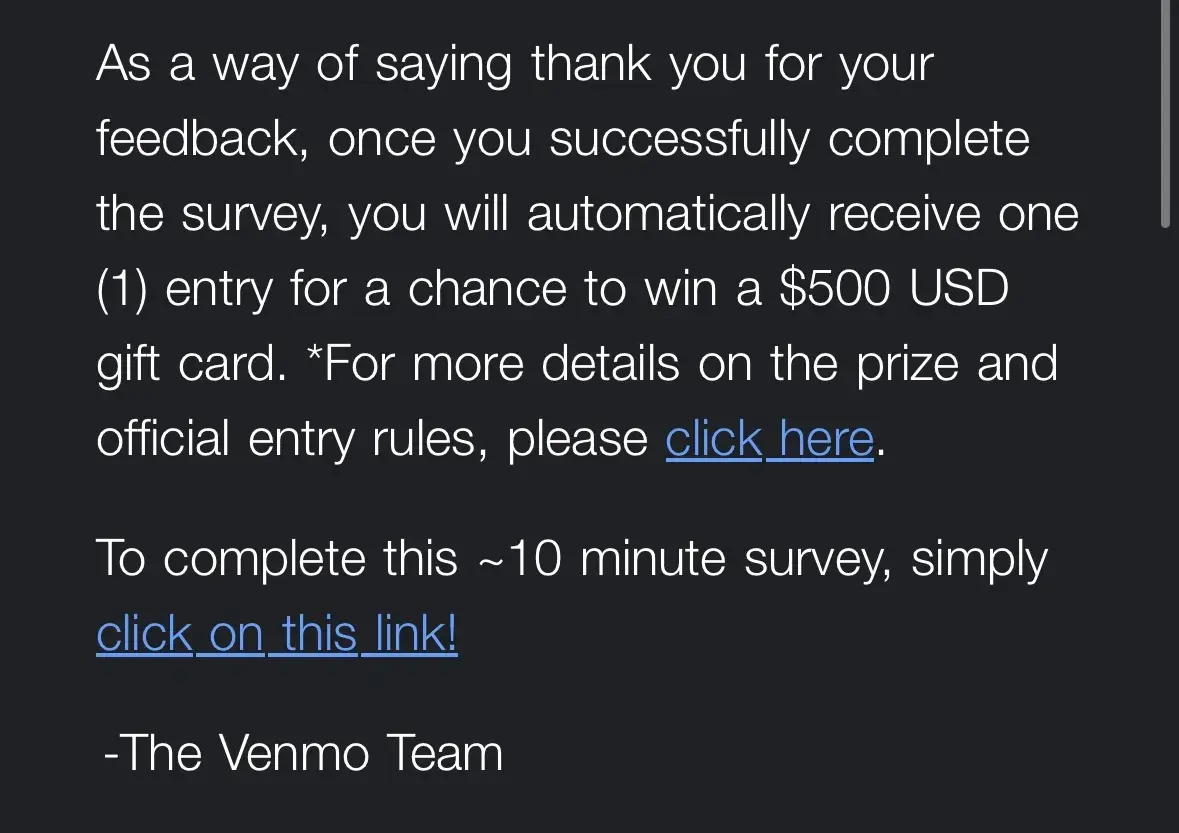
I got this email from Venmo the other day, and I’ll be honest: Ten minutes is a significant ask for my time and attention online. However, I appreciate that Venmo gave me a heads-up about the time investment. And the gamble of a free $500? Feels like a fair trade for 10 minutes I’ll never get back.
7. Avoid “Yes” or “No” questions.
Yes/No questions don’t give you much to work with. People tend to click “yes” out of habit, and these kinds of questions usually lack the context necessary for drawing valuable insights.
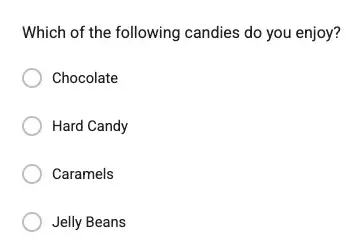
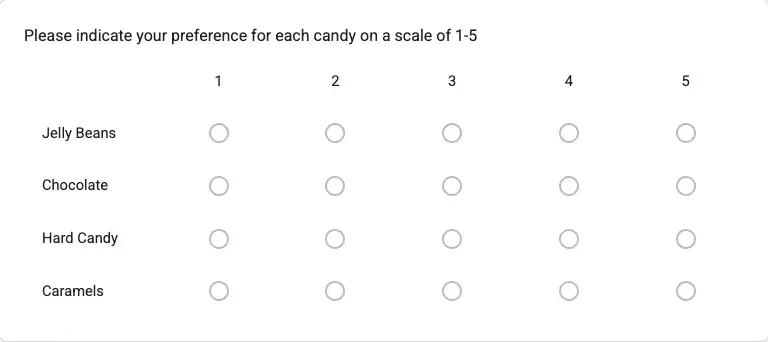
Let’s say you are a candy maker trying to understand how people feel about jelly beans. The following question won’t give you very useful feedback:

Instead, pose the question as a multiple choice or checkbox. That way, you’ll get a clearer contextual understanding of how jelly beans stack up against your other offerings:
8. Use survey logic to create personalized paths.
Survey logic, also known as skip logic or conditional branching, lets you adapt your survey based on a respondent’s answers. Taking advantage of survey logic allows you to deliver more personalized and engaging questions and cuts down on fluff that isn’t relevant to a particular respondent.
Example:
I’d use skip logic in my band's survey to hide questions about our live shows if a fan says they haven’t been to one yet. Instead, they would jump to the next section about merchandise items or streaming habits.
9. Randomize your answer options.
Just like with yes/no questions, survey respondents are likely to pick the first option of a multiple-choice question without thinking. This is called the first-choice bias or primacy bias, and it can skew your data.
Randomizing your answer options helps combat this phenomenon. Most survey options let you randomize multi-choice answers while anchoring “All of the above” or “Other” at the bottom.
Example:
If I ask fans which song they want to hear us play as an encore, I’ll randomize the order so the same track doesn’t get picked too often just because it’s listed first.
Pro tip: There are certain times when you shouldn’t randomize answers. For example, ordinal scale questions (Very Dissatisfied → Very Satisfied) or questions where respondents expect answers in a particular order (numerical or alphabetical).
10. Offer an incentive for completing the survey.
Asking for people’s time and attention can be a hard sell. Personally, I almost never fill out a voluntary survey unless there’s something in it for me.
Offer your respondents an incentive to fill out your survey.
It doesn’t have to be anything crazy. A small discount, early access to product drops, or a giveaway entry will do. What’s important is that the incentive is relevant to your audience and proportional to the time and effort necessary to complete the survey.
Pro tip: Lead with your incentive. Highlight it in emails, on landing pages, and in social posts to boost visibility and drive responses. Here’s an example:
The $500 incentive in the subject line hooked me. I investigated, and I took the survey. Proof that leading with your offer works.
11. Keep your tone neutral.
The way you phrase your questions significantly impacts responses. The goal of your survey should be to gather honest, unbiased feedback, and using leading questions or a biased tone compromises this.
Use a neutral tone and ask unbiased questions that don’t assume a particular opinion or experience from your respondents.
Example:
If I’m asking fans for their opinion on my band's latest single, here’s a leading vs. neutral question:
Leading: “Wouldn’t you agree that our new single is our best song yet?”
Neutral: “On a scale of 1-10, how would you rate our newest single?”
The leading question is biased and makes fans feel pressured to agree with me and answer the question accordingly. The second option encourages people to answer honestly, and that feedback is much more valuable.
Pro tip: Ask someone outside of your team to read your survey after you’ve written it. It’s hard to spot your own bias when you’re deep in the process. Sometimes, watching someone read it over their shoulder is enough to make those mistakes light up like a neon sign.
12. Use matrix questions judiciously.
Matrix response questions can be great for gathering a large amount of detailed feedback in one question. However, you should resist the urge to overuse them. Matrix questions require a little more attention than other question types, and you don’t want to risk overwhelming respondents and causing them to abandon your survey.
In addition, you should limit the number of rows and columns in your matrix questions to avoid scaring people away with a visually daunting table.
Here’s an example of a manageable matrix response question:
This one, on the other hand, is intimidating:
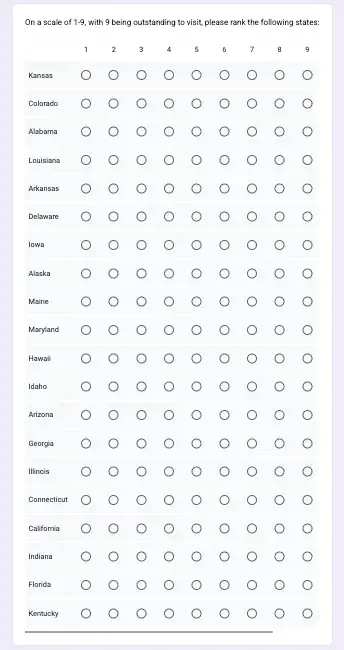
Pro tip: If your matrix question is beginning to look too dense, consider breaking it into two or three simpler questions.
13. Try out a template.
There’s no need to start from scratch. I like using a survey template to get an idea of where to start. It makes the whole process less daunting and reminds me how a well-structured survey should flow.
Whether you’re measuring customer satisfaction or gathering feedback on a new product, templates provide a solid framework that you can tweak to fit your needs.
Check out HubSpot’s 21 Best Survey Templates to help you get started.
Pro tip: Customizing your survey template is key to success. It should be a starting point you customize to match your brand voice, audience expectations, and survey goals.
14. Include a “red herring” question to weed out inattentive respondents.
Sometimes, people don’t pay attention when filling out a survey. Perhaps they are zoned out or breezing through the survey to score that juicy incentive you laid out (guilty as charged). Either way, it’s a recipe for junk data.
A red herring is a question you can use to weed out those low-effort responses. Here’s how it works:
Ask a simple demographic question at the start of your survey and the same question again at the very end. If a person's responses to these identical questions are inconsistent, that warrants investigation.
Example:
In my band survey, I could ask a simple question like:
“What country do you live in?”
Then, I’d repeat the same question later but with the drop-down list items in alphabetical order instead of putting the U.S. at the top.
If someone answers a different country the second time, they’re either a dual citizen or not paying attention. I think the latter is more likely.
Pro tip: Don’t automatically toss a response over one red herring slip-up. People make honest mistakes. Use it as a flag, not a verdict. If they contradict themselves and give a bunch of low-effort answers, then it might be time to toss it.
15. Test your survey before launching.
Before sending your survey to your entire audience, test it with a small group of people. You’d be surprised how easy it is to miss little mistakes when building a survey yourself. Sharing it with others will ensure you spot unclear questions, logical inconsistencies, or technical issues.
Do your best to share it with some friends or family members who approximate your target audience and ask them for feedback. Did any questions not make sense? Did the survey feel too long? Did you want to abandon the survey at any point?
Example:
Before launching my band survey, I’d have my bandmates review it for inconsistencies. Then, I’d share it with friends and a few superfans who are always down to help. If possible, I’d try to sit with someone as they take it to get a feel for any areas that seem clunky or unclear.
Pro tip: Test out your survey on your phone. Over half of survey completions occur on mobile, so it needs to look clean and scroll smoothly on the little screen.
5 Free Customer Satisfaction Survey Templates
Easily measure customer satisfaction and begin to improve your customer experience.
- Net Promoter Score
- CSAT Score
- Customer Effort Score
- And more!
Download Free
All fields are required.
Form not available
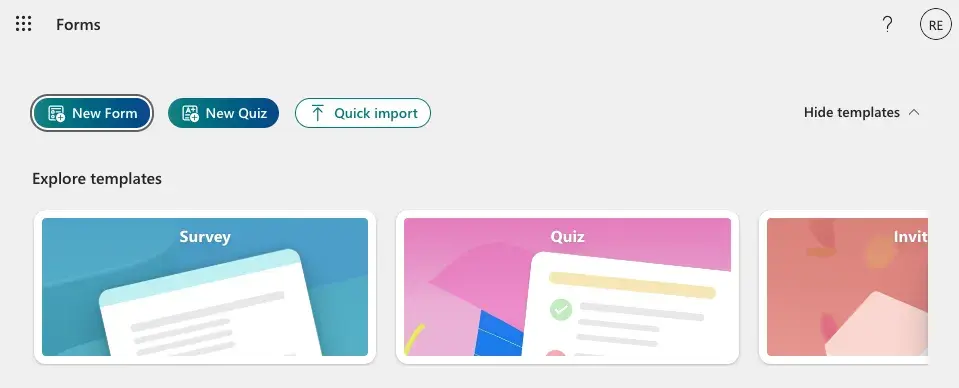
How to Make a Survey in Microsoft Forms
- Log in to your Microsoft Office 365.
- Start a new form.
- Name your form and add your first question.
- Style your form.
- Add questions and preview your form.
- Share your survey and present the results.
Microsoft Forms is the dark horse of free survey platforms. My first instinct is to reach for Google Forms when I need to generate a quick survey. However, I was impressed with how easy Microsoft Forms was to use. I found it simple to create new questions and choose from various question types, and I was impressed by their selection of attractive, usable templates.
1. Log in to your Microsoft Office 365 account.
The first step is logging in.
I already have a Microsoft Office 365 account (now called Microsoft 365 Copilot) for additional storage on OneDrive, so logging in and getting started was a breeze. All you have to do is select the Forms app, and you’re in.
You can also navigate directly to forms.office.com to skip the extra clicks.
2. Start a new form.
Click the “New Form” Button in the upper left-hand corner, and you’re off to the races. You can also start from a template (more on that later).
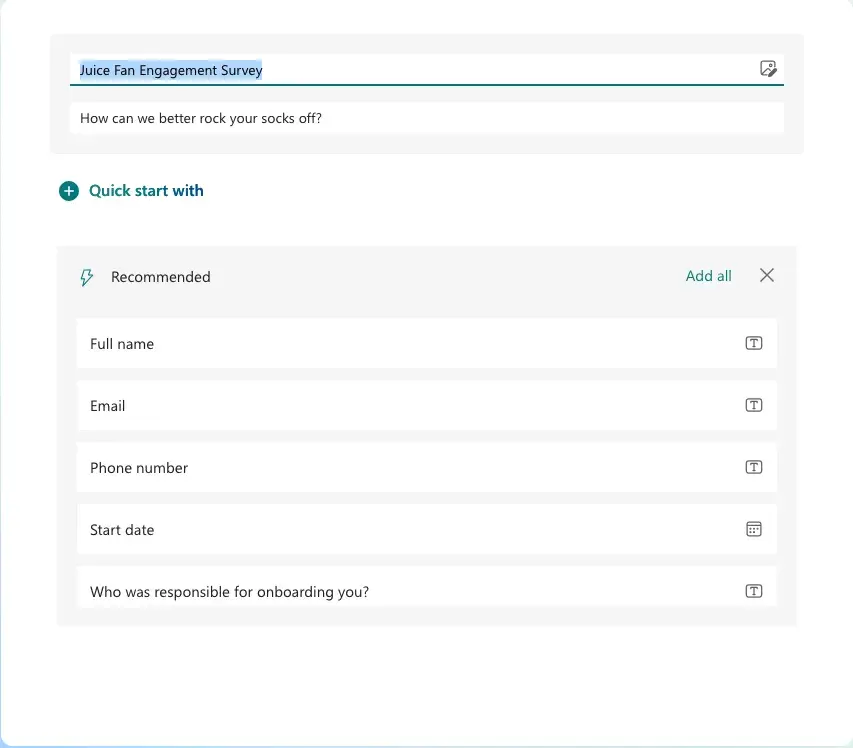
3. Name your form and add your first question.
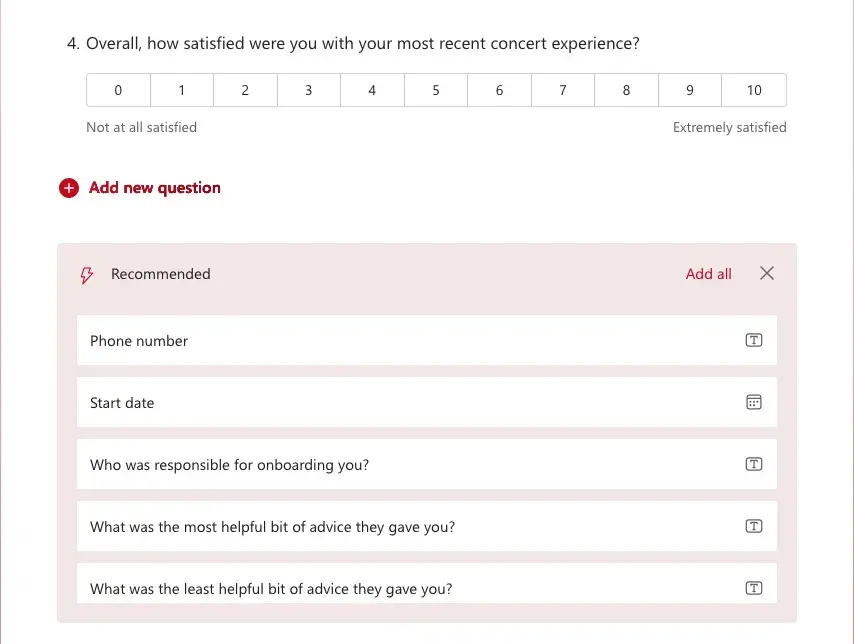
Right away, I was greeted with the opportunity to name my form, add a short description, and insert my first question. Microsoft Forms lets you “quick start” with a question type of your choice, and I was satisfied with all the available types, including more detailed ones like NPS and Likert scale questions.
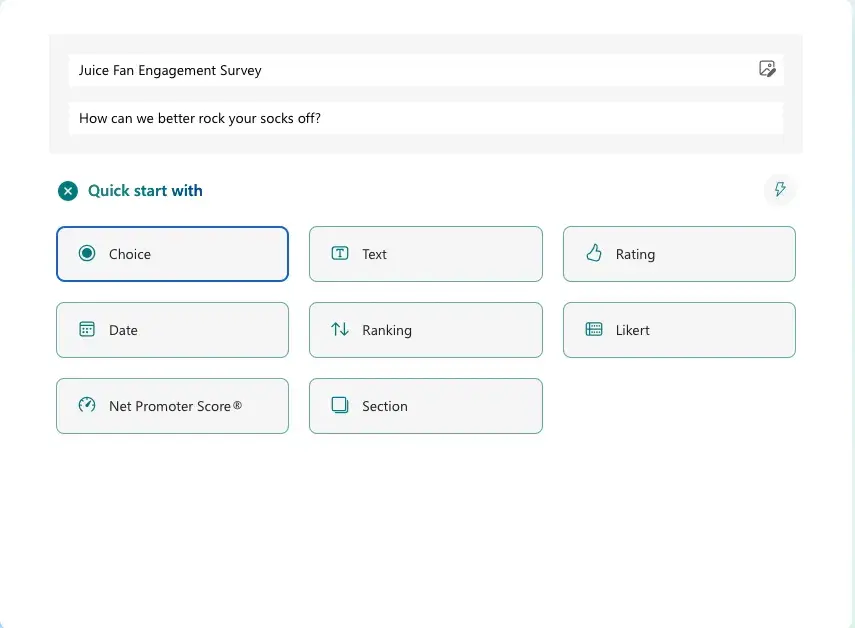
Pro tip: If you’re unsure where to start, click the lightning bolt icon (in the upper right) to open up Microsoft’s AI-powered question suggestions. I thought it was convenient that it immediately suggested fields for basic information like Name and Email. It’s a small detail, but it saves time.
4. Style your form.
Before I started filling out the rest of my survey questions, I took a moment to explore the style and layout options. Click the “Style” icon in the top toolbar to select from multiple attractive layout and style options. You can even add background music that plays as your respondents fill out the form (not sure if I recommend it, though).
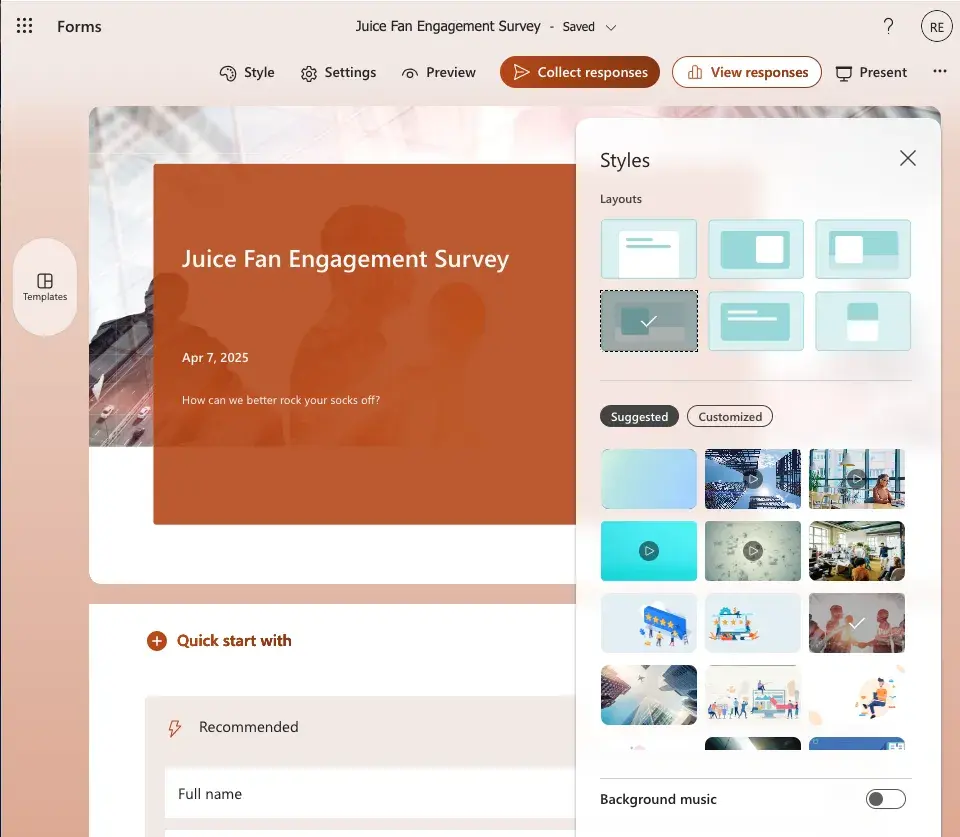
This is also a great time to check out Microsoft’s pre-made templates by clicking the button on the left-hand side:
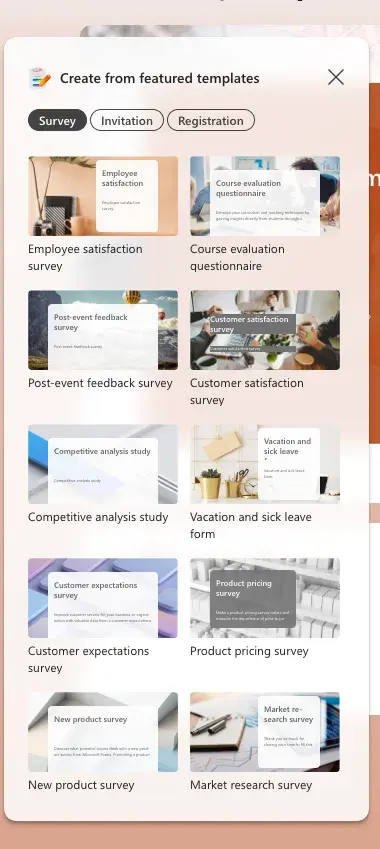
Microsoft Forms offers a variety of pre-built templates that are great for common survey goals like measuring customer satisfaction or performing market research. Each template is stylized and comes packed with relevant questions, all of which are customizable.
5. Add questions and preview your form.
Here comes the fun part: fleshing out your survey. If you’ve done your homework before starting your survey, filling out your questions should be quick and easy. Adding and editing questions is as simple as clicking the “Add new question” button or selecting and tweaking them from the AI-recommended smart list.
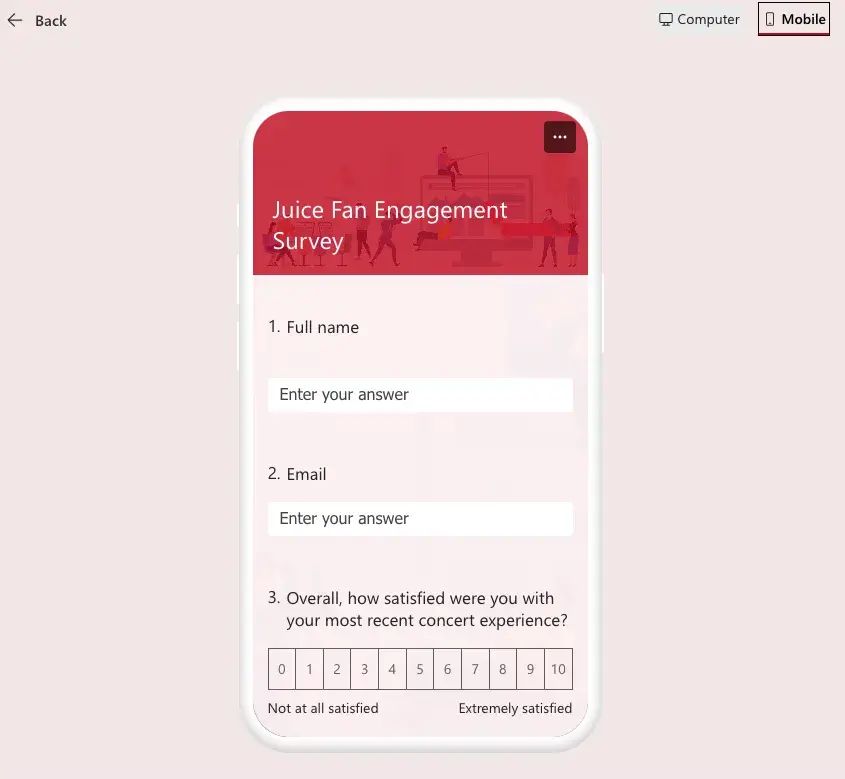
Once I finished filling in all my questions, I clicked the “Preview” button above to see how my survey looked from the respondents' POV. I liked that I could toggle between desktop and mobile view and fill in my responses.

6. Share your survey and present the results.
Once you’ve completed your survey, you can share far and wide using the “Collect responses” button on the top toolbar.
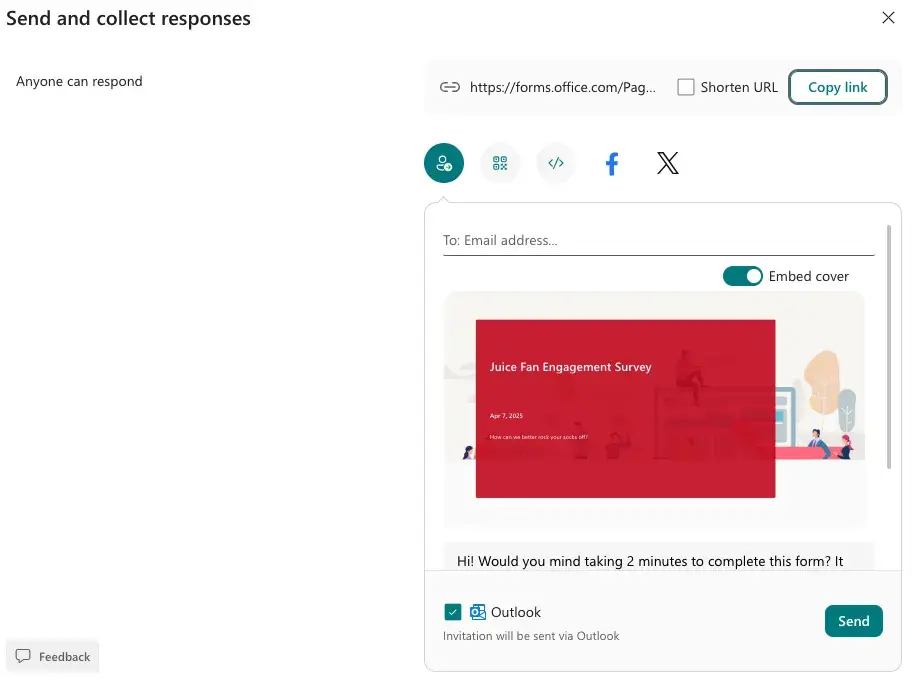
I liked that Microsoft Forms provided me with an easily shareable link and other sharing options like email, a website embed code, social media, and even a QR code for scanning.
Once you’ve collected your responses, you can easily share results with your team by clicking the “Present” button. I like that Microsoft Forms provides a link and QR code so team members can join your presentation from their screens anywhere.

Now all that’s left is turning your insights into smart business decisions. Easy!
How to Make a Survey in Microsoft Word
- Start with a blank document or search for 'Form' in the templates gallery.
- Enable the developer tab.
- Fill out your survey and add form fields.
- Input instructional text or drop-down menu options.
- Click the 'Review' tab, click 'Protect,' then select 'Protect document.'
- Share your form with recipients.
Word isn’t my first pick for survey building. Turning a Word document into a fillable form requires a little finagling, especially compared to dedicated form-building tools. You can only do it on the desktop version of Word, not the web-based version, which is free through Office 365.
That said, creating a survey in Microsoft Word can be a good idea if you are a Word power user and want to make something easily printable with visuals, detailed instructions, and customized formatting.
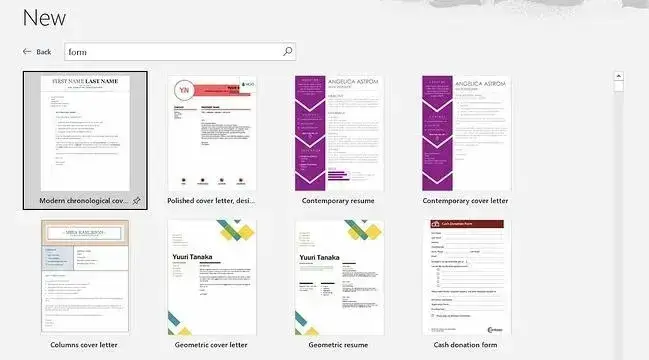
1. Start with a blank document or search for “Form” in the templates gallery.
Open Microsoft Word and decide whether to start with a blank document or search for a “Form” template in the templates gallery. I tried both, and starting with a template was much easier for my needs. If you’re looking to create a common form, such as a customer satisfaction survey, templates are the way to go.
Speaking of customer satisfaction surveys, if you’re looking for inspiration, I’ve got five free customer satisfaction survey templates that are a great starting point.
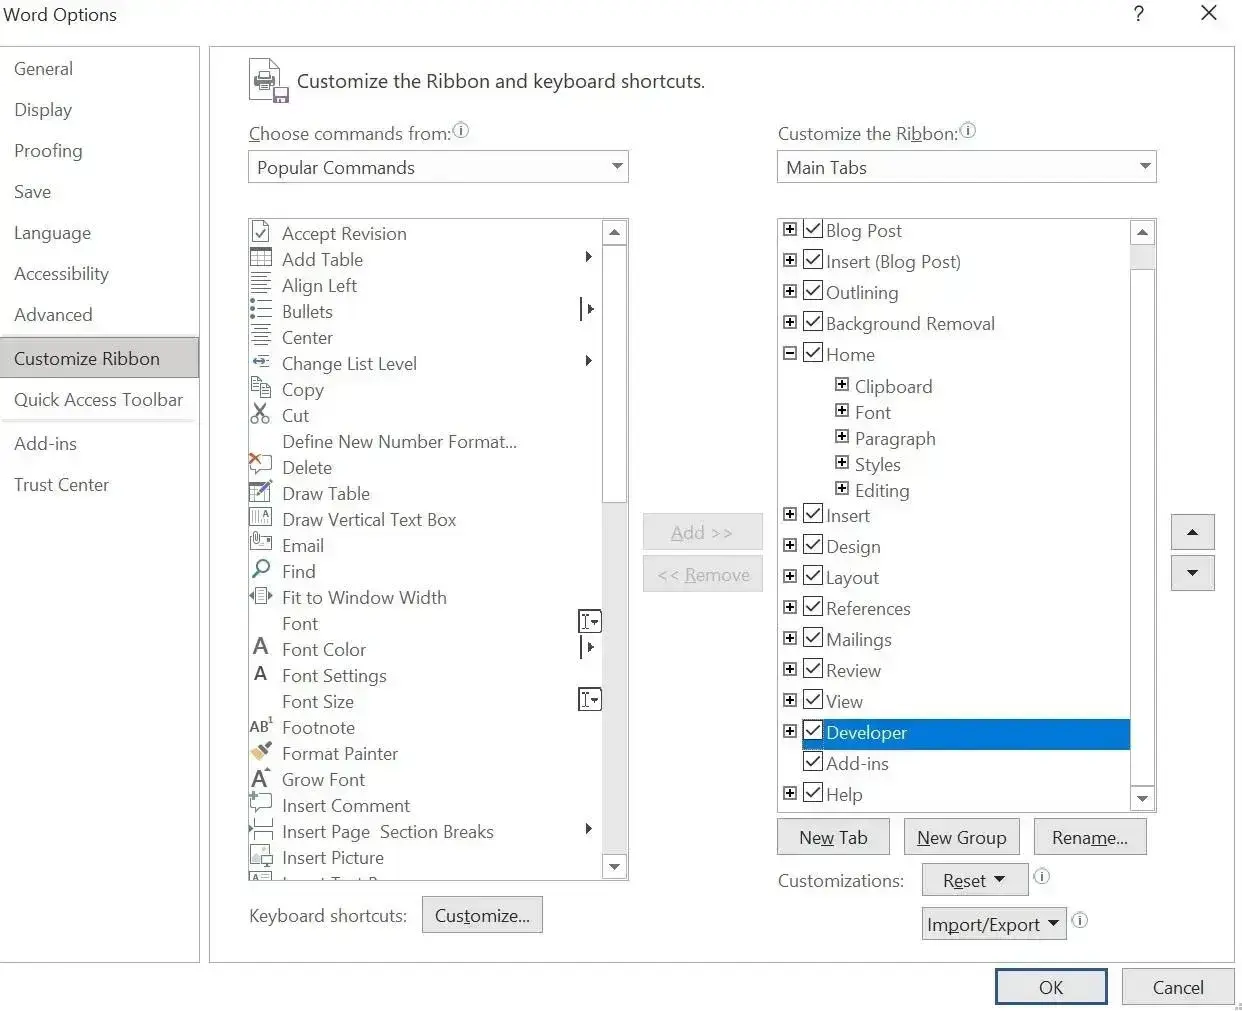
2. Enable the developer tab.
The developer tab is the key to creating the features that take your survey from a text doc to an actual form with fillable text fields, drop-down lists, checkboxes, and more. I know it sounds a little intimidating, but all you are doing is adding another tab to your top toolbar ribbon alongside “File,” “Edit,” “View,” etc.
Once you’ve enabled the developer tab, you can access Content Controls, which allow you to add text fields and checkboxes.
Here’s a great video I found that walks you through enabling the developer tab and using content control options to build a form in Word:
Here’s how to enable the developer tab:
On PC, click File > Options > Customize Ribbon > Main Tabs > Developer > OK.
On Mac, click Word > Preferences > Authoring and Proofing Tools > View > Show developer tab.
3. Fill out your survey and add form fields.
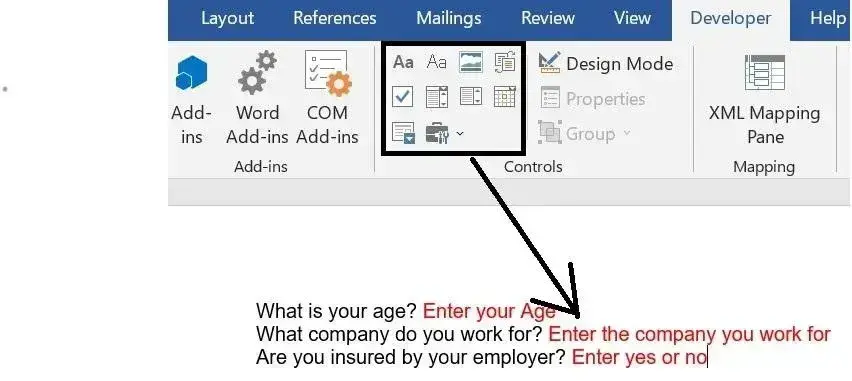
Once I enabled the developer tab, I could locate content control options, as seen above.
At this point, I typed up my survey questions and used the content control options to add the appropriate form field I needed based on each question.
Form fields included in the developer tab include:
- Text fields for short answers
- Checkboxes for multi-select questions
- Drop-down menus (Combo Box) for multiple choice
- Rich text fields for longer responses
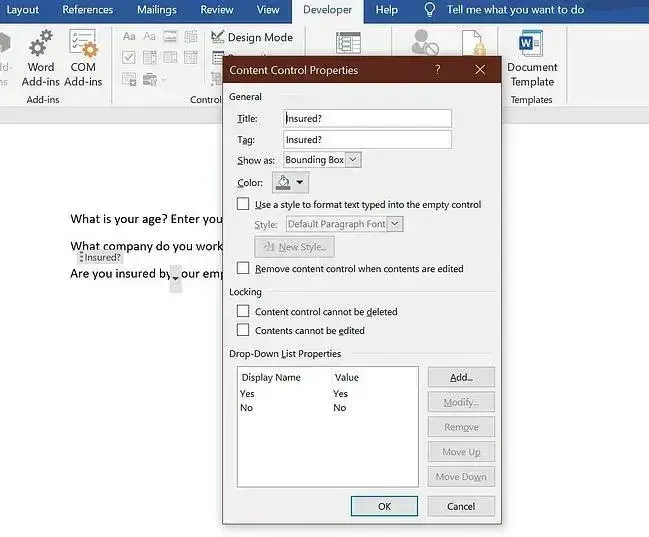
4. Input instructional text or drop-down menu options.
For questions where I've chosen the “Combo Box” control, I input the list of answer options that respondents can choose from in the drop-down menu. This ensures that they select from a predefined set of answers.
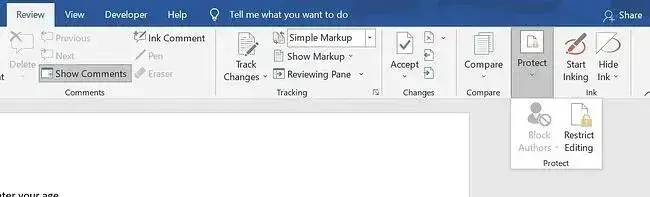
5. Click the “Review” tab, then “Protect,” and select “Protect Document.”
To prevent recipients from accidentally editing the survey questions while still allowing them to fill in their answers, I click on the “Review” tab, then “Protect,” and select “Protect Document.” This locks the survey content while keeping the answer fields accessible.
6. Share your form with recipients.
Now that my Word-based survey is ready to go, the final step is to share it. I can share it as an email attachment, print it out, or drop it in Slack. Or, if you’re so deep in the Microsoft ecosystem that you’re using Word to create surveys, you can share it on Teams.
Pro tip: Word surveys are best for small groups, like internal teams. If you are sending out to a big audience featuring customers and prospects, I recommend using Google Forms or Microsoft Forms for ease of use and clean analytics.
5 Free Customer Satisfaction Survey Templates
Easily measure customer satisfaction and begin to improve your customer experience.
- Net Promoter Score
- CSAT Score
- Customer Effort Score
- And more!
Download Free
All fields are required.
Form not available
How to Make a Google Survey
- Locate Google Forms
- Select a blank form or use a template from the gallery.
- Name your survey and add a description.
- Add questions.
- Use the sidebar menu to add multimedia elements, sections, or unique formatting options.
- Adjust the form settings.
- Send the survey to your recipients.
Google Forms has been my go-to survey creation tool since the beginning. It’s easy to use, free, and connects seamlessly with the rest of the Google ecosystem. Since it’s linked with my Gmail, I can add survey recipients with a simple click and start sharing within minutes.
[Video: How to Create a Survey Using Google Forms]
1. Locate Google Forms.
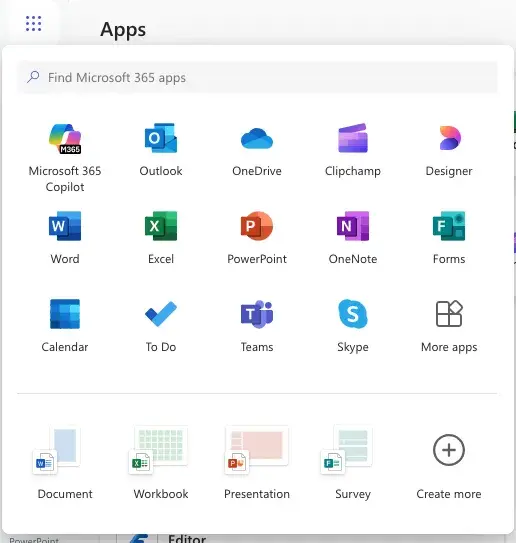
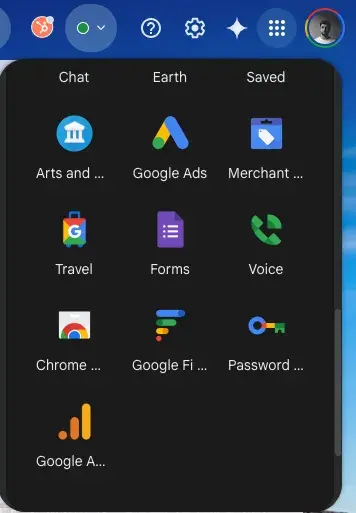
There are multiple ways to locate Google Forms. Sometimes, I’ll just Google “Google Forms,” but I usually open up my Gmail, click the Apps button in the top right next to my profile image, and click on Forms.
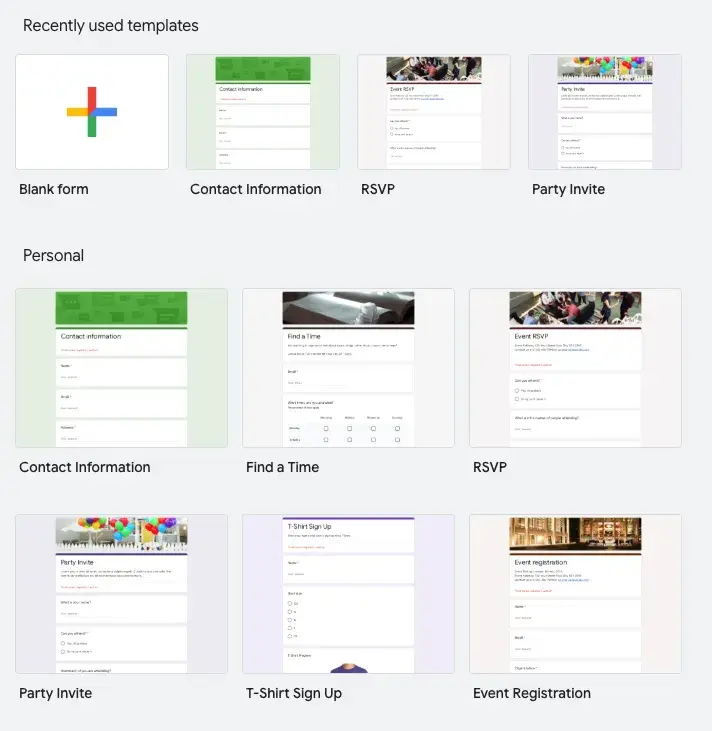
2. Select a blank form or use a template from the gallery.
The next step is to start a new form from scratch or use one of Google’s many templates. I like to get started using a template so I can hit the ground running, and I can always customize it later.
3. Name your survey and add a description.
The first thing you’ll be prompted to do upon creating a new survey is give it a name and a brief description.
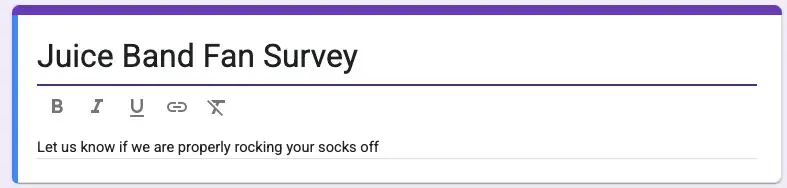
At this point, I like to add a little flair to my survey. Click the style icon in the top toolbar to customize fonts and colors and add a header image.

4. Add questions.
Now it’s time for me to start adding questions. It’s easy; just click the ‘Add question’ button shown below:
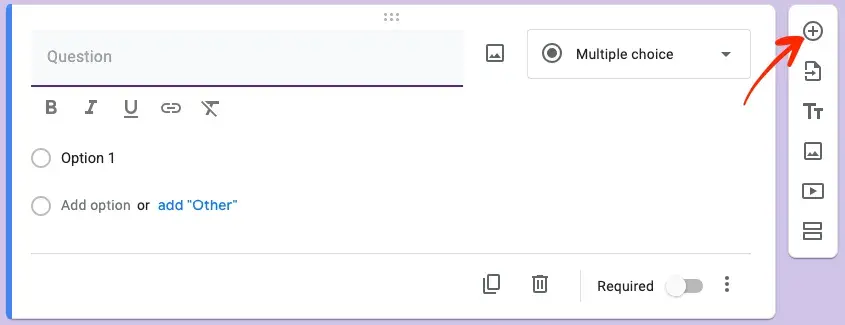
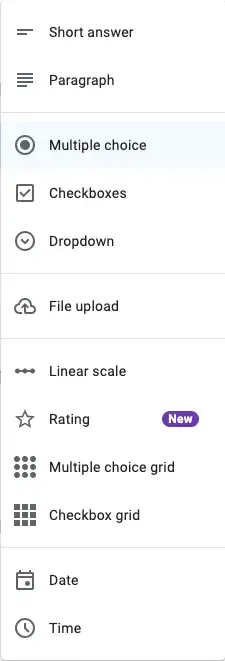
You can change the question type by selecting from the drop-down box seen above. I found the available question types to be extensive and valuable.
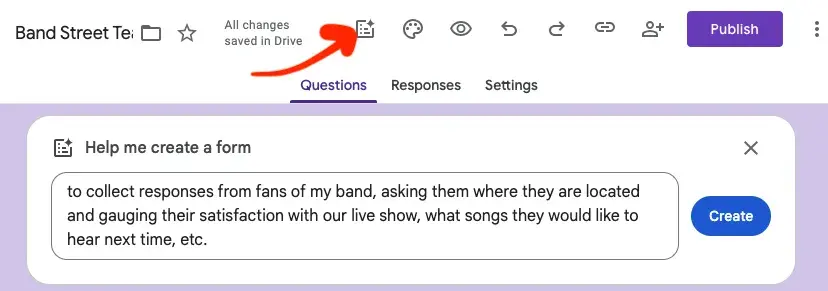
Pro tip: If you’re feeling stuck, you can use Google’s AI-powered survey helper to create a survey for you based on a prompt. I like to use this feature to get the ball rolling, and then I’ll customize the survey further.
Check it out.
Click the “Help me build a survey” button and input a prompt. Here’s the prompt I gave it:
And here’s what I got in return:
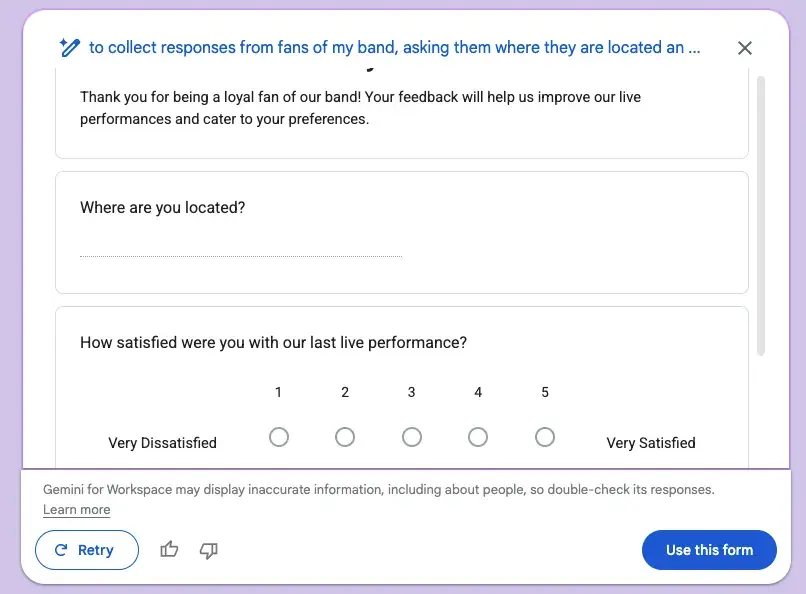
There are more questions that aren’t visible in my screenshot, but I was pleasantly surprised that Google’s AI-generated survey featured all the questions I was planning to include and then some. It’s a great starting point, I like to think of as a template customized to my needs.
5. Use the sidebar menu to add multimedia elements, sections, or unique formatting options.
Use the sidebar menu to add multimedia elements like images, customize text, or even insert videos. I like adding dividers to separate my forms into sections to make them more digestible.

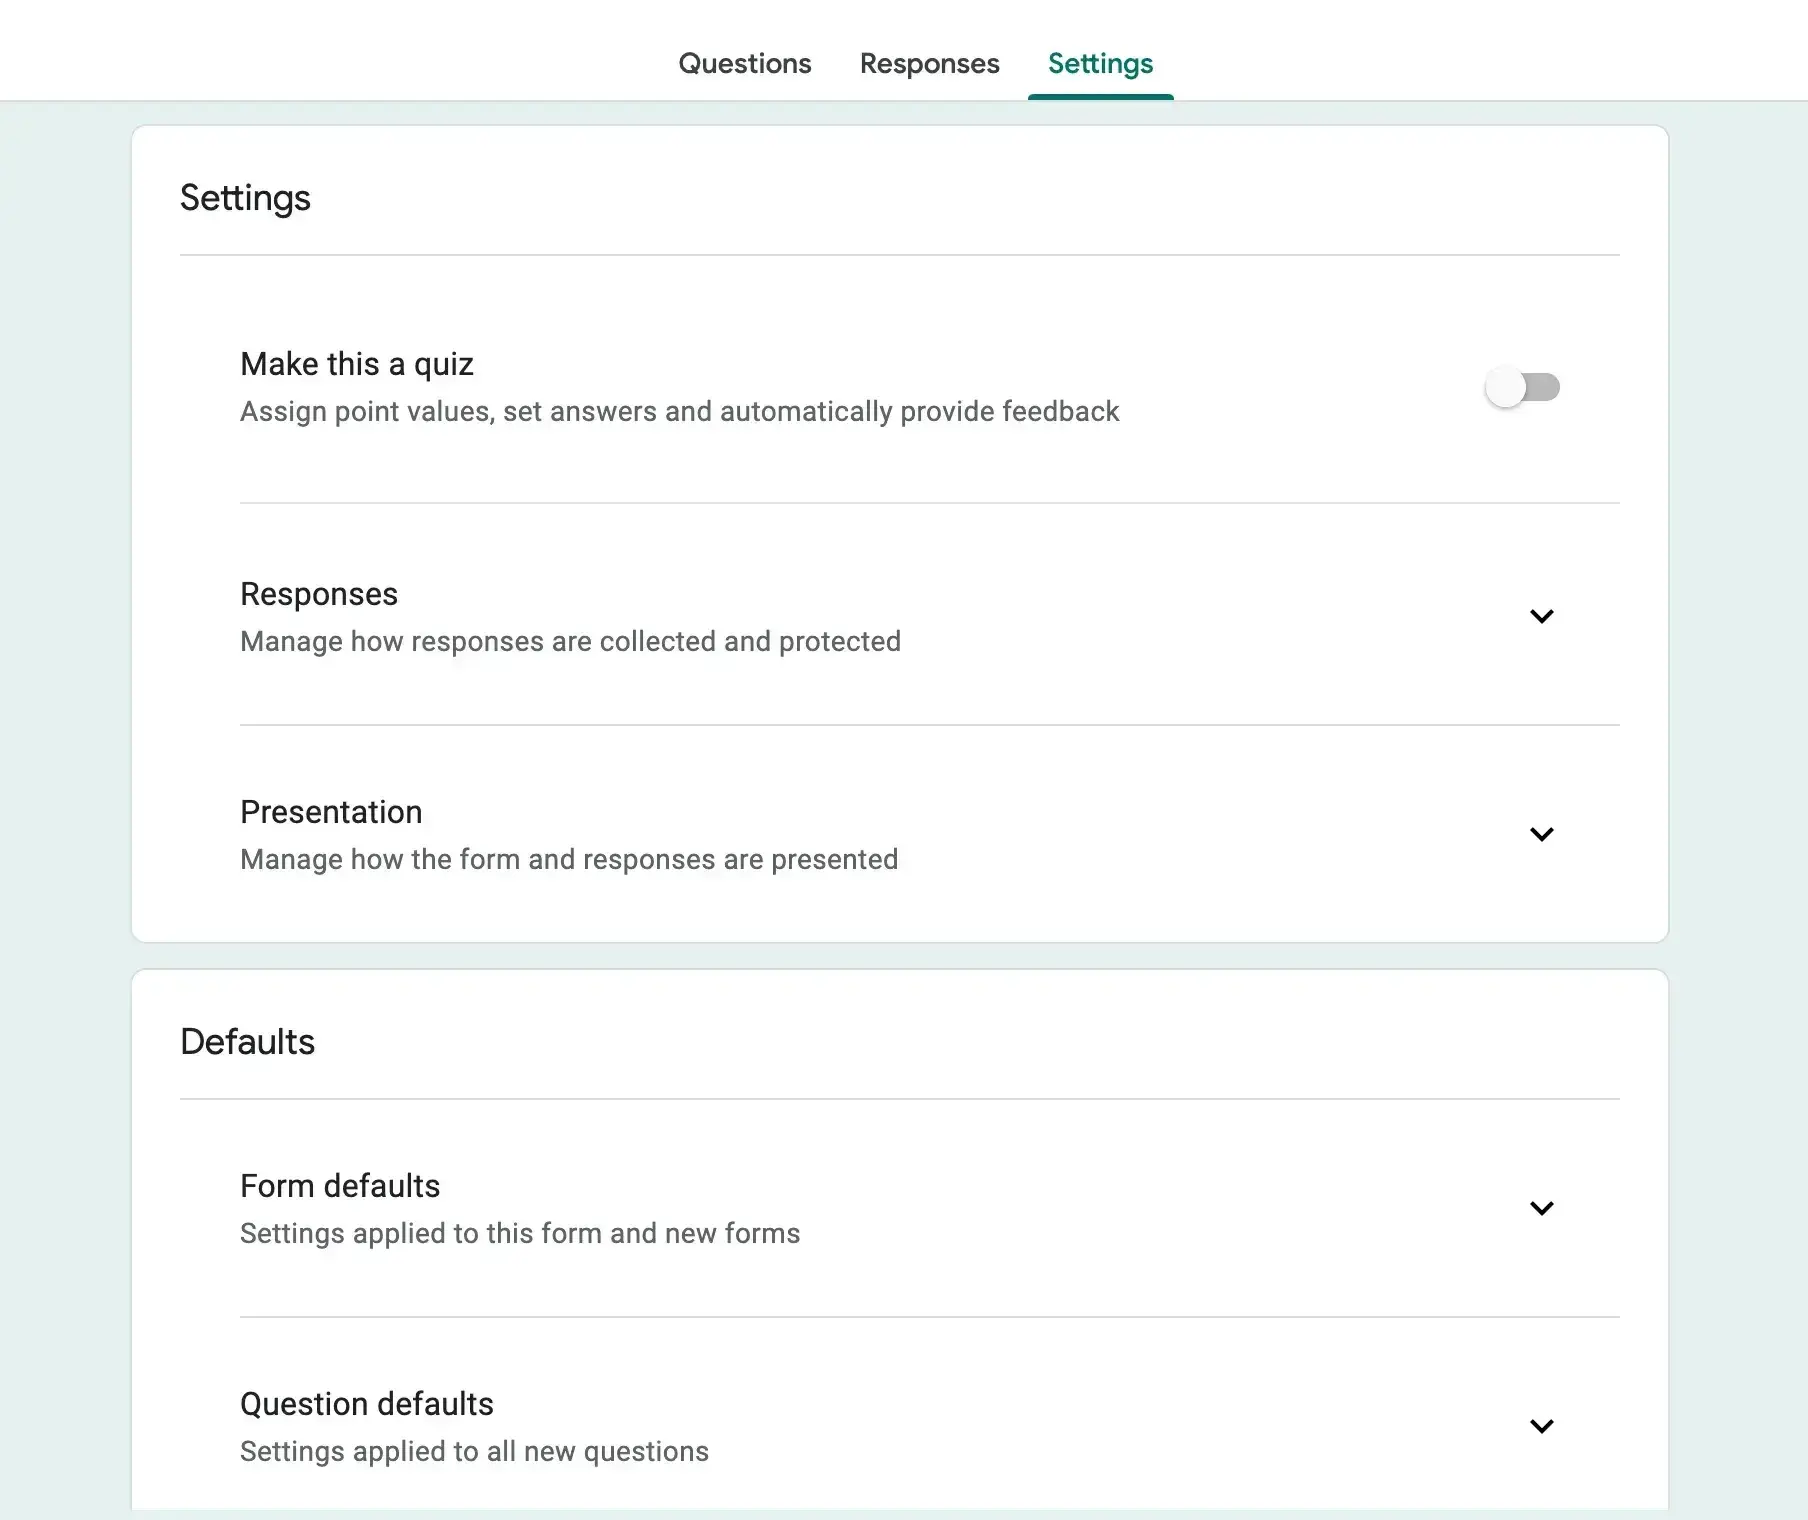
6. Adjust the form settings.
Within form settings, I can manage a few key aspects of the survey, like collecting email addresses, showing a progress bar, and turning the survey into a quiz.
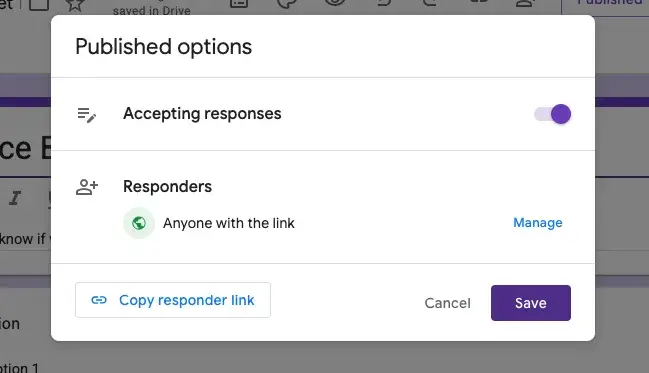
7. Send the survey to your recipients.
Sending out your survey is simple. Click the “Publish” button in the upper right-hand corner to make your survey live and send it out via link, or click the “Manage” button to add email addresses directly.
5 Free Customer Satisfaction Survey Templates
Easily measure customer satisfaction and begin to improve your customer experience.
- Net Promoter Score
- CSAT Score
- Customer Effort Score
- And more!
Download Free
All fields are required.
Form not available
How to Create a Survey on Facebook
- Enter 'survey' in your Facebook search bar.
- Select the 'Use app' button on the Facebook page.
- Give the survey permission to use your profile information.
- Customize your survey questions and answer options.
- Name your survey.
- Customize your survey question and answer options.
- Preview your survey.
- Publish your survey on your profile or business page.
Facebook offers two options for creating surveys: a simple poll or the Survey app. The poll option only allows you to ask one question, whereas the Survey app allows you to customize and expand your survey to include multiple types of questions. Read below for instructions for creating both:
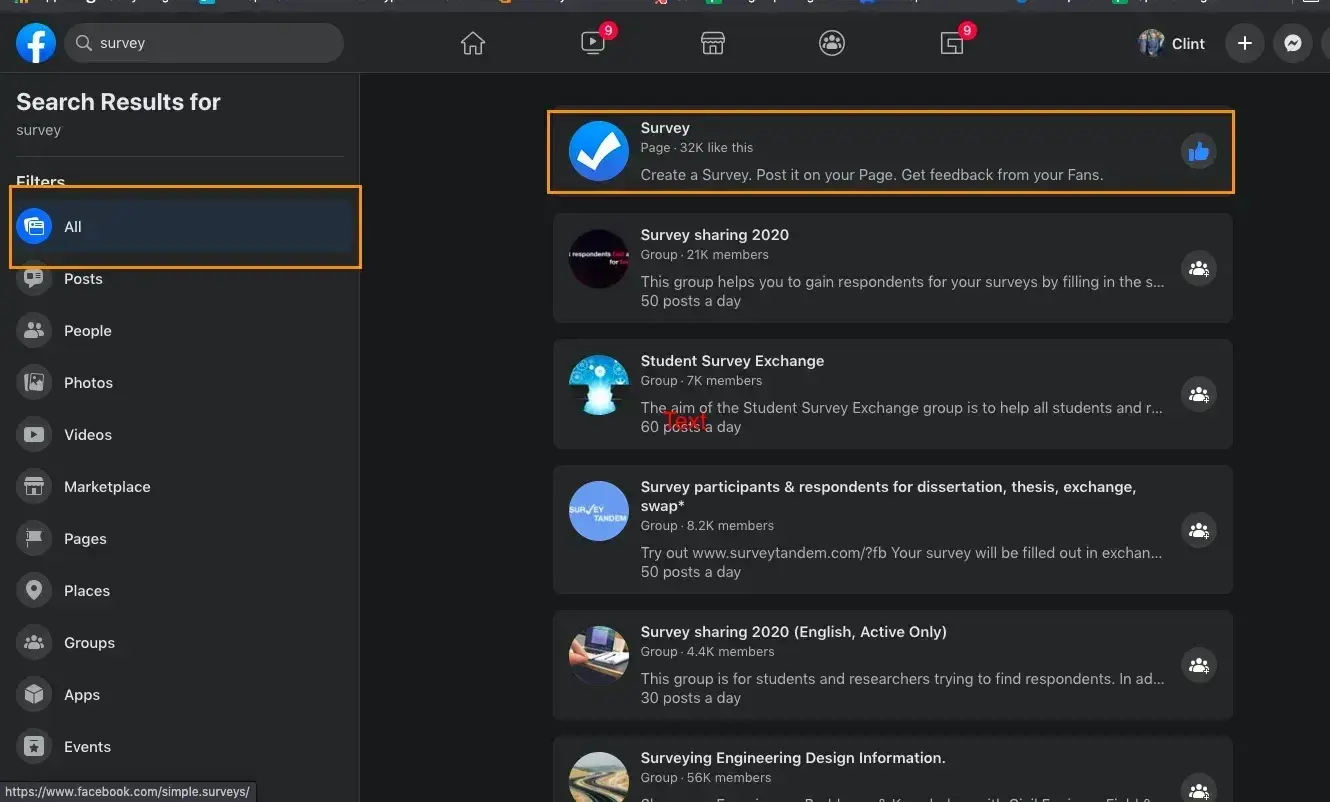
1. Enter “ Survey ” in your Facebook search bar.
I start by typing “Survey” into the Facebook search bar. When the search results appear, I look under the “All results” section and select the first option, "Survey,” which takes me to the app's Facebook page.
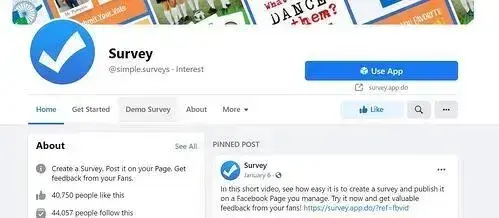
2. Select the “Use app” button on the Facebook page.
On the app's Facebook page, I locate the “Use App” button at the top and click on it to begin using the Survey app.
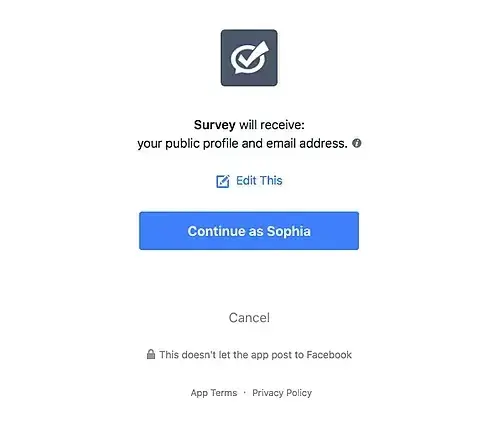
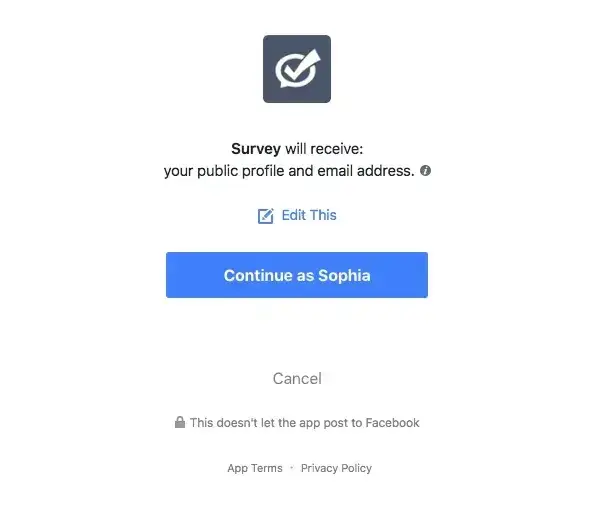
3. Give the survey permission to use your profile information.
Before I can start creating my survey, I need to grant the app access to my Facebook profile information. I carefully review the permissions and click “Allow,” knowing that the app won't post anything on my behalf without my instruction.
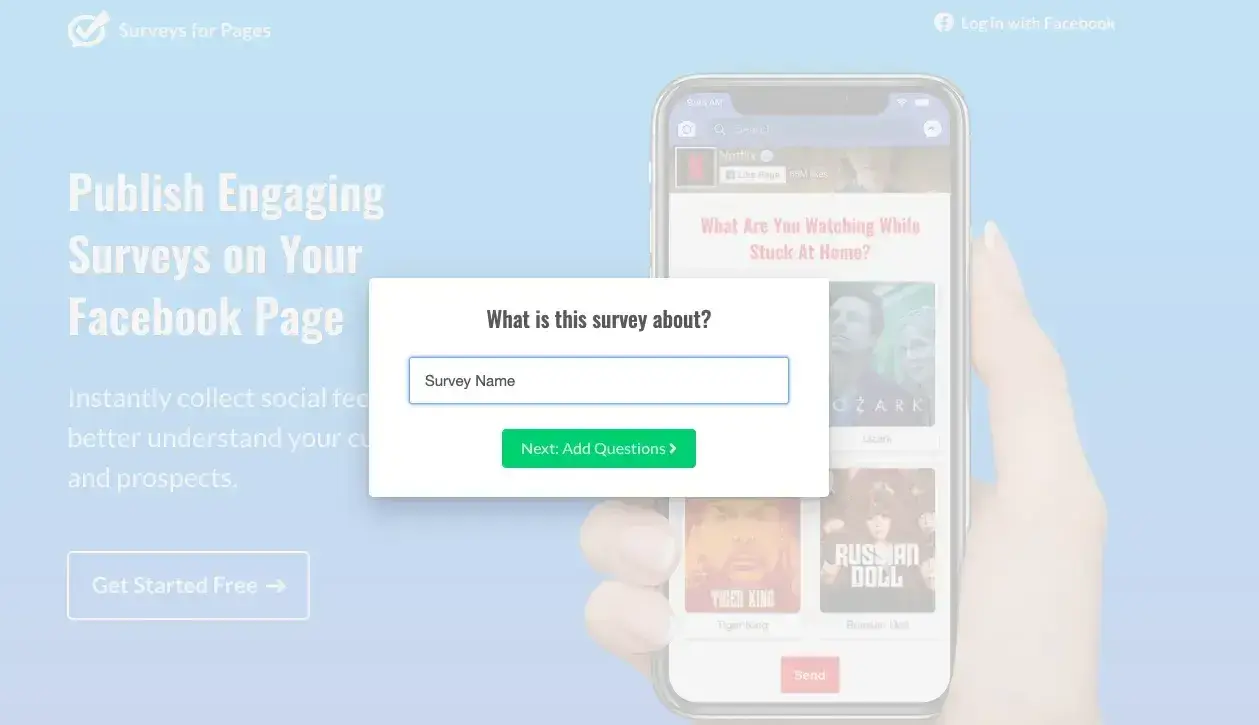
4. Name your survey.
With the app permissions granted, I name my survey. I choose a clear and concise title that reflects the purpose of my survey. I keep in mind that I can always edit the name later if needed.
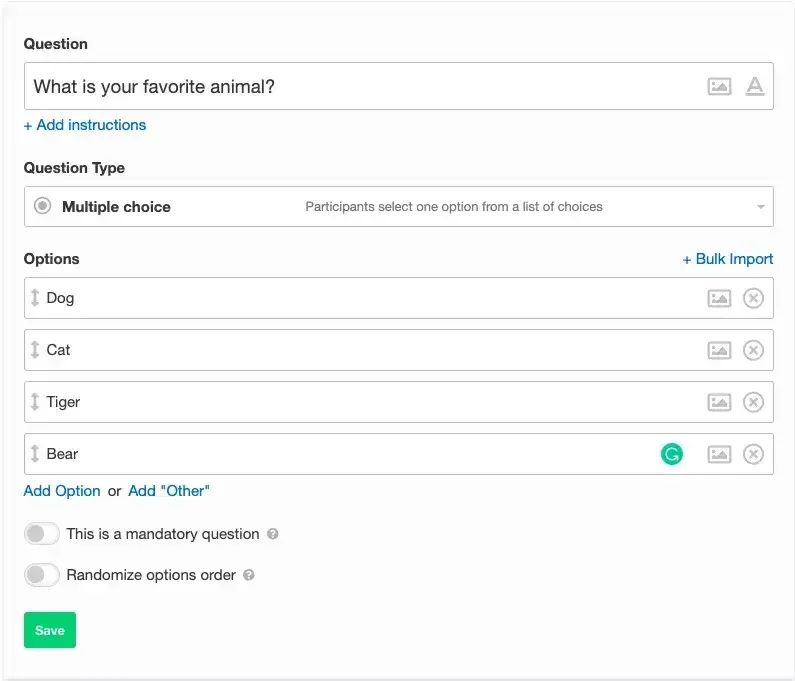
5. Customize your survey question and answer options.
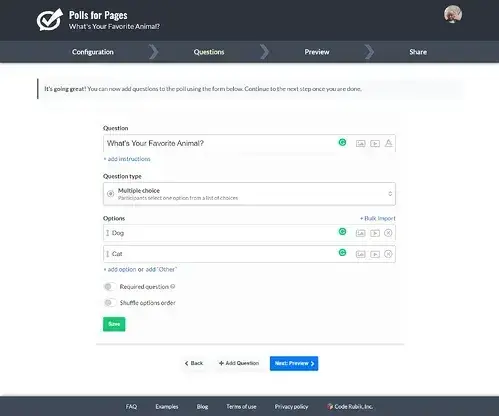
I dive into creating my survey questions, taking advantage of the various question types available in Facebook's survey app. I use the rich-text field to bulk import my answer options for multiple-choice questions, saving time and effort.
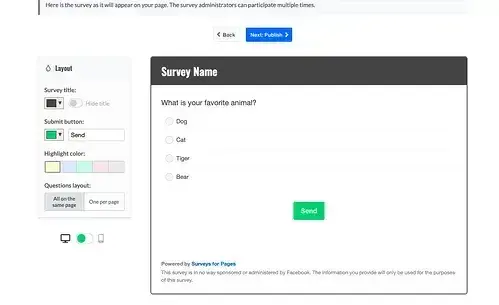
6. Preview your survey.
After completing my survey questions, I take a moment to preview the entire survey. This allows me to see how it will appear to my respondents and make any necessary adjustments before publishing.
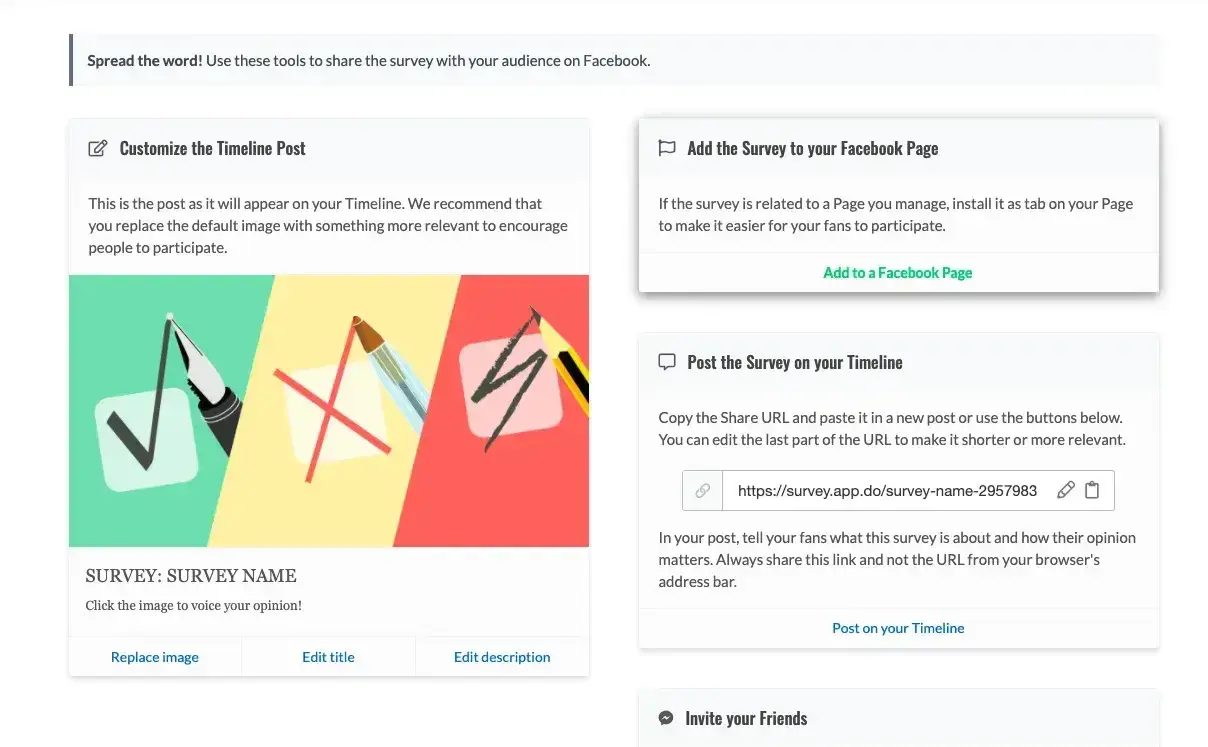
7. Publish your survey on your profile or business page.
Once I'm satisfied with my survey, I move on to the final step: publishing it on my Facebook profile or business page.
I consider my options, such as creating a unique post for the survey, sharing it via a URL, or inviting individual followers to complete it. I select the method that best suits my needs and publish the survey, making it live for my audience to access and complete.
How to Make a Poll on Facebook
- Enter 'poll' in your Facebook search bar.
- Select the 'Use app' button on the Facebook page.
- Give the poll permission to use your profile information.
- Name your poll.
- Customize your poll question and answer options.
- Preview your poll.
- Publish your poll on your page.
Sometimes, a survey may be too much of a hassle to collect the data you're looking for. Opt for a Facebook Poll instead. With Polls, you can solicit feedback from your Page followers and fans on simple topics.
With the click of a button, respondents can weigh in on any topic you choose to discuss. Plus, they‘ll get to see an aggregate of the responses to know whether they’re in the majority or minority opinion.
1. Enter “Poll” in your Facebook search bar.
I begin by typing “Poll” into the Facebook search bar. In the “All results” section, I click on the first option, "Poll,” which directs me to the app's Facebook page.

2. Select the “Use App” button on the Facebook page.
I locate and click the “Use App” button on the Poll app's Facebook page to start using the application.

3. Give the poll permission to use your profile information.
Before I can create my poll, I need to grant the app permission to access my Facebook profile information. I review the permissions carefully and click “Allow,” understanding that the app will not post anything on my behalf without my explicit instruction.
4. Name your poll.
With the app permissions granted, I give my poll a name. I choose a clear and concise title that reflects the topic or question I want to ask my followers.
5. Customize your poll question and answer options.
I start creating my poll by filling out the question and customizing the answer options. The Poll app provides various question types, allowing me to choose the one that best fits my needs.
6. Preview your poll.
After completing the poll question and answer options, I take a moment to preview the poll. This allows me to see how it will appear to my followers and make any necessary adjustments before publishing.
7. Publish your poll on your page.
Once I am satisfied with my poll, I move on to the final step: publishing it on my Facebook page. I consider the available options, such as creating a unique post for the poll, sharing it via a link, or inviting individuals to participate. I choose the method that best aligns with my goals and publish the poll, making it live for my followers to engage with and provide their opinions.
How to Create a Survey on SurveyMonkey
- Select the type of survey you want to create.
- Name your survey.
- Add or choose survey questions.
- Send your survey to respondents.
For longer surveys with more functionality and data analytics, try SurveyMonkey. You can choose from a variety of question and response options, making this survey platform applicable for virtually any type of research.
1. Select the type of survey you want to create.
I start by signing up for a SurveyMonkey account, choosing between a free or paid option depending on my needs. Once I'm logged in, I select the option to build my survey from scratch.
2. Name your survey.
After deciding on the type of survey I want to create, I give it a clear and descriptive name that reflects its purpose. I also assign the survey to a relevant category to keep my surveys organized.
3. Add or choose survey questions.
I begin building my survey by either typing in my own questions or selecting from the suggested questions provided by SurveyMonkey based on the type of survey I've chosen. I carefully consider each question to ensure it aligns with my research goals.
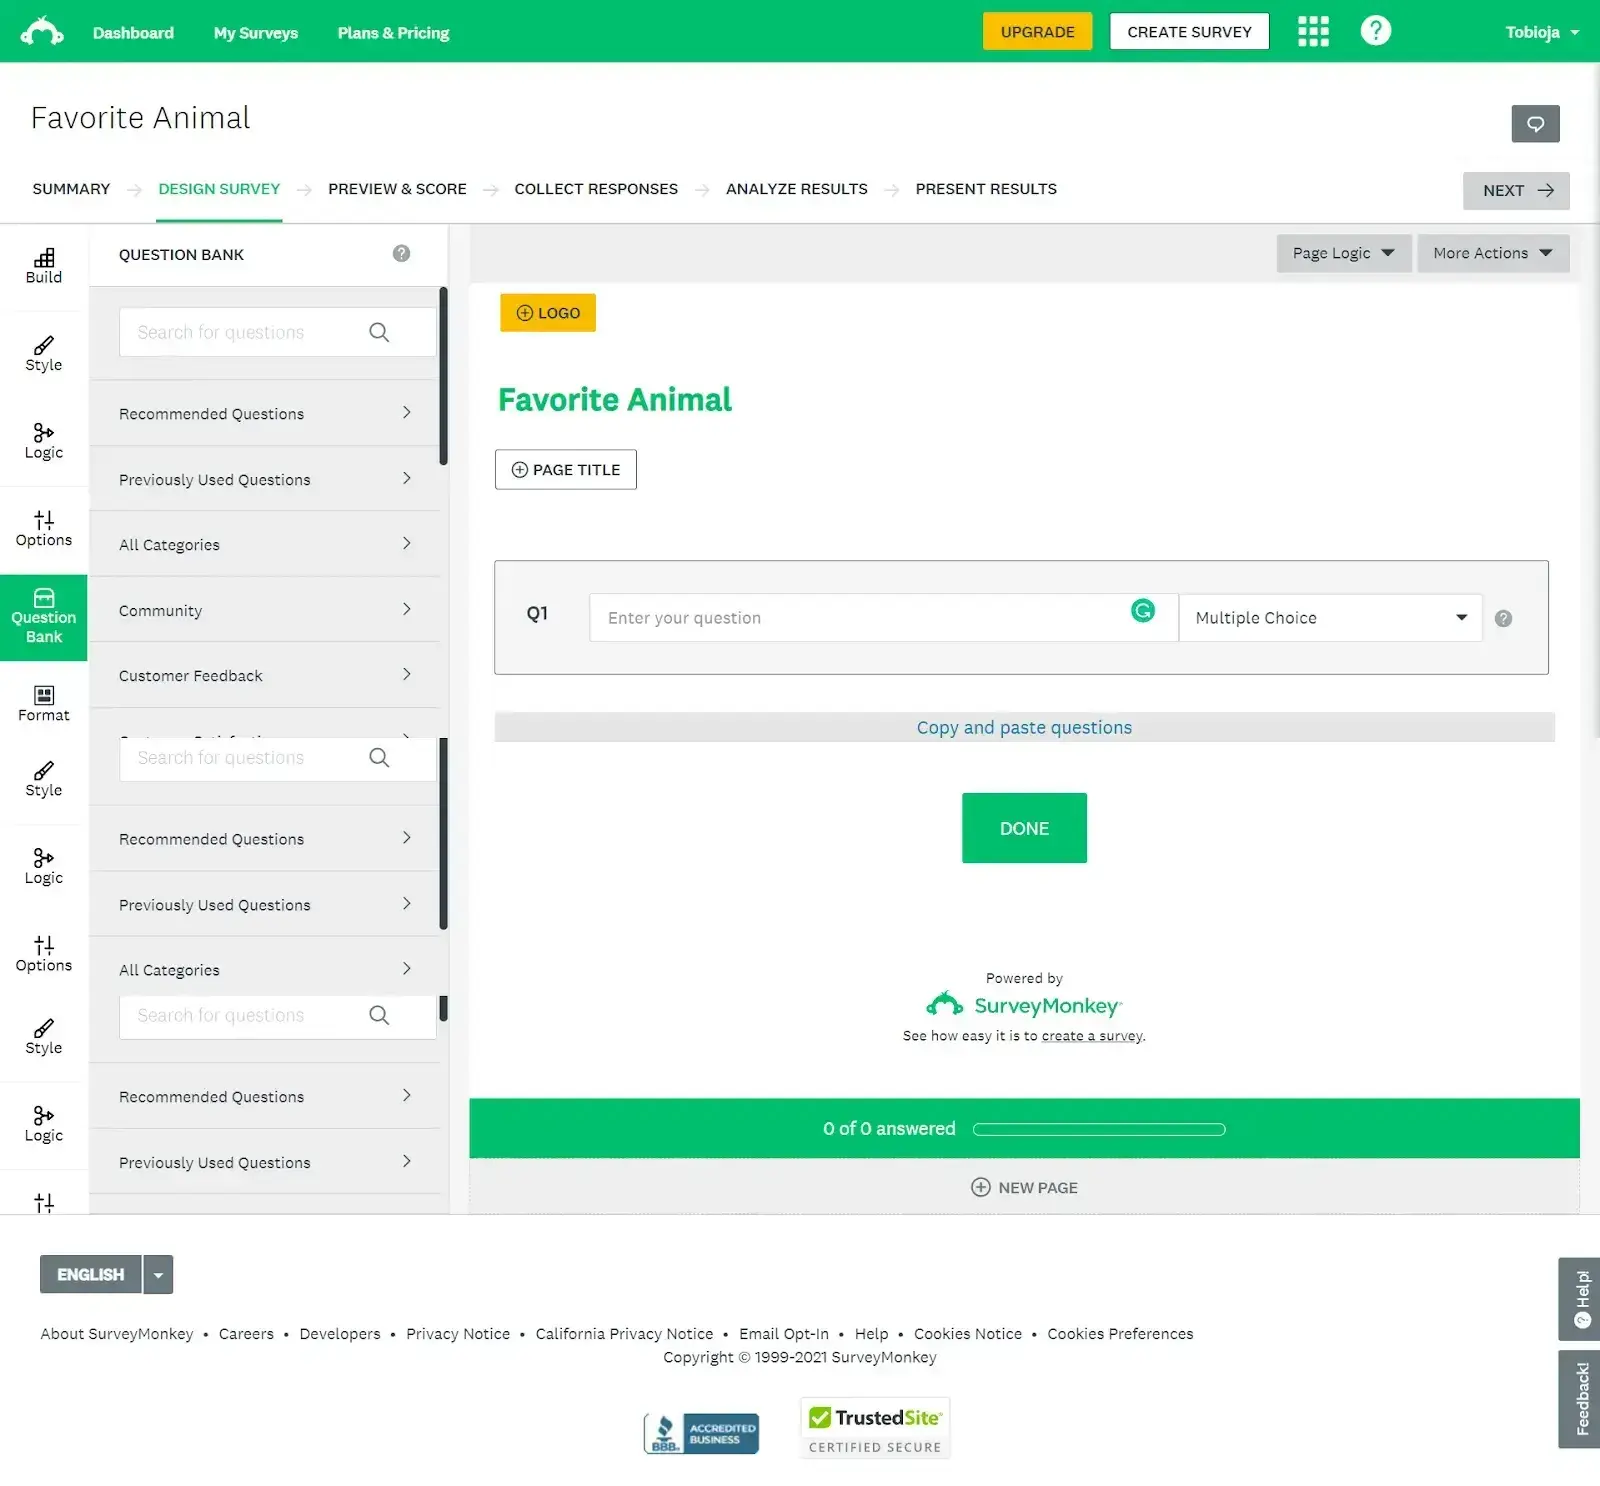
4. Send your survey to respondents.
When my survey is complete, I explore the various options SurveyMonkey offers for distributing my survey to respondents. I can share the survey link myself, embed it on a website, or even purchase responses from a broader pool of participants provided by SurveyMonkey.
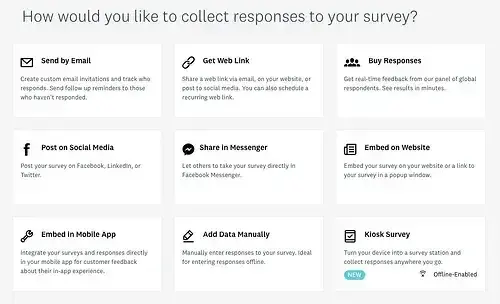
Once I‘ve selected the most appropriate distribution method for my needs, I’m ready to send out my survey and start gathering feedback from my target audience.
Create a Survey People Will Want to Take
After exploring various survey tools, I’ve remained steadfast in my preference for Google Forms. It’s simple, free, and easy to use. I also like that it integrates with the rest of Google’s tools that I’m already familiar with, like Gmail for sharing and Google Sheets for viewing my results in spreadsheet form.
That said, I was pleasantly surprised by Microsoft Forms. It’s a strong alternative to Google Forms and offers the same level of simplicity and powerful features with a different look and feel. If I were embedded in the Microsoft ecosystem the way I am with Google, Microsoft Forms would be an easy choice.
For me, survey creation is primarily casual. Once in a while, I’ll make a survey to check in on fans or gather sign-ups for my band’s street team to help promote shows. However, if I needed professional customer satisfaction surveys with advanced reporting features, HubSpot’s customer feedback software would be my choice, especially with the free CRM.
As much as I love checking out new tools and passing judgment on cloud-based software, writing this article reminded me that the success of a form isn’t just about what platform you use. Sure, picking the right platform can make my life easier and provide valuable insights, but no software can define your goals and write thoughtful, purposeful questions for you.
At least, not yet.
Try out these survey tools to see what insights you uncover about your audience.
Editor's note: This article was originally published in April 2018 and has since been updated for comprehensiveness.
5 Free Customer Satisfaction Survey Templates
Easily measure customer satisfaction and begin to improve your customer experience.
- Net Promoter Score
- CSAT Score
- Customer Effort Score
- And more!
Download Free
All fields are required.
Form not available
Survey Creation
![16 best free online survey makers and tools [+ recommendations]](https://53.fs1.hubspotusercontent-na1.net/hubfs/53/free-online-survey-maker-1-20251028-2654831.webp)

![How to conduct survey analysis like a data pro [all my tips + secrets]](https://53.fs1.hubspotusercontent-na1.net/hubfs/53/survey-results-1-20241031-6355381.webp)
![Leading questions: What they are & why they matter [+ Examples]](https://53.fs1.hubspotusercontent-na1.net/hubfs/53/leading-questions-hero.webp)
![How long should a survey be? The ideal survey length [New data]](https://53.fs1.hubspotusercontent-na1.net/hubfs/53/how%20long%20should%20a%20survey%20be_featured.png)


![What Is a Likert Scale? [Examples & Templates]](https://53.fs1.hubspotusercontent-na1.net/hubfs/53/likert-scale-1-20241031-1487623.webp)