.webp?width=112&height=112&name=Help-Desk-EN@3x%20(1).webp)

What Is Ticket Routing?
Ticket routing is the system used by customer service teams to distribute and assign support cases. When customers submit new tickets, this system determines which ones are distributed first, and who will be responsible for responding to each one.
Ticket routing can be either manual or automated. When it's manual, support reps scan the ticket queue and assign themselves cases. This is ideal for businesses with smaller customer bases, where their support teams aren't as big and there are fewer tickets to answer.
If you're managing a growing business, then you may want to consider automating your ticket routing. This ensures all tickets are assigned to your support team and customers get fast responses whenever they reach out for help.
Below are a few more benefits of automated ticket routing.
Benefits of Automated Ticket Routing
The most notable benefit of automated ticket routing is speed. Tickets are assigned to reps automatically, which means reps can respond to customers faster. They don't have to sort through a queue to find their next case, instead, they simply have to click "next ticket," and they're assigned a new inquiry.
Another benefit is consistency. If tickets are being automatically assigned, you don't have to worry about reps "cherrypicking" your queue and only taking tickets that are easy to resolve. With automated ticket routing, reps are assigned tickets evenly, so everyone is responsible for the same amount of work.
Both of these benefits lead to a better support experience because customers are getting faster responses and are working with reps who have fewer tasks to complete each day. Instead of trying to track down their next case, reps can focus on the customer and creating a memorable interaction with your brand.
If you're ready to start automating the ticketing system at your business, check out the steps outlined below.
How to Automate Ticket Routing
1. Create New Tickets.
Your first step should be to install a workflow that creates new tickets automatically. To do this, you'll need a help desk or ticketing system that supports workflows and forms.
For example, if you have a support form on your website, it can automatically record customer inquiries and send them to your team's shared inbox. The support form can gather different details about the customer's case which are then translated into ticket properties that reps use to troubleshoot problems.
Here's an example of a new ticket being created via a HubSpot form.
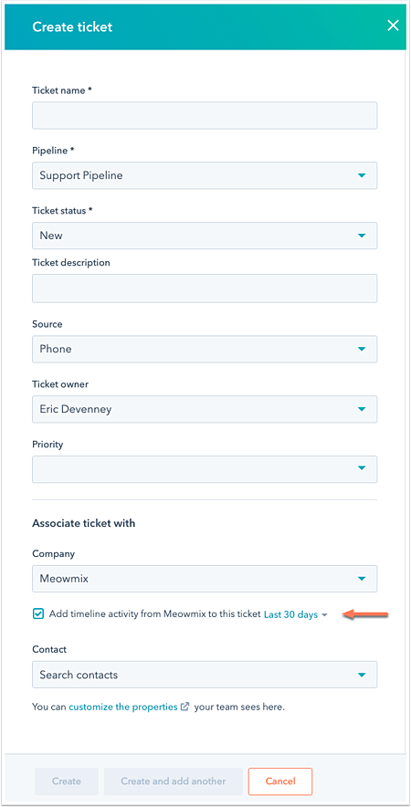
These tickets tell reps who submitted the inquiry, what channel it came from, and any additional details outlining the customer's relationship with your business. Having this context available with the ticket makes it easier to provide a delightful customer experience because reps don't have to ask the customer for this information. Instead, they can go right into troubleshooting knowing all the context surrounding the problem.
2. Set Ticket Status.
A ticket's status updates customers after the ticket reaches your support team. For instance, when a ticket is in your support queue, you might set its status as "unassigned," to let the customer know it has yet to be assigned to a rep. When it's assigned, you can set its status as "assigned," or "matched with rep," to let the customer know their case is being looked at and someone will reach out soon.
Ticket statuses also help reps organize their open cases. Once they respond to a customer, they can set the ticket status as, "waiting on customer." This lets both the rep and the customer know who needs to respond if they want to move closer to a solution.
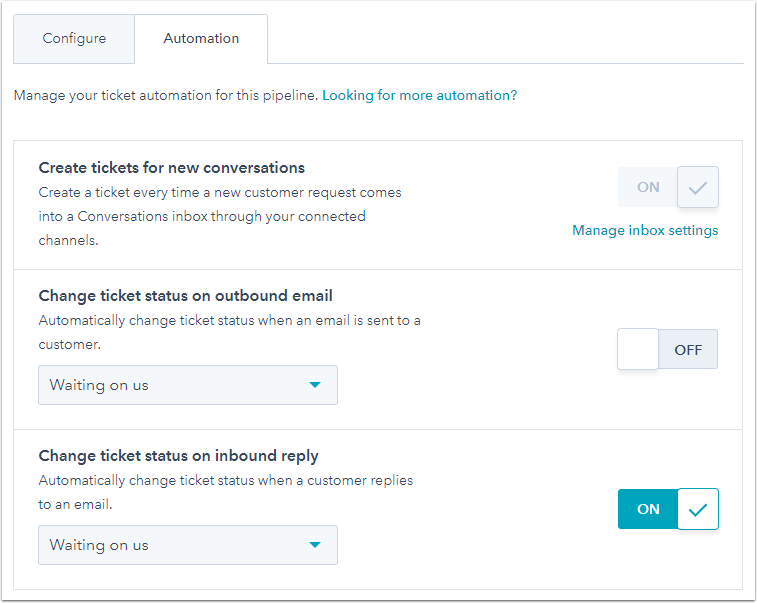
Most ticketing systems will offer an automation feature for this within their settings. Below is an example of what this might look like.
3. Automate Ticket Actions.
Once you've automated ticket statuses, you can do the same for ticket actions. If you have a workflow or pipeline feature, you can instruct your CRM to execute different functions based on the ticket's data.

For example, let's say a customer doesn't respond to your rep for three days. Instead of the rep having to remember to follow up, the ticketing system will do this automatically and message the customer about the case. You'll never forget about a ticket, even if the customer forgets to respond.
4. Customize Ticket Pipelines.
If you're managing several tickets at once, pipelines can edit properties, like ticket status, in bulk. Once a ticket reaches a certain stage in your pipeline, the status is automatically updated along with any other properties you choose to edit. This creates a consistent support process where customers are always being treated the same way no matter who they interact with on your team.
5. Merge Existing Tickets Into Your New Routing System.
Now that your ticketing system is fully automated, it's time to bring your existing tickets into your new system. And, as you might have guessed, you can automate this process, too.
If your CRM supports this feature, look for an option to "merge," similar to the one below.
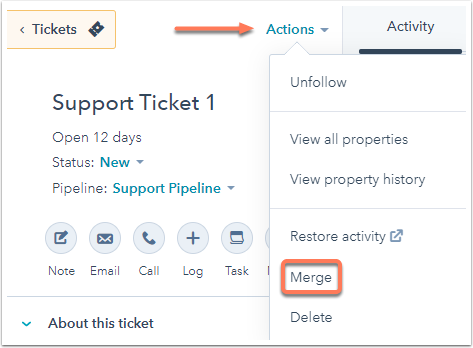
This should combine all of the records from your original ticket to your new one. Now, you can make the switch to your automated ticket routing system without leaving behind any important customer inquiries.
For more automation tips, read how you can support digital customer experiences.


![Is The Customer Always Right? [What It Means + Why It Matters]](https://53.fs1.hubspotusercontent-na1.net/hubfs/53/customer-is-always-right-origin-1-20250202-6448090.webp)