Building a website from scratch is one way to create a fast, lightweight site that you have complete control over. However, creating, customizing, and maintaining an HTML site will require technical knowledge of HTML, CSS, and JavaScript and a significant time investment.


The good news is there are many ways you can simplify these stages. To simplify the customization process of your website, for example, you can use CSS selectors.
Below, we’ll take a closer look at what CSS selectors are. Then we’ll explore the different types, how you can use them, and how you can combine them to create a website that looks exactly the way you want.
What are CSS selectors?
CSS selectors are used to define the elements you want to style with CSS. There are many different types of CSS selectors, each with their own unique syntax. These tell the browser which elements to apply CSS property values to.
The element or elements targeted by a CSS selector are referred to as the “subject of the selector.” A subject can be selected based on its element type, class, ID name, given attribute, or pseudo-state.
With so many different types available, you are not only able to customize your site faster — you’re also able to maintain granular control over your code.
Below we’ll explain how you can use CSS selectors on your site and then explore the different types of selectors. Let’s get started.
How to Use Selectors in CSS
There are two major ways you can use selectors in CSS. If you have your HTML and CSS in one doc, then you simply have to add CSS selectors into the <head> section of your webpage. You’ll see this method in the examples below.
However, you can also keep your HTML and CSS in separate documents. In that case, you might have an HTML document labelled index.html and a CSS file labelled style.css. The index.html file must include a line of code referencing the CSS file so that these styles are rendered on your webpage.
That HTML file would look something like this:
Notice the line <link rel="stylesheet" href="style.css">? That’s the reference to your CSS file. That file would only include the selector blocks you’ll see below and other custom CSS.
Now that we’ve gone through a brief overview of how CSS selectors work, let’s look at the major selector types below.
Types of CSS Selectors
Below we’ll cover the four major types of CSS selectors. Each can help you select different groups of elements on a webpage. We’ll start with the type that will help you target the largest groups of elements and then move onto the types that get more precise.
For the demos below, I’ll be using the W3Schools Online Code Editor. That means you can click any of the Source links to see the full code snippet behind the example and try your own.
Universal Selector
The asterisk (*) is the universal selector in CSS. By default, it selects all elements in a document.
It can, however, be used in combination with namespaces. @namespace is a useful rule in documents with multiple namespaces, such as HTML5, inline SVG, MathML, and/or XML. You can use a defined namespace to restrict the universal selector to elements only within that namespace.
Universal Selector Syntax
A universal selector can have the following syntax:
- * or *|* { style properties } - matches all elements
- ns|* { style properties } - matches all elements in the namespace ns
- |* { style properties } - matches all elements without any defined namespace
Universal Selector Example
Let’s say I want every single element on the page to be orange, then I can use the universal selector.
Here’s my HTML:
Here’s my CSS with the universal selector defining all elements.
Here’s the result:

Type Selector
A type selector selects all HTML elements that have a given node name. For example, “a” would select all <a> elements and apply the CSS property values to them. “Input” would select all <input> elements, “span” all <span> elements and so on.
You can also use a defined namespace to restrict the type selector to elements only within that namespace.
Type Selector Syntax
The syntax of a type selector is:
- element { style properties }
Type Selector Example
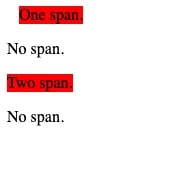
Let’s say my document contains paragraph and span elements and I want the span elements to be highlighted in orange.
Here’s my HTML:
Here’s my CSS with the type selector defining the span elements:
Here’s the result:
Class Selector
A class selector selects all elements that have a given class name. For example, .intro would select any element that has a class of “intro” just as .index would select any element that has a class of “index.”
If you're using the open-source framework Bootstrap CSS, then you'll notice that virtually all its styles use classes as selectors. You can find a complete list of Bootstrap classes on W3Schools.
Class Selector Syntax
The syntax of a class selector is:
- .classname { style properties }
Class Selector Example
Let’s say I want to change all elements with class ="pastoral" to the color orange.
Here’s my HTML:
Here’s my CSS with the class selector defining all elements with the class “pastoral.”
Given these rules, the first h1 would not have orange text and the second would. Here’s the result:
ID Selector
An ID selector selects an element based on its ID attribute. For example, #toc will select the element that has the ID "toc.” Please note that this selector only works if the value given in the selector matches the element’s ID attribute exactly.
ID Selector Syntax
The syntax of an ID selector is:
- #idname { style properties }
ID Selector Example
Let’s say I want to change the color and alignment of the element with the id "hubspot.".
Here’s my HTML:
Here’s my CSS with the ID selector defining the element with the ID “hubspot.”
Here’s the result:

Please note: if the element’s ID attribute is written in all lowercase and I capitalize the “H” in my CSS selector, then the element will not be selected.
Attribute Selector
An attribute selector selects all elements that have a given attribute or an attribute set to a specific value. For example, a[href] will match all links, while a[href*=”hubspot”] will only match links with "hubspot" in their URL.
You can also use an attribute selector to apply CSS rules to elements with the given value of an attribute (and not just the presence of an attribute). So if I want to style any links with "hubspot" in their URL then I can use a[href=”hubspot”].
You can also use a defined namespace to restrict the attribute selector to elements only within that namespace.
Attribute Selector Syntax
The syntax of an attribute selector includes the following:
- [attr] { style properties }
- [attr=value] { style properties }
- [attr~=value] { style properties }
- [attr|=value] { style properties }
- [attr^=value] { style properties }
- [attr$=value] { style properties }
- [attr*=value] { style properties }
The syntax you use depends on whether you want to select elements that have an attribute set to a specific value.
Attribute Selector Example
Let’s say I want to make any links with "hubspot" in their URL orange. then I can use a[href=”hubspot”].
Here’s my HTML:
Here’s my CSS with the attribute selector defining all links that include “hubspot.”
Here’s the result:

Pseudo-class Selector
A pseudo-class selector applies CSS to a selected element or elements only when in a special state. For example, :hover will only style an element when a user hovers over it. Other common examples are :active, :visited, and :invalid.
Pseudo-class Selector Syntax
The syntax of a pseudo selector is:
- selector:pseudo-class { style properties }
Pseudo-class Selector Example
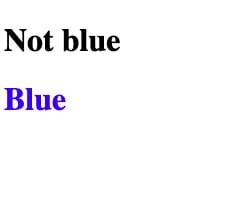
Let’s say I want to change the color of links that the user has already visited to green. I want to keep the links that the user hasn’t visited to blue. And I want the links to change to an eye-catching fuschia color when a user hovers over them.
Here’s my HTML:
Here’s my CSS with three different pseudo classes for links that have not been visited, have already been visited, and that are being hovered over.
Here’s the result:

Now that we understand the major types of CSS selectors, let’s walk through how you can combine them on your website.
How do you group multiple selectors in CSS?
Let’s say you have multiple elements that you want to apply the same CSS to, like an h2 and a class of .spacious that you want to make green. You could write the code as two separate rules, as shown below.
Or, you could combine the selectors into a selector list. To create a selector list, you just have to list multiple selectors and separate them by commas before the bracket containing the style properties. Since white space is valid before and after the comma, I’ll add in a space after each comma to make the code easier to read.
The syntax would therefore be: element, element, element { style properties }. Here's the example above:
You can also place selectors on their own line if that makes the code easier to read. In that case, the syntax would look like this:
Combining CSS selectors in this way can help reduce the size of style sheets and make your web page load faster.
Customizing with CSS Selectors
CSS selectors enable you to maintain precise control over your customization process and code when building a site from scratch. While there might be a learning curve, you should invest the time in learning and testing different types of CSS selectors. Doing so can enable you to style your site according to your brand while keeping the code lightweight and your load time fast.


![How to Center an Image with HTML and CSS [+ Code Modules]](https://www.hubspot.com/hubfs/center-an-image-in-html.jpg)

![How to Import Bootstrap in React [The Beginner's Guide]](https://www.hubspot.com/hubfs/import-bootstrap-in-react.jpg)
![How to Create Scrolling Text With CSS [+ Code Examples]](https://www.hubspot.com/hubfs/Google%20Drive%20Integration/scrolling%20text%20css.jpeg)