Table of Contents
- What is cURL?
- Why use cURL?
- What do you need to use cURL?
- cURL Syntax
- cURL Command Examples
- cURL Protocols and Formats
- Outputs of Curl Command
What is cURL?
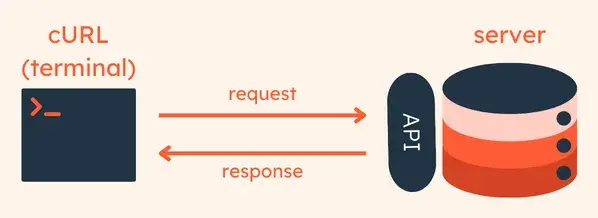
cURL (short for “client URL” and pronounced “curl”) is an open-source command line tool for exchanging data with a server. With cURL, you specify an endpoint (a URL where you want to send data to or retrieve data from) and, if necessary, the data you want to send — all this through a command line interface (CLI).
You might have heard of API clients like Postman and Insomnia that provide a user interface for making requests to APIs. cURL lets you do the same thing from your terminal. It works on Windows, Mac, and Linux.
cURL supports many kinds of transfer protocols, including HTTPS, HTTP, FTP, and SMTP. It also enables you to include cookies, set proxies, and add authentication credentials when making requests.

Why use cURL?
While cURL isn’t the only way to make API requests, it’s one of the simplest. Just install cURL, open the terminal, and enter your request in the command line. It doesn’t matter what OS you’re using either, since cURL runs on most of them.
cURL’s convenience makes it ideal for quickly testing and debugging things like APIs and websites, downloading or uploading data, or learning how to use an API if you’re a beginner.
However, if you’re just interested in building or maintaining a website through a graphical interface, you probably won’t need to use cURL much if at all. Instead, try a website builder like HubSpot to build your site quickly.
What do you need to use cURL?
cURL comes pre-installed on Windows and macOS. You can download the package from the cURL website.
Other than that, you only need your computer’s terminal program and an internet connection to use cURL. When practicing using cURL, it’s helpful to pick some public API to send commands too, which is what we’ll be doing next.
cURL Syntax
The basic syntax of the curl command looks like this:
cURL [options] [URL]
Let's unpack each part of this command:
- command: All cURL commands begin with cURL to specify that you are making a cURL command.
- options: Options (also called flags) customize the behavior of the command. They are, you guessed it, optional.
- URL: This is the location where you want to access data from or send data to.
cURL Command Examples
Next, let’s see how to use cURL syntax to make requests. We’ll be using the JSONPlaceholder Fake API to demonstrate the different ways to use cURL. This mock API contains different example paths for making requests, and is a quick and easy tool to practice cURL without needing any authentication.
Get Webpage Content
The simplest cURL command you can make is curl [URL]. This command is a simple GET request that retrieves the content of the web page and displays it in the terminal. If the type of HTTP method is not specified in the command, then GET is the default.
curl https://jsonplaceholder.typicode.com/
When you enter this command, the HTML of the page will print in the terminal.
Get Data
Next, let’s look at another GET request we can make to this API. One resource we can get from this API is a post. The endpoint for retrieving posts is https://jsonplaceholder.typicode.com/posts/{id} where {id} is a number specifying which post. Let’s write a cURL command to get post 1 from the API:
curl https://jsonplaceholder.typicode.com/posts/1
The command returns the response body sent from the API in JSON format, which looks like this in the terminal:
{
"userId": 1,
"id": 1,
"title": "sunt aut facere repellat provident occaecati excepturi optio reprehenderit",
"body": "quia et suscipit suscipit recusandae consequuntur expedita et cum reprehenderit molestiae ut ut quas totam nostrum rerum est autem sunt rem eveniet architecto"
}
Or, if we want a list of all posts returned to us as JSON, we can simply enter:
curl https://jsonplaceholder.typicode.com/posts
Let’s try another endpoint that lets us get a comment from this post, using the /comments endpoint. The following command will give us the comments from post 1:
curl https://jsonplaceholder.typicode.com/posts/1/comments
As long as you know the endpoint, making GET requests with cURL is that easy. Next, let’s make some other kinds of requests.
Post Data
Using the POST method, you can transfer data to a server through an API. The API processes the data, then takes steps such as saving it to a database, and returns a response indicating the status of your request.
To use POST and other HTTP methods besides GET, we need to add options to our command. For specifying the HTTP method, we use the -X flag combined with the method. The -X flag is an alias for --request.
For example, to post a new resource through the JSONPlaceholder API, we’ll construct a command with the following:
- -X POST to specify that we’re making a POST request.
- -H “Content-Type: application/json” which sets the header of the request and tells the API that the data is in JSON format. -H is an alias for --header.
- -d '{"title": "My New Post", "body": "This is the body of the post.", "userId": 1}' which is the new resource to be posted. -d is an alias for --data.
- https://jsonplaceholder.typicode.com/posts which is the endpoint of the request.
Together, the command looks like this:
curl -X POST -H “Content-Type: application/json” -d '{"title": "My New Post", "body": "This is the body of the post.", "userId": 1}' https://jsonplaceholder.typicode.com/posts
After sending this request, the API gives us a response confirming the post was made.
{
"title": "My New Post",
"body": "This is the body of the post.",
"userId": 1,
"id": 101
}
(Note that we’re not actually posting anything in this example, since the JSONPlaceholder API is just for practice.)
Put Data
While a POST request adds a new resource, a PUT request updates an existing resource. A PUT request replaces an existing resource with the new data that we send.
For this example, we’ll replace the data of post 1 with new data:
curl -X PUT -H “Content-Type: application/json” -d '{"id": 1, "title": "Updated Title", "body": "Updated body content", "userId": 1}' https://jsonplaceholder.typicode.com/posts/1
And again, we get a response confirming the request went through:
{
"id": 1,
"title": "Updated Title",
"body": "Updated body content",
"userId": 1
}
Delete Data
This one is pretty self-explanatory — we’re going to delete data from the server (not actually, since this is a practice API, but let’s just pretend). To delete post 1, we’ll enter the command:
curl -X DELETE https://jsonplaceholder.typicode.com/posts/1
The API returns an empty response to indicate the data has been deleted:
{}
Output to a File
Thus far, we’ve had responses from the API print to the terminal. However, we can use the -o (output to file) flag to instead save the response to a file, making it easier to read.
To get a list of posts downloaded as a JSON file, we can use the command:
curl -o posts.json https://jsonplaceholder.typicode.com/posts
This file will be saved in the same directory where you ran the cURL command.
This is just the beginning of what you can do with cURL, but these commands will take you pretty far. To dive deeper into more complex commands, see the cURL documentation.
Tip: HubSpot has several APIs you can test with cURL too — check them out here.
cURL Protocols and Formats
The cURL command uses the libcURL client-side URL transfer library. This library supports many different transfer protocols, including HTTPS, SMTP, and FTP.
By default, cURL uses the HTTP protocol. Here are some other protocols and formats that cURL can use:
Hypertext Protocol Transfer Secure (HTTPS)
HTTPS is a popular protocol that simplifies retrieving data, API interactions, automating tasks such as tests, and several network operations when used with the curl from the command line. It is a more secure version of HTTP, hence the S at the end which stands for “secure”.
When using this protocol, the data that is transmitted across servers can maintain confidentiality and integrity thanks to HTTP’s secure encrypted connection. Run the following command, but be sure to specify the web address you want to access:
curl https://www.example.com
File Transfer Protocol (FTP)
The File Transfer Protocol (FTP) transfers files from a server to a client. Use this protocol with cURL to upload files like this:
curl -T [selected-file] “ftp://[target-destination]”
cURL makes for a good replacement for a standard FTP client.
Simple Mail Transfer Protocol (SMTP)
The Simple Mail Transfer Protocol (SMTP) is used to send data to an SMTP server. This data consists of the text you’re sending, the sender, and the receiver. It looks like this:
curl smtp://[smtp-sever] --mail-from [sender] --mail-rcpt \ [receiver] --upload-file [mail-content-file]
Dictionary Network Protocol (DICT)
The Dictionary Network Protocol (DICT) provides access to dictionaries. Using it with cURL, you run the following command:
curl “dict://dict.org/d:hello”
With this command, you get a result showing the dictionary selected and the meaning of “hello” from the dictionary.
Internet Message Protocol(IMAP)
Using IMAP(s) with the curl command enables mail server interaction, retrieval and reading of email messages, and mailbox management. I use the IMAP protocol when I want to search my inbox from the command line.
curl -X ‘SEARCH TEXT "example"’ imaps://imap.example.com/INBOX
Using the command structure above, I am able to search my inbox for emails containing a certain word. Replace “example” with the word you want to find in emails. Change “//imap.example.com/INBOX” with your IMAP server address + the mailbox you want to search.
Lightweight Directory Access Protocol (LDAP)
Using cURL with LDAP is great for accessing and managing servers that store directory service information. If you want to use the command line to complete tasks like authenticate users, update your directory, or modify your access control list, it’s worth using the LDAP protocol.
curl -v ldap://example.com:389/dc=example,dc=com
This command will start an LDAP connection to example.com on port 389 and perform a search starting from the base distinguished name(DN) dc=example,dc=com. Make sure to replace example.com and the base DN with your LDAP server’s actual hostname and base DN.
Post Office Protocol Version 3 (POP3)
POP3 can be used with the cURL command to retrieve emails from a mail server to a local environment. If you want to use a script to automate managing your email, you should definitely try out this command protocol duo.
curl -u username:password -l pop3.example.com -R <message_id> > email.txt
While it’s possible to use POP3 with curl, it is less secure and has limited capabilities.
Real-Time Streaming Protocol (RTSP)
If you want to interact with streaming media servers from the command line, you can use the RTMP protocol with cURL. The command structure looks like this:
curl -i -X Play rtsp://example.com/stream
Keep in mind that the actual video will not be displayed in the terminal. Instead, you will get a text-based response about the media you are requesting.
You can find more protocols on the cURL man page.
Outputs of Curl Command
While API platforms usually provide intuitive interfaces for requesting and transferring data to a URL, cURL can be an excellent tool for the terminal. Here are some everyday use cases for the cURL command and the output of the system.
Quickly Testing APIs From the Terminal Output
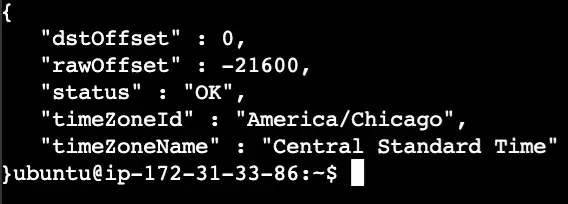
As we’ve seen, cURL allows you to test APIs quickly from your terminal without downloading any API-based application. Let’s use the geolocation API provided by Google. The following command returns the time zone of the Dallas Cowboy Stadium:
curl “https://maps.googleapis.com/maps/api/timezone/json?location=32.7480,-97.0934×tamp=1331161200&key=YourKeyHere”
Check out the output from the command below:

Downloading Images and Files to a Device Output
Since the terminal has access to the file system, you can also download images from URLs easily. For example, here’s the Google logo URL. Using cURL, you can download the image like this:
curl https://www.google.com/images/branding/googlelogo/2x/googlelogo_light_color_272x92dp.png > google-logo.png
Check out the output from the command below:

Using cURL and the URL of the image returns the binary data of the image. By storing the raw image data in an image file (with a .png extension matching the extension of the original image), you can save the image on your device.
Make cURL work for you.
cURL is a CLI tool that allows you to request and transfer data over a URL using different protocols. It gives you flexibility and control of URLs on the terminal.
Using cURL on the terminal is simple but may not be intuitive for every user. By providing the URL and the options needed, you can request and download data from URLs, transfer data to URLs, and more.
Editor's note: This post was originally published in August 2022 and has been updated for comprehensiveness.


![How to get a YouTube API key [tutorial + examples]](https://53.fs1.hubspotusercontent-na1.net/hubfs/53/%5BUse%20(1)-4.webp)
.webp)


