A long time ago, in a computing device far away, there was something called ladder logic. Ladder logic acted as a sort of yes or no programming, providing a simple way to handle simple tasks. This kind of logical behavior is still widely used today though it has moved behind the scenes and is less hands-on. There is often a more prominent use for this type of logic, and there will likely always be a need for it. JavaScript provides for this need with the Switch statement to handle true/false and either-or logic.
This post will explain the JavaScript Switch statement and how to use it in software development. You will learn to understand the syntax, how it behaves, and some caveats. Finally, you will see some code examples and explanations of real-life uses for the switch statement in different applications.
Let's get started.
![Download Now: An Introduction to JavaScript [Free Guide]](https://no-cache.hubspot.com/cta/default/53/52e488f1-9b65-4968-b59f-38009a1c92a3.png)
What is a switch statement?
Switch statements are a great way to handle code that could have multiple logical possibilities. One example would be error checking, and in the case of an error, it could be one of many different kinds. Switch statements let you choose between two or more possible outcomes, each with a different result.
The switch statement lets you leverage more control over the outcomes of tasks, such as user input, error handling, responses to requests, and more. Now that you understand what a switch statement does, let's dissect the syntax to understand how they work.
switch(expression) {
  case x:
    // code block
    break;
  case y:
    // code block
    break;
  default:
    // code block
    break;
}
The switch statement may look confusing at first glance, but it’s very straightforward and can only benefit you to learn. The switch statement starts with its keyword, followed by a conditional expression to test. Within a switch statement are multiple >cases, each case contains a return or break keyword and the optional default case.
>When the expression gets evaluated against each case within the switch statement, the result is either true or false for each case you set up. If all cases return false, the default case serves as a fallback.
JavaScript Switch Statement
Let's look at an example of testing a string value for a match and further dissect the behavior. In this example, we assume a potential of three values provided from user input.
var title = "Dalek";

switch (title) {
  case "The Doctor":
    console.log(`Hello! It's nice to meet you, you can call me ${title}`);
    break;
  case "Dalek":
    console.log(`I am a ${title}! Exterminate!`);
    break;
  case "Cyberman":
    console.log(`We are the ${title}, you will be upgraded!`);
    break;
  default:
    console.log("Earth is defended!");
    break;
}
The switch statement above accepts a single expression, in this example, a string that gets tested against each case. If the outcome of the test is true, the switch statement will execute the respective code. For this example, the test returns true for Dalek and returns the string below.
“I am a Dalek! Exterminate”
After executing the code within the case, the break keyword steps out of the switch statement. Using the break or return statement will prevent the code from continuing to run.
JavaScript Switch Case
Now there are caveats to the way switch cases behave, and being aware of them will help you prevent errant results. If you omit the break or return statement, any case after the passing case will also get executed.
Let’s see what that looks like in the code below.
var title = "Dalek";

switch (title) {
  case "The Doctor":
    console.log(`Hello! It's nice to meet you, you can call me ${title}`);
  case "Dalek":
    console.log(`I am a ${title}! Exterminate!`);
  case "Cyberman":
    console.log(`We are the ${title}, you will be upgraded!`);
  default:
    console.log("Earth is defended!");
}
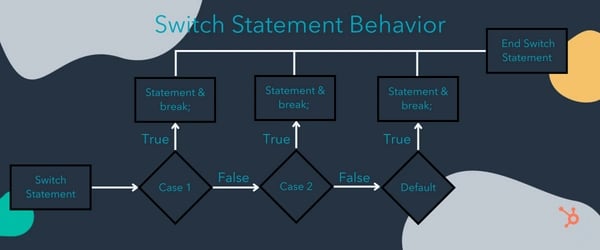
The above line would result in the second (case two), third (case three), and fourth (default) strings all logged to the console. This behavior is by design as it can offer more flexibility to use the switch statements for certain tasks.
The image below demonstrates this behavior.
JavaScript Switch Break and Return
For example, if you have a test that can pass multiple checks, such as scoring enough points to win a game. When the player wins, you may want to alert them of the points they scored and the fact that they are winning.
Let’s look at an example using the code from this post so far.
switch (title) {
  case "Dalek":
  case "Cybermen":
    console.log(`The ${title}, are here! Run!`);
    break;
  case "The Doctor":
    console.log(`Hello! It's nice to meet you, you can call me ${title}`);
    break;
  default:
    console.log("Earth is defended!");
    break;
}
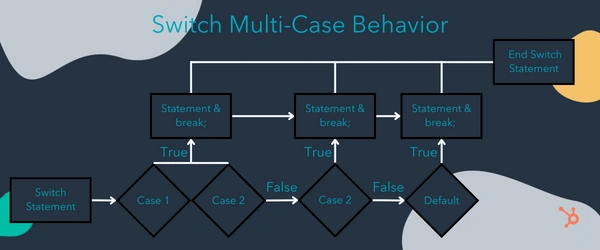
In this example, if either “Dalek” or “Cybermen” is passed, the result will be the same for both conditions. This syntax lets us encapsulate certain behaviors and responses by group or category. The image below shows the flow of the multi-case statement.
Finally, to prevent scope issues, JavaScript provides a way to offer more control. A switch statement has its own block scope, so you will need a way to add scope. Creating a case with its contents wrapped in curly brackets will create a unique scope to give you more dynamic control.
Let's see what that might look like in the code below.
 case "The Doctor": {
    let title = "The Doctor";
    console.log(`Hello! It's nice to meet you, you can call me ${title}`);
    break;
  }
This syntax allows you to create a unique title variable based on a matching case, allowing for more dynamic control.
JavaScript Switch Statement Examples
Now that you understand the behavior of the switch statements and their various syntaxes, let’s recap with an example of the full syntax.
switch(title) {
  case 1:
    //code block
  case 2: {
    // code block
    break;
  }
  case 3:
  case 4: {
    // code block
    break;
  }
  default:
    // code block
    break;
}
Check out the next video to see some examples of the switch statement in action.
A caveat worth considering is that while return statements are allowed in switch statements, there are restrictions. Switch statements can only contain return statements if they are within an object that accepts a callback.
This behavior is because a return statement cannot return information to the global scope. Return statements must be within an object that encapsulates the switch statement.
Getting Started Using JavaScript Switch Statement
Getting started with using the JavaScript switch statement is a simple process. Understanding where to go next is also a challenge, and knowing when and where to use it takes practice. Moreover, learning the best ways to maximize the switch statement by knowing how to set it up is also different.
The best way to solidify your understanding is through practice and repetition with different structures. Solving various problems will help illuminate the most efficient times and ways to use the switch statement.