Here’s what the MySQL error message looks like:

There are several possible causes for this error. Let’s go over the following.
- You’re using an outdated version of WordPress.
- Your plugins need to be updated.
- The MySQL extension isn’t installed.
- The PHP extension is not configured properly.
The “Your PHP installation appears to be missing the MySQL extension which is required by WordPress” error typically occurs with new WordPress installations. But it can also occur if you recently migrated your website, changed your server configuration, or switched your operating system to one that doesn’t include the MySQL extension by default, like Linux.
Whatever the case is, you need to know how to fix it. Let’s walk through five ways.
1. Check what PHP version you’re using.
Before you can diagnose what is causing the MySQL extension error, you have to know which version of PHP your WordPress site is running. You can do so in two ways.
If you’re able to log in to your WordPress dashboard, you can check which version of PHP your site is running right in your dashboard.
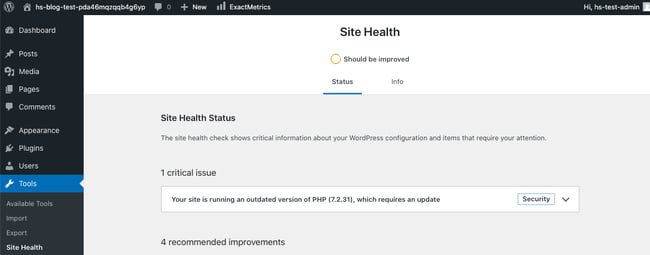
- Select Tools > Site Health.
- Under Site Health Status, WordPress will tell you which version of PHP you’re running, and whether it should be updated.

If you’re unable to log in to your WordPress dashboard, then you’ll have to access your website via an FTP client. This process is more complicated but still relatively quick and easy.
- Log into your server using Filezilla or another FTP client.
- Open your public_html folder. This is the root directory of your WordPress site.
- Create a blank file and name it phpinfo.php.
- Edit this phpinfo.php file.
- Add the following code snippet:
<?php phpinfo(); ?>
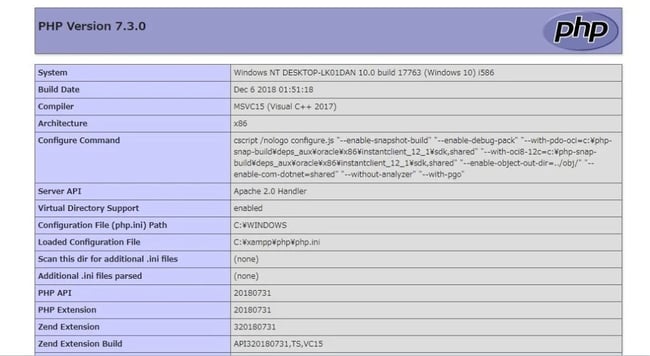
- Now load that file in a browser. To do so, just add /phpinfo.php to your website’s URL. So it will look something like: mywebsite.com/phpinfo.php
- Once loaded, the web page will list all PHP settings currently used on your website, including the version that’s running. This version should be listed at the top.

If your PHP version starts with a “7”, then you likely need to update your WordPress software. You can go to step 2.
On the other hand, if you’re still using PHP 5.X, you might be missing the MySQL extension. You can go to step 4.
Note: It’s strongly recommended that you run your site on the latest version of PHP (which is currently 8.0). It’s faster, more secure, and offers better compatibility with the latest plugins and themes.
If you need to update your PHP installation, follow the steps in How to Update PHP in WordPress.
2. Update WordPress.
If you’re using PHP 7+ with an outdated version of WordPress, you might see the MySQL extension error. That’s because PHP 7.0 deprecated the MySQL extension that the older version of WordPress is looking for. In this case, the simple solution is updating your WordPress.
Newer versions of WordPress will use different extensions, like PDO_MySQL or MySQLi extensions, so you won’t see an error message. That’s why you need to check whether an updated version of WordPress is available.
If you can still log in to your WordPress dashboard, you can check whether there’s an update directly in your dashboard.
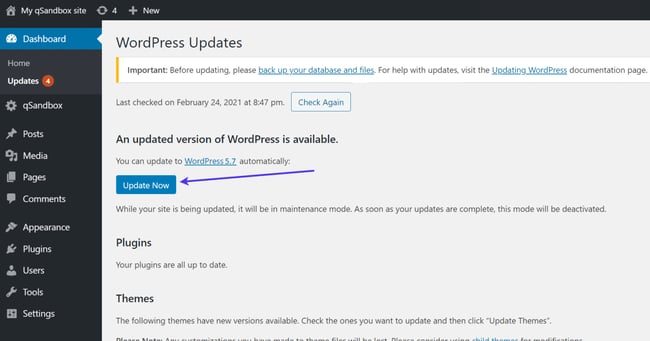
- Select Dashboard > Updates.
- If you see the message “An updated version of WordPress is available,” click Update Now.
- Select Dashboard > Updates.
- Click Update all if the option is available.

If you’re unable to log in to your WordPress dashboard, then you’ll have to update the software via an FTP client.
- Download the latest WordPress .zip file.
- Extract the .zip file.
- Log in to your site’s server via FTP.
- Navigate to the wp-content folder.
- Right click the plugins folder and rename it “plugins.hold.” This will temporarily deactivate your plugins.
- Delete the wp-includes and wp-admin folders.
- Upload the new wp-includes and wp-admin folders from the .zip file you extracted earlier.
- Upload individual files from the new wp-content folder to your existing wp-content folder. This will overwrite the existing files. Only delete the files in your existing wp-content folder that are being overwritten by new files.
- Upload all new loose files to your public_html folder (your WordPress root directory).
- Rename the “plugins.hold” file back to “plugins.”
You should be all set. To test it, visit your /wp-admin page. You’ll likely be prompted to log back in. Once logged in, you should not see an update option for the WordPress core in your dashboard.
You can find more detailed update instructions in this WordPress Codex article if needed.
3. Update your plugins.
Like outdated core software, outdated plugins can have compatibility issues with PHP that prompt the MySQL extension error.
If you can still log in to your WordPress dashboard, you can check that all your plugins are running their latest versions directly in your dashboard.
If you’re unable to log in to your WordPress dashboard, then you’ll have to update any outdated plugins via an FTP client.
- Download the plugin .zip file.
- Extract the .zip file.
- Log in to your site’s server via FTP.
- Navigate to the wp-content folder.
- Click the plugins folder.
- Delete the folder of the plugin you’re updating.
- Find the extracted plugin folder you just downloaded, right-click it, and press “Upload”.
4. Verify that the MySQL extension is installed.
If you are running an earlier version of PHP (5.6 or lower), then the MySQL extension was not yet deprecated. That means, if you’re seeing a MySQL extension error, the extension might not be installed.
To check that, return to your phpinfo.php file that was loaded in your browser in step one. Find the row labelled “Client API library version.” You should see a four-digit number separated by dots.

If you can’t find this row, that means the MySQL extension is not installed. In that case, you can reach out to your hosting provider and have them install it for you. Or better yet, update the PHP version your site is running and you won’t need this extension.
When you’re done, make sure to delete the phpinfo.php file. Since it contains information about your server, you don’t want anyone else to see and use it to gain access to your server.
5. Verify that the PHP extension is configured correctly.
If you are running the latest versions of PHP and WordPress, then it’s possible that your PHP extension is configured incorrectly, which is causing the “Your PHP installation appears to be missing the MySQL extension which is required by WordPress” error.
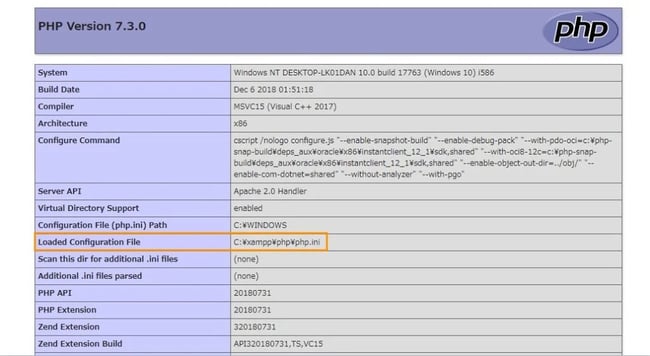
To check that, return to your phpinfo.php file that was loaded in your browser in step one. Find the row labelled “Loaded Configuration File.”

Compare its value to the value in the row labelled “extension_dir.” If they are not matching, edit your php.ini file to replace it with the file path listed for Loaded Configuration File.
Resolving the MySQL Extension Error
Like any error in WordPress, the MySQL extension error can be frustrating — and threaten to impact the user experience on your site. Following the steps above you can resolve the error to get your site up and running as quickly as possible, with the least damage done to your site’s UX.
WordPress Website


![How to become a WordPress developer [+ tips from WCEU speaker Paul Bearne]](https://53.fs1.hubspotusercontent-na1.net/hubfs/53/59_How%20to%20Become%20a%20WordPress%20Developer.png)


