Each month, my team at AerServ sends a spotlight email campaign to feature some our customers.

The problem is that each email campaign could feature a different number of customers — from one to six.
As many email and marketing automation managers know, email template flexibility and nice design don’t often go hand in hand.
This varying quantity of email modules is typically solved in one of two ways.
- Create a template for each quantity of publishers, up to a max of six.
- Create a single template and manually code the additional changes in a single rich text module within the email body.
Both of these solutions are perfectly fine and exactly how most businesses would solve the problem of flexibility + nice design. But that’s not the best way to build an email template.
The best way to solve this is with HubSpot custom modules.
We used HubSpot custom modules to build a flexible email template for publisher spotlights. Now our team can easily create an email that showcase anywhere from one to six publishers. Pretty cool.
Here’s how I did it.
Step 1: Create your email template (the old fashioned way)
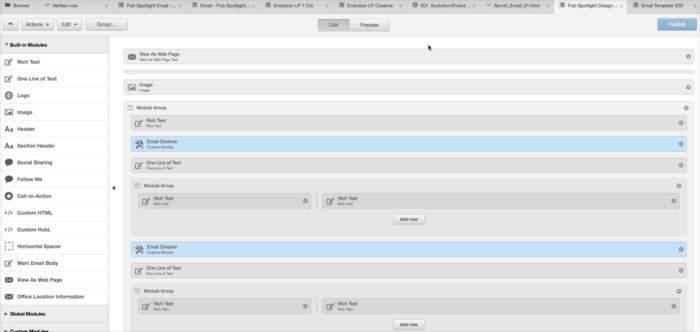
Navigate to your HubSpot design manager and create your email template. You can design your email using the WYSIWYG editor, the same way you would any other email in HubSpot. This means adding modules and editing those modules to have the right CSS and images to create a nice looking template. Make it look like your “final” production template so that it looks exactly the way you want it to if you were to hit send today.
For this template, I started by building my template with sections (remember, I’m looking to have a template that can scale from one to six featured customers). Below, I’ve outlined the code that's included in each of the three primary sections of my email.
[Image Module] - This is the hero image at the top of the email.
--- ! Module Group Start ! ---
[Rich Text Module]
[Custom Module (Email Divider)]
[One Line of Text]
--- !Module Group Start ! ---
[Rich Text Module] | [Rich Text Module]
--- ! Module Group End ! ---
[Rich Text Module]
[Custom Module (Email Divider)]
[One Line of Text]
--- !Module Group Start ! ---
[Rich Text Module] | [Rich Text Module]
--- ! Module Group End ! ---
[Rich Text Module]
[Custom Module (Email Divider)]
[One Line of Text]
--- !Module Group Start ! ---
[Rich Text Module] | [Rich Text Module]
--- ! Module Group End ! ---
--- ! Module Group End ! ---
Does that make ZERO sense to you? That’s okay. Here’s a graphic to illustrate what it looks like in HubSpot.
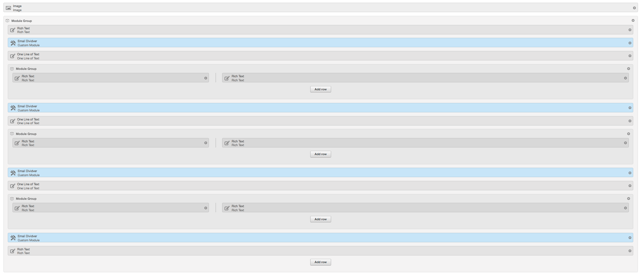
And here’s a breakdown of what’s in each of those boxes.
--- ! Module Group Start ! ---
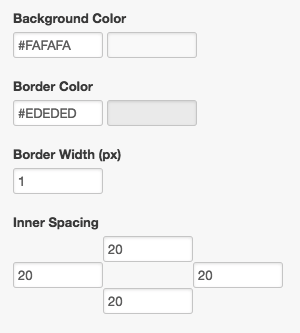
This is the container for all the elements within the body of the email. I use this container to create spacing on the outside edges of all the content. To create the spacing, click on the “gear” icon ![]() and click
and click ![]() . From there, add the amount of spacing to your email body. I used the following:
. From there, add the amount of spacing to your email body. I used the following:

[Rich Text Module]
This is some intro copy to the entire email.
[Custom Module (Email Divider)]
This acts as a line divider for the content within the email. It’s also a custom module, but if you want to learn how to build this one, you’ll have to wait for the next post 😊
[One Line of Text]
This is the title of the customer we’ll feature in that section. I put some additional CSS on this module to make the text look the way I wanted. In my case, I needed it center aligned, blue, bold, and 18px in font size. To do that, go to your CSS declarations and add the following.
In “Custom Inline Styling”:
text-align: center; font-size:18px; font-weight: bold; color: #2199e8;

--- ! Module Group Start ! ---
I use the grouping feature to wrap these elements together and style them slightly differently from the body of the email. This is how I accomplish the grey background you see.
To make the background grey, here’s the code you need. Edit your CSS declarations for the group container and add the following:
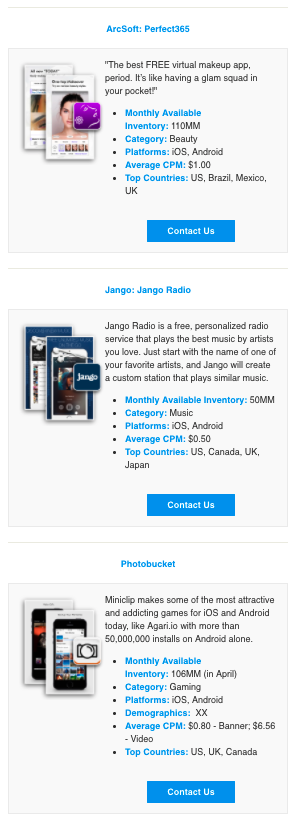
[Rich Text Module] | [Rich Text Module]
Used for Graphics | Used to describe the customer and put a CTA in the email.
--- ! Module Group End ! ---
You can repeat building these containers three different times to have the same email layout I’ve got. Once everything is prepped, preview the template one more time before moving onto the next step.
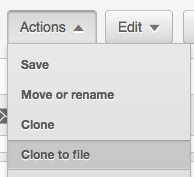
Step 2: Use the “Actions” menu and clone your email to a file with “Clone to file”
This will create an HTML version of your email template ready for you to strip out the elements of the email you need for a custom module. In my case, I needed to take the three spotlight sections in the example GIF and put them into a new custom module (Step 3).
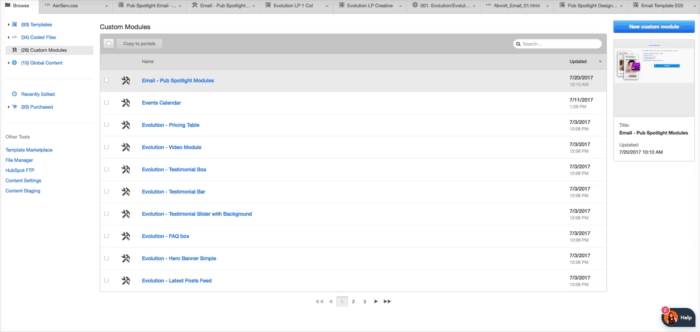
Step 3: Create a custom module
Navigate to your design manager and create a new custom module.
Step 4: Add a “CHOICE” field to your custom module
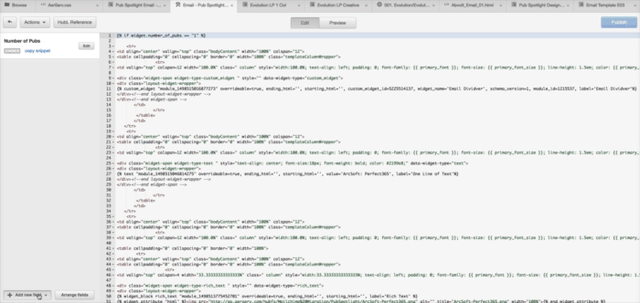
Name the choice field. In my case, I called it “Number of Pubs.” This will be used in step five to declare the IF statement for your future email template.
At this point, you’ll also want to determine how many choices someone using your template will have. For my example, I used six choices. Someone could choose one publisher or two, three, four, five, or six and the template will respond accordingly.
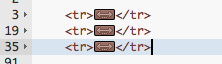
Step 5: Copy the HTML from the “Clone to file” template you made
Go back to your newly cloned email (the one from step 2) and copy all the code you created. Make sure you grab all the stuff you want and nothing that you don’t. In my case, I grabbed the three table rows (<tr>) that made up my three spotlights.
In code, it looked like this (when it was all collapsed):
If you want to see the entire thing, here’s a Google Doc that has all the code.
Step 6: Prepare your IF/ELIF statements
If you’re not familiar with IF/ELIF (else if) statements, it might be good to checkout how they're used in HubSpot design documentation or any other learning center like Udemy, or Codecademy. It’s pretty simple stuff, though — it basically just means “if x do y, else if xx do yy,” and so on.
The important thing is to remember that you have to tell the code when you’re done with the IF/ELIF statement by using { % endif % } at the end of your code.
It would look something like this:
In my custom module ,it’s like this:
, which ends the IF/ELIF statement and makes it all work.
Here’s what it looks like on my custom module:
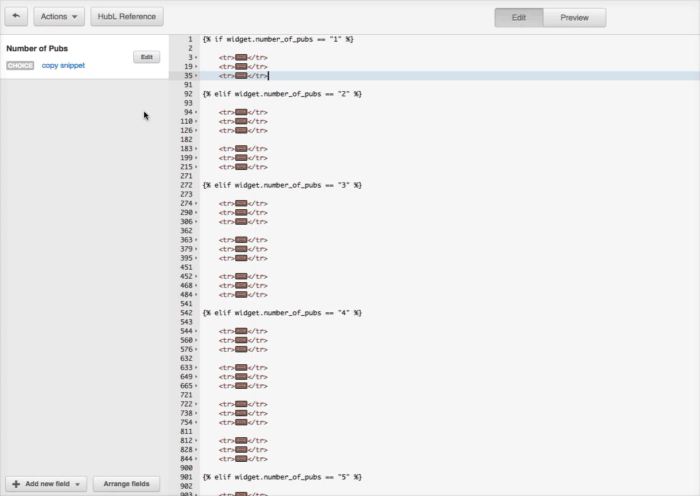
Step 7: Copy your HTML sections into your IF/ELIF statements
You’ll now want to copy and paste your code however many times you need it to appear. For my template, I need to take the three table rows (<tr>’s) and repeat a set of three for every single one customer spotlight.
This means if I want to have two featured spotlights, I’ll need six <tr>’s to appear in the code. For three, I’ll need nine, etc.
Step 8: Create a new email template with your new custom module
Now that you’ve created a custom module (l assume you’ve saved the module already), you need to create a new email template. It’s probably easiest to just clone the same template you started with — the one from the very beginning of the exercise — and just delete all the stuff you don’t need. You can then replace the stuff you deleted with your one simple custom module.
Here’s what my new custom module looks like inside my cloned email template:

Here’s what the old (original) template used to look like:

All this hard work paid off. Now, on the front end, we can have a single email template that lets anyone building a spotlight email choose between one and six number of spotlight customers to feature. This makes it easy for our team to create beautifully designed emails, fast.


![Plannuh Builds Product With the Customer at the Forefront [Customer Story]](https://53.fs1.hubspotusercontent-na1.net/hubfs/53/IMG_0128-3.jpg)
![How One HubSpot Customer Uses Pop-Up Forms and Workflows to More Intelligently Help Customers [Customer Story]](https://53.fs1.hubspotusercontent-na1.net/hubfs/53/inbound-lorax-ff7a59-light.jpg)


![How TurboTenant Makes Property Management Easy With HubSpot [Customer Story]](https://53.fs1.hubspotusercontent-na1.net/hubfs/53/unique-balcony-architecture.jpg)