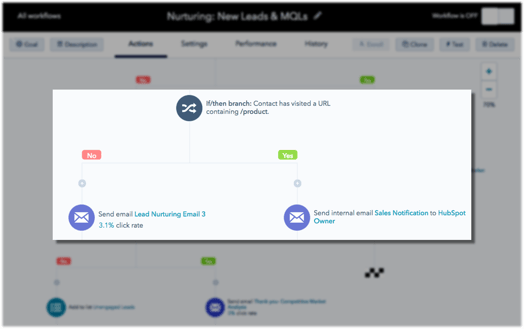
The HubSpot workflows tool is your marketing automation engine. It's designed to save you time on those pesky manual tasks so you can focus on what really matters to your business.
Workflows is one of the most flexible tools in HubSpot. It can be used in many different ways, depending on which tasks your team needs to automate. And with so much flexibility, you have a ton of options in configuring your workflows: dozens of actions to choose from, multiple settings, branches, reports, and more.
In this article, we'll walk you through four of our favorite parts of the Workflows tool you might have missed.

Use the workflows tool to take your automation to the next level.
1. Visual Editing
Let's start with a hot-off-the-press addition to your Workflows tool: The visual editor. If you're reading this article, chances are you know how important marketing automation is to inbound success. In case you're not, get a load of this: According to The Annuitas Group, businesses that use marketing automation to nurture prospects experience a 451% increase in qualified leads.
But powerful automation can be tough. As your team scales, your automation footprint grows and your workflow ecosystem gets more complex. What exactly does this mean? A single workflow can give way to three or four more, and one branch can become several. And when more people are involved in the process, the team needs a quick way to access and understand your processes.
The refreshed interface, which is live in your portal now, makes the process of building workflows a whole lot simpler. Visualize your branching logic as you go without having to open and close branches. Zoom in to optimize a specific component, or zoom out to get a holistic view of your campaigns.

How it works:
The new visual workflows editor is now available to all HubSpot Professional and Enterprise customers. Starting today, you can opt in to the new editor in the bottom-right corner of any of your workflows. And not to worry — you'll be able to switch back to the current builder as you get used to the visual one. Once in the new editor, you'll notice that the workflow subnavigation and all your configuration settings run horizontally along the top of the screen. To get started building workflows, simply click the "+" to start adding your actions.
2. Sales Actions
Now for a pop quiz: How should sales reps spend their day? If your answer was anything other than "selling," think again. But, as it turns out, that's not always the case. A recent study showed that sales reps spend less than a third of their time actually selling — compared to a full 50% spent between administrative CRM tasks and searching for content.
Sales reps often spend much of their day doing CRM administration — creating contacts and companies, logging tasks to follow up on, and creating opportunities. Workflows can save time for sales teams by automating those manual tasks.
Here are a few examples of automated sales actions that can be set up using Workflows:
- Create a task for a sales rep to follow up on after a contact attends a product webinar.
- Create a new deal for a rep when a contact fills out a demo request form.
- Assign leads to your sales team based on location, company size, or persona.
- Send an email to a lead's owner as soon as they fill out a demo or trial request.
How it works:
Navigate to any of your workflows and add an action. In the action selector, choose "Create a deal," "Create a Task," or "Assign leads," and fill out the relevant information in the subsequent step. For full instructions on how to implement sales actions, take a look at this help document.

3. Enroll from Salesforce
Don't use HubSpot CRM? No matter which CRM your sales team uses, automating manual jobs is a no-brainer. Less manual work = more time = more business.
If you use Salesforce CRM and have configured HubSpot's native Salesforce integration, your team can add contacts to HubSpot Workflows with one click, without leaving the Salesforce contact record.
Let's walk through a quick example of a situation in which you might use this functionality. You've just generated an uber-qualified lead and nurtured them with content to the point that they're ready for a conversation with sales. You pass the lead to the right sales rep, and the two have a productive chat. But, as it turns out, the timing isn't quite right for that company to purchase your product — they're a seasonal business, and they don't need your product until business picks back up in a few months.
For the next few months, the rep has two options: ignore the lead, or follow up with helpful and relevant content from time to time until the timing is right to reconnect. With the ability to enroll contacts into Workflows from Salesforce, this rep can easily drop his lead into an automated campaign that will send the lead monthly emails in order to keep that connection warm and continue to provide helpful guidance. The workflow might look something like this:

As a best practice, make sure to track how many contacts you're successful reconnecting with by setting up a goal list of leads being actively worked. That way, leads will be unenrolled from the email series once they've rekindled the conversation with sales.
How it works:
First, set up the Salesforce-HubSpot integration if you haven't yet. Then, add the "Workflow Intelligence" section to your Salesforce page layouts.
Once you've done those two things, find the workflow in your HubSpot portal that you'd like to enable Salesforce enrollment for, and click "Settings." Find "Allow contact enrollment into this workflow from Salesforce?" and select "Yes, allow enrollment from Salesforce."
When your reps are ready to start adding their contacts to Workflows, they can simply select a workflow from the contact record in Salesforce, and click "Enroll."

4. Month-Over-Month Performance
When it comes down to it, are your workflows actually working? Are they accomplishing the goal you set out to accomplish — moving leads to MQL, setting up sales demos with trade show attendees, or whatever else you might have targeted? The built-in goal feature in Workflows enables you to track your workflow's success, but what if you want to track it over time? Your boss might ask you for a quarterly snapshot or a year-to-day report.
To track success of your workflow over time, use the "Performance Trends" chart:

The chart includes four lines:
- Contacts enrolled: The number of contacts currently in the workflow.
- Contacts completed: The number of contacts who finished the final step of the workflow.
- Contacts met goal: The number of contacts who were added to the goal list and subsequently removed from the workflow.
- Contacts lost: The number of contacts who don't meet any of the other three criteria. This category includes those who were manually unenrolled, suppressed, or removed as a result of enrollment in another workflow.
Select the metrics that are most important to you. Deselect any that are less relevant to remove them from the chart.
Use this data to understand what truly drove the success of your workflow. Were there certain months in which a higher percent of the enrolled contacts met the goal? What happened during those months? Which contacts were enrolled? Were changes made to the actions in your workflow? To the delays? How can you emulate the successes in your future execution?
How it works:
For any of your workflows, navigate to "Performance." You'll see a quick aggregate summary of your Workflows metrics — the chart over time displayed above — and several graphs detailing email engagement rates and contact churn.
Use these four HubSpot Workflows features to become an automation expert in no time.
Please note: HubSpot's Workflows tool is available to HubSpot Professional and Enterprise customers.
What's your favorite under-the-radar feature of the Workflows tool? Let us know in the comments below.


