Have a presentation coming up that involves PowerPoint slides? Creating the content and design for a new presentation can be a daunting task.

Between outlining, deciding on a design, filling it out, and finalizing the details, it's not uncommon for a few questions to pop up.
Where's the best place to start? Are some steps better to take before others? How can you make sure you aren't missing anything? And how on earth do you master those essential -- yet slightly technical -- design tricks that can take a presentation from good to great?
![→ Free Download: 10 PowerPoint Presentation Templates [Access Now]](https://no-cache.hubspot.com/cta/default/53/2d0b5298-2daa-4812-b2d4-fa65cd354a8e.png)
We're here to make the process a little easier for you. We've talked to some of the best presenters at HubSpot and have included their tips throughout this blog.
With the following tips in your arsenal, you'll be able to navigate PowerPoint much more fluidly and give a standout presentation that'll leave your audience wanting more.
How to Structure a Powerpoint Presentation
1. Decide on a working title and the main takeaways.
Beyond picking a topic, your first step should be coming up with a working title for your presentation. A working title is more specific than a topic: Think "How the Right Nutrition Can Strengthen Your Kids' Bones" instead of "Raising Healthy Kids." Keep in mind that a compelling presentation title is much like a compelling blog post title: short, accurate, and valuable.
Once you've got your working title, make a list of the main takeaways of your presentation to begin to give it some structure. This'll help you stay focused when writing your outline and elaborating on those sections.
Aja Frost, the Head of English SEO at HubSpot, says, "I try to structure my presentations around a story. Not only does this make the presentation more memorable and engaging, it's also easier to figure out which information is relevant."
To do this, Frost says to pick a protagonist. She adds, "It might be your team, your audience, your customer.... Then, identify the rising action, problem, climax, and falling action. It's just like grade school. This structure works whether you're talking about an accomplishment, a challenge, a big question—anything, really."
2. Create a short text outline with your audience in mind.
Once you have your main takeaways and your story in mind, it's time to begin outlining the content of your presentation in more detail, while keeping your specific audience in mind. A presentation on any topic should sound different if you're speaking to an audience of college students versus an audience of investors, for example. The tone, words, design, and delivery of your presentation should all cater to your specific audience for maximum impact.
Ask yourself: What do your audience members already know? What new information can you teach them? What are they expecting from your presentation? What's going to be interesting to them? What will keep them focused and engaged? Then, make choices during every stage of the presentation process accordingly.
Justin Champion, a content professor at HubSpot, says, "Before diving into a presentation, I create an outline of how it'll flow. I do this by creating an intro (what they're going to learn), the body (what they're learning), and finish with a conclusion (recap what they just learned) I use bullet point slide a lot for talking points I can expand on. Pro tip: use animations to guide the story. For example, instead of showing all the bullets at once, click through to each via animation."
3. Formulate your content as a narrative, if possible.
This may not apply for more formal presentation that have rigid structures (like performance reports), but for presentations that have more flexibility, presenting your content as a narrative can be much more compelling.
Stories appeal to people's emotional side in ways that information, facts, and figures can't. They help you relate to your audience -- and in turn, they'll make you and your message far more interesting to your audience. They also help make complicated concepts more easily understandable to your audience, who may not share the same experience level or work in the same industry.
Kyle Jepson, a senior professor at HubSpot, says, "Since I’m an educator, I always structure my presentations around the learning outcomes I want to achieve. If there are three things I want my listeners to understand at the end of the presentation, I’ll have three sections. Whenever possible, I put some sort of interactive element at the end of each section to assess their understanding. In a virtual event, this might be a poll or a question for people to respond to in the chat. In an in-person setting, workshop activities or small-group discussions work well."
4. Collect data and examples.
While sweeping statements can help you set the stage, supporting those statements with evidence will make your argument more interesting and credible. Data and examples give your argument content, and people will understand what you're saying much better.
But don't just slap random stats on your slides and expect to "wow" your audience. Be sure your data comes from a reputable source and that you're presenting it in a way that's easy to understand, like through accurate charts and graphs.
Finally, don't overwhelm your audience with too much data. According to psychologist George Miller, we can only remember approximately five to nine bits of information in our short-term memory at any given time. Keep that in mind as you collect your evidence.
5. Engage with your audience.
During a presentation, it's important to connect with your audience. But how can you do that when you're just talking at them?
Anni Kim, an INBOUND professor at HubSpot, says, "Staying engaged during a virtual presentation is tough, so provide plenty of opportunities for participation. You should add a slide at the beginning that points out how people can take advantage of the chat and ask questions throughout the presentation."
Once you've set the expectations, keep up on the chat and answer questions as they arise.
Now that you have a structure in mind, you'll start to write the content. Below, we'll give tips for how to start and end your presentation.
How to Start a Powerpoint Presentation
1. Start with a story.
Not to be repetitive, but storytelling is one of the best ways to capture your audience's attention in general. Presentations are no different. Starting with a hook is a great way to get your audience invested in your content.
Champion says, "The best way to start a presentation is with an interesting story that connects to the content. A great way to keep you audience engaged is to make the content interesting."
2. Be yourself.
On the other hand, while you want to tell a story, you also want your audience to connect with you as the presenter.
Jepson says, "During the introduction, I think one of the most important things to do is to set expectations for your style as a presenter. You don't always need to start with a joke or a story. Start out by being you, and then keep being you for as long as you’re on stage."
3. Include surprising or unusual information at the beginning.
While you'll most likely use a standard approach with session title, presenter's bio, and an agenda, you don't want your audience to get bored.
Jepson adds "I think the standard approach (session title, presenter’s bio, agenda) is pretty effective except that it’s usually super boring. I try to include the standard information but sprinkle in things that are surprising or unusual."
Some examples include:
- Adding a photo of your family on the About Me slide. "A lot of presenters put a picture of themselves on their About Me slide. But I think that’s silly because I’m standing right there," Jepson says. "If people don’t know what I look like, they will by the end of the presentation! So I’ve started putting a picture of my wife and kids on that slide and saying something sweet or silly about that."
- Asking people to use their phones. "A lot of in-person presentations start with a request to silence cell phones," Jepson comments. "Sometimes I’ll do the opposite and say something like, 'Before we get started, I want you all to pull out your phones. You probably think I’m going to ask you to silence them. But I’m not. I’m here from HubSpot, and I’m here to help you however I can. So if there’s anyone from your team who might have questions or need help from a HubSpotter, I want you to send them a message and tell them to send their questions to you before we get to the Q&A section of presentation. To give you time to do this, I’m going to send a text to my wife to let her know I made it here safely.' And then I’ll literally pull out my phone and send a text message on stage."
Now that you've structured your post and have ironed out the details of your introduction, it's time to work on the end of the presentation.
How to End a Powerpoint Presentation
1. Recap what the audience has learned.
First and foremost, the end of your presentation should tie everything together.
Champion adds, "Recap what they just learned, explain next steps based on learnings, and offer any associated resources to continue learning."
This will help people remember the content and give them resources to learn more or reach out if they have questions.
2. Q&A.
Another great way to end a presentation is with a Q&A.
Jepson remarks, "I always end with Q&A. The only tricky thing about that is knowing how to cut it off if you’re getting more questions than you have time to answer or if you aren’t getting any questions at all. In both of those situations, I do essentially the same: I cut it off and tell people to come talk to me individually."
For in-person meetings, Jepson will tell the audience to come find him after the presentation to ask more questions. However, for virtual meetings, he'll let people know how to reach him, whether that's via LinkedIn or email.
3. Call to action.
Calls to action are an important component of any piece of content and presentations are no different. What do you want your audience to do with this information?
In your recap, include actionable ways for your audience to incorporate your information into their day-to-day (if applicable). You can also let people know to reach out to you with questions so they know the next steps in case they want to discuss the presentation further.
Now that you have an idea of what you're going to be talking about and how you'll be laying it out, it's time to open up a new PowerPoint presentation and apply those basic design elements.
Outlining Your PowerPoint Design
1. Pick a color scheme.
Before you begin translating your text outline into PowerPoint, you'll want to start by adding some very basic design elements to your PowerPoint slides. First, choose a color scheme -- one that has enough contrast between colors to make colors stand out. Whether you decide to use two, three, or four different colors in your presentation is up to you, but certain color combinations go together better than others. Read the sections on creating color schemes in this blog post to figure out a good color combination.

2. Design your slide backgrounds.
In PowerPoint, less is more. You don’t ever want to let the design distract from your message. But at the same time, you want to get more creative than a plain, white background -- even if you're going for a very simple design.
The three main ways to add a background design to a PowerPoint presentation are: 1) to use a predesigned template from PowerPoint; 2) to create a custom background using a solid color; or 3) to create a custom background using an image. Here's how to do each of those things.
(We also have a few general PowerPoint templates available for download here, which come with a series of videos to teach you some basic PowerPoint creation tips.)
How to Browse Predesigned Templates in PowerPoint
PowerPoint comes with a series of predesigned templates to choose from.
To browse these templates on a Mac: Click on the slide or slides you want to add the background to. Then, click the "Themes" tab at the top of the screen.
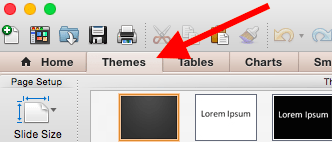
You can either scroll through your options up there, or you can access the themes gallery in a bigger window by hovering your mouse over the theme previews and clicking the dropdown arrow that appears below them.
Right-click the background style that you want. To apply the background style to the selected slides, click "Apply to Selected Slides." To apply the background style to all of the slides in your presentation, click "Apply to All Slides."
To browse these templates on a PC: Click on the slide or slides you want to add the background to. Then, click the "Design" tab at the top of the screen. In the "Background" group, click the arrow next to "Background Styles" to open up the theme gallery.

Right-click the background style that you want. To apply the background style to the selected slides, click "Apply to Selected Slides." To apply the background style to all of the slides in your presentation, click "Apply to All Slides."
Pro Tip: You can also apply any PowerPoint template you already have as a theme, even if it doesn't show up in the theme gallery. To do that, click the "Browse Themes" option you'll find at the bottom of the dropdown themes gallery, and navigate to wherever the given presentation, template, or theme is located on your computer. Then, click "Apply."
How to Create a Custom Background Using a Solid Color
Want your slide background to be a simple, solid color? The steps to do this are almost identical on a Mac and a PC.
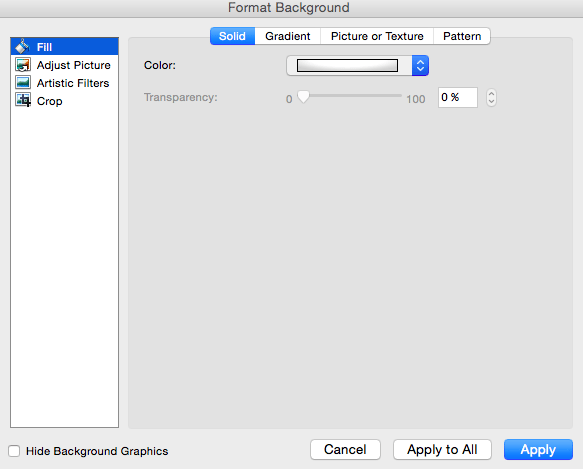
Simply right-click the slide(s) you want to add a background color to, then click "Format Background." In the window that appears, click "Fill" and then "Solid." Notice you can also adjust the gradient or make the background a pattern. Click "Apply" at the bottom to apply the changes.
How to Create a Custom Background Using an Image
Sometimes, making the slide background a high-definition image can really make that slide pop. It also encourages you to cut down on text so that only a few keywords complement the image. PowerPoint makes it easy to create a custom background using an image you own.

First, choose your image. Size matters here: Be sure it's high resolution so that it can fill your slide without becoming blurry or distorted. Here are the 17 best free stock photo sites to help you find some large, great quality images.
To create a custom background using an image on a Mac: Click the slide that you want to add a background picture to. To select multiple slides, click a slide and then press and hold CTRL while you click the other slides.
Next, click the "Themes" tab at the top of your screen. In the "Theme Options" group, click "Background," then "Format Background."

In the window that appears, click "Fill," then "Picture or Texture." To insert a picture from a file, click "Choose Picture..." and then locate and double-click the picture you want to insert. If you want to use this picture as a background for just the slides you selected, click "Apply." If you want to use the picture as a background for all the slides in your presentation, click "Apply to All."
To create a custom background using an image on a PC: Click the slide that you want to add a background picture to. To select multiple slides, click a slide and then press and hold CTRL while you click the other slides.
Next, click the "Design" tab at the top of your screen. In the "Background" group, click "Background Styles," then "Format Background."

In the window that appears, click "Fill," then "Picture or texture fill." To insert a picture from a file, click "File" and then locate and double-click the picture you want to insert. If you want to use this picture as a background for just the slides you selected, click "Close." If you want to use the picture as a background for all the slides in your presentation, click "Apply to All."
Filling In the Content
1. Fill in the text on your slides using concise language.
Your slides are there to support your speech, not replace it. If your slides contain too much information -- like full sentences or (gasp) paragraphs -- then your audience members won't be able to help but read the slides instead of listening to you. Plus ... that's boring. Instead, use slides to enhance keywords and show visuals while you stand up there and do the real work: telling a story and describing your data.
When it comes to your slide text, focus on the main phrases of a bullet point, and cover details verbally. We recommend using up to three bullet points per slide and making any text as simple and concise as possible. A good rule of thumb is this: If you're using more than two lines per slide or per idea, then you've used too much text. Depending on the type of presentation, two lines might even be a little text-heavy.
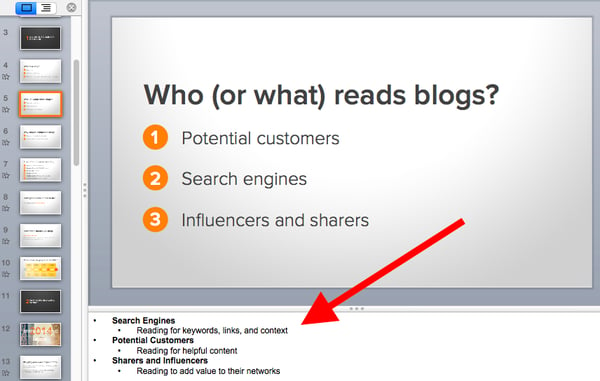
Are you planning on sending your slides to your audience afterward? If you're concerned about putting enough information on the slides for people to understand your presentation when they go back to it later, you can always add little details into the slide notes in PowerPoint. You can find the Notes pane at the bottom of your PowerPoint screen, right below your slides. Click and drag the edge of the pane to make it larger or smaller.
2. Brainstorm your final title with someone else.
Once all your content is there, you're ready to finalize your title. First, refine your working title as best you can on your own. Is it compelling and interesting enough to engage your audience from the very start? Does it accurately reflect your presentation?
Next -- and this is important -- connect with someone else to brainstorm the final title together. Read this blog post for a helpful walkthrough on writing a great title and title brainstorming with others.
Filling In Your PowerPoint Design
1. Choose a font that's easy to read.
Choose either one font to use throughout your presentation, or two (one for your headers and one for your body text) that contrast each other well. Here's a list of 35 beautiful fonts you can download for free to get you started.
If you decide on two fonts, your header font should be bold and eye-catching, and your body text font should be simple and easy to read. (For more guidance on what fonts work best together, take a look at this visual guide.)
2. Embed your font files.
Fonts changing from one computer to another is one of the most common problems PowerPoint presenters have -- and it can really mess up your presentation and flow. What's actually happening in this case is not that the fonts are changing; it's that the presentation computer just doesn’t have the same font files installed.
If you’re using a PC and presenting on a PC, then there is a smooth workaround for this issue. When you involve Mac systems, the solution is a bit rougher.
On a PC: When you save your PowerPoint file, click "Save As" and then "Save Options." Then, select the "Embed TrueType fonts" check box and press "OK." Now, your presentation will keep the font file and your fonts will not change when you move computers (unless you give your presentation on a Mac).
On a Mac: In PowerPoint for Mac, there's no option to embed fonts within the presentation. So unless you use ubiquitous typefaces like Arial or Tahoma, your PowerPoint is likely going to encounter font changes on different computers. The best way to avoid this is to save the final version of your presentation slides as JPEGs, and then insert those JPEGs onto your PowerPoint slides. In other words, make each slide a JPEG picture of your slide. (Note that the file size of your PowerPoint will increase if your presentation includes a lot of JPEGs.)
Mac users can easily drag and drop the JPEGs into PowerPoint. If you don't use actions in your presentation, then this option works especially well.
If you want your presentation to appear "animated," then you'll need to do a little tinkering. All you need to do is save JPEGs of each "frame" of the animation. Then, in your final presentation, you'll just display those JPEGs in the order you'd like the animation to appear. While you'll technically have several new slides in place of one original one, your audience won't know the difference.
If you're a Mac user and want to use this option, then be sure to add this to your checklist as the final step.
3. Adjust the font sizes.
Once you've chosen your font, you can start playing around with font size. Carefully choose the font sizes for headers and text, and consistently use the same font face and sizes on all your slides to keep things clean and legible. Be sure your font is big enough so even the audience members in the way back of the room can read them.
4. Adjust line and character spacing.
The biggest PowerPoint no-no is using too much text on a slide. The most effective slides use text sparingly and present it in a way that's easy to read. One trick to make text more legible without changing the font size or layout is to increase or decrease the space between each line and each letter.
To adjust line spacing:
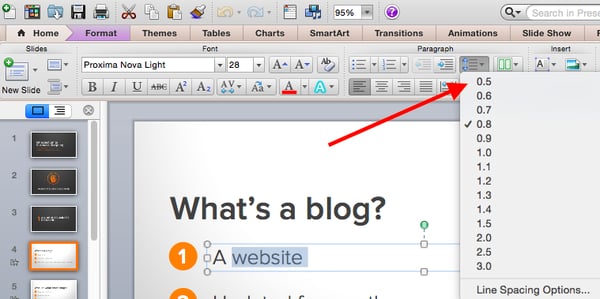
Select the text you'd like to adjust. On the "Home" tab, in the "Paragraph" group, click "Line Spacing" and choose "Line Spacing Options." In the Paragraph dialog box's "Spacing" section, click the "Line Spacing" dropdown list and choose "Exactly." In the "At" text box, adjust the value accordingly. Click "OK" to save your changes.
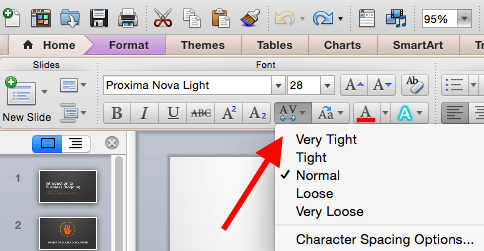
To adjust character spacing:
Select the text you want to change. Then, on the "Home" tab, find and click the "Font" button." Choose "Character Spacing Options" from the dropdown menu. Adjust spacing as needed.
5. Add images.
Great visual cues can have a huge impact on how well your audience understands your message. Using gorgeous images in a slide presentation is the perfect way to keep things interesting.
It's important, though, that you don't use images to decorate. This is a very common mistake. Remember: Images are meant to reinforce or complement your message, but they can be distracting. Focus on finding high resolution images so that they look good when expanded without becoming blurry or distorted.
If you don't have your own images to use, check out our roundup of the 17 best free stock photo sites.
Pro Tip: If you're finding that the background of an image is distracting, you can actually remove it before putting it into your presentation directly inside PowerPoint -- no Photoshop required. Read this blog post for instructions.

6. Use multimedia, but sparingly.
Using multimedia in your presentation, like video and audio, can be an effective way to capture your audience's attention and encourage retention of your message. In most cases, it's best to avoid using more than one or two video or audio clips so you don't detract from your talk or your message.
PowerPoint lets you either link to video/audio files externally, or embed the media directly in your presentation. You should embed these files if you can, but if you use a Mac, you cannot actually embed the video. We'll get to that in a second.
PC users: Here are two great reasons to embed your multimedia:
- Embedding allows you to play media directly in your presentation. It'll look much more professional than switching between windows.
- Embedding also means that the file stays within the PowerPoint presentation, so it should play normally without extra work (except on a Mac).
Mac users: You need to be extra careful about using multimedia files. You'll always need to bring the video and/or audio file with you in the same folder as the PowerPoint presentation. It’s best to only insert video or audio files once the presentation and the containing folder have been saved on a portable drive in their permanent folder. You can also record voiceovers for your presentation or hire a voice actor through Voice123.
If your presentation is going to be played on a Windows computer, then Mac users need to make sure their multimedia files are in WMV format. That can get complicated, so if you want to use PowerPoint effectively, consider using the same operating system for designing and presenting no matter what (if that's something you can control).
7. Design your title slide.
The title of your presentation is often the first impression it gives off -- especially if it's going to be on display as people file in to your presentation -- so it's important to put some time and careful thought into its design.
Here are 20 layout ideas for PowerPoint title slides from Chris Lema:
8. Add any consistent elements, like your company logo.
There's a reason this is at the end. If you add things like your logo that you want to be in the same place on every slide, any adjustments you make to individual slides could slightly alter the alignment ... and you'll have to go back and adjust them all over again.
Preparing For the Presentation
1. Review and edit your slides.
Spend some time on your own flipping through your slides while practicing your talk. Make sure you can check all of the following off the list:
- Your slides flow well and align with your talk.
- Your slides are free of all grammatical, formatting, or design errors.
- Your multimedia files work.
- You've double-checked any mathematical calculations you made yourself.
- You've properly attributed any statistics, data, quotes, ideas, etc. to the original source.
- You've double-checked you're actually allowed to use the photos/images you used. (Don't skip this step. Here's a cautionary tale about internet copyright law.)
- You're sure nothing in your presentation could potentially harm any of your partners, stakeholders, audience members, or your company.
- You've checked with a friend that nothing in your presentation might offend certain people in your audience -- or, if so, that it's worth it.
2. Know your slides inside out.
The best presenters don't read off your slides, so it's important to prepare and practice your presentation ahead of time. You never want to be the person finalizing your talk or presentation half an hour before an event ... that's just poor planning. Plus, what if the projector fails and you have to give your talk without slides? It can happen, and if does, you'll be incredibly happy you spent so much time preparing.
3. Practice using "presenter view."
Depending on the venue, you might have a presenter's screen available to you in addition to the main projected display that your audience can see. PowerPoint has a great tool called "Presenter View," which includes an area for notes, a timer/clock, a presentation display, and a preview of the next slide.
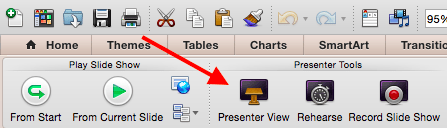
Make sure "Presenter View" is turned on by selecting it in the "Slide Show" tab of your PowerPoint.
To practice using "Presenter View," open the "Slide Show" tab within PowerPoint. In the "Presenter Tools" box, click "Presenter View."
4. Bring your own laptop and a backup copy of your presentation.
This isn't just a bonus step -- it's an essential one. Technology can mess up on you, and you need to be prepared. Between operating systems or even between different versions of Microsoft Office, PowerPoint can get a little wonky. One way to avoid problems is to ensure you have all the right hardware with you. Bring along your own laptop when you're presenting, just in case.
Even if you bring your laptop, but especially if you for some reason cannot, bring a backup copy of your PowerPoint file on a flash drive.
What other tips do you have for nailing PowerPoint presentations?
Editor's note: This post was originally published in October 2015 and has been updated for comprehensiveness.
![Blog - Beautiful PowerPoint Presentation Template [List-Based]](https://no-cache.hubspot.com/cta/default/53/013286c0-2cc2-45f8-a6db-c71dad0835b8.png)
![How to Write an Ecommerce Business Plan [Examples & Template]](https://blog.hubspot.com/hubfs/ecommerce%20business%20plan.png)
![How to Create an Infographic in Under an Hour — the 2024 Guide [+ Free Templates]](https://blog.hubspot.com/hubfs/Make-infographic-hero%20%28598%20%C3%97%20398%20px%29.jpg)
![20 Great Examples of PowerPoint Presentation Design [+ Templates]](https://blog.hubspot.com/hubfs/powerpoint-presentation-examples.webp)


![How to Start a Presentation [+ Examples]](https://blog.hubspot.com/hubfs/how-to-start-presenting.webp)
![17 PowerPoint Presentation Tips to Make More Creative Slideshows [+ Templates]](https://blog.hubspot.com/hubfs/powerpoint-design-tricks_7.webp)

![How to Create the Best PowerPoint Presentations [Examples & Templates]](https://blog.hubspot.com/hubfs/Powerpoint%20presentation.jpg)
![How to Create a Stunning Presentation Cover Page [+ Examples]](https://blog.hubspot.com/hubfs/presentation-cover-page_3.webp)