

The good news is you don’t have to start from scratch. WordPress.com allows you to move your site to your own self-hosted domain on WordPress.org. Before we discuss how to migrate your site, let’s look at the benefits of hosting your site on WordPress.org.
Why Migrate Your Site from WordPress.com to WordPress.org
To understand the benefits of migrating your site, we first have to take a closer look at the differences between WordPress.com and WordPress.org.
WordPress.com is a free hosting service. While it provides plenty of functionality, security, and support to get your site up and running, it does have limitations. For starters, you can only place your site under a subdomain. Meaning, the name of your site will be example.wordpress.com instead of example.com.
You can’t remove WordPress.com’s branding or ads from your site. As a result, you can’t monetize your site by adding your own ads. WordPress.com won’t allow you to extend your site’s functionality by installing plugins and, while you can install a theme, you’re limited to those available in the WordPress.com directory.
For complete control over your site’s appearance and functionality, you can host your own domain on WordPress.org. You will need to download the software, pay for hosting, and manage a web server. In turn, you gain control over every feature on your site, including themes, plugins, affiliate links, ads, code, and third-party analytics.
Most site owners choose WordPress.org for its seemingly limitless functionality. If you need more customization and control to continue to grow your site, then follow this step-by-step guide to migrate your site from WordPress.com to WordPress.org.
How to Move A Site From Wordpress.com to Wordpress.org
- Export your content.
- Remove your site’s search engine visibility.
- Select a hosting provider.
- Install WordPress.org.
- Change your new site’s permalinks settings.
- Import your WordPress.com content .
- Set up a site redirect.
Let’s walk through each of these steps below so you can successfully migrate your site without risking any of your content, media files, or traffic.
Step 1: Export Your Content
You can begin the process of moving your site by logging in to your WordPress.com dashboard.
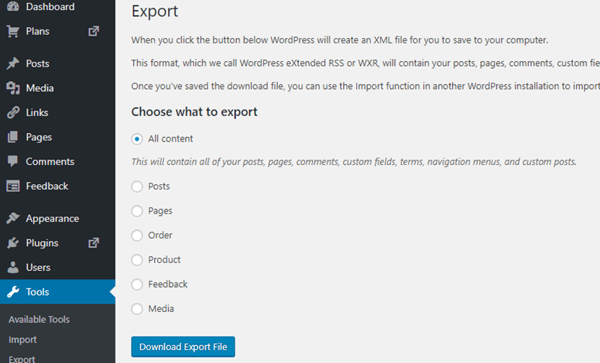
In the admin panel on the left side of your screen, click Tools > Export. Instead of paying for a guided transfer, click the Start Export button in the Export box.
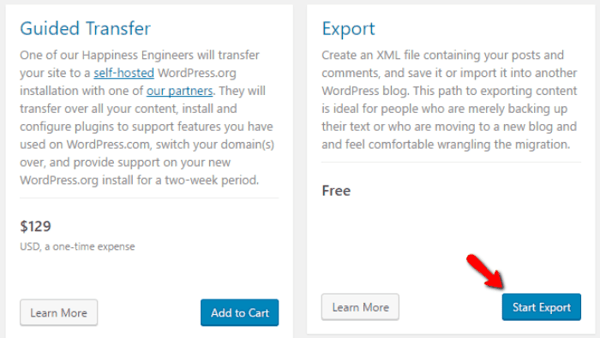
By default, “All content” will be selected. You can choose to only export posts, pages, or other content by selecting those options instead. Once you’ve selected the content you want to export, click the Download Export File button. This will download your content in the form of a single XML file.
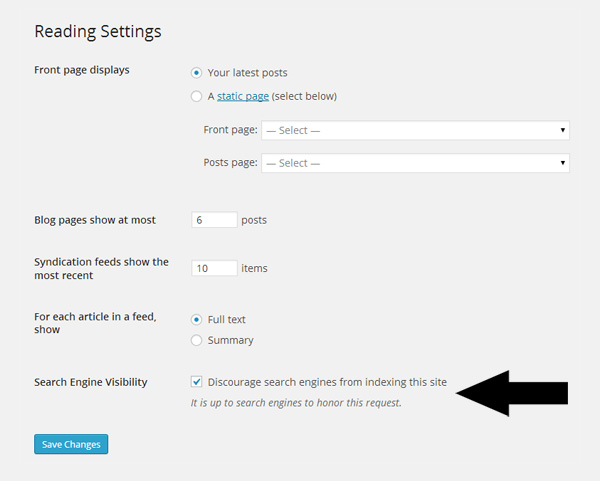
Step 2: Remove Your Site’s Search Engine Visibility
Before you move on to importing content to your new site, make sure to remove the search engine visibility of your WordPress.com site. In your dashboard, click Settings > Reading. Uncheck the Search Engine Visibility box to request that search engines no longer index this site.
Step 3: Select a Hosting Provider
Before installing WordPress.org, you’ll need to sign up for a hosting service for your new WordPress.org site. Managed hosting is among the most popular hosting services because of the speed, security, and support it can provide you and your WordPress site.
Managed hosting essentially means you partner with a company to \ install and run your site on WordPress.org. A managed hosting provider will regularly cache your site, run malware scans and daily backups, and update your WordPress theme and plugins. In other words, managed hosting will provide the most similar experience to running a site on WordPress.com — but with the flexibility and control of self-hosting.
Of the dozens of managed hosting providers to choose from, Bluehost, WP Engine, SiteGround, and WPMU Dev have a reputation for reliability and high performance.
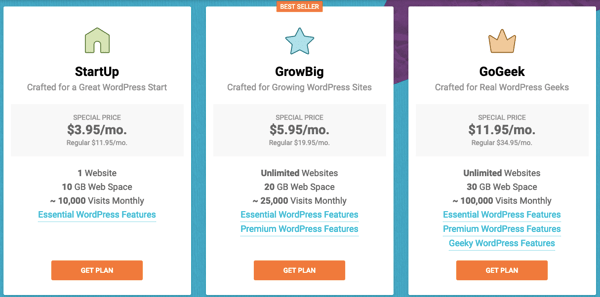
When signing up for a web hosting account, you’ll register a domain name and select a plan that has the bandwidth, storage, and security required for your site. Most providers offer three plans with each tier increasing in functionality and price. You can take a look at SiteGround’s hosting packages below.
Step 4: Install WordPress.org
Now it’s time to install WordPress.org. Most hosting providers offer an automated installation process. For the sake of this tutorial, let’s say you selected one of the above hosting plans with SiteGround.
You’ll then log in to your new web hosting account and be greeted by a pop-up window asking if you want to set up your website now.
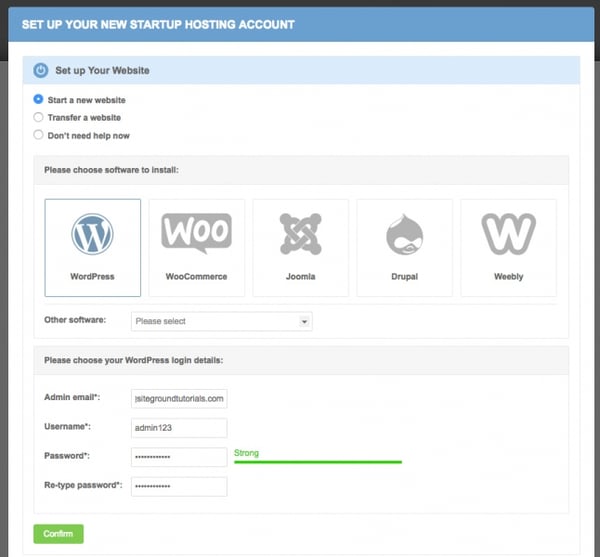
You’ll select “Start a new website” and click WordPress. A new section should appear asking for an email address, an admin username, and password for your new WordPress site. When you’re ready, click Confirm. Then click Complete Setup on the next screen.
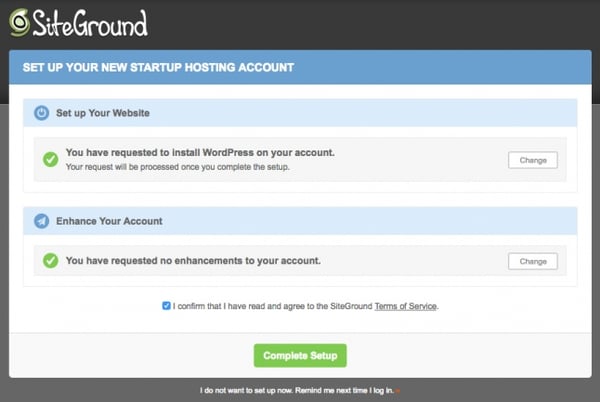
When the installation is complete, you'll receive a notification that your WordPress.org account is ready to use. To visit your new site, click Proceed to Customer Area and navigate to the My Accounts tab. Then click the Go to Admin Panel button.

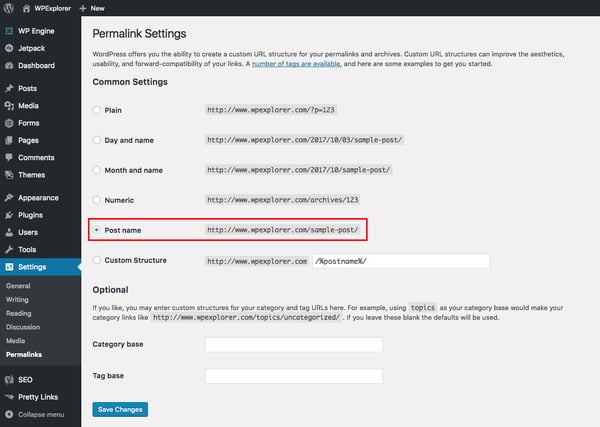
Step 5: Change Your New Site’s Permalink Settings
In the admin dashboard, you’ll want to configure the settings of your new blog. To begin, you can optimize the permalink structure for search engines. To do this, just navigate to Settings > Permalinks and select “Post Name.”
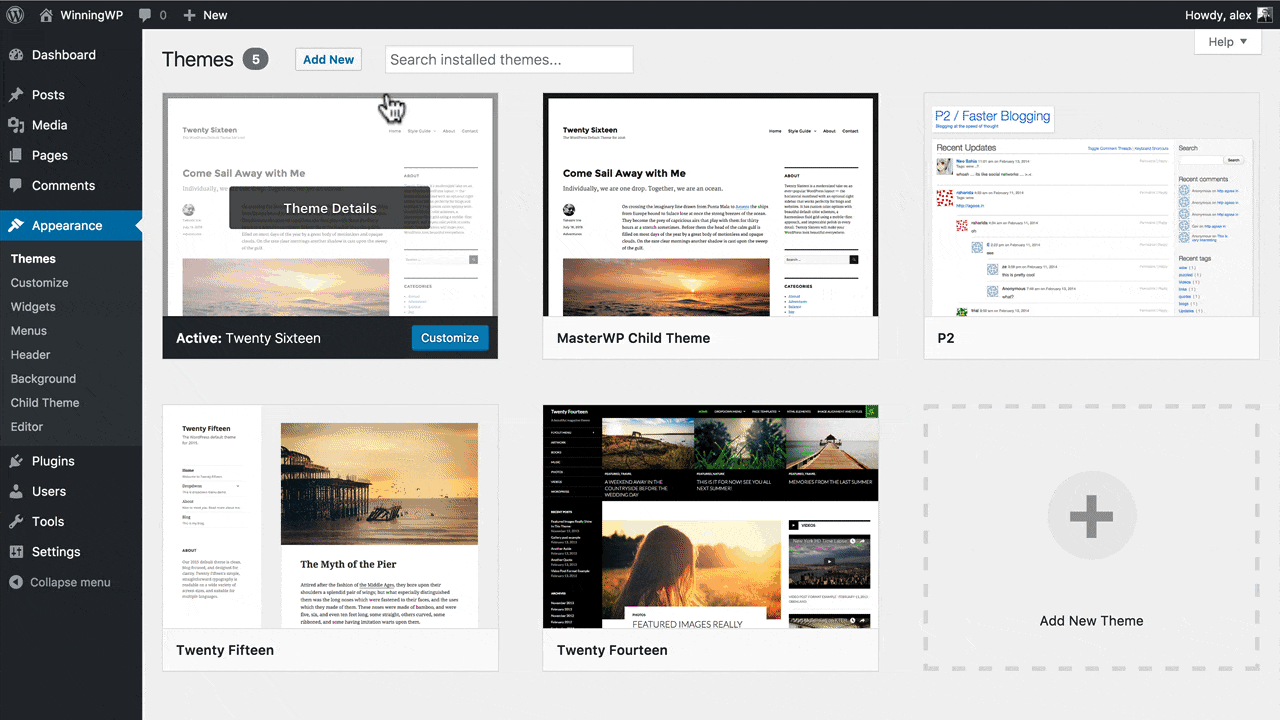
Step 6: Install a Theme
While other content can be exported from your WordPress.com site and imported to your WordPress.org site, your theme can not.
If you’d like to stick with the same theme, many WordPress.com themes are also available in the WordPress.org theme directory so you can simply search for and install the theme on your new site.
To do that, go to Appearance > Themes in your dashboard. Then, click Add New. From there, you can search for your theme by name and install it.
On the other hand, you may want to explore premium themes at StudioPress, Themify, and other sites that are available to you. Once you find a theme you like, download it and return to your WP dashboard. You can follow the same steps but instead of clicking Add New, click Upload Theme. You’ll find the theme in a .zip file on your computer. Then click the Activate button.
Step 6: Import Your WordPress.com Content
Next, you can import your content from your WordPress.com site. Just click Tools > Import > WordPress. You’ll be prompted to install a plugin called WordPress Importer.
After the plugin installation is complete, you need to click on the Run importer link to prompt a new window. There you can upload the XML file that you previously downloaded from WordPress.com by clicking Choose File.
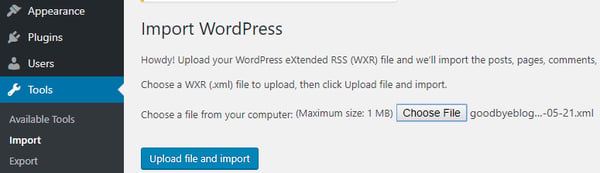
Before you upload this file, make sure to check the maximum size limit you can upload. If your XML file is over the limit, you have a few options. You can ask your hosting company to increase the file size limit or you can use the WordPress WXR File Splitter to split your file and upload it in sections.
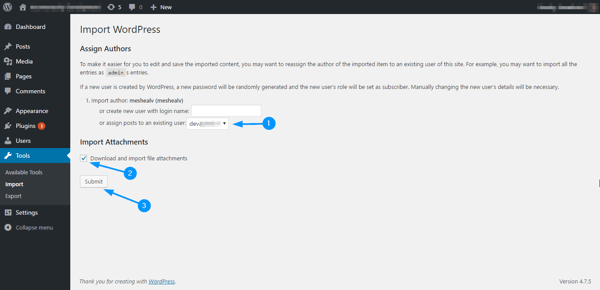
When importing the XML file, you’ll be prompted to assign an author to it. In this window, make sure to check the box labeled “Download and import file attachments” to import your images.
Now, all that’s left to do is set up a site redirect so that any visitors who try to go to your WordPress.com site are redirected to your new site on WordPress.org. This will ensure you don’t lose any traffic after the migration.
Step 7: Set up a Site Redirect
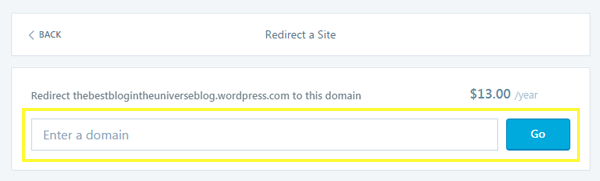
You can use the Site Redirect upgrade feature to set up 301 permanent redirects. To do that, go to the WordPress.com Site Redirect page. Then enter your new domain name in the box, click Go, and fill in your payment information. Note that you’ll have to pay $13 annually to maintain the redirect.
You should not delete your WordPress.com site if you are using this redirect feature. You also should not delete your old site if some of your images and other files are still hosted on WordPress.com.
Following the steps above, you can transfer your site from WordPress.com to WordPress.org to leverage the full potential of a self-hosted site. Now you can choose from more themes and must-have plugins to expand your site’s functionality and better meet the needs of your visitors.

Wordpress Website
![How to become a WordPress developer [+ tips from WCEU speaker Paul Bearne]](https://53.fs1.hubspotusercontent-na1.net/hubfs/53/59_How%20to%20Become%20a%20WordPress%20Developer.png)


