

Why upload HTML files to WordPress? If you're building or growing a WordPress website, importing HTML files and pages can save you significant time when setting up your website or when adding new, customized content. Sometimes you might want to build a custom HTML page or use pages from an older website and then add them to WordPress.
In this post, we'll show you how to add your HTML files and pages to your WordPress site.
Download Now: How to Launch a WordPress Website
[Free Guide + Checklist]
[Free Guide + Checklist]
We'll cover:
- What is an HTML file?
- Why Upload HTML Files to WordPress
- How to Upload an HTML File to WordPress
- How to Add an HTML Page to WordPress
What is an HTML file?
HTML stands for "hypertext markup language," which is a language used to create and structure webpages. HTML files are text-only documents, and they contain highly interactive content that’s designed to be viewed on a web browser. HTML files can be created from scratch, or you can take existing files — like Google Docs — and convert them into HTML.
Below is an example of what an HTML file could contain.
See the Pen HTML File Example by HubSpot (@hubspot) on CodePen.
HTML files can be loaded on any type of web browser. This makes them more mobile-friendly, because they’ll render properly regardless of the device or operating system being used. If you have multiple people working on your website, or if you have outsourced the job to an external developer, HTML files are a great way to distribute content before publishing it on your website.
But, this isn’t the only benefit of using HTML files. When you’re working in WordPress, HTML files are great for creating customized content that may not be offered natively with your current WordPress theme.
Read on for some additional reasons to upload HTML files and webpages when building your site on WordPress.
How to Launch a WordPress Website
Learn how to launch a website on WordPress with this step-by-step guide and checklist. Learn how to...
- Set up your domain name.
- Install an SSL certificate.
- Analyze your content.
- Back up your site.
Download Free
All fields are required.
Why Upload HTML Files to WordPress
WordPress isn't just a website builder, it's a content management system. Which means, even if your site is hosted on WordPress, you don't have to create every single page within the WordPress interface.
When it comes to creating webpages, WordPress has its benefits. You can create beautiful pages with pre-designed themes, and you can even install page builders like Elementor to create sales pages, landing pages, and product pages.
However, you may want to store custom HTML files in your WordPress dashboard. Here are some of the reasons you’ll want to.
You don’t want to rebuild pages from scratch.
You might have an existing HTML page that converts well, and rather than rebuilding it on WordPress, you can save time by just uploading the page directly. This also reduces the risk of human error, because rather than manually copying and pasting code, you can simply upload the content altogether via an HTML file.
You want to customize your page beyond a bottled theme.
Another benefit of uploading HTML files is that it allows you to customize your content outside of what your theme may allow. For instance, let's say your old site used a template or page that you really liked, but it's not offered on WordPress. You can copy the HTML for that content, and then upload it to your WordPress site.
Or, you can recreate the content from scratch and write the HTML yourself. Once complete, upload your HTML file to WordPress, and presto! You now have a new, customized page or feature at your disposal.
It’s easier to verify your website with services such as Google Search Console.
Lastly, one big benefit of uploading HTML to WordPress is that it helps you verify your site on Google Search Console. To use Google Search Console, you first need to verify your website, which involves uploading a special HTML file to WordPress. This gives Google access to your data and ensures your site is indexed properly by Google's search engine.
Ready to start uploading? Read on for a step-by-step guide to uploading HTML files to WordPress.
How to Upload an HTML File to WordPress
- Navigate to your Admin Dashboard.
- Click 'Pages' in the left sidebar.
- Choose an existing page or create a new one.
- Click 'Add Block.'
- Add a 'File' block.
- Choose your HTML file.
1. Navigate to your Admin Dashboard.
You can use the WordPress Visual Editor to quickly add HTML files to your website. To access the Visual Editor, first go to your admin dashboard.

2. Click 'Pages' in the left sidebar.
Next, look at the left-hand sidebar. There should be an option labeled "Pages." Click it. That should load a new screen to the right, similar to the example below, where you see all the pages you’ve created.

3. Choose an existing page or create a new one.
Now, you should have the option to either edit an existing page or add a new one. To add a new page, simply click the button next to the “Pages” title that sasys "Add new."
 If you would like to edit an existing post, click on the post name itself, and you’ll immediately load the editor. The Visual Editor should open by default, but if you’re also using a page builder such as Elementor, you’ll want to hover over the page’s name and click “Edit,” instead of “Edit with Elementor.”
4. Click 'Add Block.'
Once you've accessed the Visual Editor, click the option in the top left to "add block." This will trigger a dropdown menu on the left-hand side of the screen.

5. Add a 'File' block.
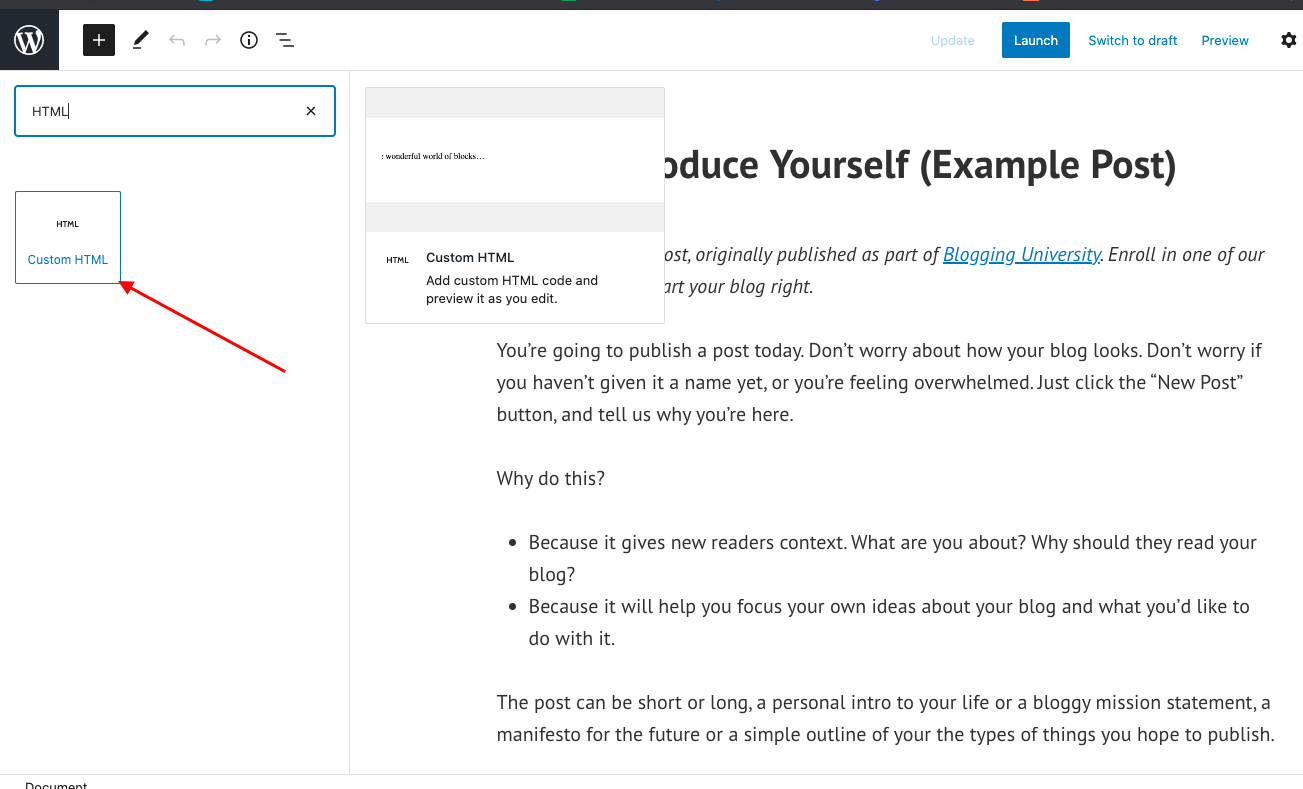
Using the search bar at the top of the left-hand menu, search for the term "File." Then, click on it to upload a new file.

Alternatively, you can also search for "HTML." This block will allow you to input HTML, but you'll have to copy and paste it manually into a code block. This works if you're uploading short snippets of code, but it's more efficient to use the media option for larger uploads.
6. Choose your HTML file.
In the module that appears, select the option to "upload." Then, choose the HTML file that you wish to add to the post. Once your file is selected, it should be automatically added to your post.

You can also add the file to your media library. This will allow you to reuse the HTML file in other blog posts.
How to Fix "File Type is Not Permitted for Security Reasons" Error
In some cases, you may encounter this error when trying to upload your HTML file to your blog post or media library.

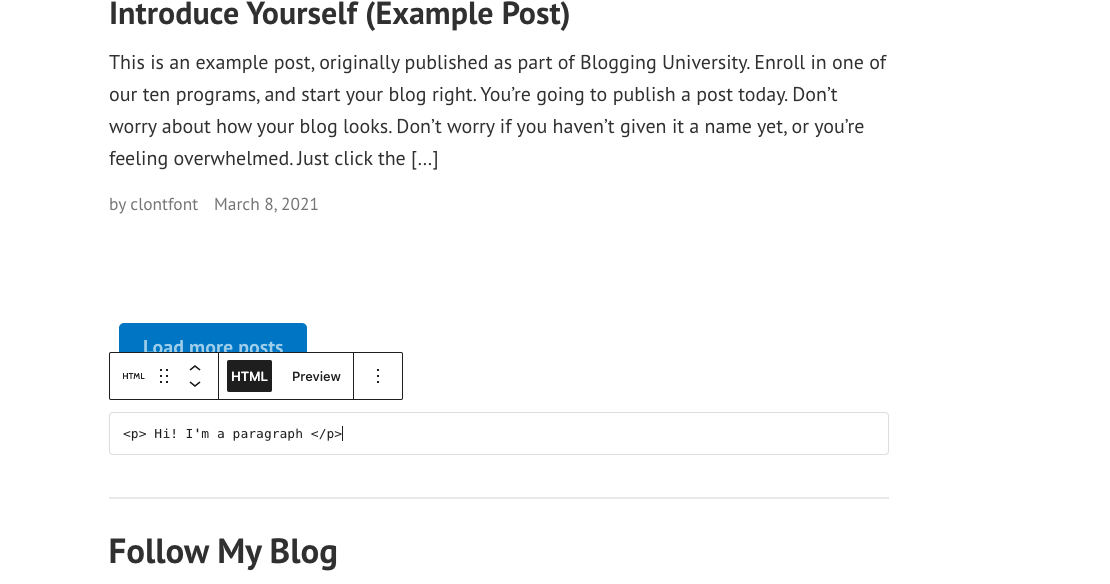
The easiest way to navigate this is to use an HTML block instead. With an HTML block, you can copy all of the code in your HTML file and paste it directly into your WordPress page — similar to the example below.
How to Add an HTML Page to WordPress
Let's say we were the proud designers of the site, Lonéz Scents, and we wanted to migrate this page to WordPress.

Let’s take a look at the process of migrating this page to WordPress.
1. Compress the HTML page into a ZIP folder.
Export the webpage from your current CMS. You don’t need to touch any of these files, unless you want to customize them before uploading them to WordPress.
Make sure this HTML file is compressed into a ZIP folder.
2. Navigate to your WordPress website’s cPanel.
Excellent! Now you have the HTML file you’ll be migrating to your WordPress website.
How to Launch a WordPress Website
Learn how to launch a website on WordPress with this step-by-step guide and checklist. Learn how to...
- Set up your domain name.
- Install an SSL certificate.
- Analyze your content.
- Back up your site.
Download Free
All fields are required.
Next, it’s time to access your cPanel, where your website's database is located. You get these logins from your hosting provider.
Pro Tip: If you'd rather someone else do the heavy lifting for you, some hosting providers will migrate your webpages for you for free. Make sure to check with your hosting service.
To navigate to the cPanel, login to your hosting provider’s website and find out where they keep the link to your cPanel.
In Bluehost, click “Advanced” on the sidebar, scroll down to “Files,” then click “File Manager.”

3. Enter your public_HTML folder inside your cPanel.
Your public_HTML folder will be found in the left sidebar. If you host several websites, you’ll need to choose the website where you want to migrate the page to.

4. Add a new folder to your website’s public_HTML folder.
Click the “+Folder” button at the top of the screen to create a new folder. Now, name your new folder and then click Create New Folder. (This folder name will be a part of your HTML page's URL.)

5. Upload the zipped HTML file to the new folder.
Once the folder is created, click on it. Then, click on the Upload button at the top of the screen. There should be an option Select File and you can choose the zipped HTML file you want to add.
6. Extract the files.
Once uploaded, your zipped HTML file is now in the folder. Select the file and click Extract at the top-right corner of the screen. Now, click Extract files.

7. Preview your page.
You'll now see an option called Extraction Results. Click Close. Then, click Reload in the middle of the screen. You'll see the unzipped HTML file in the folder. (If you like, delete the ZIP file. It won't affect your extracted HTML page or any other folders.)
Finally, you can preview the page by visiting yourdomain.com/FolderName/HTMLFileName.html.
And you're done! You now know how to upload HTML files to your WordPress website.
Upload HTML Files to WordPress to Build Your Site
Uploading HTML files to WordPress may just be the way to go — especially if you want to create a highly customized site that you can’t build with a theme. It’s also a great option for you if you want to migrate your old site to the WordPress platform. The best part is that it’s easy — but make sure to bookmark this guide, so you never get lost during the process.
Editor's note: This post was originally published in July 2019 and has been updated for comprehensiveness.
WordPress Website
![How to become a WordPress developer [+ tips from WCEU speaker Paul Bearne]](https://53.fs1.hubspotusercontent-na1.net/hubfs/53/59_How%20to%20Become%20a%20WordPress%20Developer.png)


