
WordPress site owners have multiple methods for creating custom 404 error pages. Modern content management systems, like HubSpot's Content Hub, also offer drag-and-drop 404 page builders. Understanding available customization methods allows site owners to reduce bounce rates and improve user experience — all while maintaining consistency across all touchpoints.
Each method of building a custom 404 page has different levels of control and technical requirements. This post will dive deep into each method.
Table of Contents
- Why You Need a 404 Page
- How to Create a Custom 404 Page in WordPress
- How to Avoid 404 Pages and Custom WordPress 404 Page Best Practices
- Frequently Asked Questions About WordPress Custom 404 Pages
Why You Need a 404 Page
A 404 error page alerts website visitors that a requested page cannot be found. Mistyped URLs, broken links, or deleted content can all lead to an error page. Generic 404 pages create a digital dead end. Visitors get frustrated when site owners don’t provide alternative navigation paths. They seek information elsewhere, resulting in lost traffic and missed conversion opportunities.
Custom 404 error pages provide alternative content and give visitors somewhere to go. Visitors get relevant content, which improves the site's user experience. Search bars and navigation menus can also be integrated into custom 404 pages. With relevant content at their fingertips, potential customers are moved toward relevant content, reducing bounce rate.
In fact, I've tracked 404 page performance for dozens of client sites, and the data consistently shows the same pattern: sites with custom, helpful 404 pages see 40-60% lower bounce rates from error pages compared to generic theme defaults.
One e-commerce client reduced their 404 bounce rate from 89% to 34% simply by adding product recommendations and a prominent search bar to their error page — those “lost” visitors became conversions instead of bounces.
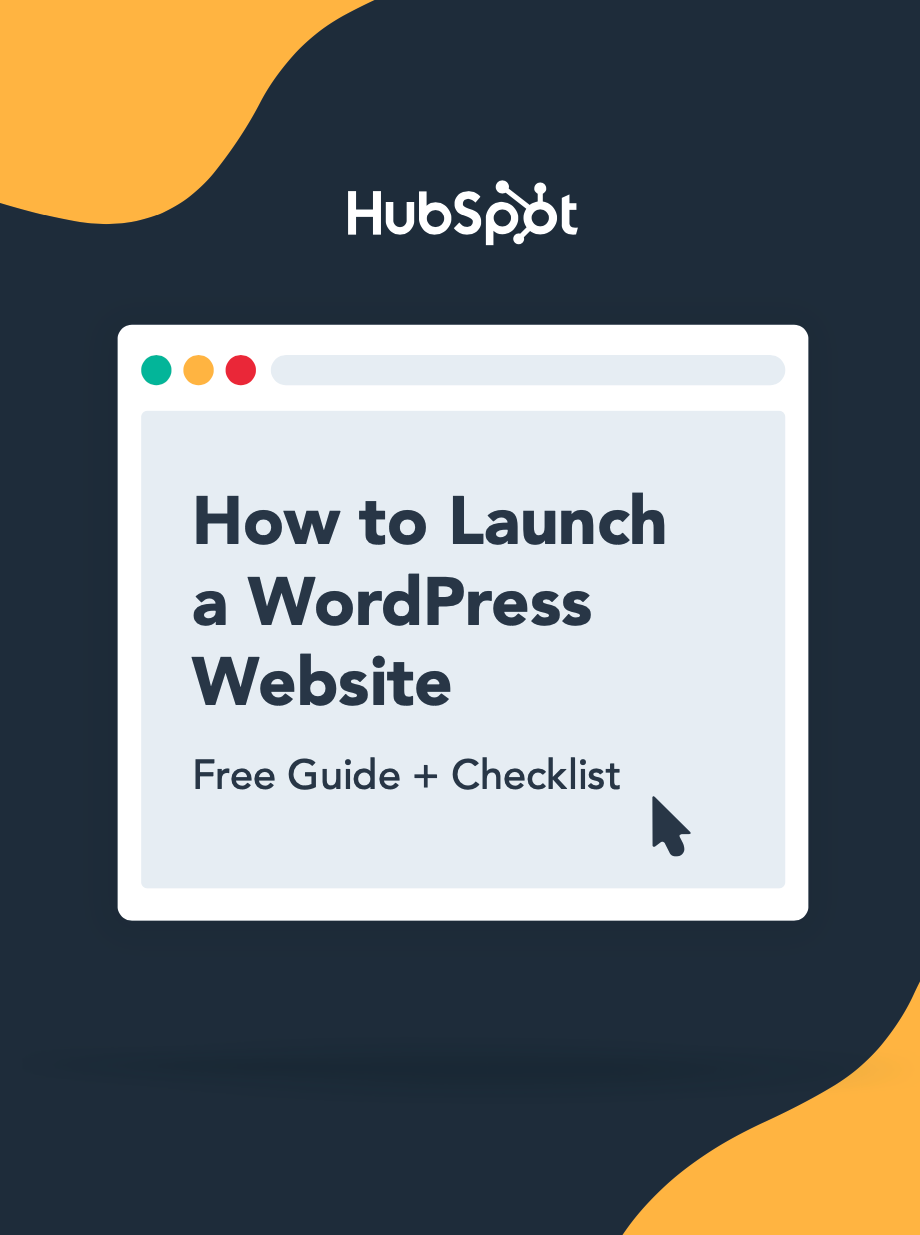
How to Launch a WordPress Website
Learn how to launch a website on WordPress with this step-by-step guide and checklist. Learn how to...
- Set up your domain name.
- Install an SSL certificate.
- Analyze your content.
- Back up your site.
Download Free
All fields are required.
The Benefits of a Custom Error 404 Page
Custom 404 pages give site visitors a place to go when they hit an error. Offering alternative content reduces bounce rates and helps maintain engagement. Error page designs can transform clicking a broken link from a huge hassle to a small roadblock.
Here are the biggest benefits of creating a WordPress custom 404 page.
1. Creates a user-friendly experience
Well-designed 404 pages provide clear, friendly messaging that explains why the requested content is unavailable. Transparency reduces visitor confusion and frustration, increasing the probability that visitors remain on the site to explore alternative content.

2. Helps maintain engagement
Visitors encountering 404 errors still want information, even if there’s a navigation failure. Structured 404 pages direct visitors to relevant alternative pages through curated links, search functionality, and navigation menus. Beyond that, helpful 404 pages guide visitors to related pages. Strategic content suggestions help retain visitor interest.
3. Establishes brand consistency
Custom error pages can showcase brand personality. Brands can craft a message that’s aligned with their voice, making a memorable moment out of a navigation error. Thoughtful messaging demonstrates attention to user experience details and differentiates sites from competitors.
I've seen brands turn 404 pages into viral marketing moments. One travel company I worked with created a 404 page featuring its mascot “lost” in various exotic destinations, with each location linking to relevant travel packages. The page got shared on social media and actually drove direct traffic to their error page URL — proof that creative 404 design can become a brand asset rather than just damage control.

4. Increases SEO presence
Search engines monitor user behavior patterns, including 404 error frequency and visitor responses to error pages. Custom 404 pages mitigate the negative impact of broken links on search engine rankings.
Custom 404 pages also have technical benefits. Customized 404 messages often feature links to popular pages or category indexes. That strategic internal linking structure can help search engines better understand content relationships. Search engines then have an easier time crawling the site, building domain authority through improved crawlability.
How to Create a Custom 404 Page in WordPress
WordPress provides multiple pathways for creating custom 404 error pages, from direct theme file manipulation to visual page builders. Site owners can select methods based on their technical comfort level and required customization depth.
Here’s how.
Method 1. Edit your theme's 404.php file.
Direct editing of the 404.php theme file provides complete control over WordPress custom 404 page structure and functionality. Direct theme file editing requires FTP access or file manager capabilities through hosting control panels, along with basic HTML and PHP knowledge.
Step 1: Access the theme files.
WordPress themes store 404 error page templates in a file named 404.php located in the active theme‘s directory. Site owners can access this file through FTP clients like FileZilla, cPanel File Manager, or WordPress’s built-in Theme File Editor found under Appearance > Theme File Editor.
Step 2: Locate the 404.php file.
Navigate to wp-content/themes/your-active-theme/ and locate 404.php. If the file doesn't exist in the active theme, WordPress falls back to the index.php template. Creating a new 404.php file in the theme directory overrides this default behavior.
Step 3: Edit the template code.
Open 404.php in a code editor and customize the HTML structure, error messaging, and navigation elements. The file typically includes WordPress template tags like get_header(), get_footer(), and get_sidebar() to maintain a consistent site structure.
Step 4: Add custom content.
Insert custom HTML for error messages, search forms, navigation menus, or links to popular content. WordPress functions like get_search_form() add search functionality, while wp_nav_menu() displays navigation menus to help lost visitors find relevant pages.
Step 5: Save and test.
Save changes to 404.php and test by visiting a non-existent URL on the site (example: yoursite.com/this-page-does-not-exist). The custom 404 page should display with all modifications intact.
Pro tip: Before editing theme files directly, create a child theme to prevent customizations from being overwritten during theme updates. WordPress's child theme functionality preserves custom 404.php files even when parent themes receive updates.
From my experience building WordPress sites for clients, direct 404.php editing offers unmatched flexibility. But, customization requires careful attention to code syntax. I once broke an entire site's error handling by forgetting a closing PHP tag. Always keep backups before editing core theme files.
Method 2. Use WordPress full site editing (block themes).
WordPress Full Site Editing enables visual customization of 404 error pages through the block editor interface without touching code. Block themes that support FSE provide template editing capabilities directly from the WordPress dashboard.
Step 1: Verify FSE compatibility.
Confirm the active theme supports Full Site Editing. Check for a templates folder in the theme directory or look for “Edit Site” in the WordPress admin menu under Appearance. Popular FSE-compatible themes include Twenty Twenty-Four, Kadence, and Astra.
Step 2: Access the Site Editor.
Navigate to Appearance > Editor (or “Edit Site” depending on WordPress version). The Site Editor displays available templates, including the 404 template.
Step 3: Select the 404 template.
Click Templates in the Site Editor navigation. Then, locate and select the 404 template from the list. WordPress loads the current 404 page design in the block editor interface.
Step 4: Customize with blocks.
Add and arrange blocks to create the custom 404 page layout. Common blocks for error pages include Heading, Paragraph, Search, Navigation, Button, and Query Loop blocks for displaying recent posts or popular content.
Step 5: Style the template.
Use the block editor's styling controls to adjust colors, typography, spacing, and layout. Global styles applied through the Site Editor affect the entire 404 template while maintaining consistency with other site templates.
Step 6: Save and publish.
Click Save in the Site Editor to publish changes. WordPress immediately applies the custom 404 template to all error pages across the site.
What we like: Full Site Editing democratizes 404 page customization by removing coding barriers. The visual interface shows exactly how the error page will appear to visitors. No more guess-and-check cycle of traditional theme file editing.
Method 3. Use a 404 page plugin.
The 404 page plugin enables site owners to designate any WordPress page as the site‘s 404 error page. This approach leverages WordPress’s familiar editor for creating error page content without custom code or theme modifications.
404 Page has over 100,000 active installations and maintains compatibility with most WordPress themes. This plugin focuses on 404 page assignment rather than redirect functionality, keeping the setup process straightforward. For comprehensive redirect management, WordPress site owners can explore dedicated redirect plugins that handle URL forwarding and link structure changes.
Step 1: Install the 404 page plugin.
Navigate to Plugins > Add New in the WordPress dashboard, search for “404 page,” and install the plugin developed by Peter Raschendorfer. Activate the plugin after installation completes.
Step 2: Create a custom 404 page.
Create a new WordPress page (Pages > Add New) and design the 404 error page content using the block editor, page builders, or classic editor. Include helpful elements like search boxes, navigation menus, popular post links, or contact information.
Step 3: Assign the 404 page.
Navigate to Appearance > 404 Error Page in the WordPress dashboard. Use the dropdown menu under the General tab to select the custom page created in Step 2.
Step 4: Configure settings.
The 404 page plugin provides options for HTTP status codes, allowing site owners to choose between standard 404 responses or HTTP 410 (Gone) for permanently deleted content. Advanced settings include compatibility modes for specific themes and caching plugins.
Step 5: Test the implementation.
Click “Test 404 error” in the plugin settings to preview the custom error page, or manually test by visiting a non-existent URL on the site.
I‘ve found the 404 page plugin particularly valuable for clients who feel comfortable editing WordPress pages but don’t want to touch theme files. One nonprofit client created a 404 page with their donation form embedded, turning errors into fundraising opportunities.
Method 4. Use a page builder (like Beaver Builder).
WordPress page builders often include 404 template editing capabilities as part of their theme builder add-ons. Beaver Builder's premium tiers provide access to Beaver Themer, which allows direct customization of WordPress theme templates, including 404 error pages.
Step 1: Install Beaver Builder and Beaver Themer.
Purchase a Beaver Builder plan that includes Beaver Themer from the official Beaver Builder website. Download both plugin ZIP files and install them through Plugins > Add New > Upload Plugin in WordPress. Activate both plugins after installation.
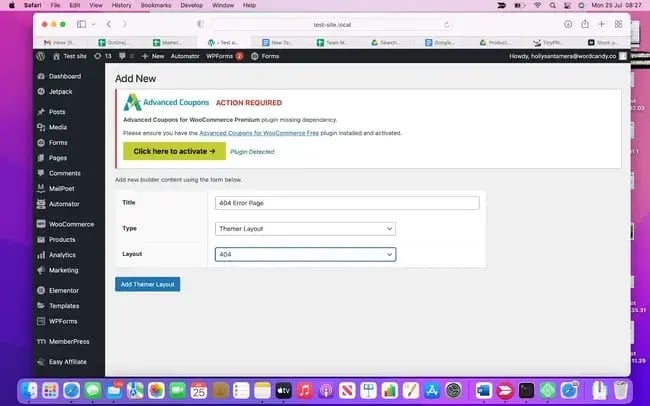
Step 2: Create a new themer layout.
Navigate to Beaver Builder > Themer Layouts in the WordPress dashboard and click Add New. Give the layout a descriptive title like “Custom 404 Page.”
Step 3: Select the 404 template type.
In the layout type dropdown menu, select “Themer Layout” and choose “404” as the specific template type. Click “Add Themer Layout” to proceed.
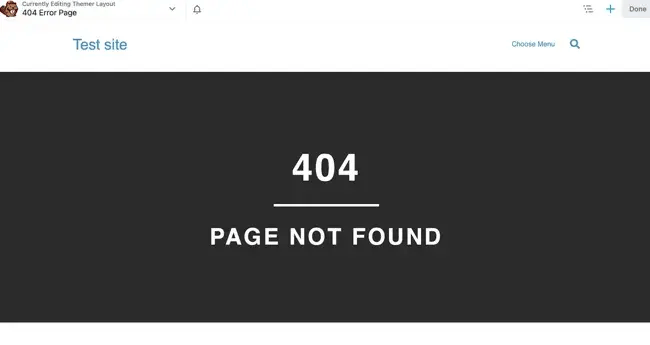
Step 4: Launch the visual builder.
Click “Launch Beaver Builder” to open the page builder interface showing the default 404 error page template. The builder provides drag-and-drop modules for customizing page content and layout.
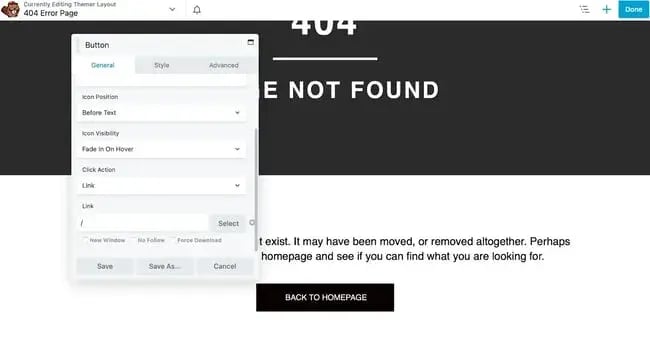
Step 5: Customize the error page.
Modify text modules to change error messaging, adjust styling through the Style tab to match brand colors and typography, and add modules like navigation menus, search fields, login forms, or content sliders to enhance functionality.
Step 6: Publish the template.
Click Done > Publish to save changes and activate the custom 404 template. Test by intentionally visiting a non-existent URL on the site.
Best for: WordPress site owners already using Beaver Builder for page design who want visual control over 404 pages without learning new tools or switching between different interfaces.
Method 5. Use HubSpot Content Hub.
HubSpot's Content Hub provides drag-and-drop website building capabilities, including custom 404 error page creation. Content Hub integrates 404 page design with broader website management, marketing automation, and CRM functionality.
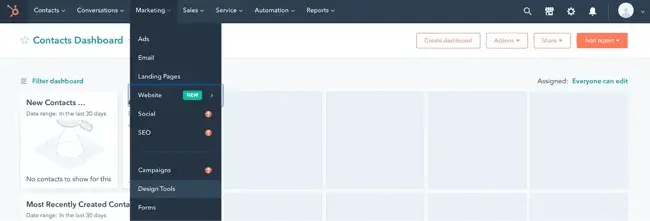
Step 1: Access HubSpot Design Tools.
Log in to the HubSpot account and navigate to Marketing > Design Tools in the main navigation menu. Content Hub's visual page builder allows template creation without coding knowledge.
Step 2: Create a new template file.
Click File > New file in the Design Tools interface. Select a template type — either HTML for custom code or the drag-and-drop visual builder for no-code design. Click Next to proceed.
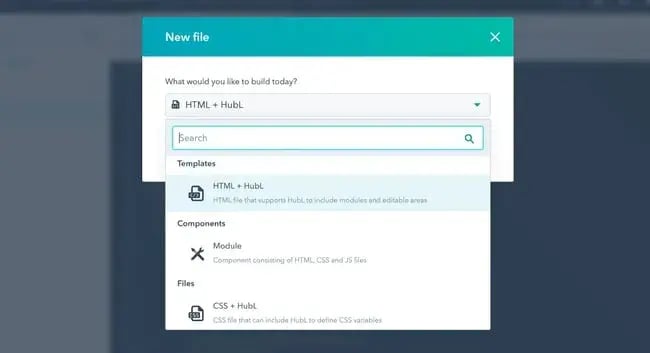
Step 3: Configure template settings.
Check the “template” box to designate the file as a reusable template. Select a page template from the dropdown menu as a starting point, and provide a descriptive file name like “Custom 404 Error Page Template.”

Step 4: Design the 404 page.
Use Content Hub‘s drag-and-drop modules to build the error page layout. Add text modules for error messaging, navigation modules for site menus, CTAs for directing visitors to key pages, and forms for capturing leads even from error pages. The platform’s AI content writer can assist with generating engaging error messaging that matches the brand voice.
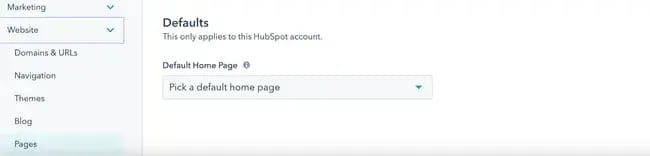
Step 5: Apply the template to the website.
Navigate to Settings > Websites > Pages in HubSpot. Select the System pages tab and use the “404 error page” dropdown menu to choose the custom template created in the previous steps. Save changes to activate the new 404 page across the website.
What we like: HubSpot Content Hub connects 404 page design with comprehensive website analytics, allowing site owners to track how visitors interact with error pages and identify patterns in broken links or incorrect URLs. The platform's built-in A/B testing capabilities enable optimization of 404 page messaging and navigation to maximize visitor retention.
I've worked with marketing teams using HubSpot who discovered their 404 pages were receiving significant traffic from outdated backlinks. By customizing their error page with HubSpot's CMS and adding targeted CTAs, they converted what were previously lost visitors into newsletter subscribers and demo requests.
How to Avoid 404 Pages and Custom WordPress 404 Page Best Practices
Web teams should monitor their sites and reduce the number of broken links that visitors encounter. But, the occasional broken page is inevitable. Effective 404 error pages balance helpful functionality with brand consistency. Web teams should design WordPress custom 404 pages with consistent branding and clear messaging.
Below, I’ll discuss how to avoid and troubleshoot 404 pages. Then, I’ll dive into custom 404 page best practices.
Troubleshooting Tools: Tools to Detect 404 Pages
Ongoing monitoring and error detection help identify broken links before they impact the user experience. Here are the tools teams can use to catch errors before they reach visitors:
- Google Search Console, which reports 404 errors under the “Pages” section. Regular review of “Not found (404)” errors reveals broken internal links and outdated external backlinks.
- Broken link checker plugins. Plugins like Broken Link Checker automatically scan WordPress sites for non-functional internal and external links.
- Server logs. Web server logs record all 404 errors, including requested URLs and referring pages. Analyzing logs through hosting control panels reveals patterns in missing pages.
- Analytics tracking. Implementing event tracking in Google Analytics or HubSpot Analytics for 404 page views provides data on error frequency. Teams can also see whether visitors continue browsing after encountering errors.
I recommend reviewing Google Search Console weekly for new 404 errors. I caught a plugin update that broke hundreds of internal links within days instead of months by monitoring these reports consistently.
Solutions for Typical 404 Errors
Common 404 error scenarios luckily have tried-and-true solutions. If a site sees a spike in 404 page visits, consider the following.
- Redirect permanently moved pages. When content moves to new URLs, implement 301 permanent redirects from old URLs to new locations. WordPress redirect plugins create these redirects without server configuration file editing.
- Fix broken internal links. Systematically update internal links pointing to non-existent pages by editing posts, pages, and navigation menus. The Better Search Replace plugin can update multiple instances of old URLs simultaneously.
- Handle deleted content appropriately. For intentionally deleted content without replacement pages, ensure the 404 page provides relevant alternative content suggestions. If deleted pages received significant external backlinks, consider creating updated content on similar topics.
- Correct permalink structure mismatches. Changing WordPress permalink settings can break existing URLs if not handled properly. Before modifying permalink structures, create redirects from old formats to new formats using redirect plugins.
- Resolve trailing slash inconsistencies. WordPress URLs may behave differently with or without trailing slashes (/page/ vs /page). Canonical URL implementation and redirect rules standardize URL formats to prevent 404 errors.
Pro tip: After implementing redirects for commonly accessed broken URLs, monitor 404 page analytics for 30 days. If error traffic drops significantly, the redirects are working correctly.
Essential Elements for WordPress Custom 404 Pages
While WordPress allows teams to customize their 404 pages, the best error messages offer similar functionality. Teams should feature search functionality and access to the site menu on 404 pages. Call-to-action buttons are also helpful.
The following elements transform error pages from frustrating dead ends into a helpful pitstop:
- Search functionality. A prominent search bar enables visitors to find specific content despite landing on an error page. WordPress's get_search_form() function adds search capabilities to custom 404 templates.
- Navigation menu. Including the main site navigation menu on 404 pages helps visitors return to familiar waters. Visitors can browse primary categories or access important pages without using the browser's back button.
- Links to popular content. Curated links to frequently visited pages, recent blog posts, or featured products give visitors alternative destinations.
- Clear call-to-action buttons. Prominent CTAs guide visitors toward valuable site sections. Common examples include “Return to Homepage,” “Browse Products,” or “Contact Support” buttons with contrasting colors.
- Contact or support options. Providing ways to report broken links or request assistance creates customer service opportunities. Simple contact forms or email addresses show visitors the site owner cares about their experience.
From my experience building ecommerce sites, adding “Shop Bestsellers” sections to 404 pages significantly reduces bounce rates. One client saw 23% of 404 page visitors click through to product categories instead of leaving.
Design Tips for WordPress Custom 404 Pages
Design choices for 404 pages turn an error message into a consistent brand experience. Web teams also have the opportunity to create a memorable moment that shows personality. Consider the following when designing a 404 error page:
- Keep branding consistent. Custom 404 pages should reflect the same color schemes, typography, and visual style as the rest of the website.
- Use clear, friendly messaging. Error messages should explain what happened in plain language without technical jargon. Phrases like “Page not found” or “This page doesn't exist” communicate the problem clearly while maintaining a conversational tone.
- Add visual interest without distraction. Graphics or illustrations can make 404 pages more engaging, but navigation options should remain the primary focus. Simple icons or imagery that reinforce the “missing page” concept work effectively.
- Optimize for mobile devices. Navigation menus, search fields, and buttons should remain accessible and easy to tap on smaller screens. Mobile-responsive 404 pages prevent frustrated visitors from abandoning sites.
I've found that overly clever 404 pages sometimes backfire. One client wanted an elaborate animation that took 5 seconds to load. We simplified it to a static illustration, and bounce rates dropped 18%.
Frequently Asked Questions About WordPress Custom 404 Pages
How do I add a custom 404 error page?
WordPress site owners can add custom 404 error pages through multiple methods. The five primary approaches include.
- Editing the theme's 404.php file directly.
- Using WordPress Full Site Editing for block themes.
- Installing the 404 page plugin to designate any WordPress page as the error page.
- Leveraging page builders like Beaver Builder with theme builder add-ons.
- Or using content management systems like HubSpot's Content Hub for drag-and-drop customization.
How to add a 404 page in WordPress without a plugin?
Adding a 404 page in WordPress without plugins requires either editing the active theme's 404.php file or using WordPress Full Site Editing capabilities. For traditional themes, site owners can access the theme directory via FTP or hosting file managers.
For block themes supporting Full Site Editing, navigate to Appearance > Editor in WordPress, select Templates, choose the 404 template, and customize using the block editor interface without writing code.
What is the default 404 page in WordPress?
The default 404 page in WordPress displays a basic error message determined by the active theme. Default 404 pages vary significantly between themes. If the theme doesn't include a custom 404.php file, WordPress falls back to the index.php template with little error-specific content — typically just a “Page Not Found” heading and search form or navigation menu.
Create 404 pages that keep your customers engaged.
Custom 404 error pages create opportunities for continued engagement if visitors hit a dead end. WordPress provides five primary implementation methods:
- Edit the 404.php theme file for complete control over page structure
- Use WordPress Full Site Editing for visual block-based customization
- Implement the 404 page plugin for simple page designation
- Leverage page builders like Beaver Builder for drag-and-drop design
- Utilize HubSpot's Content Hub for integrated website management with analytics tracking and conversion optimization
Effective 404 pages integrate search functionality and clear navigation with helpful error messaging. Regular monitoring through Google Search Console identifies broken links requiring fixes before they impact user experience and SEO performance.
From my years building WordPress sites, I‘ve learned that 404 pages deserve the same design attention as landing pages. They’re unexpected brand touchpoints. Beyond that, the best 404 pages I've created turned errors into positive interactions, so visitors don’t mind that they found the “wrong” page.
Editor's note: This post was originally published in August 2022 and has been updated for comprehensiveness.
How to Launch a WordPress Website
Learn how to launch a website on WordPress with this step-by-step guide and checklist. Learn how to...
- Set up your domain name.
- Install an SSL certificate.
- Analyze your content.
- Back up your site.
Download Free
All fields are required.
Wordpress Website
![How to become a WordPress developer [+ tips from WCEU speaker Paul Bearne]](https://53.fs1.hubspotusercontent-na1.net/hubfs/53/59_How%20to%20Become%20a%20WordPress%20Developer.png)


