Table of Contents
- When and Why to Put WordPress into Maintenance Mode
- How to Put WordPress in Maintenance Mode
- Disabling WordPress Maintenance Mode
- WordPress Maintenance Mode Not Working
When and Why to Put WordPress into Maintenance Mode
Putting your site into maintenance mode is a great way to tell visitors that your website is under maintenance and when they can expect it to be up and running again. Consider the situations below when it would be a good idea to put your site in maintenance mode.
When to Put WordPress into Maintenance Mode
1. Performing Updates
Maintenance mode is often used when performing updates to your WordPress site, including core updates, theme updates, and plugin updates. By enabling maintenance mode, you can ensure that visitors don’t encounter any issues or errors while updates are being applied.
2. Making Design or Layout Changes
If you’re planning to make significant design or layout changes to your website, it’s a good idea to put it in maintenance mode. This allows you to work on the changes without visitors seeing an incomplete or broken layout during the process.
3. Adding or Modifying Functionality
When you’re adding new features or modifying existing functionality on your WordPress site, maintenance mode helps prevent users from encountering unexpected issues or disruptions. It allows you to test and implement the changes without affecting the user experience.
4. Fixing Errors or Bugs
If your website has encountered errors or bugs that need to be fixed, putting it in maintenance mode can prevent visitors from experiencing these issues. It gives you the opportunity to address the problems without causing inconvenience to your users.
Why Put WordPress into Maintenance Mode
1. Seamless User Experience
Maintenance mode allows you to provide a consistent and professional user experience by displaying a customized maintenance page or message. This informs visitors about the temporary unavailability of your site and provides an estimated timeline for when it will be back online.
2. Preventing Errors and Issues
Enabling maintenance mode helps prevent visitors from encountering errors or issues that may occur during updates, design changes, or functionality modifications. It reduces the risk of broken pages, missing content, or other inconsistencies.
3. Communication and Transparency
By putting your site in maintenance mode, you can communicate with your visitors, informing them about the maintenance activities you’re performing and any changes they can expect. This transparency builds trust and keeps your audience informed.
4. SEO Considerations
If your site is undergoing major changes or updates, putting it in maintenance mode can prevent search engines from indexing incomplete or broken content. This helps maintain the SEO integrity of your site and avoids negative impacts on search engine rankings.
By using maintenance mode, you can ensure a smooth and uninterrupted user experience while making necessary updates or modifications to your WordPress site. It allows you to communicate with your visitors effectively and minimize any potential disruption during the maintenance process.
Let’s take a look at the different ways you can put WordPress in maintenance mode below.
How to Put WordPress in Maintenance Mode
There are two options for putting your WordPress website in maintenance mode. You can do so manually by adding code to your functions.php file. Or you can automate some of the process by using a plugin.
Below, we’ll discuss the processes of putting WordPress maintenance mode manually and with a plugin, step-by-step.
How to Put WordPress in Maintenance Mode Manually
If you have some technical experience and are comfortable editing your theme files, then you can put WordPress in maintenance mode manually. Here are the steps.
For short-term downtime (less than an hour or so), you might not want to go through the trouble of setting up a custom maintenance mode page.
In that case, you can use WordPress’s default maintenance mode page to let visitors know you’ll be right back.
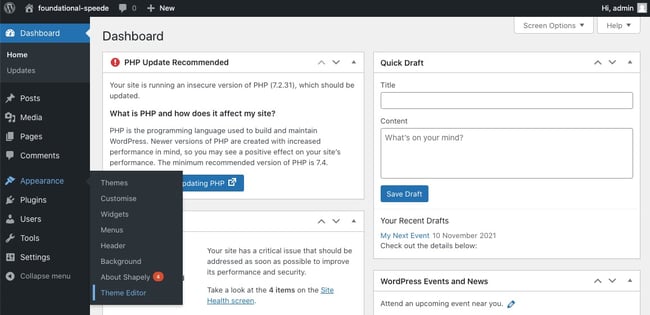
1. Click Appearance > Theme Editor in your WordPress dashboard.
2. Click the Theme Functions, or function.php file.
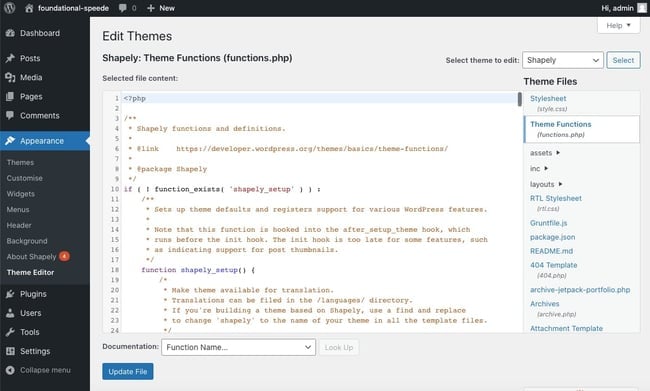
3. Copy all the code in the existing file. Paste it into a new file, and save a copy to your desktop. This will be your backup.
4. In the theme editor, scroll to the bottom of the functions.php file and copy and paste the following code snippet:
 function wp_maintenance_mode() {
if (!current_user_can(‘edit_themes’) || !is_user_logged_in()) {
wp_die(‘<h1>Under Maintenance</h1><br />Website under planned maintenance. Please check back later.’);
}
}
add_action(‘get_header’, ‘wp_maintenance_mode’);
5. Click the Update File button.
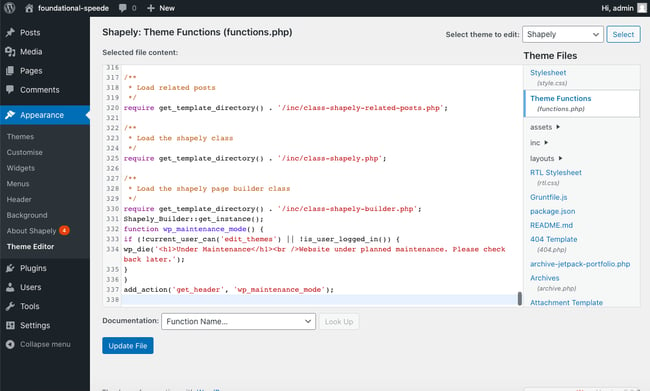
6. Now, visit your site in a new browser window to ensure it’s in maintenance mode. Here’s how the default maintenance mode page looks.
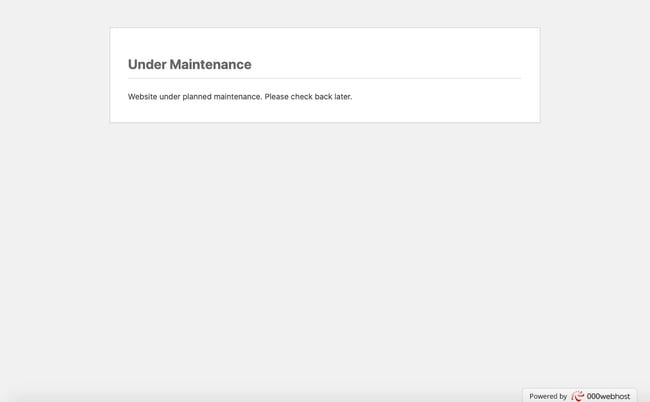
You’ll notice the default maintenance mode page is rather austere. If your site will only be under maintenance for an hour or two, then that’s fine. But for a longer maintenance period, you might want to use a plugin to easily create and customize a maintenance mode page. Let’s cover that process below.
What we like: Maintenance mode is useful when you're making significant changes to your WordPress site, such as updating themes and plugins or performing database modifications. It allows you to hide the site from visitors temporarily and display a custom message or page instead.
Best for: Those who are comfortable adding and removing code from their themes and just want a quick, generic “maintenance mode” page.
Pro tip: If you want to enable maintenance mode without using a plugin, you can do so by adding a few lines of code to your site’s functions.php file or by creating a custom maintenance.php file. However, this method requires some coding knowledge and is more advanced. It's generally recommended to use a plugin for simplicity, flexibility, and convenience.
Remember to disable maintenance mode once you’ve completed your updates or modifications to make your site accessible to visitors again.
How to Put WordPress in Maintenance Mode with a Plugin
If you’re not comfortable with editing your theme files, then you can use a plugin. There are several WordPress maintenance mode plugins to choose from.
Below, we’ll share the process using the free WP Maintenance Mode plugin, specifically, but it will be similar no matter which plugin you use.
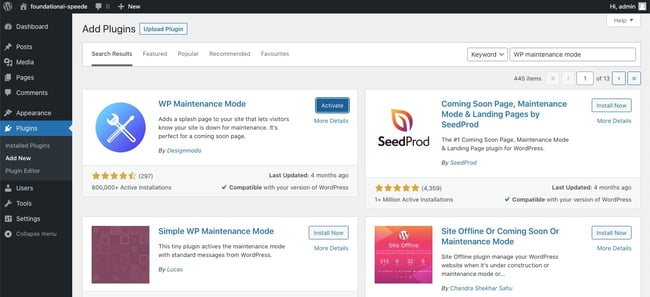
1. Install and activate the WP Maintenance Mode plugin.
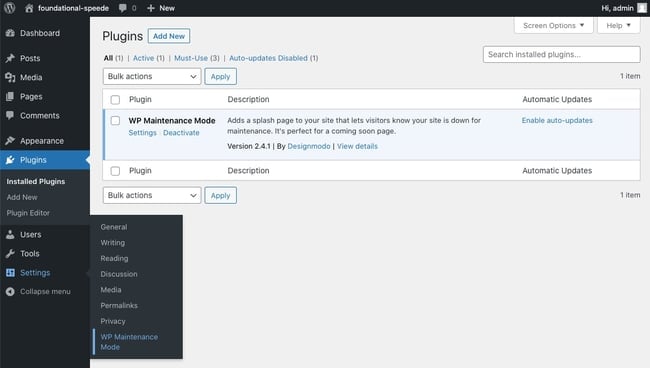
2. Go to Settings > WP Maintenance Mode.
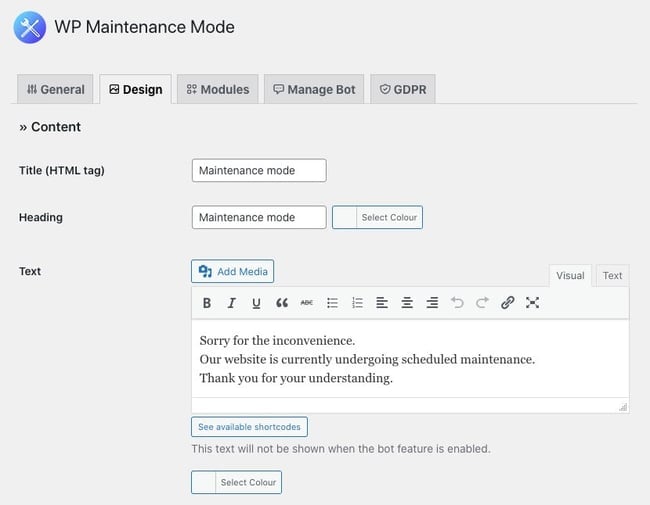
3. Click on the Design tab to customize the maintenance mode page that will appear to users when visiting your site when it’s under maintenance. Scroll to the bottom and click Save Settings.
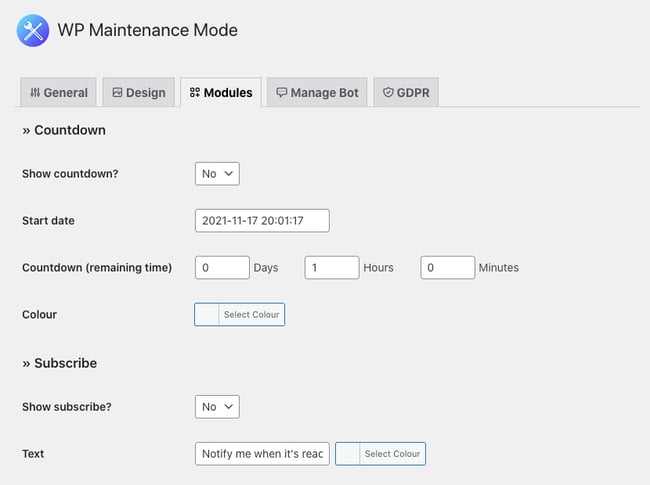
4. Click on the Modules tab to add a countdown timer, email opt-in form, social media links, and a Google Analytics tracking code to your maintenance mode site. Scroll to the bottom and click Save Settings.
5. Click on the Manage Bot and GDPR tabs if you’d like to set up a chatbot and add links to your privacy policy on your maintenance mode site. Scroll to the bottom and click Save Settings.
6. When you’re ready, click on the General Tab and switch the status to Activated. Scroll to the bottom and click Save Settings.
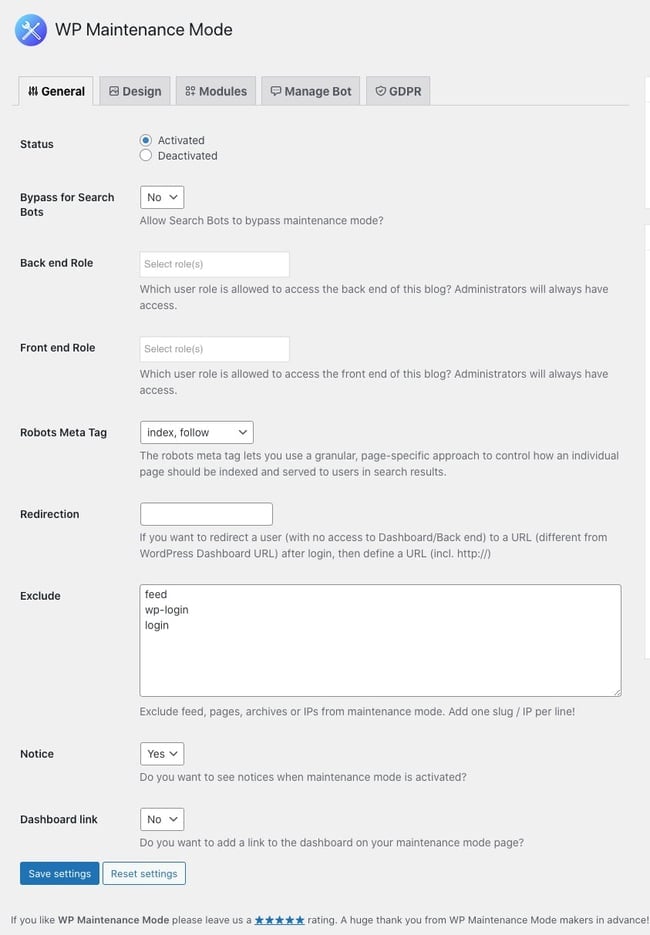
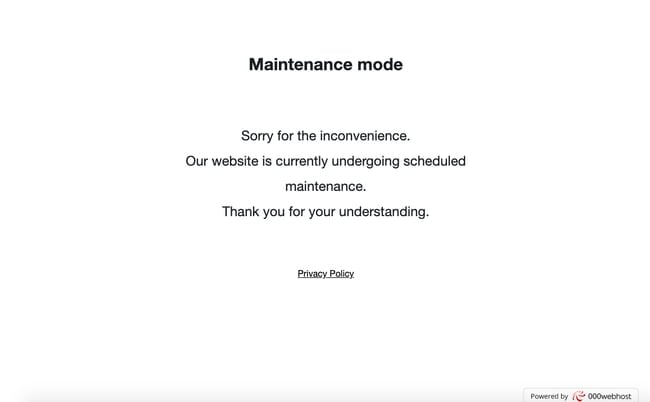
7. Now visit your site in a new browser window to ensure it’s in maintenance mode. Here’s how a default maintenance mode site built with the WP Maintenance Mode plugin looks:
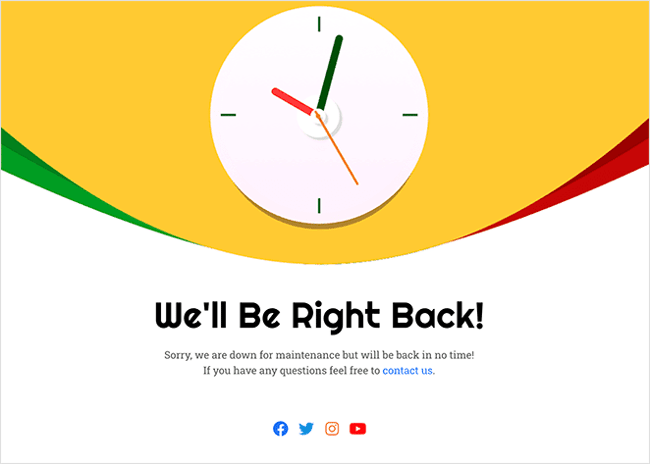
If you’re not satisfied with the customization options of WP Maintenance Mode, then you can try a plugin like SeedProd. SeedProd provides several maintenance mode templates that you can customize to create a maintenance mode page that aligns with your branding. Here’s an example.
If you’re already using Elementor, or would prefer to use that page builder instead of WP Maintenance Mode for another reason, then check out How to Create a Maintenance Mode Site With Elementor.
What we like: Using a maintenance mode plugin offers a user-friendly and efficient way to enable maintenance mode on your WordPress site. These plugins typically provide various customization options and pre-designed templates to match your branding.
Best for: Maintenance mode plugins are ideal when you want to temporarily hide your site and display a custom maintenance page while performing updates, changes, or fixes. It ensures a seamless user experience and provides information to visitors about the temporary unavailability of your site.
Pro tip: Regularly check for plugin updates and ensure the maintenance mode plugin you’re using is compatible with the latest version of WordPress. Keeping your plugins up to date ensures security and compatibility with the WordPress core and other themes or plugins installed on your site.
Disabling WordPress Maintenance Mode
Once you complete your updates and maintenance tasks, you’ll want to disable maintenance mode. The process is easy, no matter how you enable this mode.
If you manually put your site in maintenance mode, then you simply have to navigate back to the functions.php file and remove the code you added. Once you remove that snippet (and only that), save the file. Then, visit your site in a new browser window to ensure it’s live and no longer in maintenance mode.
If you used a plugin to turn on maintenance mode, then the process to disable it is even simpler. The steps below are for the WP Maintenance Mode plugin specifically, but the process will be similar no matter what maintenance mode plugin you use.
1. Log in to your WordPress dashboard.
2. Click Settings > WP Maintenance Mode.
3. By default, the General tab should be open. If not, click on it.
4. Switch the status to Deactivated.
5. Click the Save Settings button.
Don’t forget to visit your site in a new browser window to ensure it’s live and no longer in maintenance mode.
WordPress Maintenance Mode Not Working
If you’ve followed one of the processes above and WordPress maintenance mode is not working, then there are two probable causes.
One is that your browser cache hasn’t been cleared, so the maintenance mode page is not displaying when visitors first land on your site or at all.
Another is that the .maintenance file hasn’t been deleted, so your site is stuck in maintenance mode. Both have relatively easy solutions.
Let’s take a closer look at each of them.
Solution 1: Clear Browser Cache
If maintenance mode is not working, it’s possible that visitors are being served the cached version of your site — i.e., static copies of your site’s files stored in a temporary storage location. This might not reflect recent updates or changes to your site, like turning on maintenance mode. In that case, you’ll need to clear your cache.
Thankfully, clearing your browser cache in WordPress is easy, thanks to WordPress caching plugins like WP Rocket.
For example, if you’ve installed and activated WP Rocket, then you’d simply click Settings > WP Rocket. In the WP Rocket Dashboard, locate Quick Actions and click the Clear Cache button.
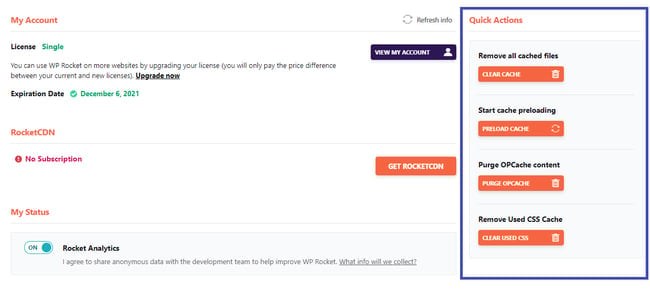
Alternatively, your hosting provider might provide a simple way to clear your cache directly in your WordPress dashboard. For example, WP Engine offers Clear All Caches as a quick action in its plugin tab in the admin dashboard.
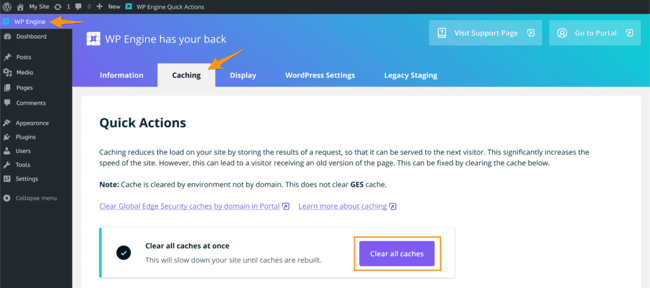
SiteGround and LiquidWeb offer similarly easy options to clear your cache in a few clicks.
Solution 2: Delete the .Maintenance File
If your WordPress site is stuck in maintenance mode, then you need to delete the .maintenance file to return your site back to normal. To do so, follow the steps below.
1. Log in to your site via an FTP client.
2. Click the public_html folder.
3. Click the wp-config.php file.
4. Find the .maintenance file, and right-click to delete it.
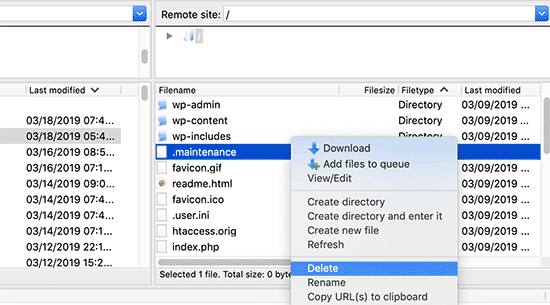
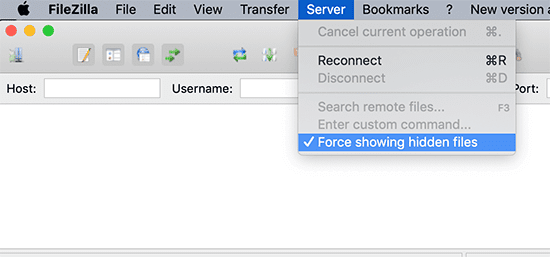
If you can’t find the .maintenance file, then check the option to show hidden files in your FTP client. For example, in Filezilla, you’d click Server > Force showing hidden files.
5. Now visit your site in a new browser window to ensure it’s no longer in maintenance mode.
Turning on WordPress Maintenance Mode
To inform visitors that your website is currently under maintenance, you can put WordPress in maintenance mode. Whether you choose to do so manually or with a plugin will depend on the updates you’re making, the timeline you expect, and what steps you’re encouraging visitors to take in the meantime.
WordPress Website


![How to become a WordPress developer [+ tips from WCEU speaker Paul Bearne]](https://53.fs1.hubspotusercontent-na1.net/hubfs/53/59_How%20to%20Become%20a%20WordPress%20Developer.png)


