

In this post, we'll review four different ways to change fonts in WordPress, including changing the font type, size, and color.
How to Change Font in WordPress
Here's a quick summary of each method:
- Use your WordPress theme: the best place to start is to check if your WordPress theme already offers flexible typography settings. This won't always work, but we always recommend starting here.
- Use a Google Fonts plugin: you can use a simple free plugin to access the 1,350+ free fonts at Google Fonts.
- Upload a custom font: you can upload any custom font to your site using a simple plugin or your own custom CSS.
- Adjust fonts for individual pieces of content: you can adjust your site's fonts on a piece-by-piece basis if needed.
1. Change fonts with your WordPress theme settings.
In WordPress, the easiest way to change font — and the best place to start — is your theme's built-in typography settings.
Virtually all WordPress themes come with built-in options to let you change the font, font size, and font color. These options are unique to each theme, though.
Some themes will give you very limited options, in which case you might want to use one of the other methods on this list. Other themes will give you very detailed options, in which case your theme's font options might be all you need.
There are two ways to access your theme's font settings.
WordPress Customizer
The most common way to access your theme's typography settings is via the WordPress Customizer. To launch it, go to Appearance → Customize in your WordPress dashboard.
You'll need to find the settings area for your theme's typography. Unfortunately, this will be slightly different for every theme, so we can't give you exact instructions.
Typically, you'll see a menu area named something like "Typography" in the Customizer sidebar.
However, you might need to first navigate into one of the menu categories. For example, in the Astra theme, you need to first open the Global settings before you can find the Typography settings:
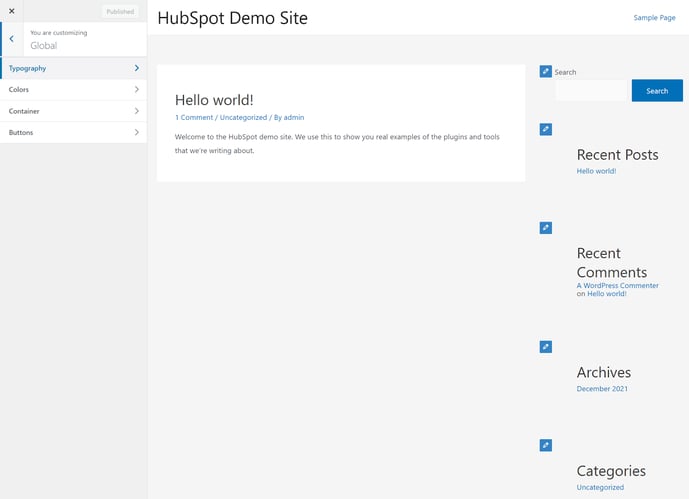
Once you select those settings, you'll see options to change your site's font. Again, these options will be different for every WordPress theme.
For this example, the image below shows the typography options in the free Astra theme. You can use the drop-down menus to change the font for different parts of your site. If you're not sure how to change font size, you should be able to do that from this area, too.
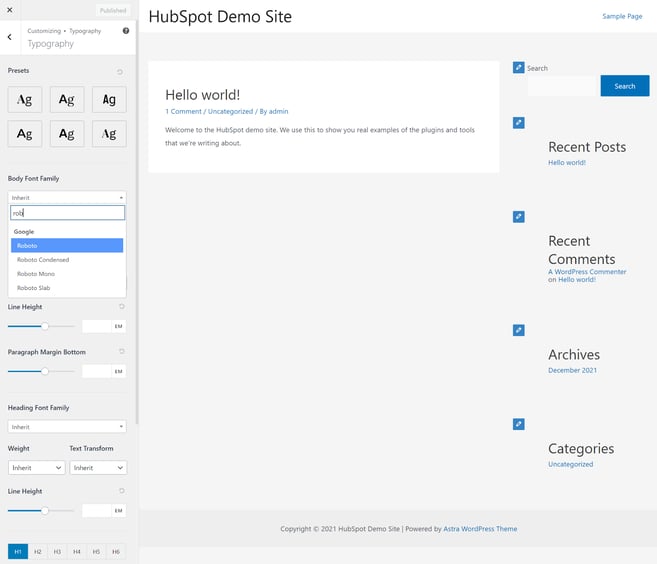
When you make changes here, you should see those changes appear instantly on the live preview of your site.
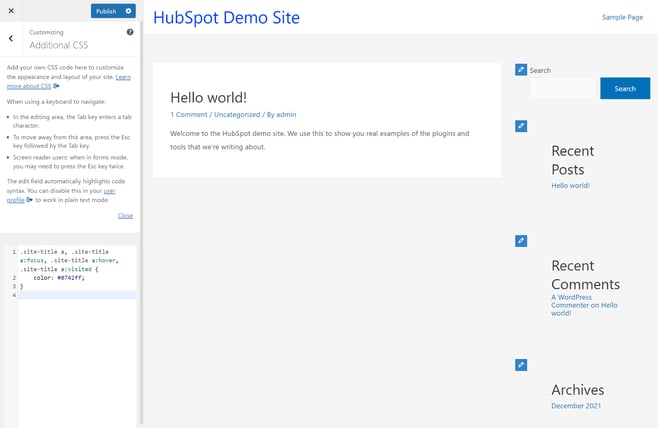
To change the font color, you might need to go to a different area in the Customizer, such as the Color settings. Or, you might need to add some custom CSS. For example, here's how to change the font color in your header by adding some custom CSS:
.site-title a, .site-title a:focus, .site-title a:hover, .site-title a:visited {

  color: #0742ff;

}
You can add this custom CSS to the Additional CSS section in the Customizer, as shown below.
If you're happy with how your changes look, click the Publish button to make them live.
Custom Theme Options Panel
This second method has become a lot less common, but some WordPress themes still use a custom theme options panel.
In this case, you'll typically manage fonts from that area instead of the WordPress Customizer.
If you don't see any font options in the Customizer, check your theme's documentation to see if you might need to use a custom theme options area instead.
2. Add Google Fonts to your WordPress website.
If you aren't happy with your theme's built-in font settings, another great option is to add Google Fonts to your site.
If you're not familiar with Google Fonts, it's a large collection of 1,350+ free-to-use fonts, including some of the most popular fonts on the web such as Roboto, Montserrat, and Lato. You can browse the full collection here.
Many popular WordPress themes now offer built-in Google Fonts support, which you can typically access via the methods in the previous section.
However, if your theme doesn't offer that option, there are a number of typography plugins that let you easily add Google Fonts to WordPress. Here are some of the most-used WordPress Google Fonts plugins:
More advanced users can also consider the OMGF plugin, which helps you locally host fonts on your server instead of using the Google Fonts content delivery network (CDN). Some webmasters prefer this approach from a performance perspective because it lets you control caching behavior and eliminate third-party HTTP requests.
For this tutorial, we'll use the free Fonts Plugin, but most Google Fonts plugins work in a similar way.
To begin, install and activate the plugin from WordPress.org. From there, the Fonts Plugin lets you customize your site's fonts using the real-time WordPress Customizer, just as we showed you for the theme method above.
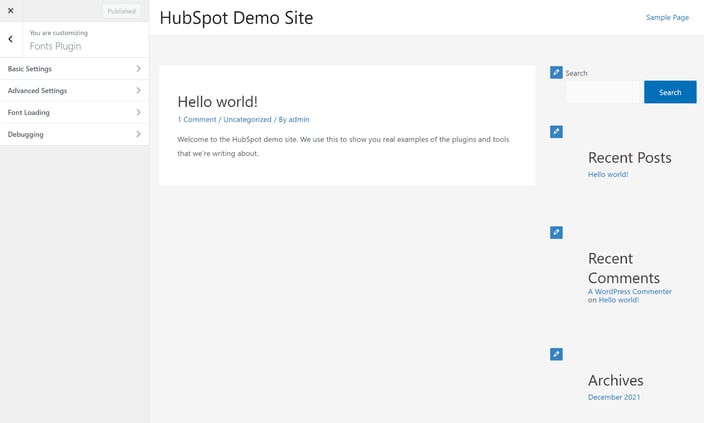
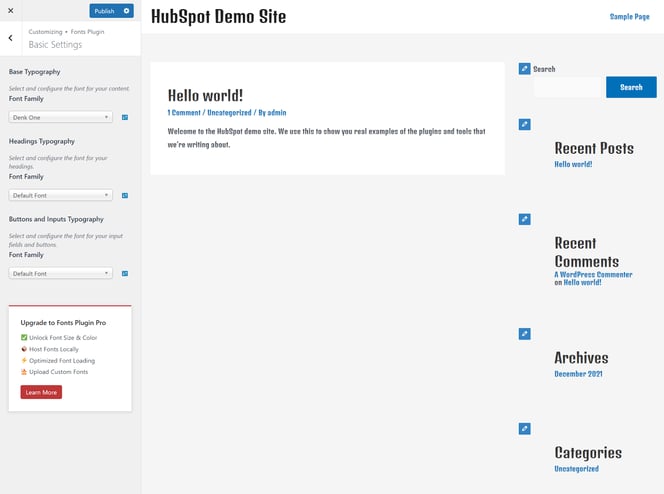
To launch the interface, go to Fonts Plugin → Customize Fonts in your WordPress dashboard. You should see a live preview of your site along with four settings areas in the sidebar:
- Basic Settings: control sitewide typography for your body text, headings, and buttons.
- Advanced Settings: apply typography to more specific elements such as sidebar widgets and footer widgets. These will automatically inherit the font from the Basic Settings area, but you can override them if needed.
- Font Loading: requires the premium version of the plugin.
- Debugging: you should be able to leave these as the defaults.
To begin, go to the Basic Settings and make your sitewide selections. As you change the font, you should immediately see the live preview change.
For some sites, this might be all you need. However, if you want to adjust the font for specific elements, you might want to open the Advanced Settings area for more granular control.
3. Add custom fonts to WordPress.
Google Fonts is popular because of its huge library of quality fonts. However, you might have situations where the Google Fonts collection isn't enough.
In that case, you can find a number of free or paid fonts that you can use on your WordPress site. However, you'll need to upload the fonts to your site's server and then integrate them into your web pages.
To find fonts, try searchng on Google or browse popular free font marketplaces such as Font Squirrel, DaFont, and 1001 Free Fonts (which actually has 65,000+ free fonts). Then, you can either use a plugin to add them to your site or upload and register the fonts manually using CSS.
We'll cover both methods below.
Download the “Use Any Font” plugin.
The simplest way to add custom fonts to WordPress is via the aptly named, Use Any Font plugin. As the name suggests, this plugin lets you upload any font file to WordPress and use it anywhere on your site, including in the native editor, page builder plugins, and some popular WordPress themes.
This plugin is the best option for non-technical users because it eliminates the need to use custom CSS.
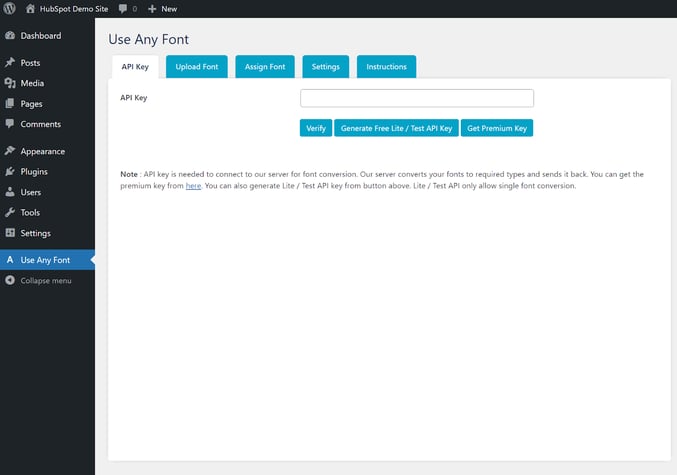
To begin, install and activate the plugin. Then, go to the new Use Any Font area in your WordPress dashboard.
First, click the button to Generate Free Lite / Test API Key and then click the Verify button once it generates the API key.
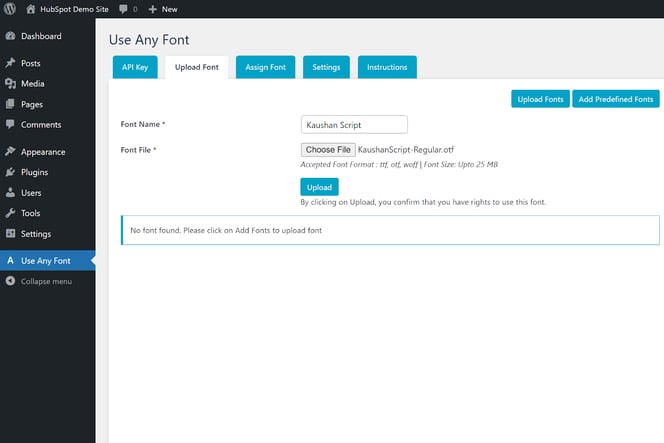
Then, go to the Upload Font tab and upload the font file that you want to use. You can use the following formats:
- .woff
- .ttf
- .otf
If you downloaded the font as a zip file, you'll first need to extract the zip file and then upload the actual font file.
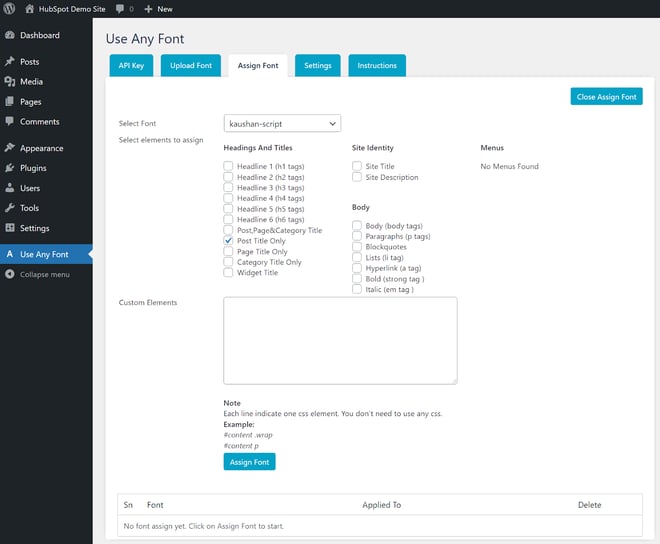
Once the upload finishes, go to the Assign Font tab to assign where you want to use that font on your site:
- Click the Assign Font button.
- Select the font that you just uploaded using the drop-down.
- Use the checkboxes to control where you want to apply that font. For example, to use the font for your blog post titles, you can select Post Title Only. Or, you can select Headline 1 to use it for all H1 tags.
- Click the other Assign Font button below the settings to save your choices.
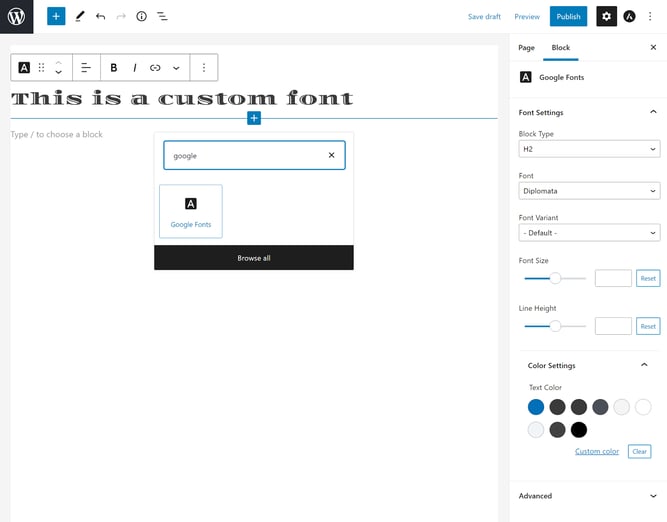
And that's it. Your site will start using that font for the element that you selected. Here's an example of the custom font for the post title:
Use custom CSS code.
If you'd prefer not to use a plugin, you can also add custom fonts to WordPress using CSS — though this method is a bit more technical.
First, you'll need to upload the custom font file to your WordPress site's server. We recommend using the WOFF2 format whenever possible because it offers smaller file sizes than other font formats, which will improve your site's performance.
Once you've uploaded the font file, you need to use the CSS font-face property to register the font on your site. You can do this via two ways:
- Open the WordPress Customizer and add the code to the Additional CSS area.
- Create a WordPress child theme and add the code to the style.css file in your child theme.
Here's the code that you need to use. Make sure to replace the details (name, file location, and so on) with the actual font that you're using:
@font-face {

font-family: YourFontFamilyName;

src: url(full-url-path-to-font-file.woff);

font-weight: normal;

}
Once you've done that, you can use additional CSS to control where to use the font. For example, if you want all of the H1 headings on your site to use this font, you would add the following code:
font-family: YourFontFamilyName;

}
Using custom CSS is also a good solution for changing font colors because you just need to add an extra line of code to control the color and size of the font that you're using.
4. Change fonts in the WordPress Editor.
So far, we've assumed that you want to change fonts across your entire site. However, you might have situations where you only want to change the font for a specific piece of content.
Here are two options for doing so.
Use the Block Editor and the Fonts plugin.
If you're using the native WordPress Block Editor, you can change the typography for specific blocks in your design. However, you'll need the help of a plugin — the same Fonts plugin that we featured in the Google Fonts section above.
As long as you have the plugin active, you'll get a new Google Fonts block that you can use in the editor. This block lets you add paragraph or heading text to the editor. However, unlike the regular Paragraph or Heading blocks, you'll also get an option to change the font.
When you add the Google Fonts block, you'll first want to choose the Block Type. The default is paragraph text, but you can also use the drop-down to make it into a heading.
Then, use the Font drop-down to choose which font you want to use. You can select any font from Google Fonts.
Below that, you'll also get additional options to control the font size, line height, and color, which also makes this a great solution for changing font size in WordPress.
Use a page builder.
Another option is to use a page builder plugin, as virtually all page builder plugins give you granular typography control on a content-by-content basis. For example, if you use Elementor, it will let you adjust the typography for every single widget on your page.
Changing Fonts in WordPress
Typography plays an important role on your website, so learning how to change the font in WordPress is an important skill to have.
To start, you'll want to check if your theme's built-in typography options can do what you need. If not, consider using a Google Fonts plugin or uploading your own custom fonts.
If you need more granular control over fonts on a piece-by-piece basis, you can also use typography controls in your favorite page builder or the WordPress Block Editor (with the help of a plugin).
Give these solutions a try and you'll be up and running with the perfect fonts on your site in no time.

Wordpress Website
![How to become a WordPress developer [+ tips from WCEU speaker Paul Bearne]](https://53.fs1.hubspotusercontent-na1.net/hubfs/53/59_How%20to%20Become%20a%20WordPress%20Developer.png)


