
-1.png)
These types of blogs serve many purposes. Some are personal; some are for business. For me, I built one to share stories from a trip I took last year.
I’ll show you how I designed it and what I might recommend to you.
Before we get started…
This post assumes that you have a website that’s ready to be worked on. But, if you’re not quite there yet, here’s what you need to do before we get to the good stuff.
Come up with a blog idea and name.
It’s hard to get started without a solid idea for what your blog will be about. I’m not just talking about the types of pictures you’ll post. I’m talking about the actual purpose of your blog.
Will you entertain readers with thrilling stories of perilous adventures? Will you share helpful advice like dinner recommendations or places to visit when traveling? Or, maybe you’ll start a nature blog and sell images for stock photography.
It doesn’t matter what your blog’s purpose is, but you should have an idea of what you want to accomplish and how you’ll go about doing so. My advice is to pick a niche that you’re passionate about. You’ll know the ins and outs of your topics and it’ll be easier to create content that resonates with your audience.
After that, pick a catchy and memorable name and you’re off to the races.
Pick your hosting provider.
A less glamorous step in the web design process is setting up the backend of your site. Unless you’re building everything from scratch, you’ll need a hosting provider like HubSpot's Content Hub that offers helpful web-building and data management tools like a Content Hub, CRM, and more.
Register your domain name.
Another foundational web-building task: registering your domain name – though this is a bit more fun than picking a hosting provider.
Once you register your domain name, your website obtains a unique IP address. In other words, you’re now a proud owner of a website and people can find your content by visiting your pages.
Now that we got the housekeeping items out of the way, let’s jump into setting up your blog.
How to Design a Photography Blog
For context, my blog documented my experiences biking the Great Divide – a mountain bike trail that follows the Rocky Mountains. I wanted to share pictures from the trail and stories from my travels. I also wanted to encourage folks to donate to an animal shelter – hence the name: Pedaling4Pups.
This matters because it was the vision that led my design process. I knew exactly what I wanted on my site, but that doesn’t mean it’ll be the same features that you’ll want for yours.
I’d recommend using the information below to get a feel for the design process. These steps aren’t necessarily chronological, but I tried to set them up in the order of operations that I worked in.
Choose a site theme and template.
Unless you are building each page completely from scratch (good luck to you brave soul), I’d recommend picking a theme and template for your site.
First and foremost, this is going to save you time. Rather than building everything from the ground up, you’ll have pre-built pages ready to go that you can add to and customize.
Second, templates and themes keep things consistent across your site. Not only does this make your content more organized and aesthetically pleasing, but it also creates a more habitual experience for visitors. They’ll get used to where things are and become more comfortable with visiting and navigating pages.
The theme that I chose was called “Session.” It was pretty minimalistic and had all of the page templates (blog, author, etc.) that I was looking for. I really liked the use of whitespace in the background because I felt this made images stand out more on the page.

Create a home page.
This post details how I designed my home page, but the SparkNotes are this:
- Starting with the home page as the first page of your site can be tricky. I’d recommend creating a wireframe to flesh out what your site will look like and how folks will navigate it.
- It’s okay to start the home page and then finish it after you’ve created a few other pages. You’ll have a better idea of what the site looks and feels like and what you might want to direct visitors to on the home page.
- Some elements that you might include on your home page are CTA’s, HTML image sliders, blog RSS feeds, and more. Many of these elements come prepackaged in drag-and-drop builders that you can easily add to your template.
Your home page will likely influence your visitors’ first impression of your site. So, make it eye-catching, interesting to read and look at, and establish it as a good launching point for people coming to your site.
Here’s what I went with on mine:

Build a gallery page.
A gallery page stores all of your blog’s most eye-catching and interesting images. It’s a teaser for visitors to thumb through and get a taste of what your blog is all about.
This could be one of the first pages you build or your last – it really depends on how much imagery you have at your disposal.
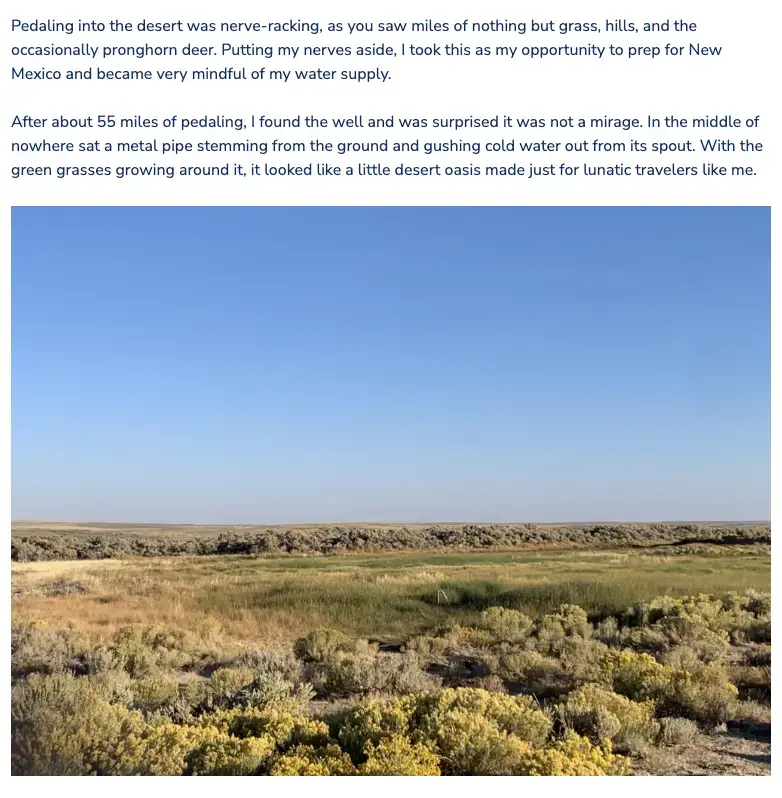
In my case, I didn’t have any pictures to start with so I added this page after my trip. I used CSS animations to create hover effects on each image and then linked readers to the post where the picture was taken so they could read its backstory.

With the drag-and-drop builder, this took about an hour to create. The images were uploaded to my hosting provider and then called onto the page via an out-of-the-box module. All I had to do was go through the tedious task of uploading each one, adding alt text, and linking the image to its corresponding destination via the menu below.

Configure your blog’s settings.
To make your site more than just a collection of images, you’ll need a place to put pen to paper, or text to web page in this case.
Fortunately, my CMS came with a built-in blogging tool that streamlined the creation process. Here I named the blog, determined its URL, wrote its meta description, and more.
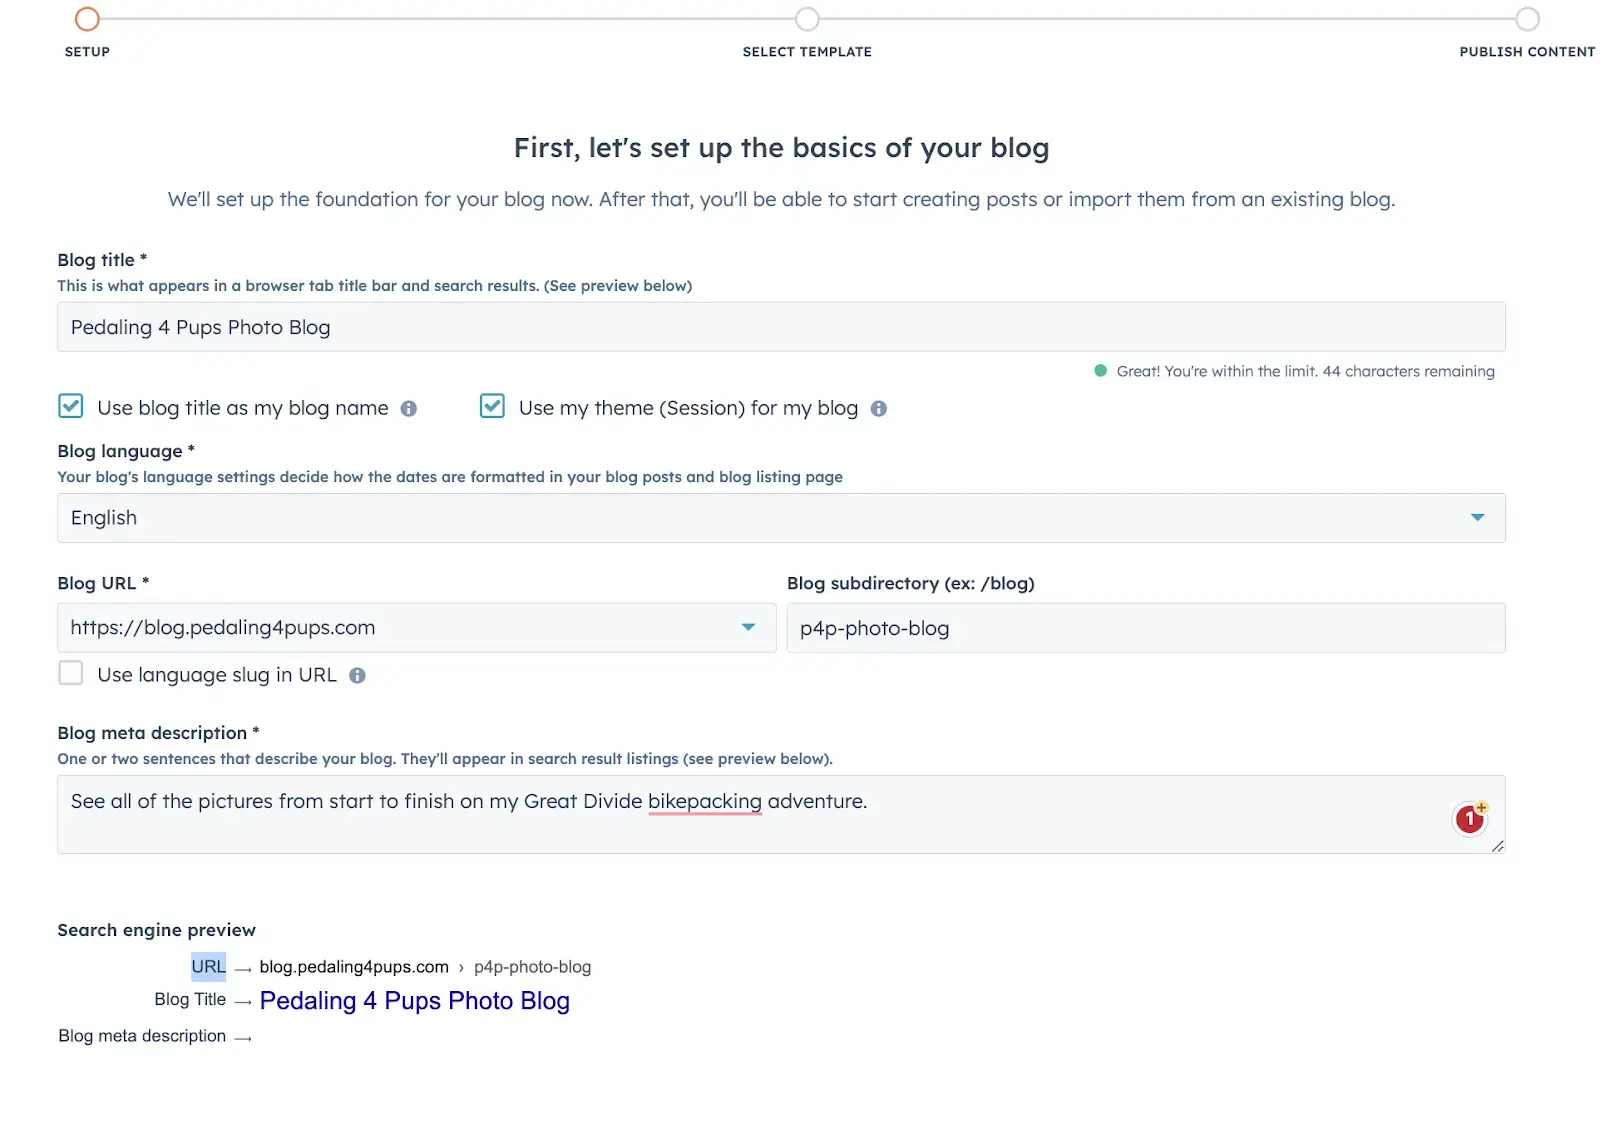
Most providers offer similar tools, but if you’re left high and dry, you can always build a blog using the standard web pages on your site.
The downside here is two-fold. First, it’ll take some time to create the blog listing page. You’ll have to set up a blog RSS feed that’s connected to a landing page. Second, every time you create a new post, you’ll have to remember which template you picked, how you customized the layout, any elements that you added, the list goes on and we haven’t even started writing anything, yet. All of this can be streamlined with a template and blogging tool.
In my case, I chose a template that had a large featured image, plenty of whitespace, and a comments box. I was publishing on the go, so I wanted a very simple template that directed most of the focus to my images.
Create author pages.
Author pages not only provide a backstory for who is creating content, but they also add credibility to your site. Search engines like Google prefer trustworthy content and your author page shows that the person behind the text has experience with the topic.
The author page is important, but if you’re running a personal blog, don’t forget to be yourself. This page is for you. It’s your time to give the reader a snapshot of who you are and why you launched the site.
In my case, I wrote a funny little backstory about why I was going on this trip and what the website was for. I kept it quick, and lighthearted and had fun sharing this goofy picture of myself.

Review your conversion paths.
This wasn’t so much of a concern on my site, but I wouldn’t be in digital marketing if I didn’t take this chance to talk about the wonders of conversion paths.
All content should serve a purpose. Whether it’s to inform, entertain, or sell, every page on your site should be there for a reason.
For example, if you’re looking to sell photos online, then your posts should have CTA’s directing visitors to various purchase points. Or, if you’re looking to make money from advertisement, then your template should be aligned to one side so there’s space for advertisers to promote.
This wasn’t something I paid too close attention to because I wasn’t trying to monetize my site. However, as a marketing professional, I strongly recommend mapping out your conversion paths because it will help you develop a clear content strategy.
Publish genuine content.
A picture speaks a thousand words – metaphorically though, not literally. Your blog is only as good as its content so don’t forget to put as much effort into the copy as you did with the photography.
As far as design goes, stick to short, skimmable paragraphs. Large blocks of text can overwhelm readers and will draw attention away from the images on your page.
When it comes to images, make sure they’re resized proportionally and load efficiently on each post. You may want to compress images if you find pages are taking too long to load.
You should also make use of sliders to create a better user experience. It’s a lot nicer to click through a slide deck of images as opposed to scrolling through an endless column.
My blog was like a visual journal. I kept the copy casual, my tone lucid, and used images to bring my stories to life.
Launching Your Photography Blog
This isn’t everything you can do with your blog, but it should provide a solid starting point to grow and develop content. The more you publish, the more you’ll see what works with your audience and what you should be leaning into.
As far as monetization goes, keep tinkering with conversion paths and make sure every piece of content pushes readers toward your end goal. Whether it’s to promote your business, sell ads, or highlight a hobby, your new website will be an excellent place to share images and encourage people to follow your story.
Starting A Blog