Believe it or not, the web isn’t just magic. Behind the scenes, HTML serves as the structure of almost every page on every website you visit, telling web browsers what content should be on a page and in what order.
If you want to create a website, or if you work on websites in any way, knowing the basics of HTML is essential. Learning HTML (and its sibling language, CSS) opened up opportunities for me to create, design, and help manage websites — it made me stand out and have the career I have today. My goal is to help you do the same.
![Download Now: 25 HTML & CSS Hacks [Free Guide]](https://no-cache.hubspot.com/cta/default/53/bda442e5-294c-47ef-afde-339bbadd95e1.png)
In this guide to HTML for beginners, I’ll explain what HTML is, what HTML is used for, and how to code some basic HTML. We’ll end with a brief look at some resources you can use to continue learning and using HTML.
Let’s get started.
What is HTML?
HTML, which stands for HyperText Markup Language, is the primary coding language of the World Wide Web. It defines the content and structure of web pages.
HTML is used by 96% of all websites and probably all of the ones you use on a regular basis.
HTML is an acronym for “HyperText Markup Language.” Allow me to break this down:
First, “HyperText” is text on a web page that references another web page. You probably know these as hyperlinks, such as this one. Hyperlinks typically bring us to a different web page or a different section of the same page. Hyperlinks can also open a PDF, email, or multimedia, like a video or audio file.
Linking information together via hypertext was revolutionary in building the web we know today. When you’re “browsing the web,” you’re just clicking hyperlinks that take you to different web pages. Even if those pages are more complex and dynamic, like on a social media site or web application, at their core, these are all just HTML documents that display information.
I realize that’s not very compelling, so I’ll put it this way: Hypertext makes it possible for anyone to access all types of information around the world in any order they want.
Moving on, “Markup” refers to how HTML “marks up” the page with annotations within the HTML file. These annotations are not displayed on the web page itself. Instead, they work under the hood, telling the browser how to display the document to visitors. We'll soon learn more about how this markup works.
Finally, “Language” is the simplest part of the acronym to understand. Like any language, HTML has an alphabet and is used to communicate information. HTML is a coding language, which is different from natural languages like English or Spanish. So, how do we use this language? That’s next.
What is HTML used for?
HTML is used to create web pages. When you view a web page in a browser like Google Chrome or Safari, your browser has parsed an HTML file and is displaying visual elements like text, buttons, and images based on the contents of that file.
With HTML, you can make a web page show text, lists, images, videos, buttons, forms, and a lot more. Plus, you can add hyperlinks to other pages, allowing visitors to easily navigate your website and jump to other websites.
HTML is used to create things other than web pages, too. You can also use it to make:
- emails
- web forms
- ebooks
- custom HTML modules in a CMS or a website builder
- mobile and web apps
- data tables and visualizations
If you want to make any of these things, it helps to know how to code HTML. So, let’s cover that next.
How to Write HTML
Compared to other coding languages, HTML is easy to read and understand since it’s essentially plain English text with extra symbols.
The main building block of an HTML file is an element. An HTML element is a component that defines a piece of content or a section on a web page. An element could be a piece of text like a paragraph, an interactive component like a button, or a section of the page like a header or footer.
Here’s what a basic element looks like written out in HTML. This element is called the p element, which stands for paragraph. It’s the most common element we use to display text on a page.
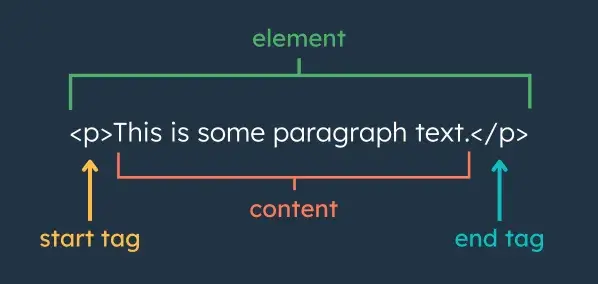
Let's take a closer look at each component of this element.
Start Tag
HTML elements are designated by tags. For most elements, the start tag (or opening tag) and end tag (or closing tag) mark the beginning and end of an element, respectively. The opening tag contains the name of the element (in this case, p for paragraph) enclosed in angle brackets (<>).
A start tag may also contain additional information called attributes. I’ll cover those in more detail later soon.
Also, element names are case-insensitive. For example, the <p> tag can also be written as <P>. However, I recommend writing in exclusively lowercase — that’s what you’ll see in almost all HTML.
Content
The content of the element is placed between the opening and closing tags. This is what the user actually sees on the webpage. An element’s content could be text, a link, an image or other multimedia, a list, or a table. It can also contain other elements — we’ll touch on this soon.
End Tag
The end tag defines the end of the HTML element. Like the start tag, it contains the element name. The difference is that a forward slash (/) precedes the element name.
Most HTML elements have a closing tag. However, some HTML elements only have an opening tag. For example, <img> (image) and <br> (line break) do not require closing tags. Elements with only a start tage are called empty elements.
These three things — a start tag, an end tag, and content between them — are all we need to make a paragraph. In the code module below, you can see the HTML code written on the left side and the rendered HTML (i.e., what the user sees in the browser) on the right.
See the Pen HTML - p example by HubSpot (@hubspot) on CodePen.
Notice how you only see the content in the rendered HTML, and the tags are hidden. Try adding some more paragraphs to the code above and seeing how they look when rendered on the page.
HTML Attributes
An opening tag may also contain one or more attributes. An attribute is extra information that defines how the element looks and/or behaves. Some elements require certain attributes, and almost any element can take optional attributes.
An attribute is always found in the opening tag of an HTML element. Most have the syntax name=“value” though some attributes only require the name without any assigned value.
Let’s look at another element, the a (anchor) element. This element creates a hyperlink. It requires one attribute called href that specifies the destination URL.
(Note that in the example below, the code module won’t open the new page if you click the link due to the module’s limitations. On an actual web page, clicking the link would bring you to hubspot.com.)
See the Pen HTML - anchor example by HubSpot (@hubspot) on CodePen.
The a element can also take other optional attributes. For example, adding the attribute target=“_blank” makes the link open in a new tab or window.
Codpen: https://codepen.io/hubspot/pen/ZENaoYW
Attributes can be written in any order inside the opening tag. However, you shouldn’t put multiple instances of the same attribute inside the same HTML tag. If this happens, generally, only the last instance of the attribute is considered.
How to Make an HTML File
We now know what HTML looks like. So, how do we put it into action? As I said, a web page is just an HTML file that is read by a browser. So, let’s make an HTML file.
To create an HTML file, you’ll need a text editor. A text editor is a software program for writing code. Since an HTML file is in standard text format, any basic text editor will work for this tutorial.
Your first step will be to download a free text editor. I recommend a text editor with syntax highlighting, which displays the code in different colors making it easier to read. Notepad++ is a good free text editor for Windows, and Sublime Text is a popular option for Mac (and my personal preferred text editor).
Install the text editor, then open it. When you open the text editor, you’ll likely see an editor window that looks something like this.
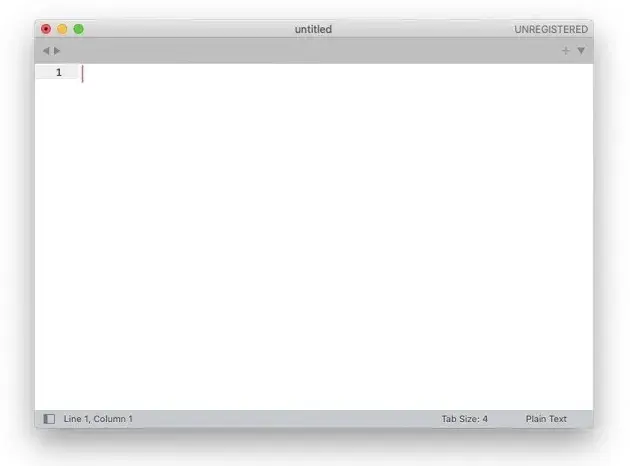
With this editor window open, copy the HTML template below and paste it into the text editor window.
Let’s break down what each section of this code means:
- We start with the doctype declaration. This is a special tag that tells the browser that the file is an HTML file. To start, we’ll need to declare the type of document as HTML. The <!DOCTYPE html> tag is placed on the very first line of any HTML file.
- The <html> element follows the doctype declaration. This is also called the “root” element of the document because it contains all other elements — </html> is the final closing tag of the document. Within the opening tag also has a lang (language) attribute, which tells screen readers what language the document is in, making the page more accessible.
- Inside <html>, there are two main parts of the document: the head section and the body section. <head> contains meta-information about the page — the browser does not display this information to users. <body> contains all page content that users can see, like text and images.
You’ll also notice that the <head> and <body> tags are indented here. This visually indicates to us that these tags are placed inside, or “nested” in, the <html> tags. While indenting isn’t necessary and makes no difference in how the browser renders the document, it’s still common practice to indent your HTML for better readability.
Anyways, continuing on:
- In the head section, we’ve named our page with the <title> element. The title appears, among other places, in the browser tab and in search engine results.
- In the body section, we have two elements: a paragraph element and an H1 (heading 1) element. H1s are used as the primary heading of the page, usually to mark the main title of the page.
With this HTML code pasted into the window, save the file as “index.html” on your desktop. “index.html” is the conventional file name for a website’s homepage HTML file.
After saving the file, you’ll be able to open it in your web browser. You can double-click the file, right-click and choose Open, or drag and drop the file icon into an open browser window. It will look something like this in your browser:

And there it is, your first HTML page! Yes, it’s pretty basic looking, but that’s intentional. HTML is purely for the content of a page. It creates a simple base upon which you can add styling with another language called CSS. With CSS, you can customize your styling and layouts, changing the color, font, and alignment of elements.
Once you’re comfortable with basic HTML, check out our full CSS tutorial to learn how to make your page come to life.
Free Guide: 25 HTML & CSS Coding Hacks
Tangible tips and coding templates from experts to help you code better and faster.
- Coding to Convention
- Being Browser-Friendly
- Minimizing Bugs
- Optimizing Performance
Download Free
All fields are required.
Common HTML Elements
The most recent version of HTML, HTML5, includes 110 HTML elements. Don’t worry, though — there are only a handful that you’ll use the most often. Next, I’ll review the most common elements and their tags.
Paragraph (<p>)
The HTML paragraph element represents a paragraph. By placing <p></p> tags around text, you’ll make that text start on a new line.
See the Pen p example by HubSpot (@hubspot) on CodePen.
A paragraph is the most common text element in HTML. You’ll probably see at least one on just about any page you visit.
Headings (<h1>, <h2> … <h6>)
Headings are another common element for displaying text. HTML contains six heading elements that represent different levels of section headings. <h1> is the highest section level and the most prominent, whereas <h6> is the lowest and therefore least prominent.
See the Pen headings example by HubSpot (@hubspot) on CodePen.
Image (<img>)
The HTML image element embeds an image into the document. It requires a src (source) attribute, which specifies the file path of the image.
It also takes the alt attribute, which specifies the image alt text. The browser will still render the image if the alt attribute is not present in the <img> tag. However, readers with visual impairments might have trouble understanding what the image conveys without an alternative text description. So, it’s recommended that all non-decorative images have alt text and therefore use the alt attribute.
Here’s an example of an image with a source and alt attribute:
See the Pen img example by HubSpot (@hubspot) on CodePen.
Anchor (<a>)
The HTML anchor element creates a hyperlink. It requires an href attribute, which species the destination of the link. The destination can be another section on the same web page, another web page on the same site, or external websites, files, and email addresses.
Here’s an example of an anchor nested in a paragraph:
See the Pen anchor example by HubSpot (@hubspot) on CodePen.
Emphasis (<em>)
The HTML emphasis element signals that the text inside it should be emphasized to readers. Browsers typically render text inside <em> tags in italics.
Here’s an example of the emphasis wrapped around a paragraph and nested within a paragraph:
See the Pen em example by HubSpot (@hubspot) on CodePen.
Strong (<strong>)
The HTML strong element indicates that the text it contains is of particular importance or urgency. Browsers typically render the text in bold.
See the Pen strong example by HubSpot (@hubspot) on CodePen.
Div (<div>)
The HTML div (division) element is a generic content container. Divs help organize the code into sections, which can then be targeted by CSS. They also add line breaks before and after their content. Otherwise, they do not affect the content or layout of the page unless styled with CSS.
Here’s an example of a div wrapped around a paragraph:
See the Pen div example 1 by HubSpot (@hubspot) on CodePen.
Here, the paragraph looks the same as it did without the div wrapper. That’s because no style information was given to this div element. To change the appearance of the container and therefore the paragraph inside that container, you need to add style information.
Say, for example, you wanted to center the paragraph. You could use the following code to horizontally center the text on the page:
See the Pen div example 2 by HubSpot (@hubspot) on CodePen.
Divs are also useful for visually distinguishing different sections of the page. In the example below, the text is wrapped in a div, which is styled to look like a card:
See the Pen div example 3 by HubSpot (@hubspot) on CodePen.
Span (<span>)
The HTML span element is a generic inline container. Like the div element, the span element does not inherently represent anything, but can be used to apply styling to a section of text.
For example, here’s a <span> tag being used to create a drop cap.
See the Pen span example by HubSpot (@hubspot) on CodePen.
Line Break (<br>)
The line break element creates a line break. You can add a <br> tag wherever you want the text to end on the current line and resume on the next. This element can be used to display poems, song lyrics, or other forms of content where line breaks are important.
Below is an example of an address rendered in two ways: one using line break elements and one using paragraph elements.
See the Pen Paragraph vs Line Break Element by HubSpot (@hubspot) on CodePen.
You’ll notice that the example using line breaks looks different than the paragraphs example, which has larger spacing between the content. This is because the paragraph element is a block-level element and creates a new block of content. You can learn more about how block-level and inline elements work in this guide.
Unordered List (<ul>)
The HTML unordered list element creates lists of items. Specifically, it’s for listing items when the order of the items in the list doesn’t matter. Shopping lists, for example, don’t need to follow a particular order.
List items are defined by the <li> (list item) tag and wrapped in the <ul> element. By default, the browser will use a bullet point for each <li> element.
Here’s an example of an unordered list. Try adding some list items yourself and see how the list changes.
See the Pen ul example by HubSpot (@hubspot) on CodePen.
Ordered List (<ol>)
The HTML ordered list element is for listing items when the order does matter. Recipes, for example, should follow a particular order. The steps must be defined by the <li> tag and then wrapped in the <ol> element.
Each <li> element will have numbers placed with it. An ordered list starts at the number 1 by default. If you’d like to start at another number, add a start attribute and set the value to the number you want.
Here’s an example of an ordered list that starts at 1. Try adding steps at different parts of the list:
See the Pen ol example by HubSpot (@hubspot) on CodePen.
Table (<table>)
The HTML <table> element creates a table for organizing content. It requires three other HTML elements:
- <tr> defines a table row.
- <th> defines the table header
- <td> defines the table data (i.e., the content of the table’s cells).
Here's an example of a table:
See the Pen HTML table example by HubSpot (@hubspot) on CodePen.
Button (<button>)
The button element creates, you guessed it, a button. Browsers will apply some default styling buttons, so when you click, it looks like it’s being clicked. Attach some JavaScript code to the button to make it do something on the page, like in this example:
See the Pen HTML Button example by HubSpot (@hubspot) on CodePen.
Select (<select>)
The select element creates a dropdown list from which a user can select one option (or multiple if allowed). It’s best for letting users select one option out of many while maximizing space on the web page.
See the Pen HTML-only Dropdown by HubSpot (@hubspot) on CodePen.
Horizontal Rule (<hr>)
The horizontal rule element defines a horizontal line across a web page. It can be used to mark any thematic change, like the next scene in a play, a new section of an essay, or the conclusion of an article.
See the Pen Horizontal Rule element by HubSpot (@hubspot) on CodePen.
Common HTML Attributes
Attributes modify HTML elements in different ways. An attribute can change the appearance of an element, change an element’s behavior, apply identifiers so the element can be targeted by CSS, or provide accessibility information. Attributes usually appear as name/value pairs, with values in quotes.
Let’s look at the most common attributes you’ll see in HTML.
Style Attribute
The style attribute can be used to quickly apply CSS to an element. It will only be applied to the HTML element that has the style attribute in its opening tag.
Here’s an example of the style attribute in HTML:
See the Pen html: style example by HubSpot (@hubspot) on CodePen.
ID Attribute
The id attribute is used to identify a single element in an HTML file. Using an ID, you can target a single element CSS. The value of an ID attribute should not be repeated inside an HTML file.
Here’s an example of the id attribute in HTML.
See the Pen html: ID example by HubSpot (@hubspot) on CodePen.
Class Attribute
The class attribute is used to group multiple elements under the same name and apply styling to every element in that group.
In the example below, the first two paragraphs are given the class styled-text. Then, in the CSS, the style-text class is targeted with CSS (the class is denoted by a period).
See the Pen HTML - class examples by HubSpot (@hubspot) on CodePen.
Href Attribute
The href attribute contains the destination of a hyperlink. In simpler terms, it’s where the user goes when they click a link. This attribute is required in an anchor element.
Here’s an example of the href attribute in HTML:
See the Pen anchor example by HubSpot (@hubspot) on CodePen.
Source Attribute
Just like an anchor element needs an href attribute, an image element needs a source (src) attribute. This contains the path to the image file or its URL.
See the Pen img example by HubSpot (@hubspot) on CodePen.
Alt Attribute
The alt attribute provides alt text, which is descriptive information about an image element. Including alt is important for readers with visual impairments, or in case the image doesn’t load. In these cases, readers will still be able to understand what the element was meant to convey. Like the source attribute, you’ll most often find the alt attribute with the image element.
Here’s an example of the attribute in HTML:
See the Pen html: alt example by HubSpot (@hubspot) on CodePen.
Language Attribute
The language (lang) attribute indicates the language of the element, which helps screen readers and search engines correctly interpret the content of the page.
This attribute is often used in the <html> tag to indicate the primary language of the web page, but it can be placed in other text-based elements like paragraphs and headings. Here are a few examples of lang in HTML:
See the Pen html - lang example by HubSpot (@hubspot) on CodePen.
Title Attribute
The title attribute gives additional information about an element that you may want the reader to know. When the user hovers over an element with this attribute, the value of title will usually appear as a tooltip.
Try hovering over the “(what’s this?)” text in the example below to see an example of a tooltip.
See the Pen html - tooltip example by HubSpot (@hubspot) on CodePen.
Now that we’ve covered the most common elements and attributes in HTML, let’s explore where you can practice writing this language and continue learning more about it.
Free Guide: 25 HTML & CSS Coding Hacks
Tangible tips and coding templates from experts to help you code better and faster.
- Coding to Convention
- Being Browser-Friendly
- Minimizing Bugs
- Optimizing Performance
Download Free
All fields are required.
How to Learn HTML
There are hundreds of resources available for learning HTML. Depending on your learning style, you may prefer blog posts, video tutorials, an online course, or an ebook. Below, we’ll cover at least one example of each of these so you can find a resource that will help you learn HTML.
1. The Beginner's Guide to HTML and CSS for Marketers
If you‘re just starting to learn to code, this free e-book is designed to teach HTML to beginners. It explains what HTML and CSS are, how they work together, and how to get started with these languages if you’re brand new to web development.
As the title suggests, this guide is great for marketers who need to be able to make quick fixes to their websites, blogs, and landing pages without getting too bogged down in details.
2. LinkedIn Learning
If you’re a visual learner, check out the online tutorials available at LinkedIn Learning (formerly known as Lynda.com). LinkedIn Learning offers dozens of courses and thousands of video tutorials that cover virtually every HTML topic.
Lessons on LinkedIn Learning are organized into three levels — beginner, intermediate, and advanced — so you can develop your skills over time. To get access to all content on the site, you can sign up for a monthly or annual subscription.
The video below is an excerpt from one course called “HTML Essential Training” by Jen Simmons:
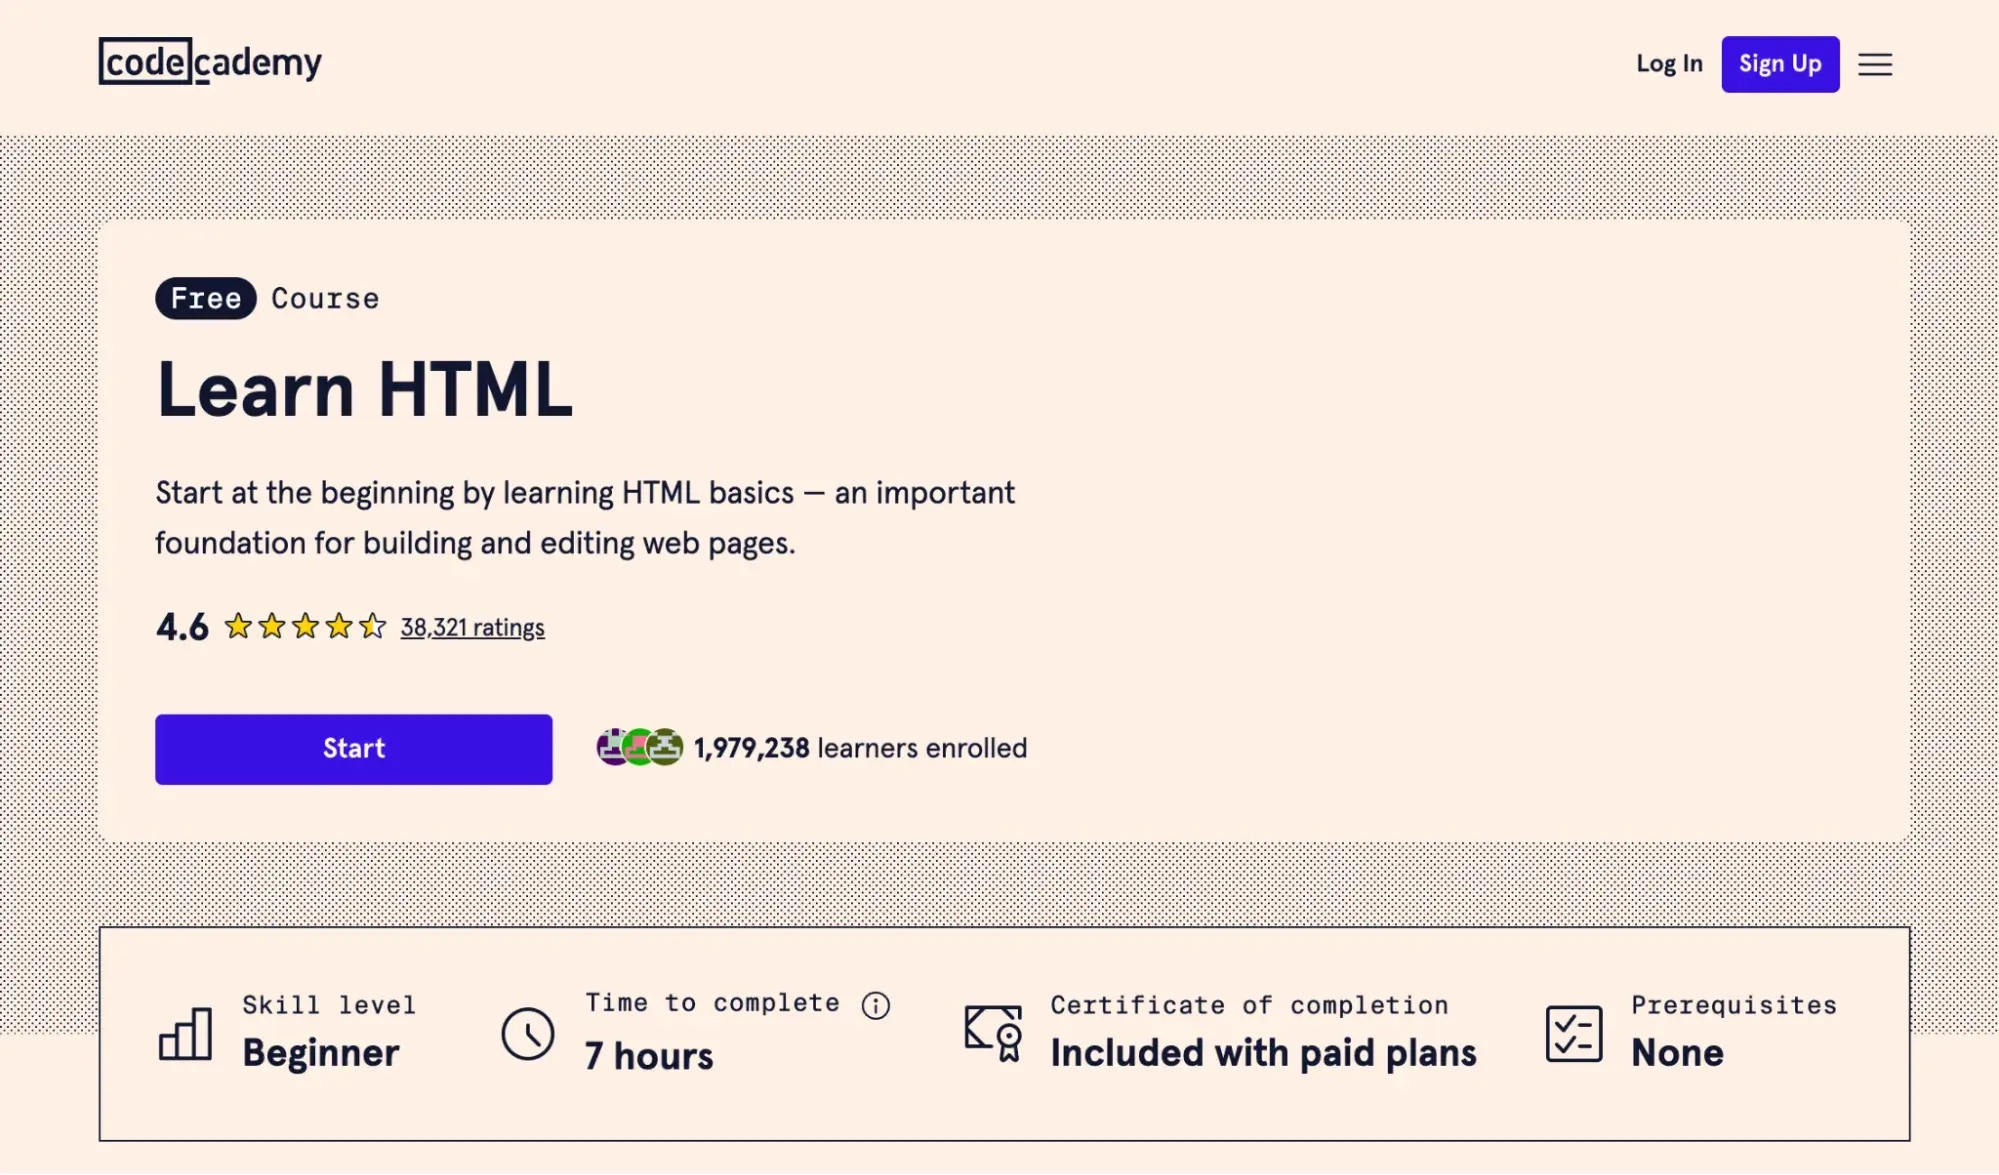
3. Codecademy
If you’re overwhelmed by the sheer quantity of videos available on LinkedIn Learning, try Codeacdemy’s Learn HTML class. This online course will start with the basic structure and elements of HTML. You can then put your knowledge to the test by building out more complex elements and projects, including HTML tables and forms, from scratch.
While you can complete most of the course for free, there are pro features like quizzes and projects that you’ll have to pay to unlock.
4. W3C
The World Wide Web Consortium (W3C) currently offers an introductory HTML and CSS course through edX, an online learning platform. W3C sets the standards for the web, so you can trust it’s pretty good source on these things.
The course covers the fundamentals of HTML and CSS, including creating a webpage, essential concepts to understand, introductory web design concepts, and an intro to page layouts and flexbox.

5. Learn HTML
Learn HTML is a free interactive tutorial. However, rather than try to be the most comprehensive resource on HTML, Learn HTML offers a short step-by-step guide for building out a web page.
At every step, you can test whether you understood the lesson by completing an exercise in the online code editor. If your code matches the expected output, then you’ll get a success message and be invited to move to the next lesson.
6. HTML Beginner Tutorial by HTML Dog
HTML Dog created an HTML Beginner Tutorial for those who have absolutely no previous knowledge of HTML or CSS.
It starts with a general overview of what HTML is and what it’s made of (tags, elements, and attributes). It then walks through how to build out an HTML file with titles, paragraphs, headings, and other elements. By the end, you’ll know how to create a complete HTML file.
Is HTML a programming language?
You may have heard of programming languages like JavaScript, Python, or Java. However, you might have noticed that I don’t refer to HTML as a programming language, but instead as a “coding language.” This is because most do not consider HTML to be a programming language.
All programming languages have some function, whether it be evaluating expressions, declaring variables, or modifying data. JavaScript is the most widely used programming language on the web and is used in conjunction with HTML and CSS to make web pages dynamic and interactive.
Though it’s a very useful language, HTML doesn’t really “do” anything in a functional sense. It simply gives browsers the content it needs to display. HTML doesn’t care how the browser goes about displaying the content, as long as it’s displayed. In other words, HTML has a structural purpose, not a functional one.
Some developers argue that HTML is a programming language — it’s just a declarative programming language. According to Professor David Brailsford from the University of Nottingham, declarative languages are more restricted than other languages, but that doesn’t make them any less of a programming language. You can see his full argument in this video.
You’re ready to code.
HTML is the language we use to talk to computers. It is how browsers display text, images, paragraphs, and other elements on a web page.
HTML is the predominant language on the World Wide Web. That makes the language important not only to aspiring programmers, but to marketers like yourself. Knowing the basics of this markup language will allow you to make changes to your website without needing to rely on a developer, saving you and your business time and money.
Editor's note: This post was originally published in August 2020 and has been updated for comprehensiveness.


![How to Create an HTML Dropdown Menu [+ Examples]](https://www.hubspot.com/hubfs/html-dropdown.jpg)
![Onchange Event in HTML: How to Use It [+Examples]](https://knowledge.hubspot.com/hubfs/onchange.webp)
![How to Create a Landing Page in HTML & CSS [+ 15 Templates]](https://lh7-us.googleusercontent.com/gmIHbJpUHbZTRtyrKrl3gPKd1vx-42KDD7q3zNsm-KeCrF2YypEaYW7J0lQXsog9CXD4UYxUJ-A7VAvPJTjKclV-Rd-bZrAFHvKLE4JFP5UKk84v8M8R5rtubdotpFQxOCZataRdWf_KE0hKe4N06qw)