It can be disheartening to sink so much time and energy into your WordPress website, only to find that your pages are laggy. What is it that other, faster websites do that you don’t?

One possible answer is browser caching.
Even if you’re brand new to web development, you’ve probably heard the term “cache” used in terms of web browsing and page speed. You may have even cleared your browser cache a few times.
At its core, the concept of browser caching isn’t a hard concept to grasp or implement in order to speed up your WordPress website. In fact, you don’t even need to touch your server files, since there are plugins that can handle the back-end work for you. And, since it takes just seconds for visitors to become impatient with your load time, it’s worth the extra effort for even a small speed boost.
In this guide, you’ll learn what browser caching is and how to leverage it on your WordPress website, either by editing your server files yourself or with the help of a WordPress plugin.

What is browser caching?
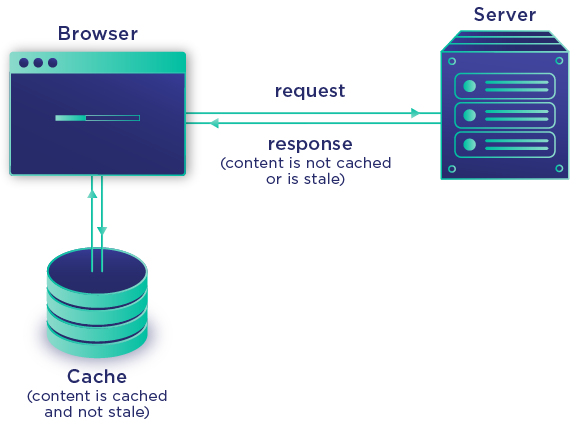
Browser caching occurs when a web browser temporarily stores a copy of a resource locally on its device so that the resource can be loaded more quickly in the future. The space on the local disk where resources are stored is called the “cache.”
To better understand the basics of caching, let’s review how websites normally work. When a user enters your website’s URL into their browser, the browser sends an HTTP request to your site’s web server, asking for the website resources at the location specified by the URL. These resources include content like text and images, style sheets, and scripts to make things happen on the page.
If all goes well, your web server sends the requested resources back to the browser, along with some extra instructions on how those files should be handled. The browser parses these files and displays them as a web page to your visitor.
However, none of this really matters to the average internet user — all they want is your web page on their screen as fast as possible. And one common method to decrease load time (or, in other words, increase performance) is to leverage browser caching.
With browser caching enabled, your server instructs visitors’ browsers to hold on to some of your website resources in its cache for a set length of time. Then, the next time that visitor returns to the same page, the browser can pull the resource from its cache instead of requesting a copy from your web server again. The process of requesting, receiving, and parsing the cached items is eliminated, resulting in faster load times overall.
Similarly, if the visitor jumps to another page on your website that uses some of the same resources as the previous page — for instance, a repeated logo or a header region — their browser can pull from the cache for those resources as well.
It’s important to note that cached content is almost always temporary. It’s up to the server to tell the browser what resources can be cached and for how long. This could be as short as a minute or as long as one to two years, depending on how often you expect to update this content.
Caching is best applied to static content. Static content doesn’t change once uploaded to a web server — images are a common example. Static files will look the same to the user whether they’re downloaded from a server or pulled from the browser cache.
Should you enable browser caching?
In short, most likely yes — most popular websites use caching to improve performance and save on bandwidth. To be sure, you can run your website through a speed checker like Website Grader or PageSpeed Insights and look for suggestions related to efficient browser caching.

If you get notices like these, it’s probably because you are not caching static resources, or because your cached content expires too quickly.
To address this problem and speed up your WordPress site, you’ll need to configure your server to allow for cached content. There are two ways to do this: First, I’ll explain how to enable caching with a few popular WordPress plugins. Later on, we’ll discuss how to turn on caching by editing server files directly.
How to Leverage Browser Caching in WordPress with a Plugin
Plugins are perfect for site owners who might not be comfortable making changes to their server files directly. A browser caching plugin will handle the behind-the-scenes work for you, and many will also help optimize your website in other ways too. In this section, we’ll review three such plugins and how to turn on browser caching in each.
But, before installing a caching plugin on your website, make sure that it’s okay with your web host. Many hosting providers, including and especially managed WordPress hosts, prohibit the use of caching plugins and might even ban specific plugins — not because they’re harmful, but because they are incompatible with the current server configuration. In these cases, browser caching is probably already enabled. Get in touch with your hosting support with questions about caching your WordPress site.
Now, let’s unpack these plugins.
WP Rocket
After getting your host to take care of browser caching for you, the WP Rocket plugin is the most hands-off solution for WordPress site owners. WP Rocket is a comprehensive speed optimization plugin that handles many aspects of performance automatically, including caching. WP Rocket is a premium plugin, starting at $49 for one year of updates and support on one website.

WP Rocket applies desktop and mobile caching to your content immediately upon activation, but you can toggle your cache settings under Settings > WP Rocket. Here you’ll be able to toggle caching on and off, as well as change the cache lifespan. Cached assets are set to expire after 10 hours by default, but you may want to shorten this if your site frequently updates content, or lengthen it if your site is largely static.
In addition to caching, WP Rocket also optimizes your website by applying GZIP compression to files hosted on your domain, preloading certain assets, and lazy loading images.
Hummingbird by WPMU DEV
Hummingbird is a member of the WPMU DEV plugin suite — this particular plugin is dedicated to boosting your site performance with several measures, including GZIP compression, a content delivery network (CDN), uptime monitoring, and a set of caching features. A subscription is $5 per month for one website, or you can get all WPMU DEV plugins for $15.83 per month.

Hummingbird lets you enable several forms of caching on your page, including page caching and browser caching. To enable page caching in Hummingbird, log in to your WordPress dashboard and choose Hummingbird Pro > Caching. Then, in the Page Caching module, click Activate. In this module, you can toggle which elements are cached based on how frequently they change on your site — caching is less useful on elements that update frequently — as well as what devices and users can use cached content.
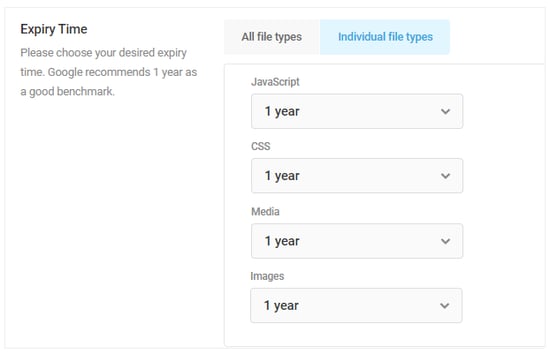
To enable browser caching, scroll down to the Configure area, select your server type, and set your expiry times for either all files or for individual files.
W3 Total Cache
Sitting at over one million downloads to date, W3 Total Cache is a leading performance optimization plugin that caches your web pages, minifies your code, lazy-loads images, and integrates with CDNs like Cloudflare. It comes in a free version and a premium plugin for $8.25 per month — caching is available in the free version.
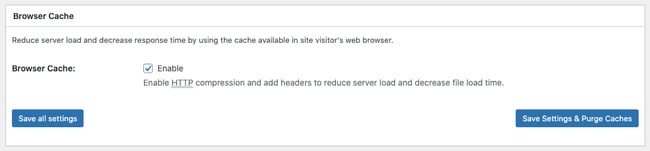
To turn on caching, choose Performance > General Settings, then scroll down to Browser Cache and check the box next to Enable if it’s unchecked. Then, click Save all settings.
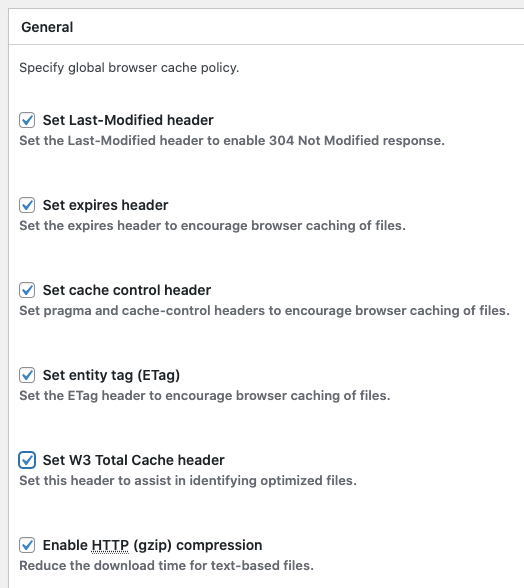
Next, choose Performance > Browser Cache. Under General, check the first five boxes. These enable the headers (HTTP instructions sent from your server to browsers) that enable browser caching.
Lastly, you’ll need to set the expiry times for your specific file types. The expires header tells browsers how long to store a copy of your site’s files.
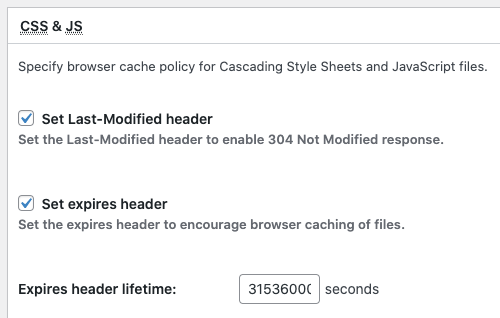
You can set separate expires headers for CSS and JavaScript files, HTML and XML files, and media files. Under Performance > Browser Cache, scroll to the CSS & JS section, check the box next to Set expires header and enter your Expires header lifetime value in seconds. By default, this value is 31536000 seconds, or 365 days. Adjust this value to what makes most sense for your CSS and JavaScript files — for example, an expiry period of two weeks would be 1209600 seconds.
Repeat this process under the HTML & XML and Media & Other Files sections, then click Save all settings.
How to Leverage Browser Caching in WordPress by Editing Files Directly
If you have access to your server files and are comfortable making direct modifications to them, you can add instructions that enable browser caching.
First and foremost, use caution whenever making edits like these. Any misplaced or miswritten code can make your site instantly unavailable, or may conflict with your server’s configuration. If you haven’t already, we recommend reaching out to server support for permission and any guidance, especially if you’re new to editing server files. Also, always create a backup of your site when making significant changes.
To leverage browser caching, your modifications will instruct the server to make specific files cacheable for a specific period of time. You’ll be adding two headers to your HTTP responses: Cache-Control, which specifies for how long and where the files can be cached, and Expires, which tells the browser how long the cached file is valid.
The process for adding these headers varies depending on your server software. In this section, I’ll cover how to enable browser caching on the most common configurations, Apache and Nginx.
How to Leverage Browser Caching on an Apache Server
If your site is stored on an Apache server, you’ll make your site-wide changes in the .htaccess file located in your main WordPress directory (usually public_html). .htaccess are text files that contain instructions and permissions for their respective directories, so the .htaccess your root directory controls applies to your entire site.
To edit .htaccess, access your server files through either your hosting panel or with an FTP client. Navigate to your root WordPress folder. If you do not see .htaccess there, you may need to reveal hidden files. If you still do not see .htaccess after revealing hidden files, that means it doesn’t exist in your root folder. In this case, simply create a new .htaccess file in this folder — here’s Hostinger’s guide on how to do that.
After locating or creating your main .htaccess file, open the file in your hosting panel file editor, or download the file and open it in a code/text editor. This is where you’ll make the necessary changes.
Set Cache-Control Header in Apache
First, let’s set our Cache-Control header. Add the following code at the bottom of the file, below # END WordPress:
<filesMatch ".(ico|pdf|flv|jpg|jpeg|png|gif|svg|js|css|swf)$">
    Header set Cache-Control "max-age=31536000, public"
</filesMatch>
This applies caching to all files with the extensions listed in the first line, sets the maximum expiration date to 31536000 seconds (i.e. 365 days), and states that files can be cached on a public server, like that of a CDN. You can change public to private in the code above to instruct the browser to only store the cached files on the client’s computer.
Alternatively, you can set different Cache-Control headers by file type. For example:
<ifModule mod_headers.c>
    <filesMatch "\.(jpeg|jpg|png|gif|svg|)$">
Header set Cache-Control "max-age=31536000, public"
    </filesMatch>
   <filesMatch "\.(js|php)$">
     Header set Cache-Control "max-age=31536000, private"
   </filesMatch>
</ifModule>
This code allows image files to be cached publicly, while limiting .js and .php files to private caching.
Set Expires Header in Apache
Next, add your Expires header to tell the browser when to replace the cached files with new versions. Paste the following code below your Cache-Control rules:
<IfModule mod_expires.c>
ExpiresActive On
ExpiresByType text/html "access 1200 seconds"
ExpiresByType text/css "access 1 month"
ExpiresByType text/javascript "access 1 month”
ExpiresByType text/x-javascript "access 1 month"
ExpiresByType image/jpeg "access 1 year"
ExpiresByType image/jpg "access 1 year"
ExpiresByType image/png "access 1 year"
ExpiresByType image/svg "access 1 year”
ExpiresByType image/gif "access 1 year"
ExpiresByType application/pdf "access 1 month"
ExpiresByType application/javascript "access 1 month"
ExpiresByType application/x-javascript "access 1 month”
ExpiresByType application/xhtml+xml "access 1 month""
ExpiresByType application/x-shockwave-flash "access 1 month"
ExpiresByType image/x-icon "access 1 year"
ExpiresDefault "access 1 month"
</IfModule>
Here, each ExpiresByType assigns an expiry period to a file type. These values are not set in stone — you might need to change the times to best suit your needs. In general, image files rarely change and can be cached for longer periods.
The last line is a catch-all for any file type not specified above it. Here, it defaults to 1 month.
Once finished with your edits, save the file (and re-upload it via FTP if necessary), then rerun a speed test in an incognito browser to see how your pages perform.
How to Leverage Browser Caching on an Nginx Server
To instruct your Nginx server to add Cache-Control and Expires headers, open your configuration file (conf) in your server panel editor (or in a code editor) and make the following changes.
Set Cache-Control Header in Nginx
Paste the code below within the server block in your configuration file:
location ~* \.(ico|pdf|flv|jpg|jpeg|png|gif|svg|js|css|swf)$ {
    expires 365d;
    add_header Cache-Control "public, no-transform";
}
This sets the max expiration period for the specified file types to 365 days. You’re free to change this period and/or the included file types. It also makes these files publicly cacheable (e.g. on CDN servers), rather than just privately in the browser’s local storage. To make your assets privately cached, change public to private in the above code.
Set Expires Header in Nginx
In the same server block, paste this code to add Expires headers:
location ~* \.(jpeg|jpg|png|svg|gif)$ {
    expires 365d;
}
This sets your image assets to expire after one year. For files with shorter/longer expiry periods, re-paste this code in the same section, substitute the file extension names, and insert a different time period, like so:
location ~* \.(html|css|js)$ {
    expires 30d;
}
After making these changes, save your conf file and restart Nginx. Rerun a speed test in an incognito browser to see how your pages perform.
What if your load time isn’t improving?
Whether you’re configuring your server files yourself or enlisting a plugin to do the work for you, most WordPress sites can benefit from browser caching. If you’re not taking advantage of this function, you and your visitors are missing out on a vital speed boost.
Once you’ve implemented your changes, run your website through the same speed test that you used previously. Make sure to run your site on incognito mode, as this will not load any already-cached files.
If you’re still not seeing performance improvements, there are a couple of possible explanations. First, you might want to tweak your cache settings a bit, making sure your expiry periods are long enough and that you’re caching your large, static images.
However, another possible cause of this problem is excessive third-party scripts. When you integrate third-party tools like CRM software, analytics tools, or other applications, these all place scripts on your pages. You have no control over how these script files are cached since they’re not coming from your web server. So, you may want to consider switching or abandoning certain tools you don’t need in exchange for better performance — it may be worth it to shave a bit more time from your page load.