Some of my web projects are like Wes Anderson films, perfectly symmetrical. When I want to follow that aesthetic, I need to center my images using HTML and CSS. With these two languages, I can create that precise alignment and effectively drive attention to the most important elements on the page.
When I first began coding, aligning elements using HTML felt challenging. However, through breaking down the concept and consistent practice, I've not only mastered the skill but also believe you can too.
In this article, I’ll cover everything you need to know about centering images (or any inline elements) and share several beginner-friendly tutorials. By the end, you’ll be able to center images with your eyes closed.

Table of Contents:
- Why center images in HTML and CSS?
- How to Center an Image in CSS & HTML
- How to Horizontally Center an Image in CSS
- How to Vertically Center an Image in CSS
- How to Center an Image in Bootstrap
- Are images inline or block elements in HTML?
- Should you center images with internal, external, or inline CSS?
- How to center an Image using Hubspot CMS
Why center images in HTML and CSS?
First, why do I center images — or any other element — in the first place? Human beings crave symmetry on and offline. This preference is so strong that it’s actually hardwired in our nervous system and has been for thousands of years.
Symmetry doesn’t mean things have to be identical on either side of an axis. There are several ways to create symmetry in a website, and the one I’ll be discussing in this article is balance.
Achieving balance on my websites depends largely on how I align the elements on the page. Centering elements, particularly large elements like images, helps me achieve an ordered and visually pleasing design.
Below, I’ll share the process for centering an image or any inline element in HTML and CSS. But first, consider learning some of the basics of HTML and CSS by downloading the guide below.
Learn More: The Beginner's Guide to HTML & CSS

Want to learn more about HTML? Download our free guide for best practices for getting started with HTML.
How to Center an Image in CSS & HTML
Before I discuss the different ways to center an image, it’s important to clarify what “in HTML” actually means. In other words, where would you add the “centering” code for your image? Right within the <img> tag? Or would you have to go straight to your website’s CSS code? Let’s take a look.
Centering Images with the Deprecated <center> Tag
Once upon a time, there was an HTML <center> element. This was a block-level element that would automatically center any block or inline elements it contained. So, centering an image would require a single line of HTML that looked something like this:
<center><img src=“image1.jpg” alt=“centered image” height=“598” width=“398”></center>
However, this element was deprecated in HTML4. Now that HTML5 is the standard, this obsolete tag won’t likely render in any modern browser.
So, what process do I use to center an image in HTML? The most important thing to understand is that centering an image today requires you to add CSS to HTML. Using HTML exclusively is no longer allowed.
Thankfully, I‘ve picked up and applied several techniques for centering images, both horizontally and vertically. We’ll start by looking at how to center an image horizontally.
Free Guide: 25 HTML & CSS Coding Hacks
Tangible tips and coding templates from experts to help you code better and faster.
- Coding to Convention
- Being Browser-Friendly
- Minimizing Bugs
- Optimizing Performance
Download Free
All fields are required.
How to Horizontally Center an Image in CSS
There are three ways to center an image horizontally. Having worked with this, I have found that the first works better for smaller images and the second for larger images. The third method works best if you’re using the responsive layout model Flexbox.
I’ll cover all three so you can center any image, no matter the size, on your website.
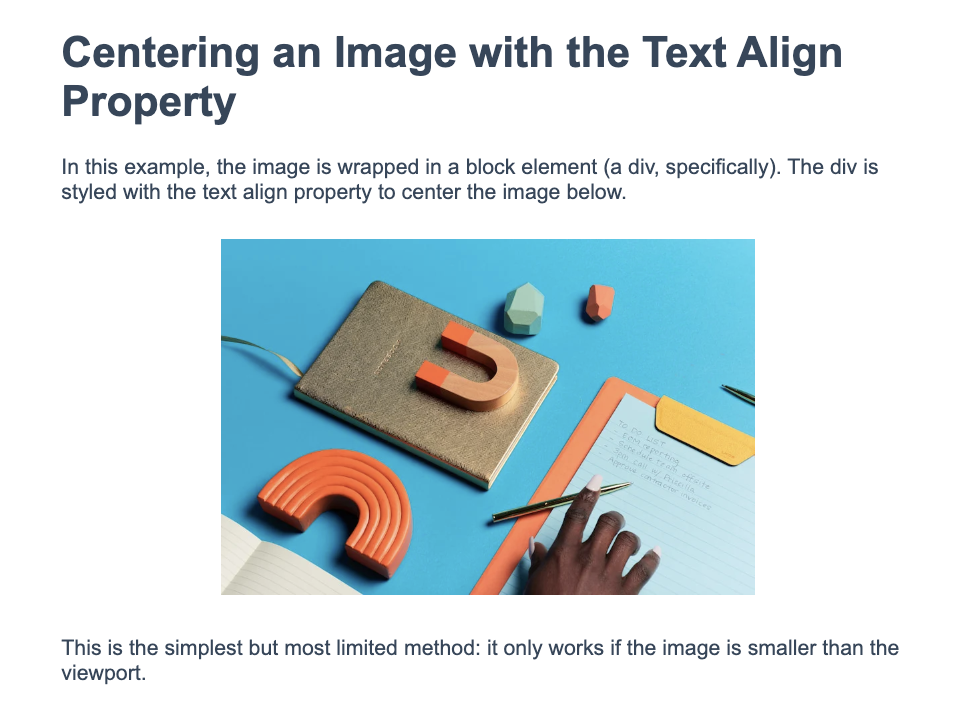
Method 1. Using the Text-Align Property
To center an image horizontally, I can use the CSS text-align property. Since this property only works on block-level elements and not inline elements, I’ll need to wrap the image in a block element.
Here's how:
- I start by opening up my HTML file.
- I then locate the image on the page, identifiable by its <img> tag.
- I wrap the image in a div.
- From there, I can add a style declaration to the opening tag of your div, i.e., <div style=“[insert style here]”>.
- Inside the quote marks, I set the text-align property to center, i.e., text-align: center;
It’s simple, but it's important to note that it only works if the image is smaller than my viewport.
Here’s the HTML with inline CSS and the result:
See the Pen How to Center an Image with the Text Align Property by HubSpot (@hubspot) on CodePen.
Try it yourself! The code module above is editable. Toggle between the HTML and CSS tabs, edit the code, and click rerun in the bottom right-hand corner.
Pro tip: As I edit my code, I take advantage of the live preview option throughout the process to observe the changes as I apply them. Live preview can be used in most web development IDEs, such as Visual Studio Code. This feature lets me see real-time updates from my code in my browser.
Method 2. Using the Margin Property
Let’s say I have a very large image that I want to center. In that case, wrapping the image in a block element wouldn’t be the best option. Instead, I’d want to define the image with the CSS display property and set it to "block.”
Here’s how to center an image using the margin property:
- I open up my CSS file.
- I locate or create the img CSS selector.
- Inside the style bracket, I can set the display property to block. This will tell the browser to treat the image as if it were a block element, not an inline element, thus allowing me to use the CSS margin property.
- I can then set the width of the image to a fixed amount so it doesn’t span the viewport. In this case, I’ll use the percentage value of 60%, but you can also use pixels.
- From there, I set the margin property to auto so that both horizontal margins are equal.
Here's the CSS with the result:
See the Pen How to Center an Image with the Margin Property by HubSpot (@hubspot) on CodePen.
Try it yourself! The code module above is editable. Toggle between the HTML and CSS tabs, edit the code, and click rerun in the bottom right-hand corner.
Method 3: Using the Flex Property
I can also center an image horizontally using the flex property, which doesn’t require margin calculations.
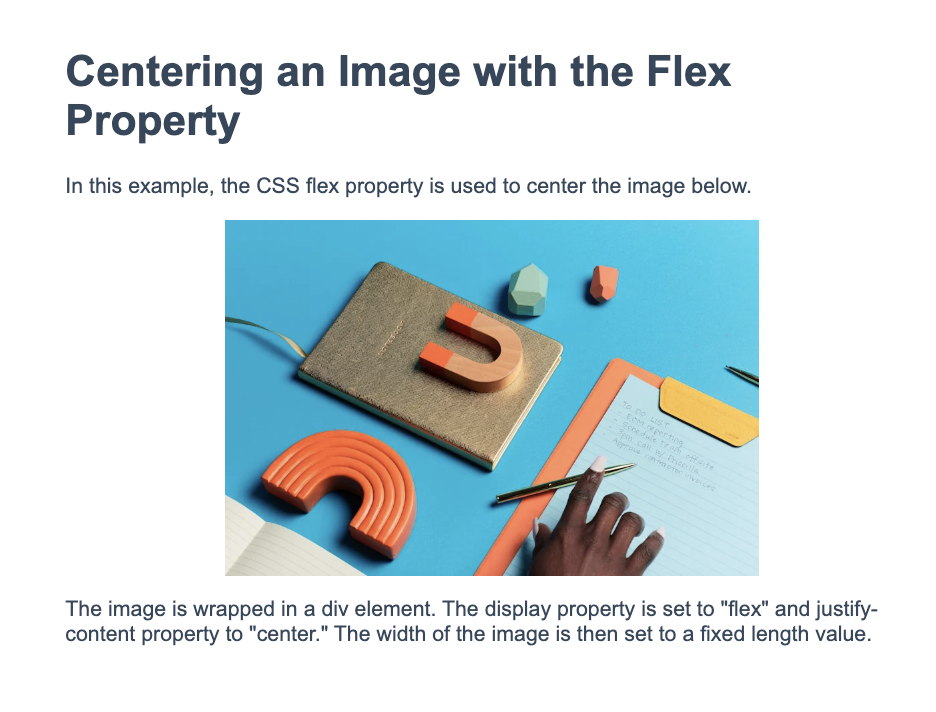
Here's how:
- In my HTML file, I start by looking for the image I want to center.
- From there, I set the width of the image to a fixed length value, i.e <img width=“400”>.
- I can then wrap the image in a div element. I also have the option of giving the div an ID or class. That way, the centering code only applies to this one specific instance and not to all divs.
- Next, I open up my CSS file.
- I can then find my div selector or write out my ID or class selector (#example or .example).
- Inside the curly brackets, I set the display property to flex, which tells the browser that the div is the parent container and the image is a flex item.
- Then, I set the justify-content property to center.
Here's the CSS with the result:
See the Pen How to Center an Image with the Flex Property by HubSpot (@hubspot) on CodePen.
Try it yourself! The code module above is editable. Toggle between the HTML and CSS tabs, edit the code, and click rerun in the bottom right-hand corner.
Click on the HTML button to see the HTML code as well.
Pro tip: As previously mentioned and speaking from personal experience, I encourage you to give an ID selector to your div and use the selector in your CSS code. That way, all divs on your website aren’t affected.
https://www.youtube.com/watch?v=PFfAuNGarYk
How to Vertically Center an Image in CSS
Centering any element vertically is more difficult than horizontally, but it’s still doable. For the demos below, I’m going to use internal CSS.
Method 1. Using the Position Property
To center an image vertically, I can wrap it in a block element like a div and use a combination of the CSS position property, the left and top properties, and the transform property.

Here's how:
- In my HTML file, I locate the image you want to center, then wrap the image in a div element.
- In my CSS file, I find my div selector or write out my ID or class selector (#example or .example).
- Inside the curly brackets, I set the position property of the div to absolute so that it’s taken out of the normal document flow.
- I set the left and top properties to 50%. This tells the browser to line up the left and top edge of the div containing the image with the center of the page horizontally and vertically (i.e., 50% to the right and down the page).
Here’s the problem: having the edges of the div lined up in the middle of the page will make the div look off-center. That’s where the CSS transform property comes in. To truly center the div containing the image, I can use the translate() method to move the div along the X- and the Y-axis.
Here's how:
- I set the transform property to translate(-50%, -50%).
- This moves the div 50% to the left and up from its current position so that the center of the image lines up with the center of the page.
- Next, I set the -ms-transform property to translate(-50%, -50%). To move left and up, I’ll need to use negative values, which is what I’ve done with this step.
Here’s the CSS:
See the Pen How to Center an Image with the Flex Property by HubSpot (@hubspot) on CodePen.
Try it yourself! The code module above is editable. Toggle between the HTML and CSS tabs, edit the code, and click rerun in the bottom right-hand corner.
Method 2. Using the Flex Property
Just like I did earlier when I centered an image horizontally, I can use the flex property to center images vertically.
Here's how:
- In my HTML file, I find the image I want to center.
- I set the width of the image to a fixed length value, i.e., <img width=“400”>.
- I wrap the image in a div element.
- In my CSS code, I can then find your div selector.
- Inside the curly brackets, I set the display property of the div to flex.
- I set the align-items and justify-content properties to center. This will tell the browser to center the flex item (the image within the div) vertically and horizontally.
- Then, I set the height of the div container to a proportionate height.
Here’s the CSS with the result:
See the Pen How to Center an Image Vertically with the Position Property by HubSpot (@hubspot) on CodePen.
Try it yourself! The code module above is editable. Toggle between the HTML and CSS tabs, edit the code, and click rerun in the bottom right-hand corner.
Pro tip: If you have other items in the flex container but only want to center the image specifically, take advantage of the align-self property. All you have to do is make a separate selector in your CSS and apply it to the img tag in your HTML.
How to Center an Image in Bootstrap
I also can vertically and horizontally center an image in Bootstrap CSS, which is one of my favorite frameworks to use. It has a series of handy, premade CSS classes to help me style my web pages.
All I need to do is add the mx-auto class to my image. This will automatically set the horizontal margin of the image to auto, centering the image.
Here's how:
- In my HTML file, I can locate the image I want to center.
- I then add the mx-auto class to the image tag, i.e., <img src=“image.jpg” class=“mx-auto”>.
You're actually done! But if I want to also center the image vertically, I can take the following steps.
- I wrap the image in a div element.
- I can then add the d-flex and align-items-center class to the div, i.e., <div class=“d-flex align-items-center”>.
The “d-flex” class declares that the parent div is a flexible container, and the “align-items-center” class centers the image vertically inside the div. This works similarly to CSS Flexbox.
Here’s the HTML with the result:
See the Pen Centering an Image in Bootstrap by HubSpot (@hubspot) on CodePen.
Try it yourself! The code module above is editable. Toggle between the HTML and CSS tabs, edit the code, and click rerun in the bottom right-hand corner.
Pro tip: Use developer tools such as Chrome Dev Tools to inspect your page and verify the class being assigned to the element is correct.
Here’s how to do this:
- Open Google Chrome.
- Right-click on the page and select inspect.
- Find the elements tab and click the element with the appropriate class name.
- Finally, verify the properties for the class under the styles tab to double-check its values.
Free Guide: 25 HTML & CSS Coding Hacks
Tangible tips and coding templates from experts to help you code better and faster.
- Coding to Convention
- Being Browser-Friendly
- Minimizing Bugs
- Optimizing Performance
Download Free
All fields are required.
Are images inline or block elements in HTML?
As you can see, the centering process isn’t difficult, but it varies depending on whether the elements are inline or block.
There are a few differences between these element types, but the major difference is how they affect the flow of a page. It's important to understand this concept if you want to center elements beyond images.
Block elements work by breaking the flow of a page, whereas inline elements work by going with the flow.
Block elements start on a new line and take up the full width of the viewport (or the width of the page). Inline elements, on the other hand, occupy the space allotted by their HTML tags, allowing them to go with the “flow” of the page as opposed to interrupting it. Of course, the width and style of these elements vary depending on the CSS code for that HTML tag.
Here’s an example to help visualize these differences.
Below, I used a Bootstrap button styled as an inline element and a block element.

The inline button would need special code to be aligned to the center, while the block button would simply need some adjustments in width or padding.
Tldr: Block and inline elements require different methods for aligning them to the center. For instance, when I center a div (which is a block element), you might use margin and padding or other methods.
However, you cannot use these methods when centering images.
That’s because images are inline elements and go with the flow of the page. Like the inline button above, you’ll need to use special code to place it in the center of the page.
Should you center images with internal, external, or inline CSS?
To center an image, you’ll need to use CSS, as we've already seen. But you have several options: internal CSS, external CSS, or inline CSS.
Internal CSS is placed in the <head> section of a webpage, while external CSS is located in an external stylesheet that’s then linked in the <head> section. Inline CSS, on the other hand, is embedded in the HTML code in the <body> section. The CSS is defined within the “style” attribute of the element being targeted.
Generally, it’s recommended to keep your HTML separate from your CSS, but any of these methods will render the same result. If you can’t separate them for some reason — maybe the website-building platform you’re using keeps them together in the source code editor, for example — then you’ll have to use inline CSS.
The good news is that the syntax for inline CSS is similar to that of internal and external CSS. The property is named and given a property value, but the rule set is enclosed by apostrophes rather than brackets.
Here’s an example of inline CSS in action. Let’s say you want to change the text color of the first header on your page and leave the other headers as is. You’d set the color property to the hex color code you prefer, place it within the style attribute, and place the whole thing inside the H2 tag.
Check it out below:
See the Pen Inline CSS Example by HubSpot (@hubspot) on CodePen.
How does this compare to internal CSS? Let’s say you wanted to use that same CSS but place it in the head section between <style> tags.
You’d replace the “style=” attribute in your HTML with a CSS selector. A CSS selector is a name that you use to identify an HTML element. You then use this name in the CSS file to design the look and feel of that element.
Note: In the example below, an ID selector is used, but you could also use a CSS class.
See the Pen Internal CSS Example by HubSpot (@hubspot) on CodePen.
This is also how the CSS would look in an external stylesheet. You would link to the external stylesheet between the <head> tags of your page. Check out an example of an external stylesheet below with the same result:
See the Pen External Stylesheet CSS Example by HubSpot (@hubspot) on CodePen.
How to center an Image using Hubspot CMS
If you are using a CMS like Hubspot Content Hub to design your pages, you can easily center your images using the layout editor.
Here’s a preview of what that looks like:
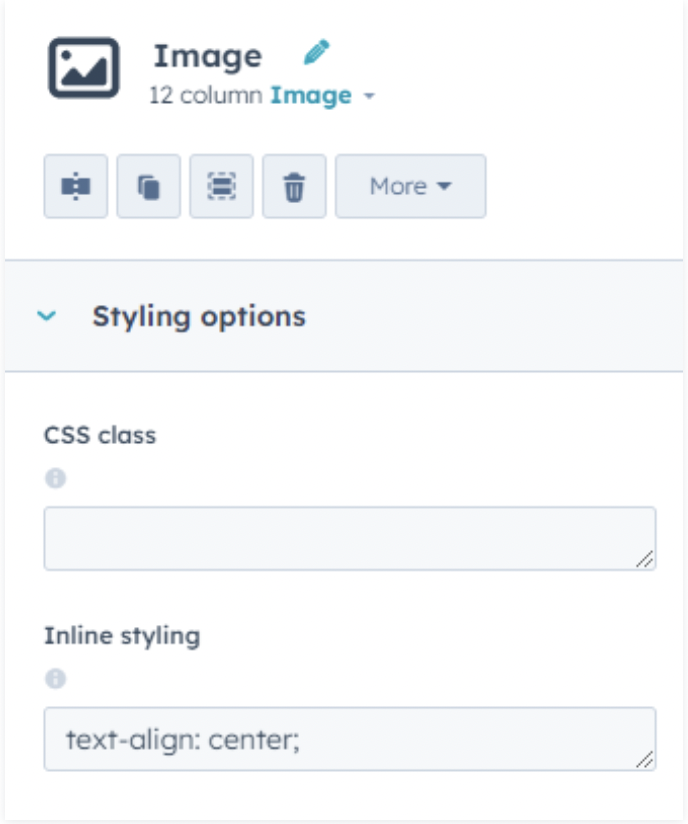
The picture above shows the image module in the inspector, which allows you to edit or add components to a template or module. To center the image, add the CSS text-align: center in the Inline styling field.
Using HTML and CSS When Centering an Image
With a bit of coding knowledge, you can bring a sense of symmetry and balance to your site with center-aligned images, texts, and buttons. Knowing how to align these elements will help you control and customize your layouts for a professional look that your website visitors will enjoy.
Editor's note: This post was originally published in November 2020 and has been updated for comprehensiveness.


![How to Import Bootstrap in React [The Beginner's Guide]](https://www.hubspot.com/hubfs/import-bootstrap-in-react.jpg)
![How to Create Scrolling Text With CSS [+ Code Examples]](https://www.hubspot.com/hubfs/Google%20Drive%20Integration/scrolling%20text%20css.jpeg)